Using a meat grinder at home is one of the best ways to take control of what goes into your food, save money, and enjoy fresher flavors. Whether you want to make juicy burgers, sausages, or pet food, a meat grinder helps you achieve better texture and taste.
Many people think using a grinder is complicated, but with the right knowledge and some practice, it becomes a simple and satisfying process. In this guide, you’ll learn how to use a meat grinder step by step, from choosing the right model to cleaning up safely.
You’ll also find expert tips, common mistakes to avoid, and answers to questions most beginners forget to ask. If you want to improve your kitchen skills and get the best from your meat grinder, keep reading.
Understanding Meat Grinders
Before you start grinding, it’s important to know what a meat grinder is and the types available. A meat grinder is a kitchen tool used to process raw or cooked meat into small pieces. It works by forcing meat through a plate with holes using a screw or auger.
The result is ground meat ready for cooking.
There are two main types:
- Manual meat grinders require hand-cranking. They are simple, budget-friendly, and good for small batches.
- Electric meat grinders use a motor to process larger amounts of meat quickly. These are more efficient for frequent or heavy use.
Some stand mixers, like the KitchenAid, offer meat grinder attachments. These can be a good option if you already own the base appliance.
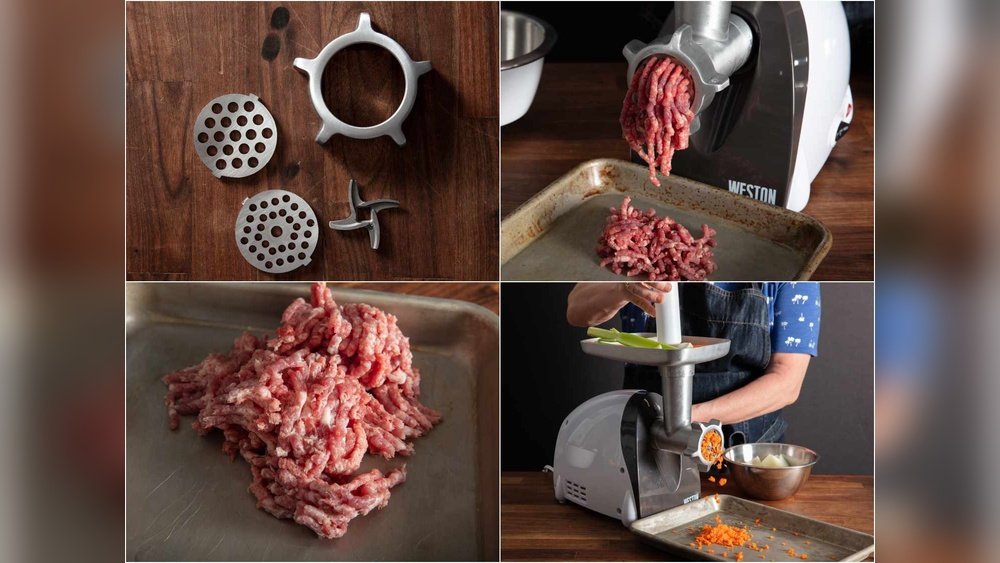
Main Parts Of A Meat Grinder
Most grinders have the following key parts:
- Hopper: Where you place the meat.
- Feed tube: The path meat travels to the blades.
- Auger (screw): Pushes meat toward the blades.
- Cutting blade/knife: Chops the meat.
- Grinding plate: Determines the final size of meat pieces.
- Screw ring: Holds the plate and blade in place.
- Handle or motor: Powers the grinder.
Understanding these parts will make assembly, use, and cleaning much easier.
Choosing The Right Meat Grinder
Picking the best grinder for your needs is important for safety, quality, and ease of use. Here’s what to consider:
Manual Vs Electric
- Manual grinders are quiet, portable, and don’t need power. They’re perfect for occasional use or small amounts.
- Electric grinders are faster and handle large quantities easily, but they take up more space and cost more.
Power And Capacity
Electric grinders are rated by wattage and pounds per minute. For home use, a machine with 350-500 watts (0.5-0.75 HP) can handle most tasks. If you grind a lot of meat (over 10 pounds at a time), consider a more powerful model.
Grinding Plates And Accessories
Multiple plate sizes offer more flexibility. Most grinders include coarse (8-10 mm), medium (4-6 mm), and fine (2-3 mm) plates. Sausage stuffing tubes, kubbe attachments, and cleaning tools are useful extras.
Build Quality
Look for stainless steel or heavy-duty metal parts. Plastic grinders are less durable and can stain or crack.
Ease Of Cleaning
Models with fewer parts, dishwasher-safe components, and simple assembly are easier to clean and maintain.
Cost
Manual grinders start around $25, while electric models can range from $60 to $300+. Price often reflects power, build quality, and included features.
Here’s a quick comparison:
| Type | Best For | Average Price | Pros | Cons |
|---|---|---|---|---|
| Manual | Small batches, occasional use | $25-$70 | Portable, quiet, cheap | Labor-intensive, slow |
| Electric | Frequent or large batches | $60-$300+ | Fast, efficient, less effort | Noisy, needs power, bulky |
| Attachment | Owners of stand mixers | $30-$100 | Space-saving, multi-use | Less powerful, smaller capacity |
Non-obvious tip: If you grind mostly beef or pork, a mid-range electric model is usually enough. But for tough meats like venison or large poultry bones (for pet food), invest in a heavy-duty grinder.

Credit: www.youtube.com
Preparing Meat For Grinding
Good results start with the right preparation. Here’s how to get your meat ready:
Trim And Cut
- Remove excess fat, sinew, and gristle. Too much sinew can clog the grinder.
- Cut meat into 1-2 inch chunks. This size fits most feed tubes.
Chill Your Meat
For the best texture, partially freeze the meat for 30-60 minutes until it’s firm but not frozen solid. Cold meat grinds more easily, keeps its shape, and reduces the risk of spreading bacteria.
Seasoning
You can grind plain meat and season later, or add salt, spices, and herbs before grinding for more even flavor. For sausage, many people add seasoning before the first grind.
Keep Everything Cold
Chill not just the meat, but also the grinder parts—blades, plates, and tray. Warm metal can melt fat, causing smeared, mushy meat.
Assembling Your Meat Grinder
Proper assembly is vital for safety and good results. Here’s a step-by-step guide:
- Wash all parts with hot, soapy water, then dry.
- If possible, chill the grinder parts in the freezer for 15-30 minutes.
- Attach the grinder body to the table or mixer (for attachments).
- Insert the auger (screw) into the body.
- Place the cutting blade onto the auger.
- Choose the right grinding plate (coarse for chili or burgers, fine for sausages) and fix it in place.
- Screw on the retaining ring to secure the plate and blade.
- Place the hopper tray on top.
Check that everything is tight and aligned. Loose parts can cause jamming or unsafe operation.
Beginner mistake: Forgetting the blade between the auger and plate. Without it, the grinder won’t cut; it just mashes meat.
Grinding Meat: Step-by-step
With the grinder assembled and meat prepared, it’s time to start grinding.
Step 1: Load The Meat
Place a bowl under the grinder’s output. Add a few pieces of meat into the hopper. Don’t overload.
Step 2: Start Grinding
- For manual grinders, turn the handle steadily. Don’t rush or force it.
- For electric grinders, switch on the machine. Use the provided pusher (never your fingers!) To feed meat gently.
If the grinder slows or clogs, stop and clear the blockage before continuing.
Step 3: Grind In Batches
If you want a finer texture, run the ground meat through the grinder a second time. For sausages, two grinds often give the best results. For burgers, one grind is usually enough.
Step 4: Add Seasonings Or Mix-ins
Now is the time to add chopped onions, garlic, or spices if you haven’t already. Mix gently to avoid overworking the meat.
Step 5: Clean Up Promptly
Meat residue can harbor bacteria. Disassemble the grinder as soon as you finish, and wash all parts thoroughly.
Grinding Different Meats And Ingredients
A meat grinder is not just for beef. Here are tips for various foods:
Beef
- Chuck roast is a favorite for burgers (about 80% lean).
- For leaner blends, mix sirloin or round with a little fat.
Pork
- Pork shoulder is ideal for sausage and ground pork dishes.
- Remove skin and large fat pieces for a better grind.
Chicken And Turkey
- Use boneless thighs for more flavor and moisture.
- Keep meat very cold, as poultry fat melts quickly.
Fish
- Grind cold, boneless fillets for fish patties or spreads.
- Don’t overprocess—fish grinds faster than beef.
Other Uses
- Vegetables: Carrots, mushrooms, and onions can go through the grinder for patties or stuffing.
- Bread crumbs: Stale bread grinds well for homemade crumbs.
- Pet food: Some heavy-duty grinders handle bones for raw diets (always check manufacturer’s instructions).

Credit: www.youtube.com
Cleaning And Maintaining Your Meat Grinder
Keeping your grinder clean is essential for food safety and long life. Here’s how to do it right:
Disassemble Immediately
After grinding, take the grinder apart. The longer meat sits, the harder it is to clean.
Wash With Care
- Use hot, soapy water and a brush to scrub all surfaces.
- Pay special attention to the blade and plate holes, where meat can get stuck.
- Rinse and dry completely to prevent rust.
Sanitize
For extra safety, soak parts in a diluted bleach solution (1 tablespoon bleach per gallon of water) for a few minutes, then rinse well.
Lubricate And Store
- Lightly oil metal parts with food-grade mineral oil to prevent rust.
- Store in a dry place. Some people wrap parts in paper towels or freezer bags to keep out moisture.
Sharpen And Replace Blades
A dull blade smears meat instead of cutting cleanly. Sharpen blades at home with a sharpening stone, or replace as needed (usually every 1-2 years for home use).
Expert tip: Never put grinder blades or plates in the dishwasher. The high heat and moisture can cause rust and dull edges.
Common Problems And Troubleshooting
Even the best meat grinder can have issues. Here’s how to fix the most common problems:
Grinder Jams Or Clogs
- Too much sinew or connective tissue: Trim meat better.
- Fat is smearing: Chill meat and grinder parts more.
- Bones or hard objects: Remove before grinding.
Meat Comes Out Mushy
- Fat is melting: Work faster and colder.
- Blade is dull: Sharpen or replace.
Grinder Won’t Turn
- Overloaded: Feed smaller amounts at a time.
- Parts are misaligned: Disassemble and reassemble carefully.
Uneven Grind
- Plate holes clogged: Clean and scrape holes.
- Wrong plate: Use a coarser plate for first grind.
Machine Overheats (electric Models)
- Running too long: Let the motor rest every 10-15 minutes.
- Grinding very tough meat: Cut into smaller pieces.
Safety Tips For Using A Meat Grinder
Grinding meat at home is safe if you follow these guidelines:
- Never use your hands to push meat. Use the provided pusher tool.
- Always unplug electric grinders before cleaning or changing parts.
- Keep children and pets away from the grinder during use.
- Wash hands and surfaces before and after handling raw meat.
- Store ground meat in the fridge or freezer within 2 hours.
Advanced Tips For Better Grinding
Experienced cooks and butchers use these extra strategies:
- Double grinding: For ultra-fine sausage, grind twice—first with a coarse plate, then with a fine plate.
- Mixing fat and lean: For burgers, a blend of about 80% lean meat to 20% fat gives the juiciest results.
- Freeze grinder parts: Especially in hot kitchens, keep blades and plates in the freezer until just before use.
- Add ice chips: When grinding sausage, a few ice chips can keep the mix cold and moist.
- Alternate meat and fat: Feed fat and lean chunks alternately for a better blend.
Unusual insight: For a unique burger texture, grind beef with a little cold butter. The butter melts during cooking and bastes the meat from within.
Comparing Home Grinding To Store-bought Meat
Is grinding at home really better? Let’s compare:
| Factor | Home-Ground Meat | Store-Bought Ground Meat |
|---|---|---|
| Freshness | As fresh as you make it | Can sit for days in store |
| Control over cuts | Full control—choose your cuts | Unknown blend, often scraps |
| Texture | Customizable, chunkier or finer | Usually uniform and fine |
| Additives | None unless you add them | May contain preservatives, fillers |
| Cost | Often cheaper per pound | Varies, often more for specialty blends |
| Safety | Cleaner if you follow safe practices | Higher risk of cross-contamination |
While store-bought ground meat is convenient, home grinding gives you more control and can improve both flavor and food safety.
Creative Ways To Use Your Meat Grinder
A meat grinder is surprisingly versatile. Here are some creative uses:
- Homemade sausages: Try classic bratwurst, chorizo, or chicken apple sausage.
- Burgers: Blend your own brisket, short rib, and chuck for gourmet burgers.
- Meatballs and kebabs: Use ground pork, lamb, or turkey for unique flavors.
- Pet food: Make custom blends for dogs or cats (check with your vet).
- Vegetarian patties: Grind mushrooms, beans, or tofu for meat-free options.
- Chili and stew meat: Grind a mix of beef and pork for robust flavor.
- Fish cakes or shrimp burgers: Fresh seafood grinds easily for patties.
- Home charcuterie: Start with simple sausages, then try pâtés and terrines.
For recipes and sausage-making guides, check resources like Serious Eats.
Storing And Freezing Ground Meat
Freshly ground meat tastes best right away, but you can store leftovers safely:
- Refrigerate in a sealed container for up to 2 days.
- For longer storage, freeze in airtight bags. Flatten for faster thawing.
- Label packages with date and type of meat.
- Use within 3-4 months for best flavor and safety.
Avoid refreezing thawed ground meat—it can dry out and lose quality.
Frequently Asked Questions
How Do I Prevent My Grinder From Jamming?
Trim away sinew, gristle, and large chunks of fat before grinding. Keep both your meat and grinder parts cold. If the grinder jams, stop, disassemble, and clear the blockage before continuing.
Can I Grind Cooked Meat In A Meat Grinder?
Yes, you can grind cooked meats for spreads, fillings, or hash. Make sure the meat is not too dry, as it can become pasty. Cut into small pieces before grinding.
Is It Safe To Grind Chicken Bones For Pet Food?
Only some heavy-duty grinders are designed to handle small, soft poultry bones. Always check your machine’s manual before trying. Never grind cooked bones; they are brittle and can damage the grinder.
What Should I Do If The Meat Comes Out Mushy?
This often happens when the fat melts during grinding. Work with well-chilled meat and grinder parts. Also, make sure your blade is sharp and you’re not overloading the grinder.
How Do I Sharpen Or Replace Grinder Blades?
Home cooks can sharpen blades using a fine sharpening stone or sandpaper. Place the blade flat and rub in a circular motion. For best results, replace blades every 1-2 years, depending on usage.
Grinding meat at home may seem intimidating at first, but it quickly becomes second nature. With a little practice, you’ll enjoy better flavor, texture, and control over your meals. Don’t be afraid to experiment with new blends, recipes, and even non-meat ingredients.
Your meat grinder can be one of the most useful tools in your kitchen—if you know how to use it right.

Credit: www.webstaurantstore.com