Sealing A Cutting Board After Wood Burning: The Complete Guide
Wood burning, or pyrography, transforms an ordinary cutting board into a piece of art. The intricate designs, custom names, and creative patterns make each board unique. But there’s a critical step that many beginners overlook: sealing the cutting board after wood burning. Without proper sealing, your artwork can fade, food and moisture can damage the wood, and the board becomes less hygienic.
Sealing isn’t just about protection—it’s about making your hard work last. If you want your wood-burned design to stay beautiful and your cutting board safe for kitchen use, you need to choose the right sealer and apply it correctly. This guide will walk you through everything: the reasons for sealing, common mistakes, product comparisons, and step-by-step instructions for a flawless finish. You’ll also find real examples, expert tips, and answers to the most asked questions about sealing after wood burning.
Why Sealing Your Wood-burned Cutting Board Matters
Wood burning leaves a permanent mark, but the wood itself remains vulnerable. When you use a cutting board for food, it faces moisture, knife scratches, and food acids. If unsealed, two things happen:
- Design fading: The burned design absorbs water and oils, which can blur or wash away the details.
- Wood damage: Cutting boards can warp, crack, or grow bacteria when left untreated.
A good sealant forms an invisible barrier, locking in the artwork and keeping out water, food, and germs. This also makes cleaning easier and prevents the board from absorbing food smells. Sealing after wood burning is not just “nice to have”—it’s essential for both durability and food safety.
Choosing The Right Sealer For Your Cutting Board
Not every finish is safe for cutting boards, especially those used with food. Some finishes can be toxic or leave a strong smell. Here’s what you need to know.
Food-safe Vs. Non-food-safe Finishes
The main rule: Only use food-safe finishes for cutting boards. This means they won’t leach chemicals or harmful substances into your food. Avoid finishes labeled for furniture or floors.
Let’s compare popular sealers:
| Sealer Type | Food-Safe? | Durability | Appearance | Odor | Easy to Apply? |
|---|---|---|---|---|---|
| Mineral Oil | Yes | Good (needs reapplication) | Matte, natural | No odor | Very easy |
| Beeswax | Yes | Very good | Satin, deepens wood tone | Mild, pleasant | Easy |
| Walnut Oil | Yes (allergy risk) | Good | Warm glow | Light nutty smell | Easy |
| Tung Oil (100%) | Yes (fully cured) | Excellent | Glossy, enhances grain | Mild | Moderate (needs curing time) |
| Lacquer / Varnish | No | High | Glossy | Strong chemical odor | Hard to apply |
Key Insight: Many beginners think any “wood finish” will work. But only a few are truly food-safe and practical for cutting boards.
The Best Sealers For Wood-burned Cutting Boards
The safest and most popular options are:
- Mineral Oil: 100% food-safe, odorless, affordable, and widely available. Great for beginners.
- Beeswax: All natural, adds a layer of water resistance, and gives a soft shine.
- Mineral Oil + Beeswax Blend: Combines the benefits of both—easy to apply, excellent protection.
- Pure Tung Oil: Cures to a hard, water-resistant finish, but needs more time to dry.
- Walnut Oil: Natural and durable, but avoid for people with nut allergies.
Avoid vegetable oils (they turn rancid), polyurethane, lacquer, or any product not marked as food-grade.
Pro Tip: Some hobby stores sell “cutting board conditioner”—usually a mix of mineral oil and beeswax. These are safe and easy to use.
Credit: en.chefstudio.vn
Preparing Your Board Before Sealing
Before adding any finish, preparation is critical. Skipping or rushing these steps leads to uneven sealing and missed protection.
Step 1: Let The Board Cool And Rest
After burning your design, let the board cool completely. Freshly burned wood can be oily or have loose soot.
- Wait at least 30–60 minutes after burning.
- Check for any heat or smoky residue.
Step 2: Clean Off Residue
Burning leaves behind carbon dust and soot. If left, this can smudge the design or mix with your sealant.
- Use a soft brush or lint-free cloth to gently wipe the surface.
- For stubborn soot, a lightly damp cloth (just water) can help. Let the board dry fully before continuing.
Step 3: Sand For Smoothness
Sanding is essential for a professional look and even finish.
- Start with 220-grit sandpaper. Sand gently in the direction of the grain.
- For a super smooth feel, finish with 320- or 400-grit.
- Pay attention to edges and corners—these areas often get missed.
Don’t sand too hard over your design, or you’ll fade the details.
Step 4: Remove All Dust
Dust will stick to your finish, making it feel gritty or cloudy.
- Wipe with a tack cloth or a clean, damp microfiber cloth.
- Check under bright light—if you see any dust, wipe again.
Insider Tip: Some beginners skip the final dust-off. This is why their boards look dull or have tiny bumps after sealing.
Step-by-step: How To Seal A Wood-burned Cutting Board
Now, you’re ready to protect your masterpiece. Here’s how to get a strong, food-safe seal.
Step 1: Choose Your Sealer
Pick one of these:
- Pure mineral oil (most common for cutting boards)
- Beeswax (alone or mixed with oil)
- A “cutting board conditioner” (usually oil + wax)
For advanced users, pure tung oil is an option but requires longer drying.
Step 2: Warm The Board And Sealer (optional)
Warming the board (and the oil) helps the finish soak deeper.
- Place the board in a warm, dry spot for 10–15 minutes.
- Slightly warm your oil or wax by placing the bottle/jar in warm water (not hot).
This step is optional but improves absorption.
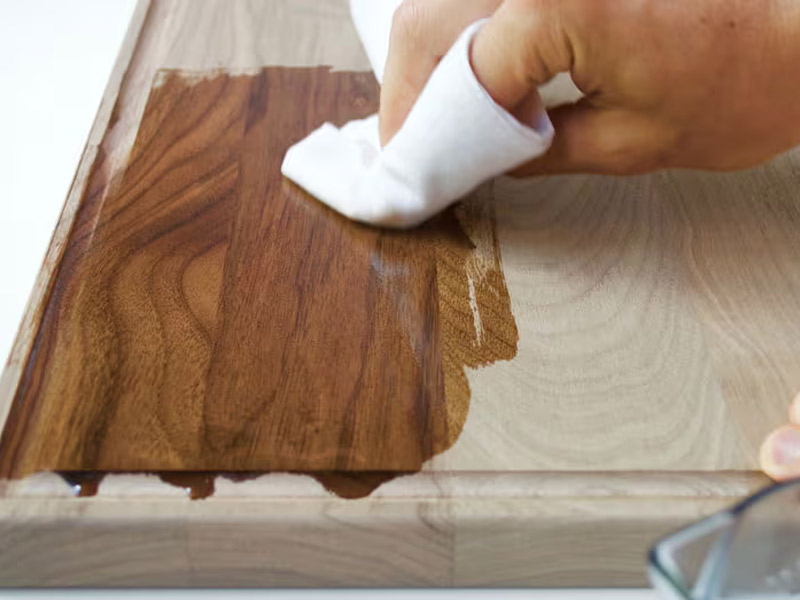
Step 3: Apply The Sealer
- Pour a small amount of oil onto a clean, lint-free cloth.
- Rub the oil over the wood in small circles, covering the entire surface—including the sides and edges.
- For beeswax, use a soft cloth or your fingers to spread a thin, even layer.
Don’t forget the back and edges—these areas absorb moisture and can warp.
Step 4: Let It Soak
Allow the oil or wax to soak in for at least 20 minutes (up to several hours for best results). The wood will absorb what it needs.
Step 5: Wipe Away Excess
After soaking, use a clean, dry cloth to wipe off any extra oil or wax. The board should feel smooth, not greasy.
Step 6: Repeat As Needed
For the first sealing, apply 2–3 coats. Let each coat soak in and wipe before adding the next. This builds a strong, water-resistant finish.
- For mineral oil: 2–3 coats, 1 hour between coats.
- For beeswax: 1–2 coats, 1 hour between coats.
- For oil + wax blends: 2 coats.
Step 7: Let It Cure
After the final coat, let your board sit for at least 6–8 hours before use. For tung oil, allow 24–48 hours.
Real-World Example: Many professionals seal their new boards every day for a week before first use. This “charging” builds a deep, protective layer.
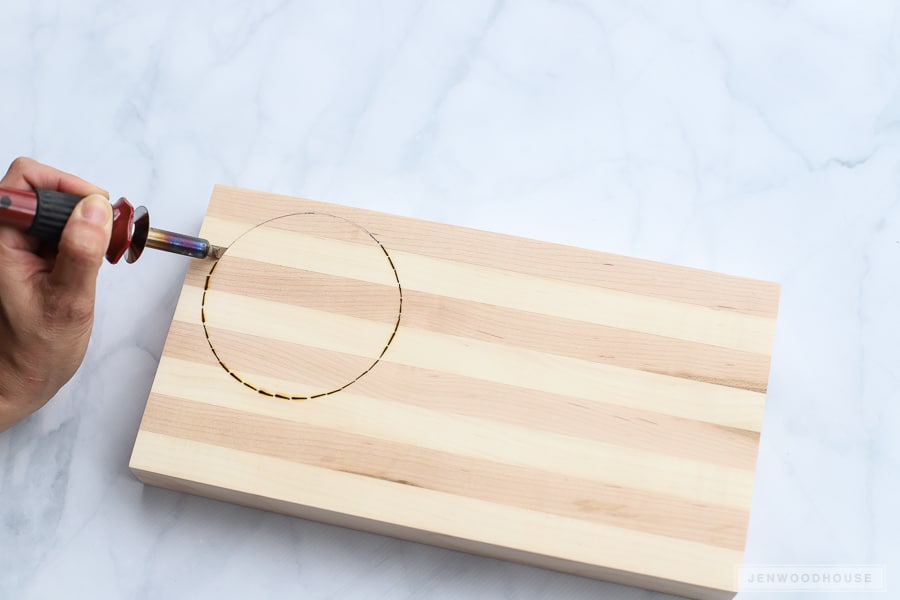
Credit: jenwoodhouse.com
How Sealing Affects Your Wood-burned Design
A well-chosen sealer makes your design look richer and more defined. Here’s what to expect:
- Oils deepen the contrast of the burned lines, making them pop.
- Beeswax gives a gentle sheen and subtle golden glow.
- Tung oil can create a glossy, almost wet look.
But, too much oil or wax can make the design look blurry. Apply thin, even layers and avoid over-soaking.
Beginner’s Mistake: Using heavy coats of wax can fill in fine details, making the artwork less crisp.
Maintaining Your Sealed Cutting Board
Sealing isn’t a one-time job. To keep your board looking and performing its best, regular care is needed.
Cleaning
- Wipe with a damp cloth after each use.
- For tough stains, use mild dish soap and water—but never soak the board.
- Dry upright to prevent warping.
Reapplying Sealer
- Re-oil every 3–4 weeks, or when the wood looks dry or loses its luster.
- For boards used daily, reapply every 2 weeks.
Avoid These Common Mistakes
- Don’t put in the dishwasher—it ruins both the wood and the finish.
- Don’t use harsh cleaners or bleach.
- Never let water sit on the surface.
Expert Insight: If your board ever feels rough or the design looks faded, lightly sand and reseal for a quick refresh.
Comparing Popular Sealing Products
With so many products on the market, it’s easy to get overwhelmed. Here’s a head-to-head look at top choices.
| Product | Main Ingredient | Food Safe | Cost (per oz) | Ease of Use | Best For |
|---|---|---|---|---|---|
| Howard Butcher Block Conditioner | Mineral Oil + Beeswax | Yes | $0.90 | Very Easy | All cutting boards |
| John Boos Mystery Oil | Mineral Oil | Yes | $1.10 | Very Easy | Large boards |
| Clapham’s Beeswax Polish | Beeswax + Mineral Oil | Yes | $1.50 | Easy | Boards with detailed design |
| Real Milk Paint Pure Tung Oil | Pure Tung Oil | Yes | $2.00 | Moderate | High-gloss finish |
Tip: You don’t need a fancy brand. Pure food-grade mineral oil from the pharmacy works just as well as branded “cutting board oils.”
Advanced Tips For Long-lasting Results
Most guides stop at the basics, but these advanced tips will help your board outlast the rest.
1. Seal The Underside And Edges
Moisture enters wood from all sides. Always coat the back and the edges—this prevents warping and cracking.
2. Let Each Coat Fully Dry
Rushing between coats traps moisture inside. Wait the recommended time before applying more oil or wax.
3. Use A Dedicated Cloth
Don’t use paper towels—they leave fibers. Use a clean, lint-free cotton cloth or microfiber towel.
4. Avoid Over-oiling
Too much oil can make the wood sticky or attract dust. Wipe off all excess after each coat.
5. Keep Your Board Out Of Sunlight
Sunlight fades both the wood and the burned design. Store your board in a cool, dry place.
6. Refresh The Burned Lines (if Needed)
If your design fades after many uses, you can carefully go over the lines again with your wood burner, then reseal.
Insider Tip: Many pros use a mixture of mineral oil and beeswax heated together. This forms a “creamy” paste that is easy to spread and gives the best protection.
Troubleshooting: Fixing Common Sealing Problems
Even experienced woodworkers run into issues. Here’s how to solve the most common problems:
Cloudy Finish
- Cause: Too much wax, or not enough drying time.
- Fix: Buff with a clean cloth, or lightly sand and reapply a thin layer.
Sticky Surface
- Cause: Excess oil or wax not wiped off.
- Fix: Wipe again with a dry cloth. If still sticky, wash lightly with warm water and mild soap, dry, then reseal.
Uneven Color Or Streaks
- Cause: Uneven sanding or application.
- Fix: Sand lightly, clean off dust, and apply another coat of oil.
Design Smudging
- Cause: Not cleaning off soot before sealing.
- Fix: Sand lightly to remove smudges. Clean thoroughly before resealing.
Key Insight: Many beginners panic when the finish looks wrong. Most issues can be fixed with sanding and careful reapplication.
How To Make Your Own Cutting Board Sealer
If you want to avoid store-bought products, you can easily make a food-safe sealer at home.
Diy Mineral Oil & Beeswax Paste
You’ll need:
- 1 cup food-grade mineral oil
- 2 tablespoons natural beeswax (grated or pellets)
Steps:
- Place beeswax in a heat-safe bowl.
- Add the mineral oil.
- Warm over a double boiler (or microwave in 15-second bursts) until the beeswax melts.
- Stir well and pour into a jar.
- Let it cool to a creamy consistency.
To use: Rub a small amount onto your board and buff in with a clean cloth. This homemade finish is safe, effective, and gives a lovely sheen.
Pro Tip: You can add a few drops of food-safe lemon or orange oil for a fresh scent.

Credit: www.woodburncorner.com
Safety Considerations When Sealing Cutting Boards
When working with any finish, keep these safety tips in mind:
- Only use finishes labeled as food-safe.
- If using oils like walnut or linseed, check for allergy risks.
- Always ventilate your workspace, especially with oils that need curing.
- Store rags with oil in a metal container—some oils can cause spontaneous combustion if left balled up.
Fact: According to the USDA, unfinished wood cutting boards can harbor bacteria if not properly sealed and cared for (USDA Food Safety).
When To Reseal Your Wood-burned Cutting Board
A common beginner question: How do you know when to reseal?
- The board looks or feels dry, pale, or rough.
- Water no longer beads on the surface.
- The design starts to look faded or dull.
- You notice food stains soaking in more easily.
Best Practice: Reseal at least once per month for boards used regularly.
Sealing For Display Vs. Everyday Use
Not all wood-burned cutting boards are meant for daily chopping. Some are for display only.
- For decorative boards: You can use non-food-safe finishes like polyurethane or lacquer for a high-gloss look, but never use these on boards that touch food.
- For kitchen use: Stick with food-safe oils and waxes only.
Insider Insight: Some artists seal the display side with a high-gloss finish and the cutting side with food-safe oil. Just never cut on a side sealed with non-food-safe products.
How Sealing Works On Different Woods
The type of wood affects how the sealer works. Here’s a quick comparison:
| Wood Type | Absorption Rate | Best Sealer | Design Contrast | Notes |
|---|---|---|---|---|
| Maple | Medium | Mineral Oil/Beeswax | High | Most popular for cutting boards |
| Walnut | Low | Mineral Oil | Medium | Dark wood, burns show well |
| Cherry | Medium | Beeswax | High | Reddish tint, deepens with oil |
| Bamboo | High | Oil + Wax Blend | Medium | Needs more oil, can be rough |
Expert Note: Open-grained woods like oak are not recommended for cutting boards—they absorb too much and are hard to clean, even with sealing.
Frequently Asked Questions
How Soon Can I Use My Cutting Board After Sealing?
Wait at least 6–8 hours after the last coat of oil or wax. For tung oil, wait 24–48 hours for a full cure. This gives the sealer time to soak in and harden, making your board safe for use.
Can I Seal My Board With Coconut Or Olive Oil?
No. Both can go rancid over time and leave sticky or smelly residue. Always use food-grade mineral oil or pure beeswax for sealing.
What If My Board Feels Sticky After Sealing?
This usually means too much oil or wax was applied or it wasn’t wiped off. Simply buff with a clean, dry cloth. If it stays sticky, wash with warm, soapy water, dry, and reseal with a thinner coat.
Is It Safe To Use A Sealed, Wood-burned Cutting Board For All Foods?
Yes, as long as you use food-safe finishes. Avoid cutting raw meat on wood boards, as bacteria can hide in cuts. Clean and dry your board after every use.
Can I Reseal My Cutting Board If The Burned Design Fades?
Absolutely. Lightly sand the surface, clean off the dust, and reseal with oil or wax. If the design is very faded, you can retrace with your wood burner before resealing.
Sealing your cutting board after wood burning is the difference between a fleeting project and a lasting piece of art. With the right materials and careful steps, you’ll enjoy a board that’s both beautiful and functional for years to come.
Whether you’re gifting, selling, or simply enjoying your own work, proper sealing ensures your creativity stands the test of time.