
Building a chimney for a wood stove is a project that can transform your home. Not only does it provide warmth and charm, but it also demands careful planning and precise execution. Many homeowners dream of cozy evenings by a wood stove, but few realize the complexities behind a safe and efficient chimney.
This guide will walk you through every step, from choosing materials to final inspection. Whether you’re a DIY enthusiast or working with a contractor, understanding each phase helps you avoid mistakes, save money, and enjoy lasting results.
Understanding Chimney Basics
Before you pick up a single tool, it’s essential to grasp why chimney design matters. A well-built chimney safely carries smoke, gases, and particles outside, preventing them from entering your living space. Poor design can lead to dangerous issues like carbon monoxide poisoning or chimney fires.
A surprising number of older homes have chimneys that don’t meet today’s safety standards. Modern wood stoves are efficient and produce hotter flue gases, which means older chimneys may not be suitable without upgrades. Even small design flaws can cause big problems, such as backdrafts, smoke stains on walls, or rapid creosote buildup.
Key Functions Of A Chimney
- Ventilation: Moves smoke and gases out of your home.
- Draft: Creates the right airflow for your wood stove.
- Containment: Keeps hot materials away from walls and ceilings.
Draft is especially important. Imagine your chimney as a straw: if it’s blocked, bent, or the wrong size, the air can’t move well. Proper draft not only helps smoke leave your house but also makes your stove burn wood more efficiently, saving you money on fuel.
Common Chimney Types
You’ll likely choose between a masonry chimney (brick, stone, or block) and a prefabricated (factory-built) chimney. Masonry is traditional and long-lasting but requires more skill and materials. Prefabricated chimneys use stainless steel pipes and are easier for most DIYers.
Masonry chimneys are often seen in older homes or where appearance is a major factor. They can be customized to match your home’s style and offer excellent durability. However, they also require a strong foundation and more maintenance.
Prefabricated chimneys, by contrast, are engineered systems designed for efficiency and safety. They come as kits with all the necessary parts and are much lighter. This makes them ideal for homes where adding extra weight or building a new foundation is not practical.
Local Codes And Permits
Never skip this step. Every area has building codes that affect chimney height, clearance, and materials. Check with your local building department before starting. Often, a permit and inspection are mandatory for insurance and safety.
You may also need to follow neighborhood or homeowners’ association rules. Some insurance companies will not cover claims if your chimney was built without a permit or does not pass inspection. Taking the extra time to get official approval protects your investment and your safety.
Planning Your Chimney Project
Good preparation saves time, money, and trouble. Here’s how to lay the groundwork.
Determining Chimney Location
The chimney should rise as straight as possible from your stove. Bends reduce draft and trap creosote—a leading cause of chimney fires. The best spot is usually an interior wall, allowing for better heat retention and less exposure to the cold.
Placing the chimney inside the building envelope (the heated part of your home) keeps the flue warm, which helps maintain a strong draft. When a chimney runs along an outside wall, it can cool down quickly, especially in winter, leading to poor performance and more creosote.
If you must run the chimney outside, consider adding extra insulation around the flue.
Calculating Chimney Height
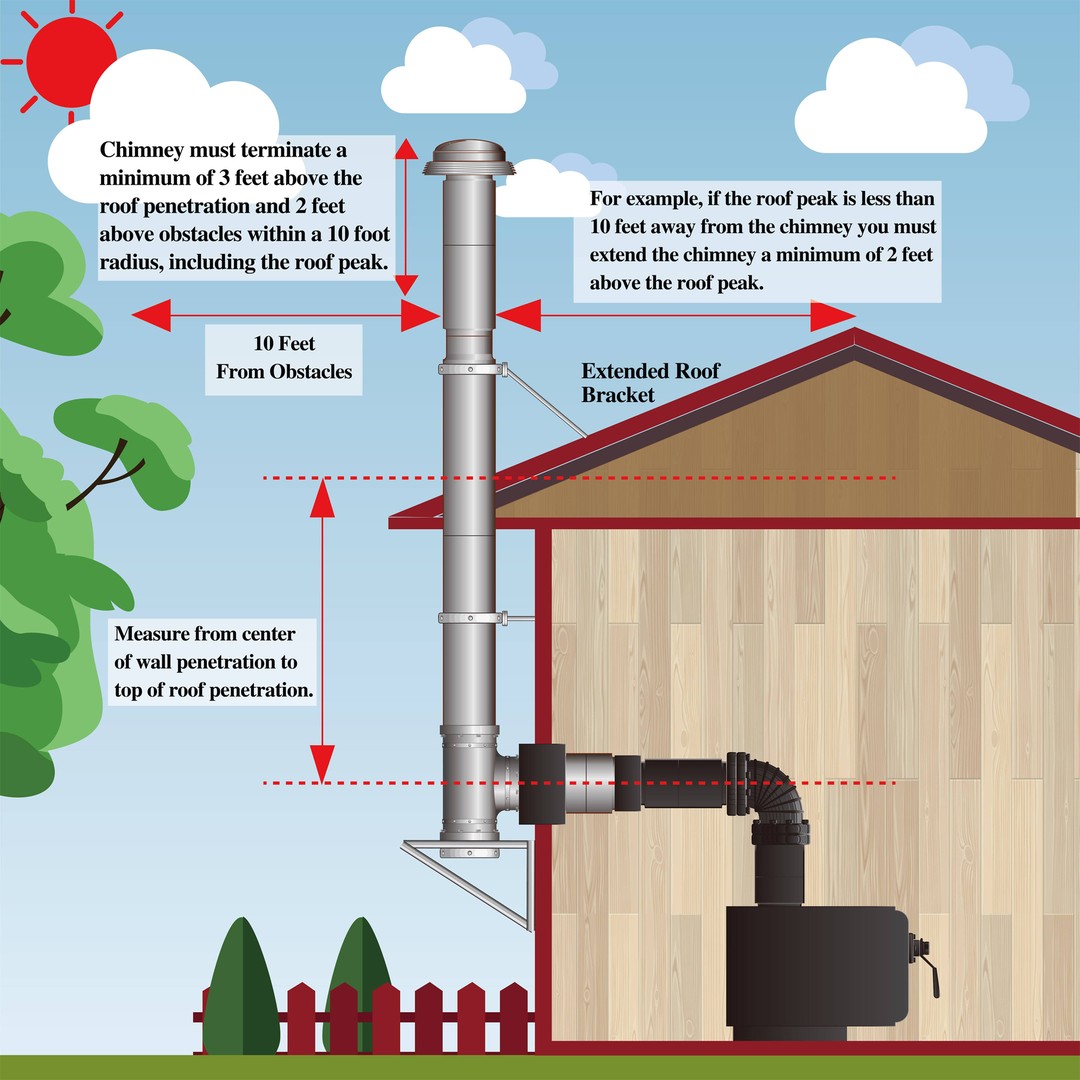
Building codes usually require chimneys to extend at least 3 feet above the roof and 2 feet higher than anything within 10 feet. This ensures proper draft and keeps smoke away from windows or neighbors. For example, if your roof is 12 feet tall, your chimney’s top should be at least 15 feet high.
These rules also help prevent downdrafts caused by wind or nearby obstacles like trees. Some stoves have strict requirements for minimum and maximum chimney height—too tall and you lose heat, too short and you risk smoke leaks.
Sizing The Flue
The flue is the inner passage that carries smoke upward. Its diameter must match your stove’s outlet. For most wood stoves, a 6-inch or 8-inch diameter is standard. An undersized flue causes poor draft, while oversized flues lose heat too quickly.
Consult your stove’s manual, as manufacturers often specify the ideal flue size. Don’t try to “improve” draft by making the flue larger; this often has the opposite effect. Also, remember that the flue should be smooth inside—rough or damaged surfaces trap creosote and slow down airflow.
Choosing Materials
- Masonry Chimney: Brick, concrete block, fireclay flue liner, mortar.
- Prefabricated Chimney: Stainless steel pipe, insulation, factory-built support brackets.
Select materials rated for wood-burning appliances and high temperatures.
For masonry, avoid using recycled bricks unless you’re sure they’re rated for high heat. Some older bricks can crack or even explode under repeated heating and cooling. For prefabricated chimneys, only use components from the same manufacturer to ensure everything fits and performs as designed.
Gathering Tools And Materials
Before starting, collect all required tools and supplies. Missing something mid-project can cause delays or mistakes.
Masonry Chimney Tools
- Trowel
- Mason’s hammer
- Level
- Masonry saw
- Wheelbarrow
- Tape measure
You’ll also need buckets for mixing mortar, gloves, safety glasses, and scaffolding or sturdy ladders for working above ground level. Don’t underestimate the amount of labor; masonry work is physically demanding and requires patience for best results.
Prefabricated Chimney Tools
- Power drill
- Metal snips
- Screwdrivers
- Wrenches
- Caulking gun
Safety gear is just as important for metal chimneys. Use gloves to avoid cuts from sharp edges, and always wear eye protection when cutting or drilling metal.
Common Materials
- Bricks or blocks
- Flue liners or stainless steel pipe
- High-temperature mortar or sealant
- Flashing and storm collar
- Chimney cap
Have extra materials on hand for mistakes or changes. For a standard single-story home, budget for roughly $2,000–$5,000 in materials, depending on type.
If you are unsure about quantities, many home improvement stores offer project calculators or advice. Buy a bit more mortar, bricks, or pipe than you think you’ll need—running out mid-project can cause weak joints or force you to mix batches with inconsistent quality.
Step-by-step Chimney Construction
Let’s break down the process into clear, manageable steps. This example focuses first on a masonry chimney, then explains key differences for prefabricated models.
1. Preparing The Foundation
A chimney is heavy. It needs a solid concrete footing that won’t crack or shift.
- Excavate a hole below the frost line (usually 1–3 feet deep).
- Pour a reinforced concrete pad at least 8 inches thick and wider than the chimney.
- Let the concrete cure for 24–48 hours.
Check for levelness with a long level. Uneven foundations can lead to leaning or cracked chimneys later. If you live in an area with soft soil, consider reinforcing the pad with rebar mesh or consulting a local building engineer.
2. Laying The Chimney Base
Start with your first row of bricks or blocks. Use a level to ensure everything is square and plumb. Apply mortar evenly between joints. Continue building upward, checking alignment every few rows.
It’s important to keep mortar joints consistent, about 3/8-inch thick. Uneven joints can create weak spots. If you’re new to masonry, lay a few practice bricks before starting the actual chimney.
3. Installing The Flue Liner
Insert a fireclay flue liner as you build. Flue liners protect masonry from heat and corrosion. Each new liner section should be staggered with the brick joints. Seal all gaps with high-temperature mortar.
Flue liners must be installed with care. Do not force sections together if they don’t fit; this can crack the liner. Always check for plumb (vertical) as you go, since a crooked liner will cause draft problems and make cleaning difficult.
4. Passing Through Floors And Roof
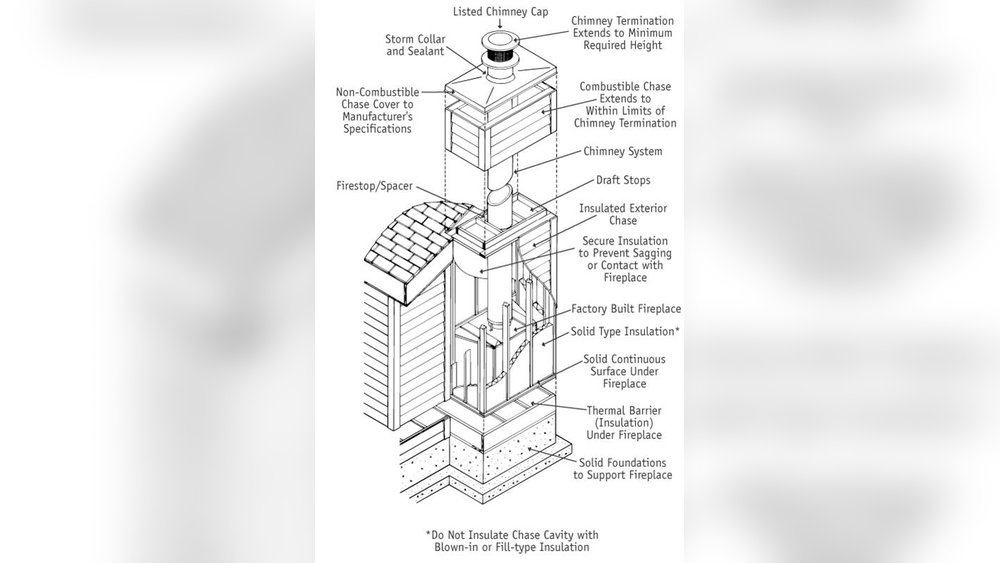
Your chimney must pass safely through floors and the roof without touching wood. Use firestop spacers and maintain at least 2 inches of clearance to combustibles.
- Cut a hole in the floor or roof larger than the flue.
- Frame the opening with metal supports.
- Seal around the flue with fire-resistant insulation.
This step is crucial for fire safety. If you are unsure, ask your building inspector to check your work before closing up the ceiling or roof. Many chimney fires start at these transition points.
5. Building Above The Roof
Chimneys must be weatherproof. Lay bricks in a tight pattern and install flashing where the chimney meets the roof. This metal barrier keeps water out. Overlap flashing pieces and seal with roofing cement.
Proper flashing is often overlooked but is critical for preventing leaks. Use step flashing along the sides where the chimney meets the roof slope, and counter-flashing to cover the top edges. Always check for small gaps, as water will find even the tiniest openings.
6. Adding The Chimney Cap And Crown
The crown is a sloped mortar surface at the top. It sheds water away from the chimney. The cap is a metal or stone cover that blocks rain, animals, and debris while letting smoke escape. Both are vital for durability.
Consider using a stainless steel cap with a spark arrestor. This prevents embers from escaping and reduces the risk of roof fires, especially in dry areas. Capped chimneys also stay cleaner and last longer.
7. Cleaning And Curing
Wipe off excess mortar and let the chimney cure for several days. Do not use the stove until everything is dry and inspected.
Rapid heating can cause cracks. Allow at least 3–5 days of curing time, especially in cold weather or if you used a lot of mortar.
Prefabricated Chimney Differences
Building with a stainless steel chimney is faster and lighter but requires attention to detail.
- Assemble pipe sections as instructed, securing joints with supplied clamps or screws.
- Always use insulated pipe for sections passing through walls or ceilings.
- Attach support brackets every 6–8 feet.
- Use factory-supplied flashing and storm collars above the roof.
- Cap the top with the manufacturer’s listed chimney cap.
One common mistake with prefab chimneys is mixing parts from different brands. Always use components from a single manufacturer to guarantee a safe, airtight fit. Make sure all joints are tightly locked and sealed to prevent leaks.
If your installation requires elbows (bends), use as few as possible. Each bend reduces draft and makes cleaning harder.
Comparing Masonry And Prefabricated Chimneys
Here’s a quick comparison to help you decide which type suits your situation:
| Feature | Masonry Chimney | Prefabricated Chimney |
|---|---|---|
| Cost | High ($3,000–$7,000) | Moderate ($1,000–$3,500) |
| DIY Friendly | No (skilled labor) | Yes (basic tools) |
| Durability | 50+ years | 15–25 years |
| Appearance | Classic/Traditional | Modern/Minimal |
| Maintenance | Requires regular cleaning | Easy to clean and replace |
Another difference: masonry chimneys can add value to your home and often become a selling point. However, if you plan to remodel or move your stove, prefabricated chimneys are easier to adapt or remove.
Safety Musts And Common Mistakes
Safety is not optional. Many chimney fires and accidents result from small oversights.
Key Safety Practices
- Keep 2-inch clearance from all wood framing.
- Use only UL-listed materials for wood stove chimneys.
- Never use single-wall pipe through walls or ceilings.
- Install a carbon monoxide detector near your stove.
- Clean the chimney at least once per year.
Also, keep flammable objects (like curtains or furniture) at least three feet away from your wood stove and chimney pipe. Teach family members, especially children, about hot surfaces.
Common Mistakes To Avoid
- Skipping Permits: This can void insurance and cause legal issues.
- Poor Sealing: Gaps allow smoke or water leaks.
- Too Many Bends: Each bend reduces draft and increases cleaning difficulty.
- Wrong Materials: Never use brick flue liners with wood stoves; they crack from heat.
- No Chimney Cap: Leaves your chimney vulnerable to rain, animals, and blockages.
Another frequent error is not reading the stove or chimney instructions closely. Every brand and model may have unique requirements. Always keep manuals and reference them during installation and maintenance.
Real-world Example: Single-story Wood Stove Chimney
Let’s walk through a real scenario. Jane, a homeowner in Vermont, wanted a wood stove in her living room. She chose a prefabricated stainless steel chimney because her roof was steep and her budget limited.
Jane’s process:
- She checked local codes and got a permit.
- She bought a triple-wall insulated chimney kit for $1,800.
- She measured, marked, and cut a hole in her ceiling and roof, keeping a 2-inch clearance.
- With a friend’s help, she assembled and secured the chimney pipe, added roof flashing, and installed the cap.
- A local inspector approved her work, and she enjoyed her first fire that winter.
Jane’s story shows that with planning and care, DIY chimney installation is possible. She saved money, avoided the most common mistakes, and her chimney works safely and efficiently.
Jane also noted that careful measuring was key. She used painter’s tape to mark cut lines and double-checked all measurements before cutting. Small mistakes at this stage can lead to big headaches later.
Essential Maintenance And Inspections
A chimney is not “set and forget. ” Regular care is critical for safety and performance.
Annual Cleaning
Wood stoves create creosote, a sticky byproduct that lines the flue. If it builds up, it can ignite and cause a fire. Clean your chimney every year, or more often if you burn a lot of wood.
Creosote comes in three stages, from flaky to tar-like to rock-hard. The later stages are much harder to remove and far more dangerous. Regular cleaning keeps buildup light and manageable.
Inspecting For Problems
Each fall, check for:
- Cracks or gaps in masonry or pipe joints
- Loose flashing or missing chimney cap
- Soot or creosote buildup
- Water leaks inside or outside
If you spot issues, repair before lighting your stove.
Regular inspections also help you spot animal nests, which are common in unused chimneys. Birds, squirrels, and even bees can build in your flue, causing blockages or fire risks.
Professional Vs. Diy Cleaning
You can clean a chimney yourself with the right brushes and rods. However, hiring a certified chimney sweep ensures a thorough job and expert eyes on potential hazards.
A professional sweep can also use video cameras to check for internal damage you can’t see from the outside. Many sweeps offer multi-point safety checks, which are especially useful after storms or earthquakes.
Cost Breakdown: What To Expect
Knowing the likely expenses helps you plan and avoid surprises.
| Item | Masonry Chimney | Prefabricated Chimney |
|---|---|---|
| Materials | $2,000–$4,000 | $900–$2,000 |
| Labor (if hired) | $1,500–$3,000 | $500–$1,200 |
| Permits/Inspection | $100–$300 | $100–$300 |
| Annual Maintenance | $150–$350 | $100–$250 |
Prices vary by location, size, and complexity. Prefabricated chimneys are usually less expensive overall.
Remember to factor in the cost of tools if you don’t own them, and add extra for unexpected expenses like additional insulation or repairs to the roof.
Credit: www.youtube.com
Two Crucial Insights Most Beginners Miss
1. The Importance Of Draft
Many people focus only on getting smoke out, but draft is a delicate balance. If your chimney is too short, smoke may spill into your room. If it’s too tall, you may lose heat and burn more wood. Always follow your stove manufacturer’s recommendations for minimum and maximum chimney height.
Also, draft can be affected by outside temperature, wind patterns, or even other vents in your house. For example, running a bathroom exhaust fan at the same time can sometimes reverse the draft and bring smoke indoors. Be aware of how other systems in your home interact with your chimney.
2. Moisture Control Matters
Water is a chimney’s enemy. Even small leaks cause rapid damage—rust in metal chimneys or crumbling mortar in masonry. Invest in quality flashing and a solid chimney cap. Inspect these yearly, especially after storms.
A less obvious risk: condensation inside the flue. Burning wet or “green” wood releases more moisture, which can condense inside a cool chimney and cause damage over time. Always burn dry, seasoned wood for best results.
Final Checks Before First Use
Before lighting your wood stove for the first time:
- Double-check all clearances to walls and ceilings.
- Make sure the chimney cap is in place and secure.
- Test your carbon monoxide detector.
- Confirm your stove pipe is tightly connected to the chimney thimble.
- Schedule an inspection if you have any doubts.
These last steps are not just about code—they’re about protecting your home and family.
Give your stove a “test run” with a small fire. Watch for smoke leaks, strange odors, or any signs of overheating. If you notice anything unusual, shut it down and inspect before trying again.

Credit: www.reddit.com
Recommended Resources
For more detailed building codes and safety guidelines, visit the Chimney Safety Institute of America.
Frequently Asked Questions
How Tall Should A Chimney Be For A Wood Stove?
Most building codes require the chimney to be at least 3 feet above the roof and 2 feet higher than anything within 10 feet. This ensures proper draft and safe operation. Check your wood stove manufacturer’s manual and local codes for specifics.
Can I Build A Chimney Myself, Or Do I Need A Professional?
If you have construction experience and follow codes, a prefabricated chimney is usually within reach for skilled DIYers. Masonry chimneys are best left to professionals due to their weight and complexity. Always have your work inspected before use.
What Is The Best Material For A Wood Stove Chimney?
Stainless steel (for prefabricated chimneys) is durable, easy to maintain, and designed for high temperatures. For masonry chimneys, use fireclay flue liners and bricks or blocks rated for wood-burning use. Never use materials not designed for high heat.
How Often Should I Clean My Chimney?
At least once per year. If you burn a lot of wood or use your stove daily, clean more often. Regular cleaning removes creosote—a flammable byproduct—and keeps your chimney safe.
What Are Signs My Chimney Needs Repair?
Watch for cracks in masonry, loose or rusted metal pipes, missing chimney caps, water leaks, or smoke coming into your home. Address issues right away to prevent bigger problems or safety hazards.
Building a chimney for a wood stove is a rewarding project that adds warmth and value to your home. With careful planning, attention to detail, and ongoing maintenance, your chimney will serve you safely for many years. Always prioritize safety, follow local codes, and don’t hesitate to seek expert help if you’re unsure.
Credit: allfuelhst.com