Welcoming a new baby brings so many small, important decisions. Feeding is one of the biggest. When you’re a parent or caregiver, you want feeding time to be smooth, safe, and stress-free. That’s where products like the Kiinde Bottle Warmer come in. Many parents choose Kiinde because it’s simple, reliable, and helps make preparing bottles a little easier. But using a bottle warmer safely isn’t just about pressing a button. There are steps, tips, and insider tricks that can make the experience even better.
If you’re new to Kiinde or thinking about using it, you may have questions. Will it work with my bottles? How do I set it up? Is it really better than warming bottles in hot water? This guide will walk you through everything you need to know about using the Kiinde Bottle Warmer—step by step. You’ll learn not just the basics, but also the details that help you avoid common mistakes, keep your baby safe, and save time every day.
What Is The Kiinde Bottle Warmer?
The Kiinde Bottle Warmer is a device made to safely heat milk, formula, or baby food. Unlike microwaves, which can create hot spots and damage nutrients, the Kiinde uses a gentle water bath or steam method. This helps keep the milk’s nutrition and ensures an even temperature. Parents often choose Kiinde for its:
- Compatibility with many bottle types and pouches
- Fast, even warming
- Simple controls
- Easy-to-clean design
With these advantages, the Kiinde has become a favorite for both new and experienced parents.
Why Use A Bottle Warmer?
Many parents wonder: why not just use warm tap water or a microwave? Here are some reasons why a bottle warmer like Kiinde is better:
- Safety: Microwaves can heat unevenly and create hot spots, leading to burns.
- Nutrition: Overheating milk can destroy important nutrients, especially in breast milk.
- Consistency: The Kiinde warms milk to a precise temperature every time.
- Convenience: No need to guess or wait for water to heat up in a pan.
- Speed: Warming is usually faster than traditional methods.
These points matter, especially during late-night feedings when you need things to work smoothly.
Setting Up Your Kiinde Bottle Warmer
Before using your Kiinde Bottle Warmer for the first time, take a few minutes to set it up properly. This ensures safety and helps the device last longer.
Unpacking And Inspecting
- Remove all packaging materials and stickers.
- Check for any damage or missing parts. Standard parts include the warming unit, measuring cup, and sometimes an adapter ring.
Choosing A Location
- Place the warmer on a flat, stable surface near an electrical outlet.
- Keep it away from water sources (like sinks) to avoid electrical hazards.
- Make sure it’s out of reach of children.
Cleaning Before First Use
- Wipe the outside with a damp cloth.
- Wash the inside with warm, soapy water and rinse well.
- Run a warming cycle with just water to remove any factory dust.
Power And Water
- Plug in the unit using the right voltage for your country (usually 120V in the US).
- Always use clean, filtered water for each cycle to prevent mineral buildup.
Understanding How The Kiinde Bottle Warmer Works
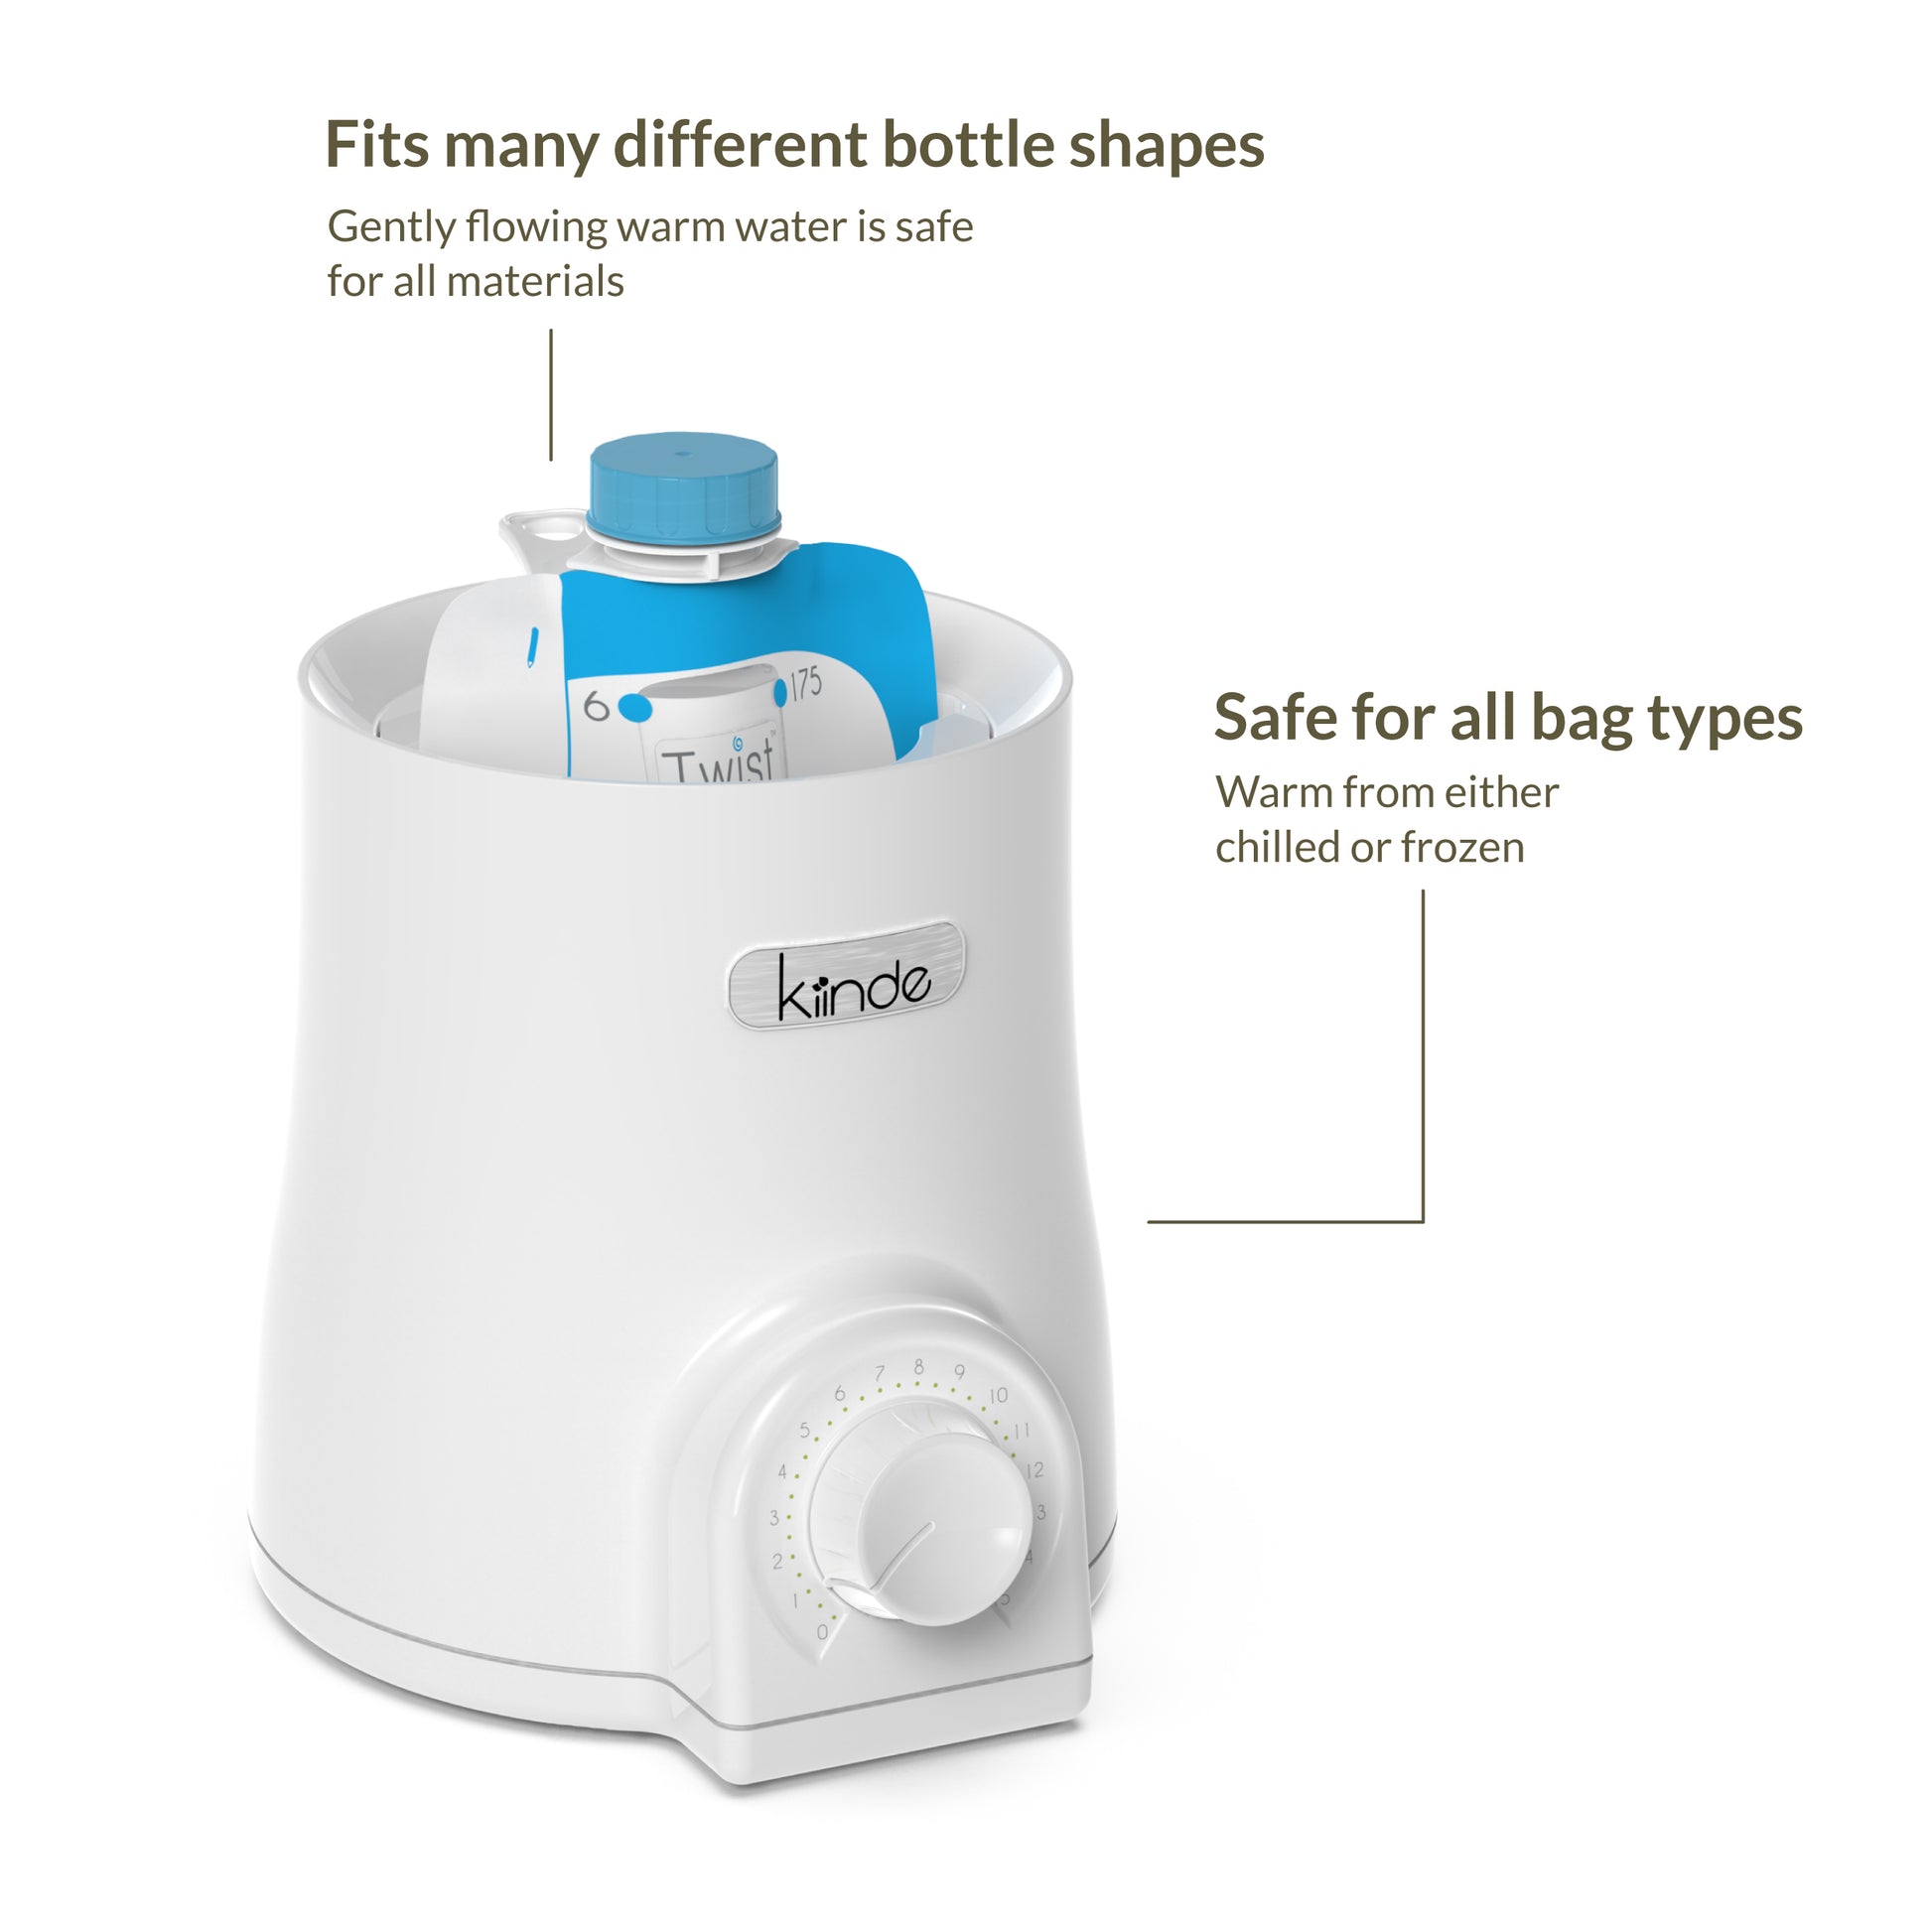
The Kiinde uses a water bath or steam to heat bottles and pouches. You add water to a reservoir, place the bottle or milk pouch inside, and turn the unit on. The warmer heats the water, which gently warms the milk or food.
Key Features
- Automatic shut-off: Turns off when the cycle is done.
- Multiple settings: Some models allow you to choose heat levels or times.
- Universal fit: Works with Kiinde pouches and most standard bottles.
What Makes It Different?
Unlike many warmers, Kiinde is designed for both bottles and storage bags (like Kiinde Twist pouches). This saves time and reduces the need to transfer milk from one container to another.

Credit: www.youtube.com
Step-by-step Guide: How To Use Kiinde Bottle Warmer
Now let’s walk through the full process of warming a bottle or pouch with Kiinde. These steps work for most models, but always check your user manual for your specific unit.
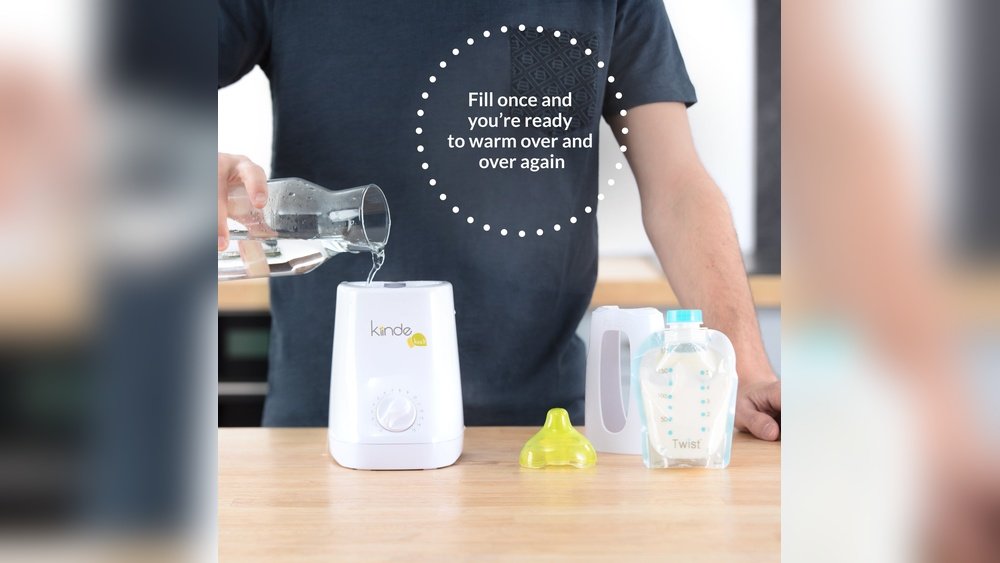
1. Fill The Water Reservoir
- Use the provided measuring cup to pour water into the warmer. Most bottles need about 2–4 ounces of water.
- For frozen milk or larger bottles, you might need more water or a longer warming time.
- Do not overfill—this can cause leaks or slow heating.
2. Prepare The Bottle Or Pouch
- If using a Kiinde pouch, make sure the cap is tight.
- For bottles, check that the nipple and ring are secured.
- Remove any air bubbles in the milk by gently swirling (not shaking).
3. Place The Bottle/pouch In The Warmer
- Set the bottle or pouch upright in the warmer.
- If your bottle is short or wide, use the included adapter ring.
- Make sure the item does not float or tip over.
4. Select Your Settings
- Some Kiinde warmers have just one button. Others let you set the time (e.g., for cold, room temp, or frozen milk).
- Choose the right setting for your container type and starting temperature.
5. Start The Warming Cycle
- Press the power or start button.
- The unit will begin heating. Most cycles take between 3 to 8 minutes, depending on the milk’s starting temperature and volume.
6. Wait For The Cycle To Finish
- The unit will beep or turn off automatically when done.
- Do not open the lid during the cycle, as hot steam can escape.
7. Remove And Test
- Use a cloth or tongs to lift out the bottle or pouch (it may be hot).
- Gently swirl the milk to mix the temperature.
- Test a few drops on your wrist—it should feel warm, not hot.
8. Feed Or Store
- Feed your baby within 1 hour for safety.
- If not used immediately, refrigerate the milk but do not reheat more than once.
Practical Tips For Best Results
A few small adjustments can make a big difference in how well your Kiinde works.
Use Filtered Water
Tap water often contains minerals that can build up inside the warmer. Filtered or distilled water helps prevent this, making cleaning easier and extending the device’s life.
Avoid Overheating
Warming milk for too long can destroy nutrients, especially in breast milk. Always use the correct setting and test the temperature before feeding.
Clean Regularly
After every use, empty any leftover water. Wipe the inside with a clean cloth and allow it to dry. Once a week, descale the warmer with a mix of vinegar and water (1:1 ratio). Run a cycle with this solution, then rinse thoroughly.
Warm Milk Bags Directly
One of Kiinde’s main advantages is you can warm milk storage bags directly, without pouring into another bottle. This reduces spills and saves time. Just be sure the bag is sealed tightly.
Don’t Shake Breast Milk
Shaking can break down the proteins in breast milk. Swirl gently instead to mix any fat that has separated.
Use The Right Adapter
If your bottle is a different shape (wide or narrow), use the included adapter ring for a snug fit. This ensures even heating.
Plan For Multiple Feedings
If you need to warm several bottles in a row, replace the water in the reservoir each time. Old water can cool down or become dirty.

Credit: www.amazon.com
Mistakes To Avoid
Many parents make simple errors that can affect safety or performance. Here’s what to watch out for:
- Using Too Much Water: This can cause spills or dilute the warming power.
- Not Testing the Temperature: Always check before feeding to avoid burns.
- Leaving the Unit Plugged In: Unplug after use to save energy and avoid hazards.
- Forgetting to Descale: Mineral buildup can damage the warmer and slow heating.
- Warming Milk More Than Once: Reheating can increase bacteria risk and reduce nutrients.
- Using Bottles That Don’t Fit: Forcing a bottle that’s too big or small can damage the unit.
Comparing Kiinde To Other Bottle Warmers
Is Kiinde better than other warmers? Let’s look at some key features in a direct comparison.
| Feature | Kiinde | Standard Electric Warmer | Hot Water Bath |
|---|---|---|---|
| Works with Pouches | Yes | No | No |
| Even Heating | Excellent | Good | Fair |
| Automatic Shut-off | Yes | Some models | No |
| Cleaning Needed | Low | Medium | Low |
| Setup Time | 1 min | 2–3 min | 5 min |
| Price | Medium | Low–Medium | Low |
Kiinde stands out for its compatibility with pouches and its speed. It may cost a bit more, but many parents feel the time saved and the flexibility are worth it.
Credit: kiinde.com
Which Bottles And Pouches Work With Kiinde?
The Kiinde Bottle Warmer is known for its wide compatibility. But not every bottle fits perfectly. Here’s a quick overview of common brands and their fit.
| Bottle/Pouch Brand | Fits Without Adapter | Adapter Needed |
|---|---|---|
| Kiinde Twist Pouches | Yes | No |
| Dr. Brown’s | Yes | No |
| Philips Avent | Yes | No |
| Tommee Tippee | No | Yes |
| Comotomo | No | Yes |
| Medela Storage Bags | Yes | No |
If you have a bottle that’s not listed, check the Kiinde website or your manual. Sometimes, a simple silicone ring or adapter can help.
Cleaning And Maintenance
Keeping your bottle warmer clean is not just for looks—it’s important for safety and performance.
Daily Cleaning
- After each use, pour out any remaining water.
- Wipe the inside with a clean, damp cloth.
- Leave the lid open to air dry.
Weekly Descaling
- Mix 1 part white vinegar with 1 part water.
- Fill the reservoir and run a warming cycle (without a bottle).
- Rinse thoroughly by running 1–2 cycles with clean water.
- Dry with a soft cloth.
Deep Cleaning
If you notice white mineral spots or a strange smell, repeat the descaling process. Never use harsh chemicals or abrasive pads.
Storing The Warmer
If you won’t use the warmer for a while, clean it fully and let it dry before storing in a cool, dry place. This prevents mold or bacteria growth.
Troubleshooting Common Issues
Even the best devices can have problems. Here’s how to solve the most common ones.
The Warmer Doesn’t Turn On
- Check that it’s plugged in securely.
- Try a different outlet.
- Make sure the power button is pressed fully.
- If still not working, contact Kiinde support.
Bottle Is Not Warm Enough
- Add more water or increase the warming time.
- Make sure the water is at room temperature before starting.
- For frozen milk, use the “frozen” setting if available.
Bottle Is Too Hot
- Use less water or a shorter cycle next time.
- Always test before feeding.
- If overheating continues, the thermostat may need repair.
Water Leaks From Unit
- Do not overfill the reservoir.
- Check for cracks or damage inside.
- Make sure the bottle or pouch is not overflowing.
Strange Smells
- Clean and descale the unit.
- Use only filtered or distilled water.
Kiinde Bottle Warmer Safety Tips
Safety should always be your first priority, especially when preparing food for babies.
Never Leave Unattended
Don’t walk away while the unit is on, especially if there are children nearby.
Avoid Overfilling
Too much water can spill and cause burns or damage the warmer.
Test Before Feeding
Always test milk temperature on your wrist. It should be warm, not hot.
Use In A Dry Area
Keep the warmer away from sinks or wet surfaces to avoid electric shock.
Unplug After Use
This helps prevent accidents and saves power.
Special Use Cases
Sometimes, your routine changes. Here’s what you should know for unique situations.
Warming Frozen Breast Milk
- Use the “frozen” setting if available.
- Expect longer warming times (about 8–12 minutes).
- Swirl gently after warming to mix the milk.
Warming Baby Food
- The Kiinde also warms jars of baby food.
- Remove lids before heating.
- Stir food and test temperature before serving.
On-the-go Warming
Some parents use their Kiinde with a car power inverter. Only do this if the inverter matches the unit’s voltage and wattage. Always monitor for safety.
Nighttime Feedings
To save time at night, pre-fill the reservoir with water and keep bottles ready in the fridge. Just add the bottle and start the cycle when needed.
Saving Time And Reducing Stress
Caring for a baby is busy work. Small steps with your Kiinde can reduce stress:
- Clean and fill the warmer each night before bed.
- Keep extra measuring cups and adapters handy.
- Use Kiinde’s twist pouches to skip transferring milk from bag to bottle.
These habits can save precious minutes during hectic days and nights.
Environmental Impact And Sustainability
Bottle warmers use electricity and water. Here’s how to use your Kiinde more sustainably:
- Use only the amount of water needed for each warming.
- Unplug when not in use to save energy.
- Recycle packaging and old units properly.
- Consider using renewable energy if available.
Kiinde pouches are single-use, but some parents wash and reuse them for non-feeding purposes (like art projects or storage).
How The Kiinde Warmer Supports Breastfeeding And Pumping
For breastfeeding or pumping moms, the Kiinde system can be a game changer. You can pump directly into Kiinde storage bags, freeze, thaw, and warm—all without transferring milk. This means:
- Less risk of spills or contamination.
- Faster preparation, especially for caregivers or daycare.
- Less cleaning, since fewer bottles are used.
Kiinde is also recommended by many lactation consultants for its gentle warming and easy-to-use design.
What The Experts Say
Pediatricians and feeding specialists agree: gentle warming is better for baby’s nutrition and safety. The American Academy of Pediatrics warns against microwaving milk, and suggests bottle warmers as a safer choice. You can read more from their guidelines at the HealthyChildren.org website.
Real Parent Experiences
Many parents report that the Kiinde saves time and reduces stress. For example:
- “I love that I can heat bags directly—no more pouring and spilling at 2 a.m.”
- “It’s so much faster than warming bottles in a cup of hot water.”
- “Easy to clean, and I can use it with both my breast milk bags and formula bottles.”
A few parents note that trial and error is needed to find the right water level and time for each bottle type, but most say the learning curve is quick.
The Investment: Is Kiinde Worth It?
A bottle warmer is not a must-have for every parent, but for those who pump, use milk bags, or want to simplify feeding, Kiinde is a smart investment. It may cost more than a basic warmer, but the time saved, ease of use, and safety features make it a popular choice.
When you add up the hours saved over months of feedings, the value becomes clear.
Frequently Asked Questions
How Long Does The Kiinde Bottle Warmer Take To Heat A Bottle?
Warming time depends on the amount and starting temperature of the milk. On average, cold milk from the fridge takes about 4–6 minutes, while frozen milk can take 8–12 minutes. Always test before feeding.
Can I Use The Kiinde Warmer With Formula Bottles?
Yes! The Kiinde works with both breast milk and formula bottles. Just prepare your formula as usual, place the bottle in the warmer, and follow the same steps.
Is It Safe To Leave Water In The Warmer Overnight?
It’s best not to leave water sitting in the unit for long periods. Old water can breed bacteria and cause mineral buildup. Empty and dry the unit after each use for best results.
Can I Warm Glass Bottles With Kiinde?
Most Kiinde warmers are safe for glass bottles, but always check your specific model’s manual. Use caution, as glass gets hot quickly and can break if dropped.
What Should I Do If I Smell Burning Or See Smoke?
Immediately unplug the unit and stop using it. Clean thoroughly and check for visible damage. If the problem continues, contact Kiinde customer support or replace the unit.
Feeding your baby should be a calm, positive experience. The Kiinde Bottle Warmer is designed to make things easier, but a little know-how makes a big difference. By following these steps and tips, you’ll warm bottles safely, keep your baby healthy, and save time every day.