Making your refrigerator flush with the cabinets is one of those small design touches that can completely change the look and feel of your kitchen. Instead of having your fridge stick out, making it look bulky or out of place, a flush fridge gives your kitchen a seamless, clean, and modern appearance.
This upgrade not only improves how your kitchen looks but also makes it more functional by saving space and creating a better workflow.
Many people believe that achieving a flush refrigerator is only possible with an expensive built-in model or custom cabinetry. The truth is, with the right planning, careful measurements, and a few smart modifications, you can make your standard refrigerator align perfectly with your cabinets.
In this guide, you’ll find clear, step-by-step advice for making your refrigerator flush with your cabinets, no matter your kitchen setup.
You’ll learn about the tools, materials, and planning required. We’ll cover practical solutions, common mistakes to avoid, and even some ideas that most beginners miss. Whether you’re renovating your kitchen, building a new one, or just looking to make a small but impactful change, this article will give you the confidence to make your refrigerator a seamless part of your cabinetry.
Understanding The Concept Of “flush” Refrigerators
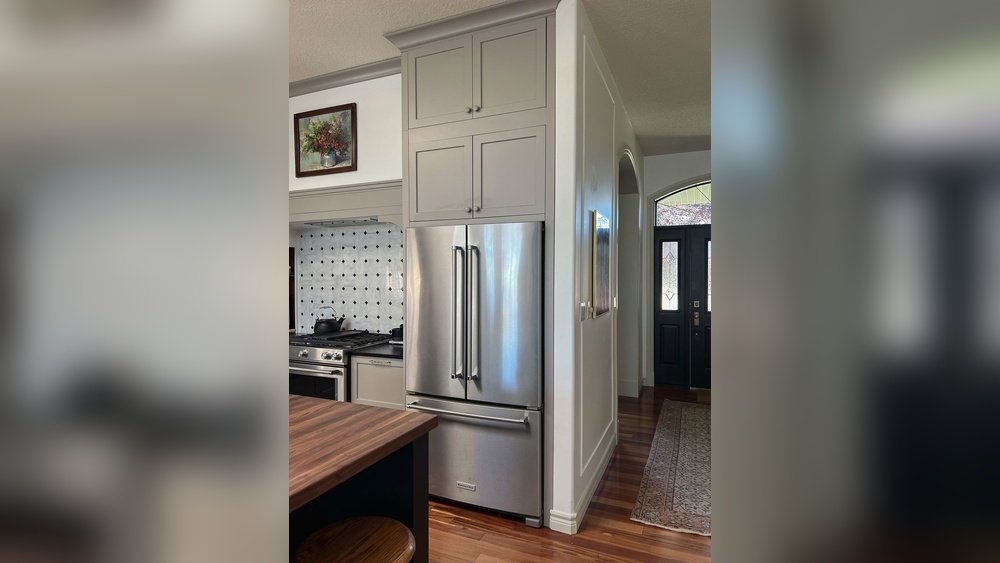
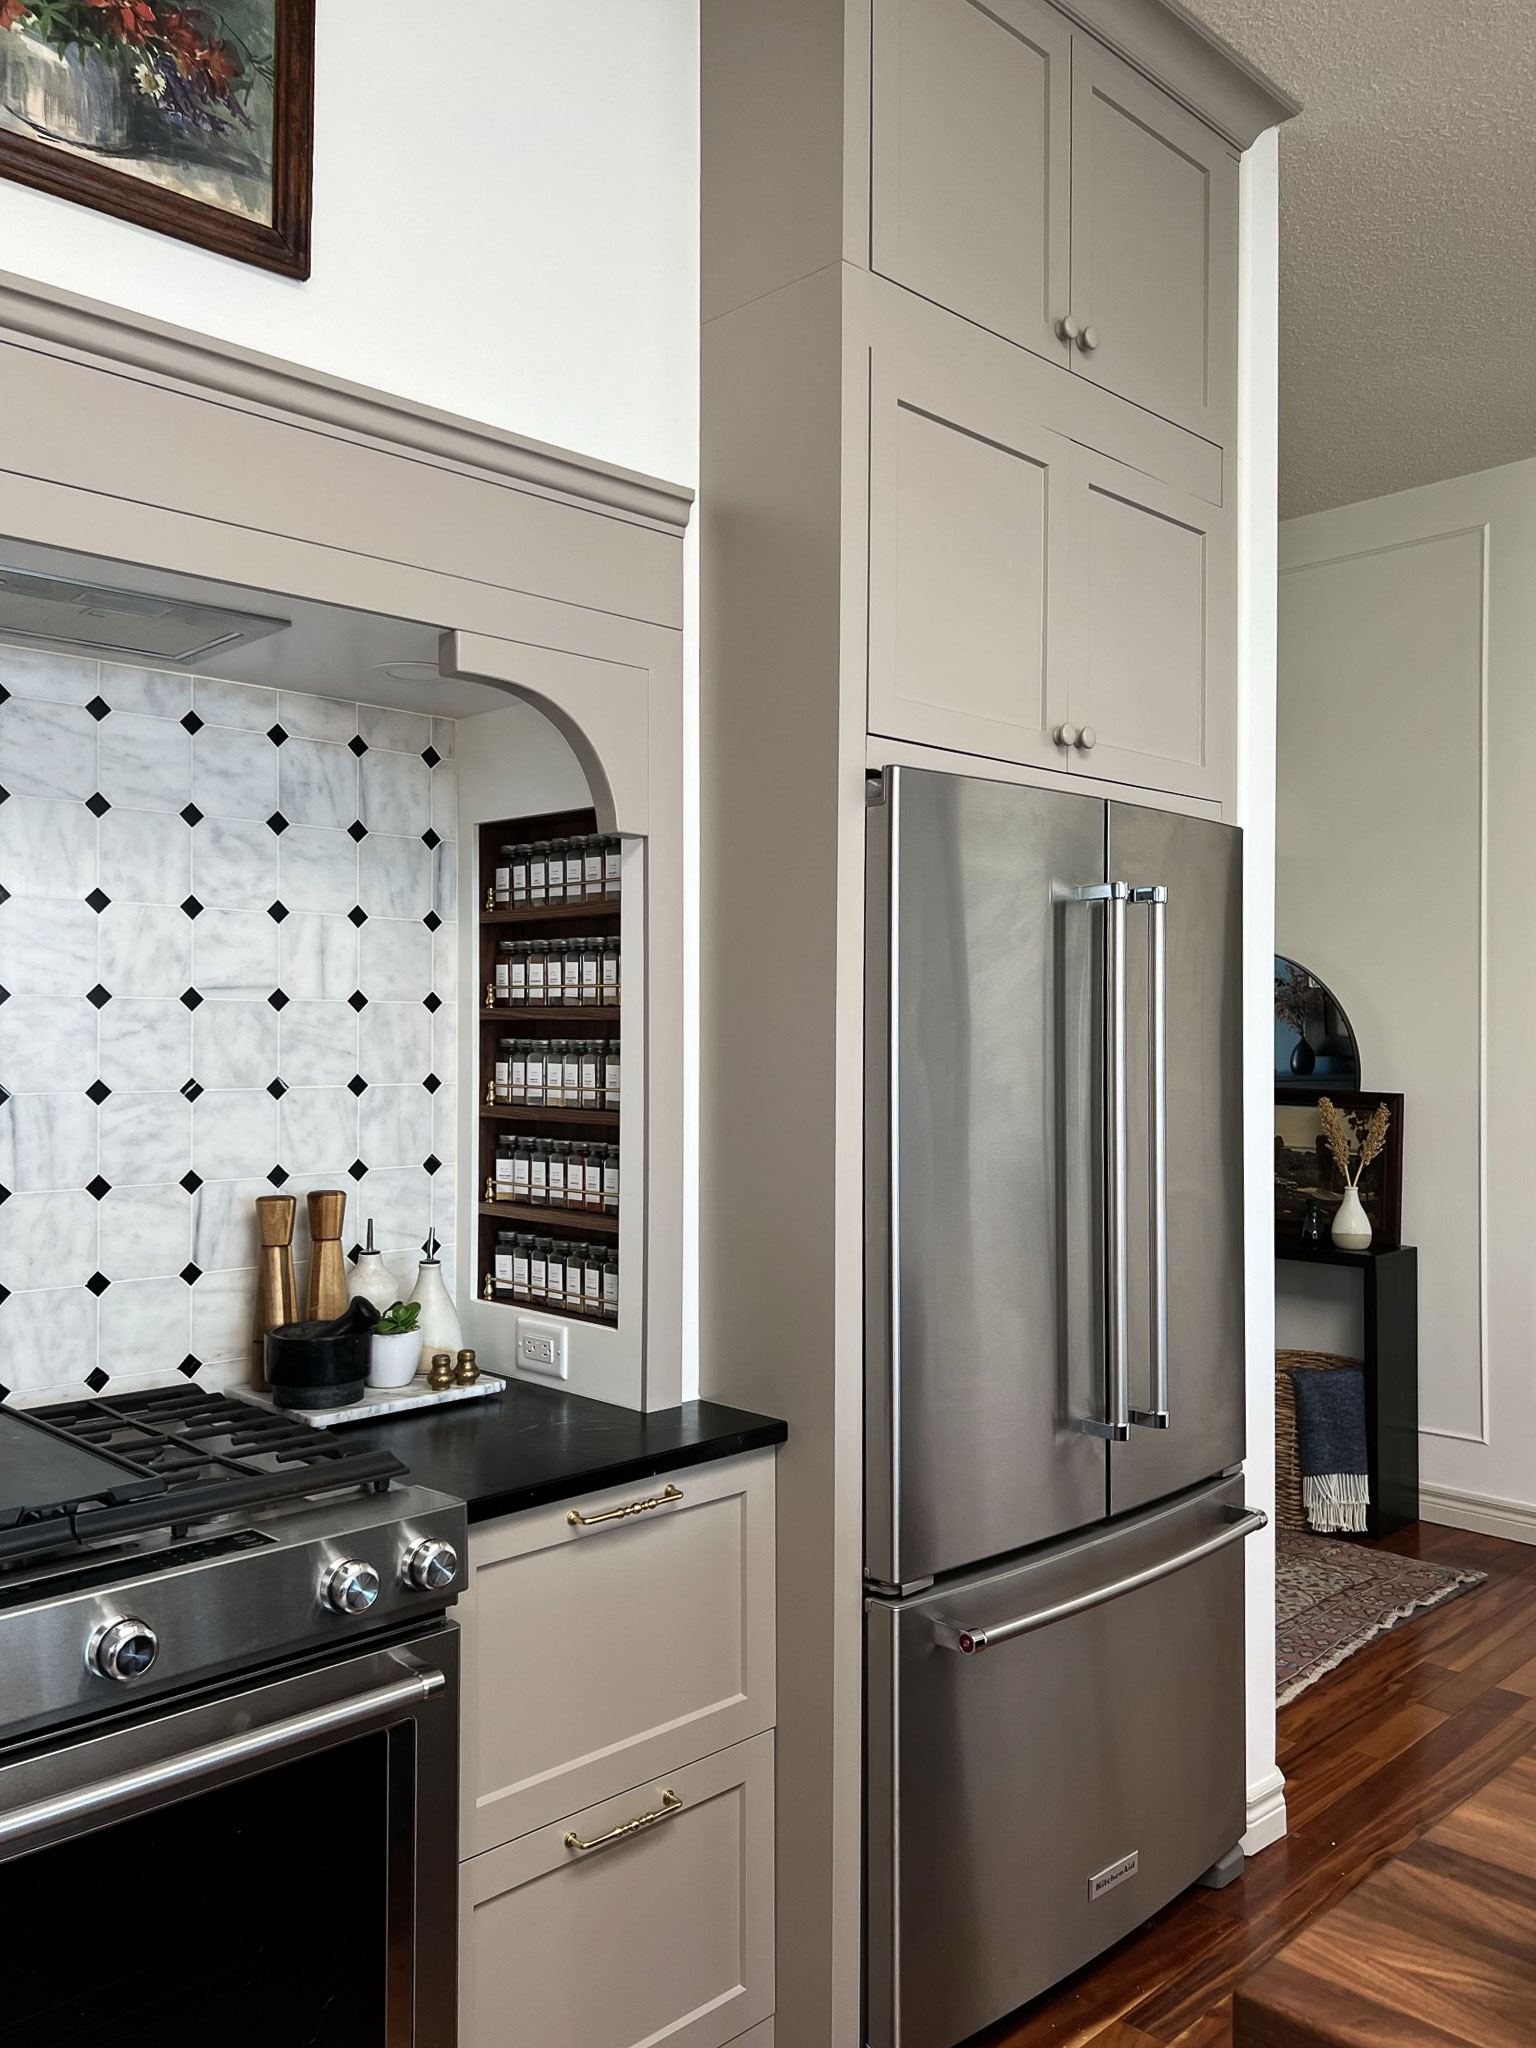
Before you start making changes, it’s essential to understand what “flush” actually means in kitchen design. A flush refrigerator sits perfectly aligned with the surrounding cabinet faces. This means the front of the refrigerator door is in the same vertical plane as the cabinet doors and drawer fronts. There are no awkward gaps, and the sides of the fridge are not sticking out or recessed behind the cabinetry.
This look is often seen in high-end kitchens and is sometimes called “built-in” or “integrated.” However, there are different levels of integration:
- True Built-In Refrigerators: These are designed from the start to be completely flush. They are expensive, often deeper than regular fridges, and require professional installation.
- Counter-Depth Refrigerators: These are shallower than standard fridges, allowing them to sit more closely aligned with cabinets. However, they may still stick out a little.
- Standard Refrigerators Modified to be Flush: With some carpentry work, trim kits, and careful planning, you can make a regular fridge look nearly flush.
Understanding these differences helps you decide what is possible in your kitchen and what will fit your budget.
Why Go For A Flush Refrigerator Look?
There are several reasons why homeowners want their refrigerators to be flush with cabinets:
- Modern Aesthetics: A flush refrigerator makes the kitchen look sleek and organized.
- Improved Workflow: Flush alignment prevents sharp edges from sticking out and makes it easier to move around.
- Increased Home Value: Kitchens with a flush, custom look often appeal more to buyers.
- Better Use of Space: A flush fridge maximizes the usable floor area and reduces obstacles.
However, the process requires careful planning. Rushing can lead to costly mistakes.
Planning Your Project
Every successful home improvement project begins with a detailed plan. Making your refrigerator flush with the cabinets is no different. Here’s how you can get started:
Measure Everything Precisely
The most common mistake is not measuring correctly. Do not rely on the manufacturer’s specs alone—measure your actual refrigerator and the space in your kitchen.
- Height: Measure from the floor to the top of the refrigerator.
- Width: Measure across the widest point, usually the doors or handles.
- Depth: Measure from the back wall to the front of the doors.
- Clearance: Check how much space is needed for ventilation (see the fridge’s manual).
It’s also important to measure your cabinet depth and the total space available.
Assess Your Refrigerator Type
Check if your fridge is standard-depth or counter-depth. Standard-depth fridges are deeper and usually stick out past cabinets. Counter-depth models are designed to align better.
Identify Obstacles
Look for potential problems such as:
- Wall outlets behind the fridge
- Water lines for ice makers
- Uneven floors
- Baseboards or crown molding
Each of these can affect how flush your fridge will sit.
Set A Realistic Budget
Making a refrigerator flush might involve cabinetry work, electrical changes, or buying a new fridge. Setting a budget helps you avoid surprises.
Options For Making A Refrigerator Flush With Cabinets
There are several approaches, depending on your kitchen layout and budget. Let’s explore the main strategies and what each involves.
1. Move The Refrigerator Back
If your fridge is sticking out, sometimes you can create more depth by moving the fridge back into the wall. This is often called a recessed niche.
How To Create A Recessed Niche
- Check the Wall: Make sure there are no plumbing or electrical lines where you want to recess the fridge.
- Cut the Drywall: Cut an opening in the drywall behind the fridge, making the niche slightly larger than the fridge.
- Frame the Opening: Use 2x4s to frame the sides of the opening. This provides support and a clean edge.
- Finish the Edges: Add drywall, paint, or trim for a finished look.
- Ventilation: Leave space for air to circulate behind and above the fridge.
Pros And Cons
| Pros | Cons |
|---|---|
| More fridge space without buying a new model | May require wall modification |
| Can use your existing fridge | Possible electrical or plumbing relocation needed |
| Lower cost than buying a built-in | May not be possible with load-bearing walls |
2. Switch To A Counter-depth Refrigerator
If you can replace your fridge, a counter-depth refrigerator is designed to be nearly flush with cabinets. Standard cabinets are about 24 inches deep, and counter-depth fridges match this depth.
Advantages
- Designed for flush installation
- No wall modifications needed
- Variety of models and price points
Things To Consider
- Counter-depth fridges usually hold less than standard models.
- They can be more expensive per cubic foot of storage.
- Still may stick out a little due to doors or handles.
3. Build Out The Surrounding Cabinets
Instead of moving the fridge back, you can pull the cabinets forward to match the fridge’s depth. This works especially well during a kitchen remodel or with new cabinetry.
Steps To Build Out Cabinets
- Add Filler Strips: Insert wood strips between cabinets and the wall to bring them forward.
- Install Deeper Panels: Use panels that match your cabinet doors to cover the sides of the fridge.
- Adjust Countertops: You may need to extend the countertops to match the new cabinet depth.
- Add Custom Trim: Use decorative trim to hide gaps and create a seamless look.
Cost And Complexity
This approach works best for new kitchens or major remodels. It’s less practical for small updates, as it requires moving cabinets and sometimes countertops.
4. Use A Refrigerator Surround Cabinet
A refrigerator surround is a tall cabinet or side panels that enclose the fridge on the sides and above. This does not make the fridge “true” flush, but it hides the sides and gives a built-in appearance.
How To Install A Surround
- Measure for side panels and an overhead cabinet.
- Install panels on both sides of the fridge.
- Add a cabinet above the fridge for extra storage.
- Use trim or molding to close any small gaps.
Benefits
- Hides unsightly fridge sides
- Adds extra storage
- Easier than full wall modifications
Drawbacks
- The fridge doors may still stick out slightly
- Not as seamless as a built-in look
5. Add Custom Trim Kits
Some manufacturers and cabinetmakers offer trim kits that close the gap between the fridge and cabinets. These are especially popular for counter-depth models.
Types Of Trim Kits
- Metal or wood strips that match your cabinetry
- Filler panels for above and beside the fridge
Installation Tips
- Always measure before ordering a kit
- Paint or finish trim to match your cabinets
- Use caulk to close small gaps for a professional look
6. Hide The Refrigerator With Cabinet Panels
For a true integrated look, some refrigerators can accept custom cabinet panels. These panels match your cabinet doors and attach directly to the fridge.
Advantages
- Fridge becomes almost invisible
- Seamless, high-end appearance
Drawbacks
- Only works with panel-ready fridges
- Requires precise custom work
- More expensive than other options
Credit: erinzubotdesign.com
Step-by-step: Making Your Refrigerator Flush With Cabinets
Now let’s walk through the process, step by step, using the most common method: creating a recessed niche behind a standard refrigerator.
Step 1: Plan Your Space
Draw your kitchen layout. Mark where the fridge currently sits and how much it sticks out. Identify how much you want to recess the fridge.
Step 2: Check The Wall
Find out what’s inside the wall behind your fridge. Look for:
- Electrical outlets
- Water lines
- Studs
- Ducts or pipes
If you’re not sure, use a stud finder or cut a small inspection hole.
Step 3: Turn Off Utilities
Before cutting, turn off power and water to the area. Safety is critical.
Step 4: Mark And Cut The Opening
Mark the area you want to recess. Cut carefully, using a drywall saw. Remove insulation if necessary.
Step 5: Frame The Niche
Use 2x4s or metal studs to frame the sides and top of the opening. Make sure the niche is at least 2 inches wider and taller than the fridge for ventilation.
Step 6: Move Electrical And Plumbing (if Needed)
If there’s an outlet or water line in the way, move it to a side wall or higher up. You may need an electrician or plumber for this.
Step 7: Finish The Edges
Install drywall, patch holes, and paint the niche. Add baseboards or trim for a finished look.
Step 8: Slide In The Refrigerator
Carefully move the fridge into the niche. Leave space around the sides and back for air flow.
Step 9: Add Side Panels Or Trim (optional)
For a more built-in look, add side panels or a cabinet above the fridge. Use trim to cover small gaps.
Step 10: Final Checks
Plug in the fridge and reconnect the water line. Make sure the doors open fully and the fridge has enough air circulation.
Key Factors To Consider Before Making Your Refrigerator Flush
Ventilation Requirements
All refrigerators need air flow to prevent overheating. Never push your fridge tight against the wall or cabinets without leaving space for air to move. Check your fridge’s manual for required clearances.
Door Swing And Clearance
Measure how far the doors need to open. Some fridges require more than 90 degrees to pull out drawers or shelves. Make sure the new position allows the doors to open fully.
Floor Leveling
Uneven floors can cause the fridge to tilt or doors not to close properly. Use a level and adjust the fridge’s feet as needed.
Cabinet Material And Structure
If you’re adding panels or trim, use materials that match your existing cabinets for a seamless look. Solid wood, MDF, or plywood can all work, but they should be painted or finished to match.
Water Line And Power Access
Do not block the water line or power outlet. Make sure you can reach them for maintenance or repairs.

Credit: www.reddit.com
Common Mistakes To Avoid
Many beginners make similar mistakes when trying to flush their refrigerator with cabinets. Avoid these pitfalls:
- Not leaving enough space for ventilation: This can cause your fridge to overheat and fail early.
- Forgetting about door swing: Doors that hit walls or cabinets are frustrating and may not open fully.
- Rushing measurements: Even small errors can lead to large gaps or a fridge that doesn’t fit.
- Ignoring local building codes: If you’re moving outlets or water lines, always check your city’s rules.
- Skipping professional help for electrical or plumbing: DIY is great, but some jobs are best left to experts.
Comparison: Built-in Vs. Modified Flush Refrigerator
If you’re debating between a true built-in fridge and modifying a standard one to be flush, here’s a quick comparison:
| Feature | Built-In Refrigerator | Modified Flush Refrigerator |
|---|---|---|
| Appearance | Completely seamless | Very close, but not always perfect |
| Cost | High ($5,000+) | Low to moderate ($200-$2,000) |
| Installation | Professional required | DIY possible |
| Storage capacity | Usually less | Standard or more |
| Flexibility | Low (custom sizes only) | High (fits many kitchens) |

Credit: www.youtube.com
Practical Tips And Non-obvious Insights
- Plan for future maintenance: Make sure you can still pull the fridge out if it needs repairs. Don’t build a niche that’s too tight.
- Consider ventilation at the top: If possible, leave a gap above the fridge and install a decorative grill. This improves airflow and extends the life of your appliance.
- Check your warranty: Modifying your fridge’s installation may affect the warranty. Read the manual or call the manufacturer first.
- Use a laser level for lining up panels and trim. This helps achieve a truly flush look.
- Order extra trim material: Sometimes, panels are damaged during installation. Having spares can save you time and frustration.
Maintenance After Installation
Once your fridge is flush with the cabinets, keep it working and looking its best:
- Clean vents and coils every 6 months to prevent overheating.
- Check door seals to make sure they are not rubbing or catching on surrounding panels.
- Inspect trim and panels for gaps, especially after moving the fridge.
- Re-level the fridge if you notice it shifting over time.
When To Call A Professional
While many steps can be done by a skilled DIYer, you should call a professional for:
- Moving electrical outlets or water lines
- Cutting into load-bearing walls
- Installing heavy panels or custom cabinetry
- Any job you don’t feel confident handling
A professional can also help you get the perfect flush look, especially with high-end cabinetry.
Real-world Example: Making A Standard Fridge Flush
Imagine a homeowner with a standard 33-inch wide, 70-inch tall refrigerator that sticks out 6 inches from their cabinets. Here’s how they made it flush:
- Moved the fridge to a wall that did not have plumbing or electrical behind it.
- Cut a 4-inch deep niche in the drywall, framed with 2x4s.
- Moved the electrical outlet to the side wall of the niche.
- Installed side panels matching the cabinets.
- Added a custom trim kit to close the gap.
- Finished with matching paint and caulk.
The result: a fridge that sits nearly flush with the cabinets, with no visible gaps or unfinished edges. The total cost was about $700, compared to $6,000 for a built-in fridge.
Cost Comparison: Different Flush Refrigerator Solutions
Here’s a quick look at estimated costs for each solution:
| Solution | Estimated Cost | Complexity |
|---|---|---|
| Recessed niche | $300-$1,500 | Medium |
| Counter-depth fridge | $1,200-$3,500 | Low |
| Cabinet build-out | $1,000-$4,000 | High |
| Surround panels | $400-$1,000 | Low |
| Trim kit | $150-$600 | Low |
| Panel-ready fridge | $2,500-$8,000 | High |
Frequently Asked Questions
What Is The Difference Between A Counter-depth And A Built-in Refrigerator?
A counter-depth refrigerator is shallower than a standard fridge and designed to align closely with cabinets, but it may still stick out a little. A built-in refrigerator is designed to be perfectly flush, often with custom panels and professional installation.
How Much Space Should I Leave Behind A Flush Refrigerator For Ventilation?
Most manufacturers recommend at least 1-2 inches behind and above the refrigerator for air flow. Always check your fridge’s manual for specific ventilation requirements.
Can I Make My Current Refrigerator Flush Without Buying A New One?
Yes, you can often make a standard fridge flush by creating a recessed niche, adding side panels, or using trim kits. However, true seamless integration is easier with counter-depth or panel-ready models.
Will Making My Fridge Flush Reduce Its Lifespan?
If you do not leave enough space for ventilation, your fridge may overheat and fail sooner. Always provide the recommended clearances and keep vents clean.
Do I Need A Professional To Make My Refrigerator Flush With Cabinets?
Simple panel and trim installations can be DIY, but moving electrical outlets, plumbing, or modifying walls should be done by a professional for safety and to meet building codes.
Making your refrigerator flush with cabinets is a smart way to modernize your kitchen without a full remodel. With careful planning, precise measurements, and the right approach, you can achieve a high-end look and improve your kitchen’s functionality. For more technical details and kitchen design standards, visit the National Kitchen & Bath Association website.
A flush refrigerator is more than just a style upgrade—it’s an investment in the comfort, efficiency, and value of your kitchen. With the knowledge from this guide, you’re ready to make it happen.