
Updating your laminate kitchen cabinets can give your kitchen a fresh look without the high cost of a full remodel. Many homeowners feel stuck with outdated laminate surfaces, believing the only solution is expensive replacement. In reality, you can completely change the appearance of your cabinets with the right techniques, tools, and creativity. This guide will walk you through every step, from planning and materials to painting, refacing, and finishing touches. You’ll learn practical methods, pro tips, and common mistakes to avoid, so you can confidently transform your kitchen—no matter your experience level.
Understanding Laminate Cabinets
Before diving into updates, it’s important to understand what laminate cabinets are. Laminate is a synthetic material made by fusing a printed surface layer to a particleboard or MDF core. This makes laminate cabinets more affordable and easy to clean, but also trickier to paint or reface than wood. The slick surface doesn’t grip paint well, and the edges can be prone to chipping. Knowing these challenges helps you choose the right methods and products for lasting results.
Assessing Cabinet Condition
Start by taking a close look at your cabinets. Are they structurally sound, or do you see sagging, water damage, or peeling laminate? Minor chips or scratches are easy to fix, but deep swelling or widespread peeling may require more work—or even replacement.
Make a list of issues you spot. If the core is damaged or the laminate is lifting across large areas, updating may not be enough. For most homes, though, small flaws can be repaired before you refresh the look.

Credit: usacabinets.com
Planning Your Cabinet Update
A successful update starts with a clear plan. Ask yourself:
- What is your desired style? (Modern, farmhouse, classic)
- What is your budget? (Paint, hardware, and refacing costs vary)
- How much time can you invest? (Some updates can be done in a weekend, others need more)
- What is your skill level?
Write down your answers, as these will guide your choices. For example, if you want a dramatic change on a tight budget, painting might be best. If you want a high-end look, refacing with new doors or panels could be worth the investment.
Options For Updating Laminate Cabinets
There are several ways to refresh laminate kitchen cabinets. Each method has its pros, cons, and ideal situations. Here’s a quick overview:
| Update Method | Cost | Difficulty | Time | Durability |
|---|---|---|---|---|
| Painting | Low | Medium | 2-5 days | Good (if done right) |
| Refacing | Medium-High | Medium-High | 3-7 days | Excellent |
| Vinyl Wraps | Low-Medium | Low | 1-2 days | Good |
| New Hardware | Low | Low | 1 day | Excellent |
| Add Trim/Moldings | Medium | Medium | 2-4 days | Very Good |
Choosing the right method depends on your goals, budget, and time.

Credit: littleterracedhouse.com
Tools And Materials Needed
Having the right tools makes the process smoother. Here’s what you’ll likely need for most update methods:
- Screwdriver (for removing doors and hardware)
- Mild cleaner or degreaser
- Sandpaper (120, 220 grit)
- High-adhesion primer (for laminate)
- Paint (acrylic, alkyd, or special cabinet paint)
- Paintbrushes and foam rollers
- Painter’s tape and drop cloths
- Putty knife and wood filler (for repairs)
- Cabinet hardware (if updating handles/knobs)
- Self-adhesive vinyl or laminate sheets (for refacing or wrapping)
- Miter saw (for adding trim)
- Quality glue or adhesive
Some methods need more specialized tools. Read the instructions for your chosen products to avoid surprises.
Step-by-step: Painting Laminate Cabinets
Painting is the most popular DIY way to update laminate kitchen cabinets. It’s affordable, offers endless color choices, and can be completed over a few days. Here’s how to do it right:
1. Remove Doors, Drawers, And Hardware
Take off all cabinet doors and drawers. Remove hinges, knobs, and handles. Label each piece and its hardware (masking tape works well) so reassembly is easier. Place all screws and small parts in a container.
2. Clean All Surfaces
Laminate holds onto grease and grime, so cleaning is critical. Use a degreasing cleaner or a mix of warm water and dish soap. Scrub surfaces thoroughly, paying extra attention near the stove. Rinse and let dry completely.
3. Repair And Sand
Inspect for chips, dents, or scratches. Fill any imperfections with wood filler or putty designed for laminate. Once dry, sand smooth with 120-grit sandpaper. Next, lightly sand all surfaces with 220-grit sandpaper. This step roughens the slick laminate so primer will stick.
Wipe away dust with a damp cloth.
4. Apply High-adhesion Primer
Laminate needs a high-adhesion primer—regular primers can peel. Use a brush or foam roller for even coverage. Let the primer dry as directed (usually 24 hours). Some primers recommend a second coat for best results.
5. Paint
Choose a high-quality cabinet paint, either acrylic or alkyd. Apply thin, even coats with a brush for edges and a roller for flat areas. Let each coat dry fully before the next (usually 4-6 hours). Two to three coats give the best finish.
6. Allow Paint To Cure
While paint feels dry after a few hours, it can take up to a week to fully harden (cure). Avoid heavy use during this time to prevent dents or scratches.
7. Reassemble
Once the paint is cured, reinstall hardware, doors, and drawers. Consider updating handles or knobs for a modern finish.
Common Painting Mistakes
- Skipping sanding: The primer and paint may peel.
- Using the wrong primer: Paint won’t stick well.
- Painting in high humidity: Can cause bubbling or poor drying.
- Rushing between coats: Leads to drips and uneven finish.
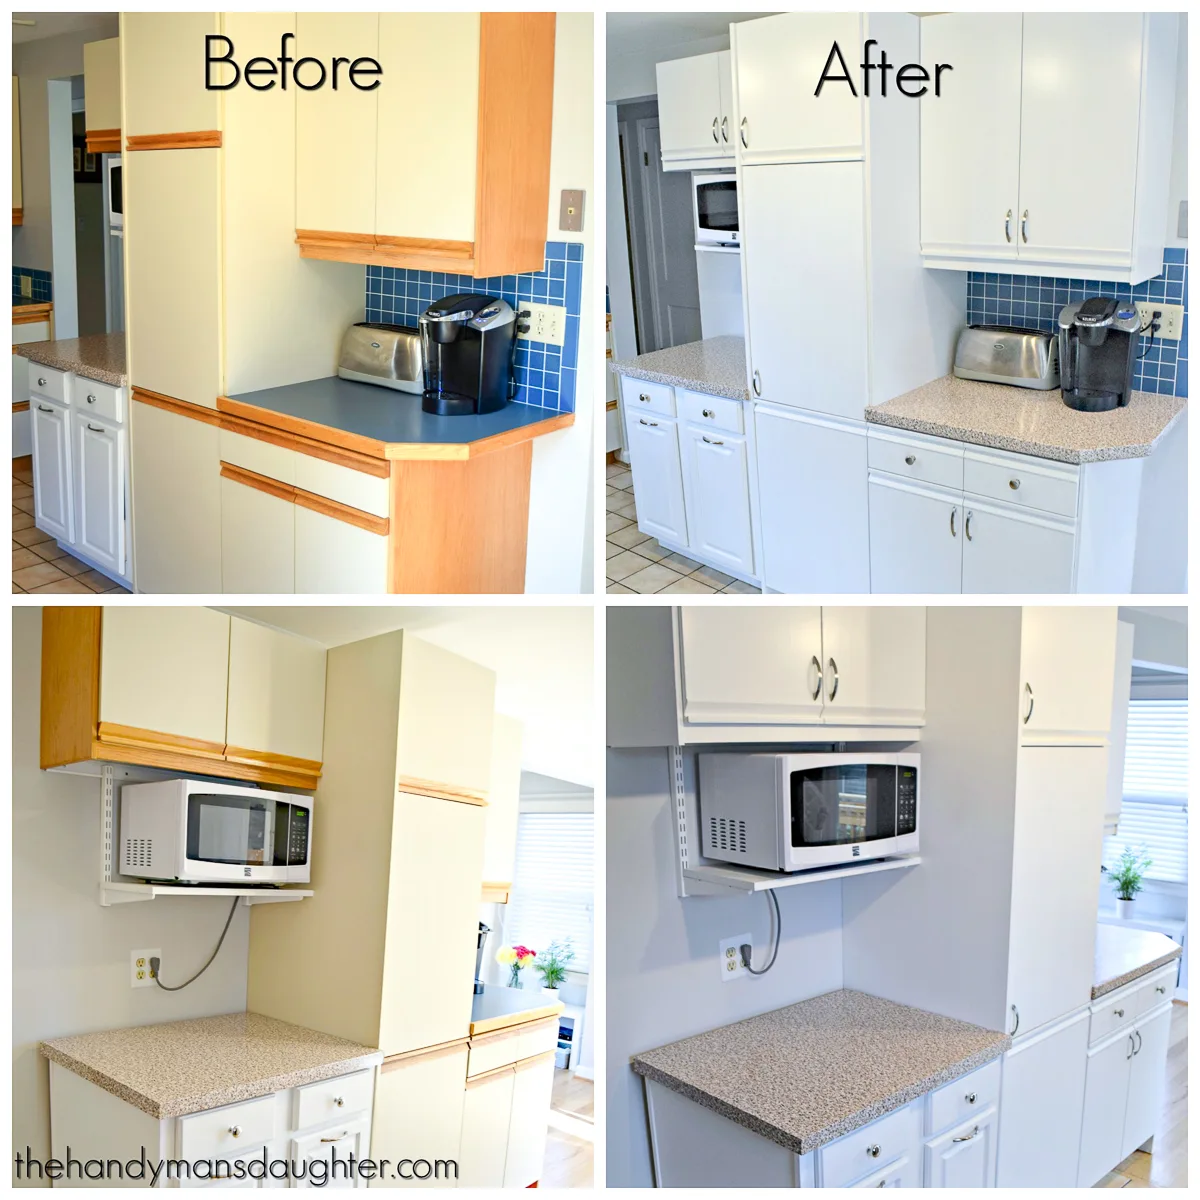
Credit: www.thehandymansdaughter.com
Step-by-step: Refacing Laminate Cabinets
Refacing means covering the cabinet boxes with new laminate or wood veneer, and sometimes replacing the doors. This method gives the most dramatic, long-lasting result without a full replacement.
1. Remove Doors And Hardware
As with painting, start by removing all doors, drawers, and hardware.
2. Clean And Sand Surfaces
Clean and lightly sand the cabinet boxes to improve adhesion for new materials.
3. Measure And Cut Veneer Or Laminate
Carefully measure each surface you want to cover. Cut sheets of self-adhesive veneer or laminate to fit. Over-measure slightly, then trim in place for a perfect edge.
4. Apply New Surface
Peel off the backing and press the new material onto the cabinet surface. Use a laminate roller or a clean block to press out bubbles. For non-adhesive materials, apply contact cement to both surfaces, let it dry, then press together.
5. Trim Edges
Use a sharp utility knife or router to trim excess material. Finish edges with matching edge banding for a professional look.
6. Install New Doors (optional)
For a full transformation, order new laminate or solid wood doors. Hang with new hinges for a fresh start.
7. Add New Hardware
Install new knobs, pulls, or handles to complete the look.
Refacing Pros And Cons
Refacing is more durable and gives a “like new” look, but it’s more expensive and time-consuming than painting. However, it’s still far cheaper than replacing cabinets. Homeowners often overlook the importance of edge banding for a seamless finish—choose banding that matches your new surface.
Step-by-step: Using Vinyl Wraps
Vinyl wraps are a quick, affordable way to change cabinet color or pattern. They come in many finishes, including wood grain, matte, or gloss.
1. Prepare Surfaces
Remove doors and hardware. Clean thoroughly with a degreaser. Sand lightly if the vinyl manufacturer recommends it.
2. Cut And Apply Vinyl
Measure each cabinet part. Cut vinyl sheets slightly oversized. Peel the backing and stick the vinyl, starting from one edge and smoothing out air bubbles as you go. Use a squeegee for best results.
3. Trim Excess
Use a sharp knife to trim along the edges. Heat with a hair dryer on corners for a tight fit.
4. Reinstall Hardware
Replace hardware and rehang doors.
Vinyl wraps are best for flat doors. Raised panels or detailed doors can be harder to cover smoothly.
Adding New Hardware
Sometimes, simply updating knobs, pulls, and hinges gives your laminate kitchen cabinets a whole new feel. Modern hardware can make old cabinets look custom and expensive.
Choosing Hardware
Consider the style of your kitchen. Sleek bar pulls work for modern looks, while cup pulls and decorative knobs fit farmhouse or classic spaces. Brushed nickel, matte black, and brass are popular finishes.
Installing New Hardware
If your new hardware needs different hole placement, fill old holes with wood filler. Mark and drill new holes using a template for even placement. Secure with included screws.
Changing hardware is a small investment with a big impact. Most people underestimate how much new handles can change the room’s mood.
Adding Trim Or Moldings
Adding trim—like crown molding at the top or simple strips to create a shaker-style look—gives cabinets depth and interest.
1. Choose Your Trim
Buy lightweight wood or MDF molding strips. Simple flat pieces can be glued to doors for a custom look.
2. Cut And Attach
Cut trim to size using a miter saw for corners. Attach with wood glue and small finishing nails.
3. Fill And Paint
Fill any gaps or nail holes with putty. Sand smooth, then paint the trim to match or contrast with the cabinets.
Trim adds detail and value. It’s a favorite trick among designers but often missed by DIYers.
Fixing Laminate Damage Before Updating
Before you paint or reface, fix any damage for the best results. Here’s a guide for common issues:
| Problem | Solution | Tip |
|---|---|---|
| Small chips/scratches | Fill with laminate repair paste or wood filler, sand smooth | Match filler color to laminate |
| Peeling edges | Lift gently, apply contact cement, press down firmly | Clamp if needed for strong bond |
| Bubbles under laminate | Prick bubble, inject glue, press flat | Use a syringe for precision |
| Loose doors/hardware | Tighten screws, use longer screws if holes are stripped | Add wood glue for extra hold |
Catching and fixing these problems early prevents bigger issues after you update.
Choosing Colors And Finishes
Picking the right color and finish can make your kitchen feel larger, brighter, or more stylish.
- Light colors (white, cream, pale gray) reflect light and make small kitchens feel bigger.
- Bold colors (navy, forest green, deep red) add drama but can make a space feel cozier.
- Glossy finishes are easier to clean but show fingerprints.
- Matte finishes hide smudges but may be harder to wipe.
Paint a small test area first to see how it looks in your lighting. Many people skip this, but it can save you from a color you don’t love.
Cleaning And Maintenance After Updating
Your refreshed cabinets will last longer with proper care. Here’s how to keep them looking great:
- Wipe spills quickly to prevent staining or swelling.
- Use gentle cleaners—avoid abrasive pads that scratch paint or laminate.
- Check hardware regularly and tighten loose screws.
- Open windows or use exhaust fans to reduce humidity.
Painted and refaced cabinets are tough, but still need gentle treatment to stay looking new.
Budgeting Your Update
Updating laminate kitchen cabinets is cost-effective, but costs vary by method.
- Painting: $100–$250 for paint, primer, brushes, and sandpaper.
- Refacing: $800–$2,500+ for materials and optional new doors.
- Vinyl Wraps: $150–$400 for DIY kits.
- New Hardware: $50–$200 depending on style and number of handles.
- Trim/Moldings: $100–$400 for materials.
Set your budget before you start. Prices can add up if you combine several methods.
Timeline: How Long Will It Take?
The total time depends on your chosen method and kitchen size.
- Painting: 2–5 days (including drying/curing)
- Refacing: 3–7 days
- Vinyl Wraps: 1–2 days
- Hardware and Trim: 1–3 days
Allow extra time for repairs, drying, and curing. Rushing leads to mistakes and a less durable finish.
When To Hire A Pro
DIY saves money, but some situations call for a professional:
- Major water damage or swollen cabinet boxes
- Complicated refacing or installing new doors
- Large kitchens with tight deadlines
- Desire for a flawless, factory-like finish
If you’re unsure, get quotes from local contractors. Sometimes the cost is worth the peace of mind and time saved.
Real-life Example: Transforming A 90s Laminate Kitchen
Sarah, a homeowner in Ohio, had outdated oak-look laminate cabinets from the 1990s. She wanted a brighter, more modern look without replacing the entire kitchen. She chose to:
- Paint the cabinets white with a durable acrylic paint
- Add simple trim strips to mimic shaker-style doors
- Replace all hardware with matte black pulls
The total cost was under $400, and the project took two weekends. The kitchen now looks fresh and modern, and Sarah increased her home’s value. Her biggest lesson? Taking time to prep and using the right primer made all the difference.
Two Insights Most Diyers Miss
- Not all primers and paints work on laminate. Using regular wall paint or basic primers often leads to peeling and chipping. Always look for products labeled “for laminate” or “high-adhesion.”
- Edges and corners are the weak points. Laminate often peels first at the edges. Spend extra time prepping these areas—sand well and apply edge banding or extra coats for the best results.
Environmental Impact And Safety Tips
Updating instead of replacing cabinets reduces waste. If you use paints or adhesives, work in a well-ventilated area and wear a mask to avoid fumes. Dispose of old hardware and materials responsibly, and choose low-VOC products when possible.
Additional Ways To Modernize Laminate Cabinets
Beyond the main update methods, small changes can make a big difference:
- Add under-cabinet lighting for a high-end touch.
- Replace glass inserts for upper cabinets.
- Use peel-and-stick wallpaper inside cabinets for fun pops of color.
- Paint or cover the cabinet sides for a complete look.
Mix and match these with your main update for a fully customized kitchen.
Resources For Inspiration
For more ideas, check out Houzz—a site full of real-world kitchen makeovers and professional advice.
Frequently Asked Questions
What Kind Of Paint Should I Use On Laminate Cabinets?
Use a high-quality acrylic or alkyd paint formulated for cabinets. Combine it with a high-adhesion primer designed for laminate surfaces. Avoid standard wall paint, as it may peel or chip over time.
Can I Paint Laminate Cabinets Without Sanding?
Sanding is important for best results. Light sanding roughens the slick surface, helping primer and paint stick. Skipping this step risks peeling and poor adhesion.
How Long Does A Laminate Cabinet Update Last?
When done properly—with good prep, primer, and paint or quality refacing—your update can last 5–10 years or more. Refaced cabinets often last even longer.
Is It Cheaper To Paint Or Reface Cabinets?
Painting is usually much cheaper ($100–$250 for most kitchens), while refacing is more expensive ($800–$2,500+), but gives a more dramatic and durable result. Choose based on your budget and goals.
Will Updating My Cabinets Increase Home Value?
Yes, updating kitchen cabinets can increase your home’s appeal and value, especially if you use modern colors and quality finishes. Kitchens are a major selling point for buyers.
Updating laminate kitchen cabinets is one of the best ways to refresh your kitchen on a budget. With the right approach, you can achieve a look you’ll love for years to come—without the stress and cost of a full remodel. Take your time, follow the steps above, and you’ll be amazed at what’s possible.