Setting the clock on your Samsung Smart Range may seem like a small task, but it’s essential for keeping your cooking on schedule and making the most of your appliance’s advanced features. Whether you’re baking bread, roasting a chicken, or simply want your kitchen devices to show the correct time, knowing how to set the clock is a key skill.
Many people overlook this step after installation or a power outage, but a properly set clock can help your recipes turn out right and your daily routine run smoothly.
Samsung Smart Ranges come with different control panels and features, which can sometimes make the process confusing, especially if you don’t have the manual handy or if you’re not familiar with smart appliances. In this guide, you’ll learn how to set the clock on various Samsung Smart Range models, troubleshoot common issues, and understand why keeping your range’s clock accurate matters more than you might think.
Understanding Your Samsung Smart Range
Samsung Smart Ranges are not just regular ovens—they’re packed with technology designed to make life easier. You’ll find models with touch controls, knobs, Wi-Fi connectivity, and even voice assistants. Some models connect with the SmartThings app, allowing you to control certain functions from your phone. Before diving into clock settings, let’s look at the main types of control panels you might find:
| Control Panel Type | Common Models | Features |
|---|---|---|
| Touchscreen | Flex Duo, Slide-in Smart Ranges | Wi-Fi, SmartThings, Voice Control |
| Touchpad with Buttons | Basic Smart Ranges | Manual Programming, Timer |
| Knob-Based | Traditional Smart Models | Physical Dials, Simple Display |
Knowing your model helps you follow the right steps. If you’re unsure which type you have, look at the control panel or check the model number on the inside edge of the oven door.
Why Setting The Clock Is Important
You might think the clock is only for telling time. But on a Samsung Smart Range, the clock is the heart of several functions:
- Delayed Start: Many recipes require a delayed start. The range uses its clock to begin cooking at the right time.
- Timed Cooking: For automatic shut-off, the appliance needs to know the current time.
- Timer & Reminders: A correct clock helps you set reminders and timers accurately.
- Smart Home Integration: If you connect your range to SmartThings or Google Home, accurate time sync is essential.
A range with the wrong time could start or stop cooking at the wrong moment, which might ruin your meal or even cause safety issues.
How To Set The Clock On Different Samsung Smart Ranges
Let’s break down the steps for setting the clock on various Samsung Smart Range control types. Each method will be detailed, with tips for common problems and extra advice for making sure your clock stays accurate.
Setting The Clock On A Touchscreen Samsung Smart Range
Many modern Samsung ranges use a full-color touchscreen. Here’s how to set the clock on these models:
- Wake the Screen: Tap anywhere on the touchscreen to wake it up.
- Access Settings: Find and tap the “Settings” or Menu icon. This is usually a gear-shaped symbol.
- Find Clock Option: Scroll through the menu. Look for Clock, Time, or Set Time.
- Set Time: Tap the option, then use the plus (+) and minus (-) buttons or the number pad to set the correct time. Some models let you tap the hour and minute sections directly.
- AM/PM Selection: If your model uses 12-hour format, make sure to set AM or PM correctly.
- Save Settings: Tap OK, Save, or Done to confirm.
Non-obvious tip: If your range is connected to Wi-Fi, it may sync time automatically. But sometimes, after a power outage or router reset, you’ll need to set it manually again.
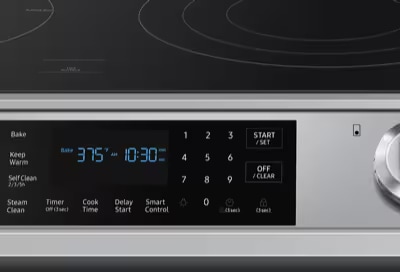
Setting The Clock On Touchpad (button) Models
Older or more basic smart ranges use a series of buttons below a small digital display.
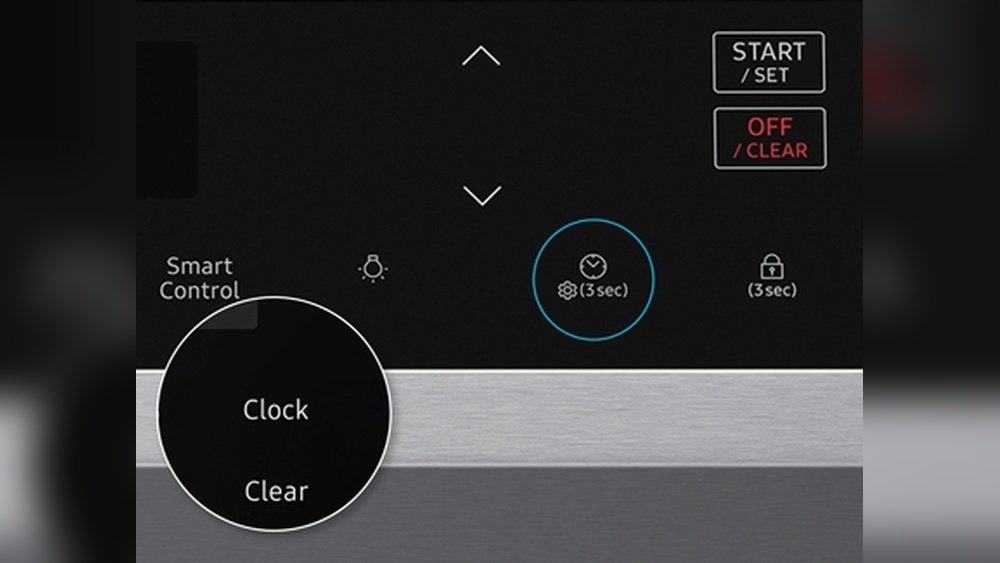
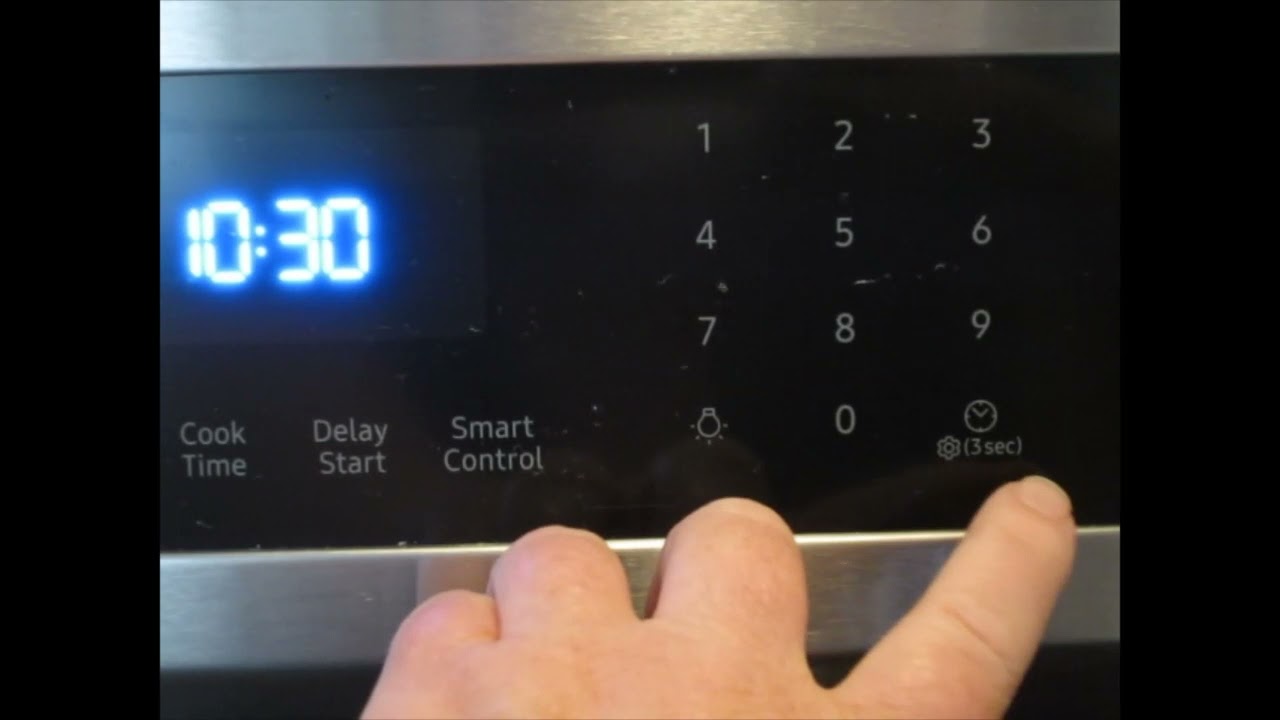
- Locate the Clock Button: Look for a button labeled Clock or a small clock icon.
- Press the Clock Button: Hold it for 3 seconds until the time display starts blinking.
- Set the Time: Use the Up/Down arrows or number pad to enter the correct time.
- Choose AM/PM: Some models need you to press the Clock button again to switch between AM and PM.
- Confirm: Press Start or Clock again to lock in your settings.
Practical insight: On some models, if you don’t press any button for 10 seconds, the display will exit clock-setting mode without saving. Move quickly or start over.
Setting The Clock On Knob-based Models
Some Samsung Smart Ranges use knobs for most controls but still have a small digital display for the clock.
- Find the Setting Button: Press the Options or Settings button.
- Select Clock: Turn the knob to scroll through options until you see Clock.
- Adjust Time: Press the knob to select, then turn to adjust hours and minutes.
- Confirm: Press the knob again to save.
Beginner mistake to avoid: Turning the knob too quickly can skip past your desired time. Go slowly, especially when setting minutes.
Using The Smartthings App To Set Clock
If your range is connected to Wi-Fi and you have the SmartThings app:
- Open the App: Launch SmartThings on your phone.
- Select Your Range: Tap the appliance in your device list.
- Go to Settings: Look for a settings or clock icon.
- Set Time: Enter the correct time and save.
Insider’s tip: Some app versions only let you sync the clock to your phone’s time. If your phone is set to the wrong time zone, your range will be too.
What To Do After A Power Outage
After a power outage, the clock on your Samsung Smart Range may blink or show “12:00”. This is a signal that you must reset it.
- Don’t ignore a blinking clock: Some features won’t work until you set the time.
- Check other settings: Sometimes, timers or delayed start functions are reset too.
- If the clock won’t set: Unplug the range for 60 seconds, then try again.
Switching Between 12-hour And 24-hour Format
Most Samsung Smart Ranges let you choose between 12-hour (AM/PM) and 24-hour (military) time.
- Go to the clock setting menu.
- Look for a “12H/24H” or “Time Format” option.
- Select your preferred format.
- Confirm your choice.
Advanced note: If your range is connected to SmartThings, it may automatically switch to match your phone or home network’s time settings.
Troubleshooting Common Clock Setting Problems
Sometimes, setting the clock doesn’t work as expected. Let’s look at the most common issues and how to solve them.
The Clock Won’t Change
- Possible causes: Child lock is on, or the range is in demo mode.
- Solution: Disable child lock by holding the lock button for 3 seconds. Exit demo mode through the settings menu.
The Clock Resets Often
- Possible causes: Power interruptions, loose plug, or a faulty outlet.
- Solution: Check that the plug is secure. Try another outlet if possible. If the issue continues, contact Samsung support.
Buttons Don’t Respond
- Possible causes: Control panel is dirty or damp, or touch buttons are malfunctioning.
- Solution: Clean the panel with a dry microfiber cloth. If it still doesn’t work, power cycle the range or call for service.
Time Is Always Wrong
- Possible causes: Time zone mismatch in SmartThings, daylight saving time not updated.
- Solution: Adjust your phone’s time zone, or set the time manually on the range.
How The Clock Affects Cooking Functions
The clock is not just for display—it interacts with your range’s cooking features. Here’s how:
- Delayed Start: If the clock is wrong, delayed start could begin too early or too late.
- Timer: The oven timer counts from the set clock time. If it’s off, your food could be undercooked or overcooked.
- Recipe Apps: Some Samsung ranges work with recipe apps that use the clock for steps and reminders.
- Self-Clean Cycle: Cleaning features often require the correct time to start and stop.
| Feature | Needs Accurate Clock? | What Can Go Wrong? |
|---|---|---|
| Delayed Start | Yes | Starts/ends at wrong time |
| Oven Timer | Yes | Incorrect cook time |
| Self-Clean | Yes | Cycle may not run |
| Manual Cooking | No | User must watch time |
Tips For Keeping Your Samsung Range Clock Accurate
Many users set the clock once and forget about it, but accuracy matters. Here’s how to keep it correct:
- Sync with Your Phone: If you use SmartThings, set your phone to update time automatically.
- Check After Power Outages: Set a reminder to check the range clock after storms or outages.
- Update for Daylight Saving Time: Not all ranges update automatically. Do this twice a year.
- Use the 24-Hour Format: For fewer mistakes, especially if you use delayed start often.
Extra insight: Some users don’t realize their oven’s self-clean or Sabbath mode might change the clock. Always double-check after using special features.
Credit: www.samsung.com
Maintaining Your Samsung Range’s Control Panel
Setting the clock is easier if your control panel is clean and in good condition. Here’s how to care for it:
- Wipe with a dry cloth: Avoid water or harsh chemicals.
- Keep buttons clear: Don’t place objects or magnets on the panel.
- Avoid splashes: When cooking, use the back burners for messy pots to protect the display.
If you notice the display dimming or buttons not responding, it may be time for a service check.
When To Call For Help
Most clock setting problems are easy to fix. But call Samsung support if:
- The display won’t light up at all.
- The clock resets daily, even with stable power.
- Buttons or touchscreens don’t respond after cleaning and power cycling.
Have your model number and serial number ready. You can find these inside the oven door or on the back of the range. For reliable information, visit the official Samsung Support page.
Credit: www.youtube.com
Models With Automatic Time Sync
Some premium Samsung Smart Ranges will automatically set and update the clock when connected to Wi-Fi. Features include:
- Automatic daylight saving adjustments
- Sync with internet time servers
- Remote clock setting from your phone
If you want this feature, check for it when shopping for a new range. Not all models have it.
How Samsung’s Clock Feature Compares With Other Brands
Samsung’s clock features are generally user-friendly, but how do they compare to other smart ranges? Here’s a quick look:
| Brand | Manual Clock Setting | App/Auto Sync | Ease of Use |
|---|---|---|---|
| Samsung | Yes | Yes (SmartThings) | High |
| LG | Yes | Yes (ThinQ) | Medium |
| GE | Yes | Yes (SmartHQ) | High |
| Whirlpool | Yes | Limited | Medium |
Non-obvious insight: Some Samsung models allow you to set the clock from your smartwatch if it’s linked to SmartThings—an option not available on many other brands.

Credit: www.youtube.com
What To Do If You Lose Your Manual
Many people lose their appliance manuals, but you still have options:
- Search for your exact model on the Samsung support website.
- Use the SmartThings app for step-by-step guides.
- Watch official Samsung tutorials on YouTube.
Don’t trust random sites for appliance instructions—always use reliable sources.
Special Clock Features: Sabbath Mode And More
Some Samsung Smart Ranges have a Sabbath Mode, which keeps the oven running in a special way for religious observances. While in Sabbath Mode:
- The clock may freeze or not show the actual time.
- You cannot change the clock until Sabbath Mode is turned off.
Know your range’s special features so you’re not surprised during holidays or special events.
Frequently Asked Questions
How Do I Know Which Clock Setting Method To Use On My Samsung Smart Range?
Check your control panel. If you have a full touchscreen, use the touchscreen method. If you see physical buttons labeled “Clock,” use the button method. For knob-based ranges, follow the knob procedure. If you’re unsure, look up your model number on the Samsung website.
My Clock Keeps Resetting After Every Power Outage. Is There A Way To Prevent This?
Most Samsung Smart Ranges do not have a backup battery for the clock. After a power loss, you must reset it. However, if your model is Wi-Fi connected, it may resync automatically when power returns. If not, consider using the SmartThings app to set it quickly.
Can I Set The Clock From My Smartphone?
Yes, if your Samsung range supports SmartThings and is connected to Wi-Fi. Open the app, select your range, and look for the clock or settings section. Remember, your phone’s time zone should match your kitchen location for accuracy.
Why Is My Clock Stuck In Military Time Or 24-hour Format?
Go to the clock settings on your range or in the SmartThings app. Look for “12H/24H” or “Time Format. ” Change it to your preferred format and save. If it doesn’t change, power cycle your appliance and try again.
What Should I Do If None Of The Clock-setting Steps Work?
Try resetting your range by unplugging it for 60 seconds. If the clock still won’t set, check for child lock or demo mode. If nothing works, contact Samsung support with your model and serial number for expert help.
A well-set clock helps your Samsung Smart Range work perfectly, keeps your cooking on track, and makes your kitchen smarter. Take a few minutes to set it right, and you’ll enjoy smoother, stress-free cooking every day.