A dripping faucet is one of those small annoyances that can turn into a big problem over time. You might hear the steady “drip…drip” while trying to sleep or see your water bill creeping up every month. What many people don’t realize is that a faucet that drips once per second can waste more than 3,000 gallons of water each year.
That’s enough to fill over 60 bathtubs! Fixing a leaky faucet not only saves money but also helps protect the environment by conserving water.
The good news is that you don’t have to be a plumbing expert to stop a faucet from dripping. With a little guidance, some basic tools, and a clear understanding of the process, almost anyone can do it. In this guide, you’ll learn everything you need to know about why faucets drip, how to diagnose the problem, and how to fix different types of faucets step by step.
You’ll also find tables comparing common faucet types, lists of tools, and tips for avoiding mistakes that can make the job harder. Whether you’re a first-time DIYer or just want to understand your home better, this article gives you the confidence to handle a dripping faucet once and for all.
Why Do Faucets Start Dripping?
To solve any problem, it’s important to understand why it happens in the first place. Faucets can start dripping for several reasons, and knowing the root cause will guide you toward the right solution.
Common Causes Of Drips
1. Worn Washers
In traditional compression faucets, rubber or silicone washers create a tight seal. Over time, these washers become brittle, crack, or flatten out, allowing water to seep through.
2. Damaged Cartridges
Cartridge faucets use a plastic or metal cartridge instead of washers. If the cartridge cracks or its seals wear out, water can leak even when the handle is off.
3. Corroded Valve Seats
The valve seat is where the faucet connects to the spout. Mineral deposits or corrosion can cause the valve seat to lose its seal, leading to slow leaks.
4. O-ring Problems
O-rings are small rubber rings that help seal various parts inside the faucet. If an O-ring dries out or splits, it can let water leak around the handle or base.
5. Loose Parts
Constant use can loosen nuts, screws, and other parts inside the faucet. Even a slightly loose part can break the seal and cause drips.
6. High Water Pressure
If the water pressure in your home is too high, it can force water past seals and gaskets, even if they’re in good condition.
7. Poor Installation
Sometimes, the faucet wasn’t installed properly, or cheap parts were used. This can cause issues soon after you move in.
Hidden Insights
Many people think all faucet drips are the same, but the location of the leak tells you a lot. A drip from the spout often means an internal seal problem, while a leak around the base or handle usually points to an O-ring or gasket issue. Also, water quality matters—hard water with lots of minerals can wear out washers and valve seats much faster.
Types Of Faucets (and Why It Matters)
Before you start fixing anything, you need to know what type of faucet you have. Each type has a different internal design and will need a different approach.
Here’s a simple comparison of the most common types you’ll find in homes:
| Faucet Type | Common Signs of Dripping | Main Parts That Fail | Typical Repair |
|---|---|---|---|
| Compression | Drips from spout, handle hard to turn | Washer, O-ring | Replace washer/O-ring |
| Ball | Drips from spout or around base | Seals, springs | Replace seals/springs |
| Cartridge | Irregular flow, handle leaks | Cartridge, O-ring | Replace cartridge/O-ring |
| Ceramic Disc | Drips from spout, stiff handle | Ceramic disc, seals | Replace disc/seals |
Not sure which type you have?
- Compression: Turns with a round knob and gets tighter as you close it.
- Ball: One handle, moves in all directions, no clicks.
- Cartridge: One or two handles, moves smoothly, stops firmly.
- Ceramic Disc: One or two handles, very smooth operation, heavy feel.
Checking your faucet’s manual or searching the brand/model online can also help you identify the type.
Tools And Materials You’ll Need
Having the right tools saves time and prevents damage. You don’t need expensive equipment, but missing even a small tool can make the job frustrating.
Basic Tools
- Adjustable wrench
- Phillips and flat-head screwdrivers
- Needle-nose pliers
- Allen (hex) wrench set
- Plumber’s grease
- Penetrating oil (like WD-40, for stuck parts)
- Old towel or rag (to cover the drain and prevent losing screws)
- Small container (to hold screws and parts)
Replacement Parts
- Washers (for compression faucets)
- O-rings (for cartridge and ball faucets)
- Cartridge (if needed)
- Ball assembly kit (for ball faucets)
- Ceramic discs/seals (for disc faucets)
- Plumber’s tape (Teflon tape, for threaded connections)
Pro Tips
- Take a photo of your faucet before you start. This helps you put everything back together correctly.
- Bring the old part to the hardware store to get an exact match. Even small differences can prevent a good seal.
- If your faucet is very old, consider replacing it entirely. Newer models are more water-efficient and easier to fix.
Step-by-step: How To Stop A Dripping Faucet
Every faucet type has a unique repair method. The steps below are organized by faucet type, so find yours and follow the process closely.
General Steps Before Any Repair
1. Turn Off The Water Supply.
Look under the sink for the shut-off valves. Turn them clockwise until tight. Test the faucet to make sure water is off.
2. Plug The Drain.
Use a sink plug or towel to block the drain. Small screws and parts can fall down easily.
3. Lay Out Your Tools And Parts.
Organize everything on the counter for quick access.
4. Take Photos As You Go.
This helps with reassembly, especially if you’re new to repairs.
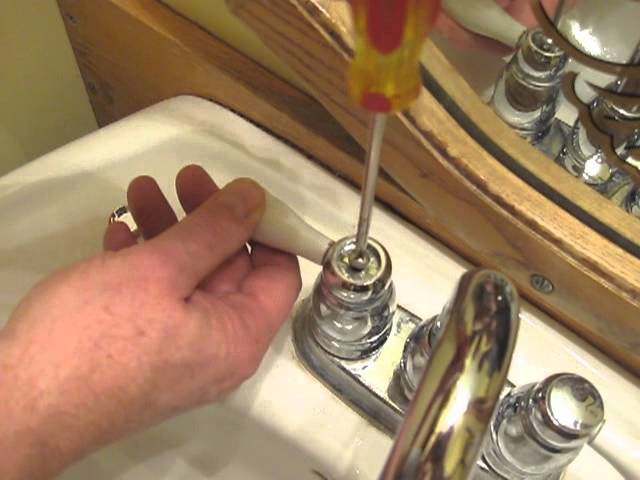
Fixing A Compression Faucet
Compression faucets are common in older homes. They have separate hot and cold handles and use a washer to seal the flow.
Steps:
- Remove the handle.
Pry off the decorative cap and unscrew the handle. Pull it off gently.
- Loosen the packing nut.
Use an adjustable wrench to unscrew the nut under the handle.
- Unscrew the stem.
Turn the stem counterclockwise and pull it out.
- Replace the washer and O-ring.
The washer is at the end of the stem. Remove the screw, swap in a new washer, and reattach. Replace the O-ring on the stem as well.
- Grease and reassemble.
Apply plumber’s grease to moving parts. Reinstall the stem, tighten the nut, and put the handle back.
- Turn on the water and test.
Open the shut-off valves and check for leaks.
Common beginner mistake: Over-tightening the packing nut can damage threads or make the handle hard to turn. Snug is enough.
Fixing A Ball Faucet
Ball faucets are durable and often found in kitchens. They use a ball bearing and several small parts.
Steps:
- Remove the handle.
Loosen the set screw (usually with an Allen wrench) and lift off the handle.
- Take off the cap and collar.
Use pliers, but protect the surface with tape or a cloth.
- Remove the cam, washer, and ball assembly.
Note the order as you remove them.
- Replace the springs and seals.
Use a small screwdriver to pull them out. Put in new springs and rubber seals from a repair kit.
- Reassemble the faucet.
Put back the ball, washer, cam, and cap. Tighten gently.
- Restore water and check for drips.
Extra tip: Ball faucets have many small parts. Lay them out in order as you remove them to avoid confusion.
Fixing A Cartridge Faucet
Cartridge faucets are common and easy to repair.
Steps:
- Remove the handle.
Find and remove the screw (sometimes under a cap).
- Pull out the retaining clip.
Use pliers to remove the clip holding the cartridge.
- Pull out the cartridge.
Wiggle if needed, or use a special cartridge puller.
- Replace the O-rings and install the new cartridge.
Grease the new O-rings. Insert the new cartridge in the same direction.
- Replace the retaining clip and handle.
Tighten everything and test for leaks.
Non-obvious insight: Some cartridges look similar but have small differences. Bring the old cartridge with you when buying a new one.
Fixing A Ceramic Disc Faucet
These faucets are modern and long-lasting but sensitive to debris.
Steps:
- Remove the handle.
Pry off the cover and unscrew the handle.
- Take out the escutcheon cap.
This usually unscrews by hand.
- Lift out the cartridge.
Note the orientation for reassembly.
- Check for worn seals or discs.
Clean any grit with vinegar. Replace damaged parts.
- Reassemble and test.
Hidden beginner issue: Never use force on ceramic discs—they can crack easily. If you see cracks, replace the disc.
How To Tell If You Fixed The Problem
After reassembly, turn the water supply back on and open the faucet fully. Let it run for a minute to clear any air or debris. Then, close the faucet and watch for drips for several minutes. Check both the spout and around the handle for leaks.
If the drip stops, you’ve succeeded!
If the drip continues, double-check:
- Did you install the right part?
- Are all O-rings and washers seated flat?
- Did you tighten (but not over-tighten) all nuts?
It’s common to miss a worn part or install a washer upside down. Take a short break, then try again with a clear head.
When To Call A Professional
Most drips can be fixed at home, but sometimes it’s smarter to call a plumber.
Call for help if:
- The faucet still drips after replacing parts twice.
- The shut-off valves are stuck or leaking.
- The faucet is very old, corroded, or hard to take apart.
- You see water under the sink or inside the cabinet.
Professional plumbers can also check for high water pressure, hidden pipe damage, or hard-to-see problems that cause leaks.

Credit: www.wmhendersoninc.com
Understanding The Cost Of A Dripping Faucet
A dripping faucet doesn’t just annoy you—it hits your wallet. Even a slow drip wastes water and increases your bill.
| Drip Rate | Water Wasted/Year | Estimated Cost/Year |
|---|---|---|
| 1 drip/second | 3,000 gallons | $30-60 |
| 2 drips/second | 6,000 gallons | $60-120 |
| Slow stream | Over 20,000 gallons | $200+ |
Tip: Local water rates may be higher. Wasting hot water increases your energy bill too!
How To Prevent Faucet Drips In The Future
Prevention is easier than repair. Here are steps you can take to keep your faucets drip-free:
1. Avoid Over-tightening Handles.
Many people think tighter is better, but it wears out washers and cartridges faster.
2. Clean Aerators Regularly.
Unscrew the tip of the faucet and rinse out grit. This prevents pressure build-up and leaking.
3. Check For Hard Water.
If you see white deposits, consider a water softener. Hard water damages seals and valve seats.
4. Inspect Faucets Yearly.
Look for corrosion, slow drips, or stiff handles. Early fixes are easier and cheaper.
5. Replace Old Faucets.
If your faucet is over 15 years old, new models are more reliable and use less water.
Pro insight: Many people skip yearly checks, but catching a small drip early can prevent much bigger problems—like hidden mold, cabinet damage, or even flooding.
Environmental Impact Of Dripping Faucets
A single dripping faucet may not seem important, but millions of homes with leaks create a big problem.
- The EPA estimates that household leaks waste nearly 1 trillion gallons of water each year in the US.
- Fixing easy leaks can save 10% on your water bill.
- Wasting hot water uses extra energy, increasing greenhouse gas emissions.
By stopping a drip, you’re not just saving money—you’re making a real difference for the planet.
What If You Have A Dripping Bathtub Or Shower Faucet?
The process is similar, but there are a few differences:
- Tub/shower valves are often behind a wall plate.
- You may need a longer screwdriver or special tools to reach parts.
- Turn off the main water supply if there are no local shut-offs.
Tip: Shower cartridges and washers wear out faster because of higher water pressure. If you have a leaky tub or shower, follow the same identification and replacement steps as for a sink faucet.
Advanced Tips For A Perfect Repair
- Use plumber’s tape on threaded parts to prevent leaks.
- Label parts as you remove them if you’re fixing multiple faucets.
- Soak corroded parts in vinegar to loosen mineral buildup.
- Replace both hot and cold washers at the same time, even if only one is dripping.
- Check supply lines for leaks after reassembly—a loose connection here can cause water under the sink.
Common Myths About Dripping Faucets
1. “it’s Just A Small Drip, It Doesn’t Matter.”
Even small drips waste a lot of water and money over time.
2. “you Need To Replace The Whole Faucet.”
Most drips can be fixed with a washer or cartridge—much cheaper and faster.
3. “anyone Can Fix A Faucet In Five Minutes.”
Some repairs are quick, but older faucets or stuck parts can take longer.
4. “any Washer Will Do.”
Washers and cartridges come in many sizes. Using the wrong one means the drip won’t stop.
Credit: www.youtube.com
Comparing Diy Vs. Professional Repair
Is it worth fixing a faucet yourself, or should you call a plumber? Here’s a quick side-by-side look:
| DIY Repair | Professional Repair |
|---|---|
| Cost: $1–$20 for parts | Cost: $75–$200 for labor + parts |
| Time: 30–60 minutes | Time: 15–30 minutes |
| Good for simple leaks | Handles complex leaks, old/frozen parts |
| Sense of accomplishment | Guarantee on work |
| Learning experience | Less hassle |
Bottom line: Most homeowners can fix a simple drip, but call a pro if you’re stuck or worried about damaging your plumbing.
Frequently Asked Questions
What If The Faucet Keeps Dripping After I Replace The Washer?
Double-check that you installed the washer correctly and that it matches the old one in size and shape. Inspect the valve seat for corrosion or rough spots—a damaged valve seat may need to be cleaned or replaced. In rare cases, water pressure or a cracked faucet body could be to blame.
How Do I Know If I Need To Replace The Cartridge Or Just The O-rings?
If you see water leaking from the handle, replacing the O-rings may be enough. If the faucet still drips from the spout after replacing O-rings, or if the handle feels loose or hard to turn, you likely need a new cartridge.
Can A Dripping Faucet Cause Other Damage?
Yes. Continuous leaks can stain sinks, cause mold under cabinets, rot wood, and even damage floors if left for months. Stopping a drip right away prevents bigger repairs later.
Is It Safe To Use Vinegar To Clean Faucet Parts?
Yes, but only soak metal parts. Vinegar dissolves mineral buildup and corrosion. Never soak rubber washers or O-rings—they can swell or break. Rinse everything well before reassembling.
Where Can I Find More Detailed Diagrams Or Guides For My Faucet?
Many faucet brands provide manuals and repair guides on their websites. For step-by-step videos and diagrams, check out Family Handyman.
Fixing a dripping faucet may seem like a small task, but it brings big rewards—quiet nights, lower bills, and a greener home. With clear steps and a bit of patience, you can solve most leaks yourself and feel more confident about tackling other repairs in your home.

Credit: www.wikihow.com