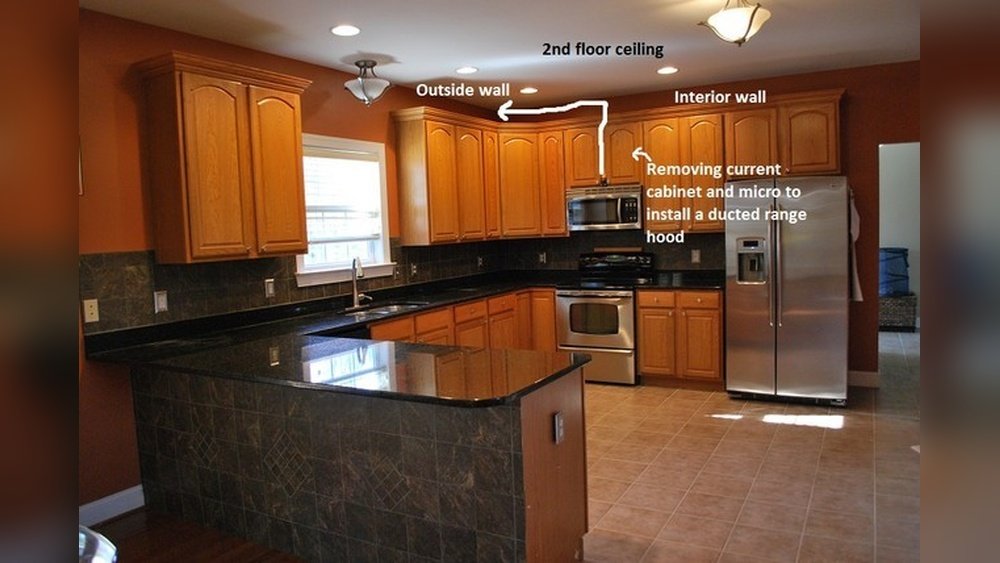
Venting a range hood on an interior wall is a challenge many homeowners face, especially in homes where the kitchen is not next to an outside wall. Good kitchen ventilation is essential for removing smoke, heat, odors, and grease from the air.
If your range hood does not vent outside, all those pollutants stay inside your house. Learning how to vent a range hood on an interior wall means you can enjoy a cleaner kitchen, reduce lingering smells, and protect your family’s health.
However, the process requires careful planning and technical steps. This guide explains everything you need to know, from planning to finishing, so you can tackle this project with confidence—even if you’re not a professional.
Understanding Range Hood Venting
Range hoods work by pulling air, smoke, and grease from your cooking area. There are two main types: ducted and ductless. Ducted hoods send the air outside your house, while ductless hoods filter the air and recirculate it back into your kitchen. Venting a hood through an interior wall means you must install ducts to carry the air from your kitchen, through the wall, and outside—usually through the attic or roof.
Why Proper Venting Is Important
If you cook often, you know how quickly steam and grease can build up. Without proper venting, these particles settle on walls, cabinets, and ceilings, making cleaning harder and causing long-term damage. More importantly, venting to the outside removes harmful gases like carbon monoxide.
Good venting also reduces humidity, which helps prevent mold and keeps your home’s air fresh.
Challenges With Interior Wall Venting
Unlike venting through an exterior wall, interior wall venting requires more work. You must find a path for the ductwork that avoids obstacles such as plumbing, electrical wiring, and structural framing. You also need to consider the length and type of duct to ensure good airflow.
While it may sound complicated, the process becomes manageable when broken into clear steps.
Planning Your Range Hood Vent
Before you start cutting holes or buying parts, planning is critical. A mistake now can lead to costly repairs or poor ventilation later.
Evaluate Your Kitchen Layout
- Location of the range: Is your stove against a true interior wall (not touching the exterior at any point)?
- Distance to the nearest exterior wall or roof: The further the air must travel, the more complicated the ductwork.
- Obstacles in the wall or ceiling: Think about water pipes, electrical wires, and studs.
Choose The Right Vent Hood
Not every range hood is suitable for interior wall venting. You need a ducted range hood with enough power (measured in CFM—cubic feet per minute) to move air effectively through longer ducts.
- Standard recommendation: At least 350 CFM for most kitchens. For heavy cooking or gas stoves, 600+ CFM is better.
- Hood width: It should match or be wider than your stovetop.
- Duct size: Most hoods require 6-inch or 8-inch ducts for best airflow.
Plan The Duct Route
Plan the shortest, straightest path from your range hood to the outdoors. Bends and long duct runs reduce efficiency.
Common duct routes:
- Up through the ceiling, across the attic, and out the roof.
- Up through the ceiling, over the kitchen, and out an exterior wall.
Avoid: Too many bends, sharp turns, or small ducts. These create resistance and trap grease.
Check Local Building Codes
Before starting, check your city or county’s building codes. Some areas have specific rules about duct materials, vent cap types, or fire safety. Failing to follow local codes can cause problems when you sell your home or file insurance claims.
Tools And Materials You’ll Need
Gather your materials before starting to save time and avoid last-minute trips to the store.
Essential tools:
- Measuring tape
- Stud finder
- Drill with hole saw and drill bits
- Reciprocating saw or jigsaw
- Screwdriver set
- Caulking gun
- Utility knife
- Level
- Hammer
Materials:
- Range hood (ducted)
- Ductwork (galvanized steel or aluminum preferred)
- Duct elbows and connectors
- Wall or roof vent cap with backdraft damper
- Foil tape (not cloth duct tape)
- Mounting brackets and screws
- High-temperature caulk or sealant
- Insulation (if vent passes through unheated spaces)
- Safety gear: Gloves, eye protection, dust mask
Pro tip: Buy at least 10% more duct than you think you need. Unexpected turns or mistakes happen.
Measuring And Marking The Vent Path
Accurate measurements are vital for a successful installation.
Mark The Hood Position
- Use the manufacturer’s template or measure your hood.
- Mark the centerline of your cooktop on the wall.
- Mark the bottom height of the hood—usually 24 to 30 inches above the stove.
Find The Duct Exit Point
- Hold the vent template against the wall above the range hood.
- Use a level to ensure your marks are straight.
- Mark the duct’s center hole on the interior wall.
Map The Duct Path
- Use a stud finder to check for framing inside the wall.
- In the attic, use a tape measure and flashlight to trace the path from the kitchen to the roof or outside wall.
- Mark any bends or turns you’ll need.
Check For Obstacles
- Cut a small inspection hole in the drywall to look for pipes or wires.
- Make adjustments before cutting the full duct hole.

Credit: hauslane.com
Cutting And Installing The Ductwork
With your path planned and marked, it’s time for the hands-on part.
Cutting The Interior Wall Opening
- Drill a small pilot hole in the center of your marked duct location.
- Use a hole saw or jigsaw to cut out the duct hole (usually 6 or 8 inches).
- Remove insulation or debris from inside the wall cavity.
Creating The Duct Path
- If your duct will go up into the attic, cut a matching hole in the ceiling.
- In the attic, measure and cut holes as needed to reach the roof or exterior wall.
Cutting The Exterior Exit
- Drill a pilot hole from inside, then finish the cut from outside to avoid damaging siding or shingles.
- Make the hole slightly larger than your duct to allow for adjustments.
Installing The Duct
- Attach the first duct piece to the range hood’s outlet, securing with foil tape.
- Run the ductwork through the wall and attic, connecting pieces with elbows as needed.
- Minimize bends—each 90-degree turn reduces airflow.
- Secure joints with foil tape, not regular duct tape (which can dry out and fail).
- Support long duct runs in the attic with straps or hangers every 4 feet.
Adding Insulation
If your duct passes through unheated areas (like the attic), wrap it with insulation to prevent condensation. Uninsulated ducts can sweat and drip, causing water damage or mold.
Installing The Vent Cap
- For a wall exit, use a vent cap with a backdraft damper to prevent cold air and pests from entering.
- For a roof exit, install a roof vent designed for kitchen exhaust.
Seal the edges of the vent cap with high-temperature caulk for a weatherproof finish.
Mounting The Range Hood
Now that your ductwork is ready, you can install the hood itself.
Secure The Mounting Bracket
- Most hoods use a wall bracket. Level it and screw into wall studs.
- If studs are not available, use heavy-duty wall anchors.
Hang The Range Hood
- With help, lift the hood onto the bracket.
- Secure it in place according to the manufacturer’s instructions.
- Connect the duct to the hood with foil tape for an airtight seal.
Electrical Connections
- If your hood plugs into an outlet, you’re almost done.
- For hardwired models, turn off power at the breaker, then connect wires using wire nuts.
- Secure the wiring and replace any covers.
Tip: If you’re not comfortable with electrical work, hire a licensed electrician.
Sealing And Testing The System
You’re almost finished, but two important steps remain.
Seal All Duct Joints
- Use foil tape to seal every duct joint and seam.
- In the attic, check for gaps or loose connections.
Test The Range Hood
- Turn on the hood and feel for strong airflow at the outside vent.
- Listen for rattles or vibrations, which may signal loose ductwork.
- Use a piece of tissue at the hood filter to check suction.
If airflow is weak:
- Check for crushed ducts, too many bends, or blocked vent cap.
- Double-check that the damper opens fully.
Comparing Interior Wall Venting Vs. Other Methods
Understanding the pros and cons of venting through an interior wall versus other options helps you make smart decisions.
| Venting Method | Pros | Cons |
|---|---|---|
| Interior Wall (to Roof/Attic) | Works anywhere; removes air outside; flexible routing | More complex; longer ducts; harder to clean |
| Direct Exterior Wall | Short duct; easy install; best airflow | Not possible if range is on interior wall |
| Ductless/Recirculating | Easy install; no venting needed | Does not remove heat or moisture; filters need frequent change |
Common Mistakes And How To Avoid Them
Many homeowners run into problems that reduce hood performance or cause safety risks.
- Using flexible plastic ducts: These trap grease and are a fire hazard. Always use rigid metal ductwork.
- Too many duct bends: Each bend slows airflow. Plan the straightest path possible.
- Small diameter ducts: Using a smaller duct than your hood requires reduces suction and causes noise.
- Not sealing duct joints: Leaks let grease and moisture escape into walls or the attic.
- Skipping insulation: Uninsulated ducts in cold spaces cause condensation and mold.
Non-obvious tip: Never connect your kitchen vent to an existing dryer or bathroom vent. Each must have its own dedicated duct.
Maintenance And Cleaning
A well-vented hood still needs regular care.
Filter Cleaning
- Wash aluminum or stainless steel filters in hot, soapy water every month.
- If your hood uses charcoal filters, change them every 3–6 months.
Duct Cleaning
- Every year, inspect ducts for grease buildup.
- Hire a professional to clean long or hard-to-reach duct runs.
Check The Vent Cap
- Clear away leaves, nests, or snow from the outside vent.
- Make sure the damper opens and closes freely.
Practical advice: Schedule duct checks before the start of winter and summer for best results.
Costs And Time Estimates
Knowing the likely costs and time helps you plan.
| Item/Step | DIY Cost (USD) | Pro Install Cost (USD) | Time Estimate |
|---|---|---|---|
| Range hood | $150–$600 | Included in total | – |
| Ductwork & vent cap | $50–$200 | Included in total | – |
| Labor (if hired) | – | $300–$700 | 4–8 hours |
| DIY Total | $200–$800 | – | 1–2 days |
| Pro Install Total | – | $500–$1,500 | 1 day |
Unexpected cost: If you find asbestos, old wiring, or mold during your project, stop and call a professional. Don’t risk your safety.
Advanced Tips For Best Venting
Experienced installers follow these extra steps for top results.
- Slope horizontal ducts slightly down toward the outside. This prevents rainwater from running inside.
- Use smooth-walled ducts for the entire run—no corrugated or flexible sections.
- Install an accessible clean-out port in the attic duct if your run is very long.
- Consider a make-up air kit if your hood is over 400 CFM and your house is very airtight.
Non-obvious insight: On cold days, the metal duct can shrink slightly. Recheck and tighten foil tape seals after your first winter.

Credit: prolinerangehoods.com
Safety Precautions
Working with ducts, power tools, and electrical wiring brings risks. Take these simple steps to stay safe.
- Turn off power at the breaker before touching any wires.
- Wear gloves, goggles, and a dust mask when cutting drywall or ducts.
- Use a sturdy ladder on a flat surface if working overhead.
- Don’t vent into an attic or crawlspace—always go outdoors.
- If you cut into a load-bearing wall or find unknown wiring, call a pro.
When To Call A Professional
Some jobs are better left to licensed contractors.
- If your duct route requires moving plumbing, major wiring, or structural supports.
- If you’re uncomfortable with electrical work or heavy lifting.
- If local codes require permits or inspections.
A professional can save time and make sure your system is safe, especially for complicated installations.
Environmental Considerations
Venting a kitchen hood outdoors is better for indoor air quality, but it does release grease and pollutants into the environment. Choose a vent cap with a grease trap to reduce mess. Clean your filters often—dirty filters push more grease into the duct.
If you want to learn more about the science of kitchen ventilation, the US Department of Energy offers detailed guidance at Energy Saver.
Frequently Asked Questions
How Do I Know If My Current Range Hood Is Vented Outside?
Check above your range hood for a duct that leads into the wall or ceiling. If you see only a filter with no duct, it is probably a recirculating or ductless model. You can also check outside your home for a vent cap near your kitchen.
What Size Duct Should I Use For Venting Through An Interior Wall?
Always use the duct size recommended by your range hood manufacturer, usually 6-inch or 8-inch diameter. Using a smaller duct than required reduces airflow and increases noise. Avoid flexible ducts for long runs.
Can I Vent My Kitchen Hood Into The Attic?
No, you should never vent into an attic or crawlspace. This causes moisture, mold, and fire hazards. Always vent to the outside using a proper vent cap.
How Often Should I Clean Or Replace The Filters In My Range Hood?
Wash metal filters every month. If your hood uses charcoal filters, replace them every 3–6 months, or as recommended by the manufacturer. Clean filters keep your system working efficiently.
Is It Possible To Install A Range Hood Vent On An Interior Wall By Myself?
Yes, many homeowners install their own range hood vents. However, it requires careful planning, safe use of tools, and following local codes. If you are unsure about electrical work or find surprises inside your walls, it’s smart to call a professional.
Venting a range hood through an interior wall is a rewarding project that improves your kitchen and your home’s air quality. With good planning, the right tools, and careful installation, you’ll enjoy better cooking, easier cleaning, and a healthier home for years to come.
