Many people think installing a dishwasher is simple—just plug it in and connect the water. But one of the most critical steps, often done wrong, is running the drain hose. This small, flexible pipe removes dirty water from your dishwasher. If installed incorrectly, it can cause leaks, odors, or even flood your kitchen. Getting the drain hose right is not just about following instructions; it’s about understanding your kitchen’s plumbing, choosing the right method, and preventing problems before they happen.
This guide will walk you through everything you need to know to run a dishwasher drain hose correctly. Whether you’re replacing an old dishwasher, setting up a brand-new kitchen, or simply fixing a drain issue, you’ll find clear steps, helpful tables, and practical tips for a leak-free installation.
We’ll also explain why certain mistakes lead to big problems and share advanced insights even experienced DIYers sometimes miss.
Understanding The Dishwasher Drain Hose
The drain hose is the tube that carries wastewater from your dishwasher to your home’s plumbing. Most hoses are made from flexible plastic or rubber and are about 6–10 feet long. The hose is usually corrugated to prevent kinks but strong enough to handle hot, soapy water.
A common mistake is thinking all hoses and installations are the same. In fact, there are several types of connections, and the way you run your drain hose depends on your kitchen’s layout. Understanding the basics will make your job easier and safer.
Key Functions
- Prevents dirty water from backing up into the dishwasher
- Directs water safely into your drain system or garbage disposal
- Blocks odors from kitchen drains
Common Types Of Connections
Most dishwashers drain in one of three ways:
- Garbage disposal connection: The hose attaches to a fitting on your garbage disposal.
- Sink drain connection: The hose connects to a branch tailpiece under the sink.
- Air gap connection: The hose first runs to an air gap device, then to the drain or disposal.
Each method has pros and cons. The right choice depends on your local plumbing codes and kitchen setup.
Tools And Materials Needed
Before starting, gather all tools and materials. Missing something halfway can lead to mistakes or delays. Here’s a checklist:
- Dishwasher drain hose (usually comes with the dishwasher)
- Hose clamps (typically metal, with a screw-tightener)
- Screwdriver (flat or Phillips, depending on clamps)
- Pliers (for stubborn fittings)
- Utility knife or scissors (for trimming hose if needed)
- Bucket or towels (to catch any water spills)
- Zip ties or hose supports (for securing hose position)
- Pipe wrench (if working with metal drain pipes)
- Air gap device (if required by code)
- Protective gloves
A pro tip: Always double-check the length of your hose. If it’s too short, buy an extension kit approved by your dishwasher’s manufacturer.
Planning The Drain Hose Route
How you route the hose depends on your kitchen’s layout. Planning is vital—don’t try to force the hose into a tight spot or sharp turn. Water flows best when the hose is smooth and gently curved.
Basic Routing Principles
- Shortest, most direct path: Avoid extra loops or slack.
- No kinks or sharp bends: These block water flow and stress the hose.
- Gentle slope downward: Water should flow freely toward the drain.
- Secure the hose: Use clamps and ties so the hose doesn’t move or sag.
Under-the-sink Layouts
Most dishwashers are installed beside the kitchen sink. The drain hose usually enters the sink cabinet through a hole in the side wall. Check that the hole is smooth—sharp edges can cut the hose over time.
For islands or far-away dishwashers, the hose may need a longer path. Make sure you have enough length, and avoid running the hose through tight corners or behind heavy appliances.
Choosing The Right Connection Method
Now, let’s look at the three main ways to connect your drain hose.
1. Connecting To A Garbage Disposal
This is common in US kitchens. The disposal has a small inlet (usually capped with a plastic plug) for the dishwasher hose.
- Remove the plug: Use a screwdriver and hammer to gently knock out the plug inside the inlet. Skip this, and water will back up into your dishwasher.
- Attach the hose: Slide the hose over the inlet, secure with a hose clamp.
- Check for leaks: Tighten until snug but don’t overtighten—it can crack the fitting.
2. Connecting To A Sink Drain Tailpiece
If you don’t have a garbage disposal, you’ll connect to a branch tailpiece just below the sink’s basket strainer.
- Tailpiece with dishwasher inlet: Make sure your tailpiece has a side inlet; if not, you’ll need to replace it.
- Attach the hose: Slide the hose onto the tailpiece, secure with a clamp.
- Double-check the fit: Some tailpieces are slightly smaller or larger than your hose. Use an adapter if needed.
3. Using An Air Gap Device
An air gap is a small device that sits on top of your sink or countertop. It prevents dirty water from flowing backward into your dishwasher—a must in some US states and cities.
- Connect the hose to the air gap: The dishwasher hose connects to the smaller air gap inlet under your sink.
- Second hose to drain or disposal: A second, larger hose runs from the air gap to your drain or disposal.
- Secure both connections: Use clamps to prevent leaks.
Comparison Of Connection Types
Here’s a quick look at the main differences:
| Method | Best For | Requires Extra Parts? | Backflow Protection |
|---|---|---|---|
| Garbage Disposal | Modern US kitchens | No (if disposal is present) | Optional (add high loop or air gap) |
| Sink Tailpiece | No disposal present | Maybe (branch tailpiece) | Optional (add high loop or air gap) |
| Air Gap | Required by code, best protection | Yes (air gap device, extra hose) | Excellent |
Credit: structuretech.com
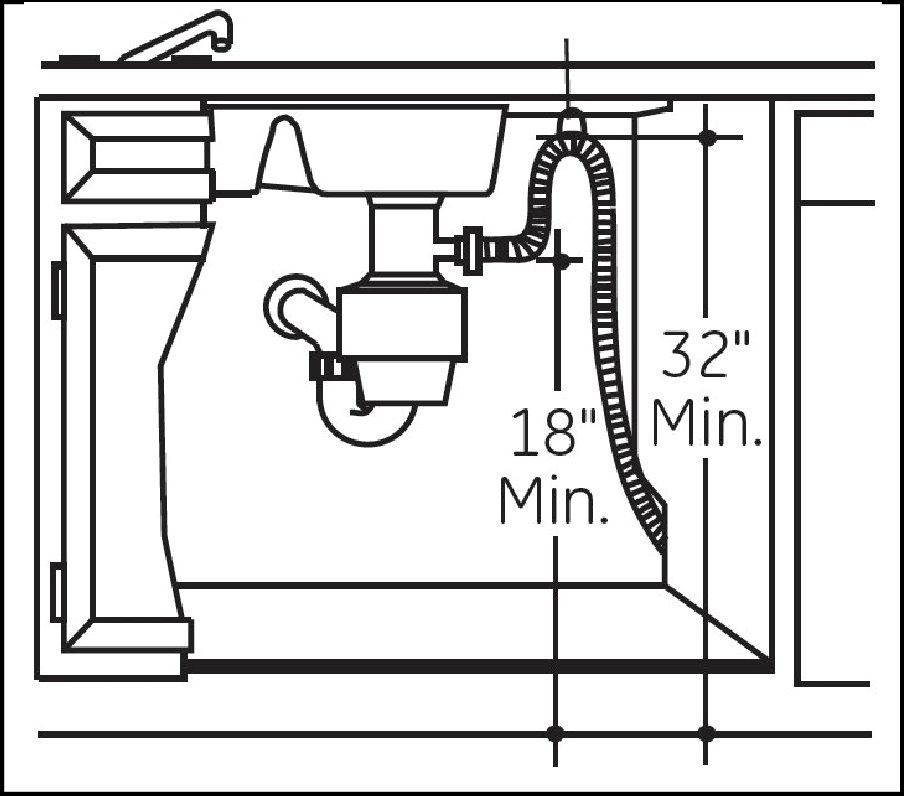
The High Loop: Why It Matters
Even if your local code doesn’t require an air gap, you should always install a high loop in your dishwasher drain hose. This simple step can save you major headaches.
What Is A High Loop?
A high loop means routing the drain hose up as high as possible under the sink—usually to the bottom of the countertop—before bringing it down to the drain or disposal. This helps stop dirty water from flowing back into the dishwasher.
How To Install A High Loop
- Route the hose upward: Secure it to the underside of the countertop or as high as possible using a bracket or zip tie.
- Keep it stable: Don’t let the hose sag; use at least one support.
- Connect to drain/disposal: After the high point, bring the hose down to your chosen connection.
Common Mistakes
- Loop not high enough (must be above the sink drain opening)
- Not securing the hose (it can fall over time)
- Skipping the high loop entirely (backflow risk)
When Is An Air Gap Required?
Some cities, like those in California, require an air gap instead of or in addition to a high loop. Always check your local code. If in doubt, install both for maximum protection.
Step-by-step: How To Run The Drain Hose
Now let’s get hands-on. These steps apply to most modern dishwashers, but always check your manufacturer’s manual for specifics.
1. Turn Off Power And Water
Safety first. Shut off the power to your dishwasher at the circuit breaker. Turn off the water supply valve under your sink.
2. Remove The Old Hose (if Replacing)
If you’re swapping out an old dishwasher, disconnect the old drain hose from the disposal or drain. Use a bucket to catch any water left in the hose.
3. Prepare The New Hose
Uncoil the new drain hose. Check for kinks or damage. If your hose is too long, measure and trim the excess (leave a little slack for movement).
4. Route The Hose
Feed the hose through the hole in the cabinet wall. Use gentle curves—never force the hose around sharp corners.
- For high loop: Secure the hose to the underside of the countertop with a bracket or zip tie.
- For air gap: Run the hose to the air gap device inlet, then a second hose from the air gap to the drain/disposal.
5. Make The Connection
Slide the end of the hose over your chosen fitting (disposal, tailpiece, or air gap). Secure with a hose clamp. Tighten until snug but not crushing.
6. Check All Fittings
Double-check every clamp and joint. Gently tug on the hose to ensure it’s secure.
7. Test For Leaks
Restore power and water. Run the dishwasher’s rinse cycle. Check under the sink for drips or leaks, especially around connections and bends.
8. Final Inspection
- Ensure the hose is not touching any sharp metal edges.
- Look for any sagging or kinks.
- Confirm the high loop or air gap is in place and secure.
Advanced Tips And Insights
Even if you’ve done this before, these advanced tips can help prevent common problems:
Use The Right Hose Clamp
Not all clamps are the same. Some dishwashers come with plastic clamps, but metal screw clamps are more reliable for long-term use. Don’t overtighten—snug is enough to prevent leaks.
Avoid Hidden Traps
Many people tuck the hose behind the dishwasher or other pipes. Over time, vibration can wear a hole in the hose, causing leaks. Always check that the hose is free from rubbing against sharp or rough surfaces.
Don’t Reuse Old Hoses
It’s tempting to reuse the old drain hose when replacing a dishwasher. This can lead to early failure, mold, or bad smells. Always use a new, clean hose for a new install.
Air Gap Vs. High Loop
An air gap is the best way to prevent backflow, but many kitchens only have a high loop. If you’re in a city that allows a high loop, install it carefully. If you have an air gap, keep it clean—food debris can block it over time.
Troubleshooting Common Problems
Even with careful installation, things can go wrong. Here’s how to spot and fix common drain hose issues.
Dishwasher Not Draining
- Check for kinks or blockages in the hose.
- Remove the hose and flush it with water.
- Inspect the drain fitting for clogs.
Water Leaks Under Sink
- Tighten hose clamps.
- Replace cracked or worn hoses.
- Check the air gap for leaks or blockages.
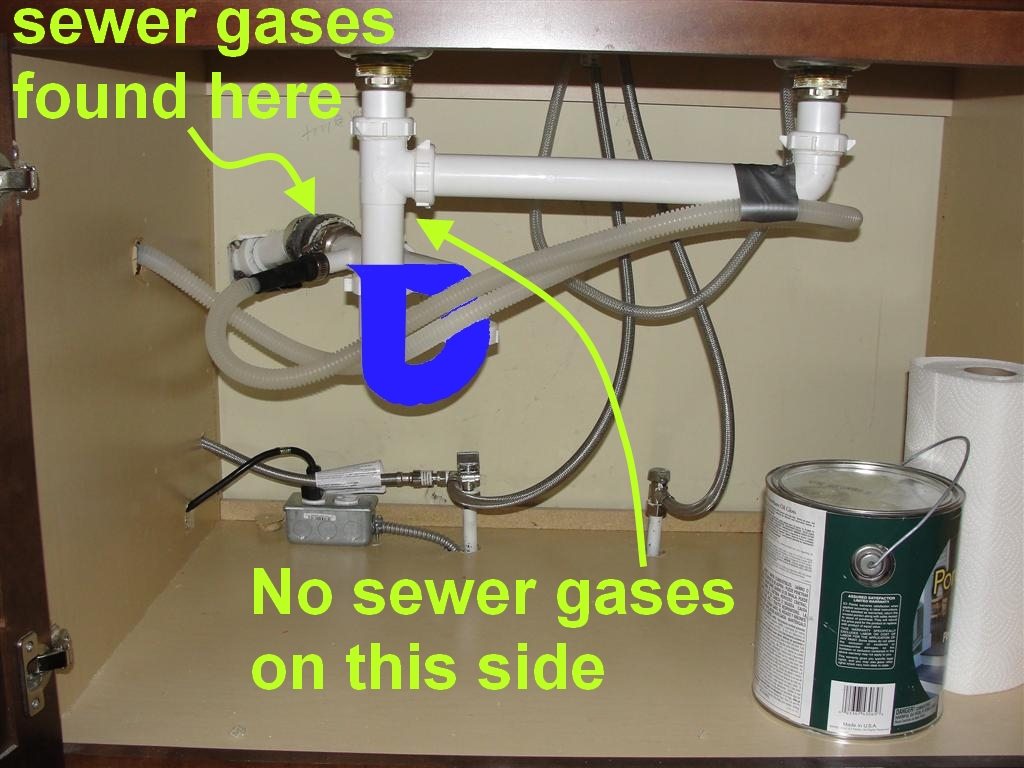
Bad Smells
- Clean the hose with a dishwasher-safe cleaner.
- Make sure the high loop or air gap is installed to block sewer gases.
- Replace old hoses if odors persist.
Hose Pops Off
- Use a better-quality clamp.
- Make sure the fitting is the right size—add an adapter if needed.
- Secure the hose so it can’t pull or twist.
Credit: owner.frigidaire.com
Comparing Different Drain Hose Setups
The way you run your drain hose can affect dishwasher performance, safety, and code compliance. Here’s a comparison to help you choose the best setup for your kitchen:
| Setup | Ease of Installation | Backflow Protection | Common Problems |
|---|---|---|---|
| High Loop Only | Easy | Good (not perfect) | Can sag over time, not always code compliant |
| Air Gap + High Loop | Moderate (more parts) | Excellent | Needs regular cleaning, more countertop clutter |
| Direct Disposal | Easy (if disposal present) | Fair to good (with high loop) | Clogs if plug not removed, possible odors |
Dishwasher Drain Hose Installation: Key Data
Here’s a summary of measurements and requirements for most US dishwashers:
| Specification | Typical Value | Why It Matters |
|---|---|---|
| Hose Length | 6–10 feet | Must reach drain, avoid tension or slack |
| Hose Diameter | 5/8” to 7/8” | Must fit drain/disposal inlet |
| High Loop Height | Minimum 32” above floor | Prevents backflow |
| Air Gap Height | Above sink rim | Code requirement in some areas |
| Clamp Type | Stainless steel screw | Prevents leaks, corrosion-resistant |
Safety And Code Compliance
Plumbing codes are there for your safety. While it’s tempting to skip steps to save time, following code is important for:
- Preventing water damage: Backflow can ruin your kitchen floors and cabinets.
- Blocking sewer gases: Proper installation keeps odors out of your kitchen.
- Passing home inspections: If you sell your home, poor plumbing can delay or kill a sale.
Always check your local building department or plumbing inspector for the latest rules. For more details on plumbing codes and dishwasher drain connections, see the International Plumbing Code.
When To Call A Professional
Most handy homeowners can run a dishwasher drain hose with basic tools. But call a licensed plumber if:
- Your kitchen has complicated or unusual plumbing.
- You need to cut metal pipes or install a new drain branch.
- Your city requires a permit or inspection.
- You see leaks you can’t fix or persistent drain issues.
A professional can ensure everything is up to code and trouble-free.
Maintenance Tips For Long-term Success
Once your drain hose is installed, a little maintenance will keep it working for years.
- Inspect the hose every 6–12 months for cracks, leaks, or wear.
- Clean the air gap (if present) every few months—remove the cap and flush debris.
- Keep the area under your sink dry to spot leaks early.
- Replace the hose every 5–7 years or if you see any damage.
- Check clamps and supports if you notice new noises or dishwasher problems.
Non-obvious Insights For Smooth Installations
Here are two things even experienced installers sometimes overlook:
- Leave extra hose length for future repairs: Don’t cut the hose too short—leave a gentle curve so you can pull out the dishwasher for maintenance without disconnecting everything.
- Secure the hose away from hot water lines: Heat from nearby pipes can make plastic hoses brittle over time, leading to leaks.
/dishwasher-drain-hose-connections-2718613-09-3f63c303030749e9985b75df021aeeb6.jpg)
Credit: www.thespruce.com
Frequently Asked Questions
What Is The High Loop Method, And Why Is It Important?
The high loop means routing your dishwasher drain hose as high as possible under the sink before connecting it to the drain or disposal. This helps prevent dirty water from flowing back into the dishwasher, reducing the risk of contamination and odors.
Do I Need An Air Gap For My Dishwasher Drain Hose?
An air gap is required by code in some areas, especially in California and other parts of the US. It offers the best protection against backflow. If your area doesn’t require one, a high loop is usually enough, but check your local regulations.
How Do I Know If My Drain Hose Is Clogged?
If your dishwasher isn’t draining properly, or you hear gurgling sounds, your hose may be clogged. Disconnect the hose and flush it with water. Check for food debris, kinks, or buildup, especially near the disposal or drain connection.
Can I Extend The Dishwasher Drain Hose?
Yes, you can extend the hose using a manufacturer-approved extension kit. Avoid using random tubing, as it may not fit tightly or handle the water pressure. Always secure connections with clamps and avoid extra-long runs, as they can cause poor drainage.
What Are Signs Of A Leak In My Drain Hose?
Look for water under your sink, dampness around the hose or connections, or musty smells. You might also notice your dishwasher isn’t draining completely. Inspect the hose regularly and replace it if you see cracks, bulges, or loose fittings.
Running a dishwasher drain hose is a simple project with big consequences if done wrong. By understanding your kitchen’s setup, following the right steps, and paying attention to details like the high loop and secure clamps, you can ensure your dishwasher drains safely and efficiently for years to come.
Take your time, follow these guidelines, and enjoy a trouble-free kitchen.