Adding ribbon to your kitchen cabinets is a clever way to refresh your kitchen without spending a lot of money. This simple DIY project allows you to bring in color, texture, and a personal touch to your cabinets. Whether you want a festive look for the holidays, a pop of color for everyday style, or a subtle accent to match your home décor, ribbons offer endless possibilities.
Many people think ribbons are just for gift wrapping or crafts, but when used thoughtfully, they can make your kitchen feel brighter, more inviting, and even a bit more luxurious.
You don’t need to be a designer or have special tools to get great results. However, the difference between a charming look and a messy one often comes down to a few small details most beginners overlook. This guide will walk you through every step—from choosing the right ribbon to attaching it cleanly, keeping it secure, and making your cabinets stand out.
You’ll also find plenty of practical tips, common mistakes to avoid, and fresh ideas for every season or style.
Why Add Ribbon To Kitchen Cabinets?
Ribbons are not just decorative; they have several practical and visual benefits:
- Instant Visual Change: Ribbon can transform plain cabinets with minimal effort.
- Budget-Friendly: A roll of ribbon is much cheaper than new paint, hardware, or remodeling.
- Temporary or Permanent: It’s easy to remove or change ribbons, so you can update your look for holidays or as your tastes change.
- Highlight Features: Ribbons can emphasize beautiful details or hide imperfections.
- Personal Expression: With endless colors and patterns, ribbon lets you show your style in a way few other materials can.
Many people overlook how much small touches can influence the feel of a kitchen. Even interior designers sometimes use ribbon as a “secret weapon” to tie together a room’s color scheme or make cabinets look custom.
Choosing The Right Ribbon
Before you buy anything, think carefully about your goals and the type of ribbon that will work best. Not all ribbon is equal—material, width, texture, and color all matter.
Material
- Satin: Shiny, smooth, and elegant. Great for a classic or formal look, but can show fingerprints.
- Grosgrain: Ribbed texture, strong, and less slippery. It holds shape well and is easy to work with.
- Velvet: Soft and plush; adds luxury but can attract dust or stains.
- Organza: Sheer and light; ideal for layering or a soft effect.
- Cotton or Burlap: Rustic, casual, or farmhouse styles.
Width
- Narrow (1/4” to 1/2”): Subtle, best for outlining or small accents.
- Medium (3/4” to 1.5”): Most versatile for borders or bows.
- Wide (2”+): Bold statements, big bows, or covering large areas.
Color And Pattern
- Match or contrast with cabinet and wall colors.
- Seasonal ribbons (red for holidays, pastels for spring) are popular.
- Patterns like stripes, polka dots, or florals can add playful or elegant touches.
Durability
Kitchens are busy spaces. Pick ribbons that can handle moisture, splashes, and frequent cleaning. Polyester ribbons are usually more durable than natural fibers.
How Much Ribbon To Buy
Measure your cabinets before buying. For example, if you want to wrap ribbon around the edge of 10 cabinet doors (each 18” tall), you’ll need at least 15 feet (180”) plus extra for bows or mistakes. Always buy at least 10-20% more than you think you need.
Credit: teacherbakermaker.com
Prepping Your Cabinets
Clean cabinets are essential for good adhesion and a neat look. Even a little grease or dust will make ribbons fall off or look wrinkled.
- Remove Surface Dirt: Wipe doors and handles with a gentle cleaner and a soft cloth. Avoid harsh chemicals.
- Dry Completely: Adhesives won’t stick to damp surfaces.
- Remove Hardware (Optional): For a very clean look, take off knobs or pulls before attaching ribbon. This also makes measuring and wrapping easier.
- Check for Damage: Fill any chips or scratches if you want a perfect finish.
Here’s a simple comparison of cleaning methods:
| Method | Pros | Cons |
|---|---|---|
| Soap & Water | Gentle, safe for most surfaces | May leave streaks if not dried well |
| Vinegar Solution | Removes grease naturally | Strong smell, avoid on natural wood |
| Commercial Cleaner | Fast and powerful | Test first—can damage finish |
Basic Methods For Attaching Ribbon
There are many ways to add ribbon to kitchen cabinets. Your choice will depend on your desired look, the ribbon type, and how permanent you want the change to be.
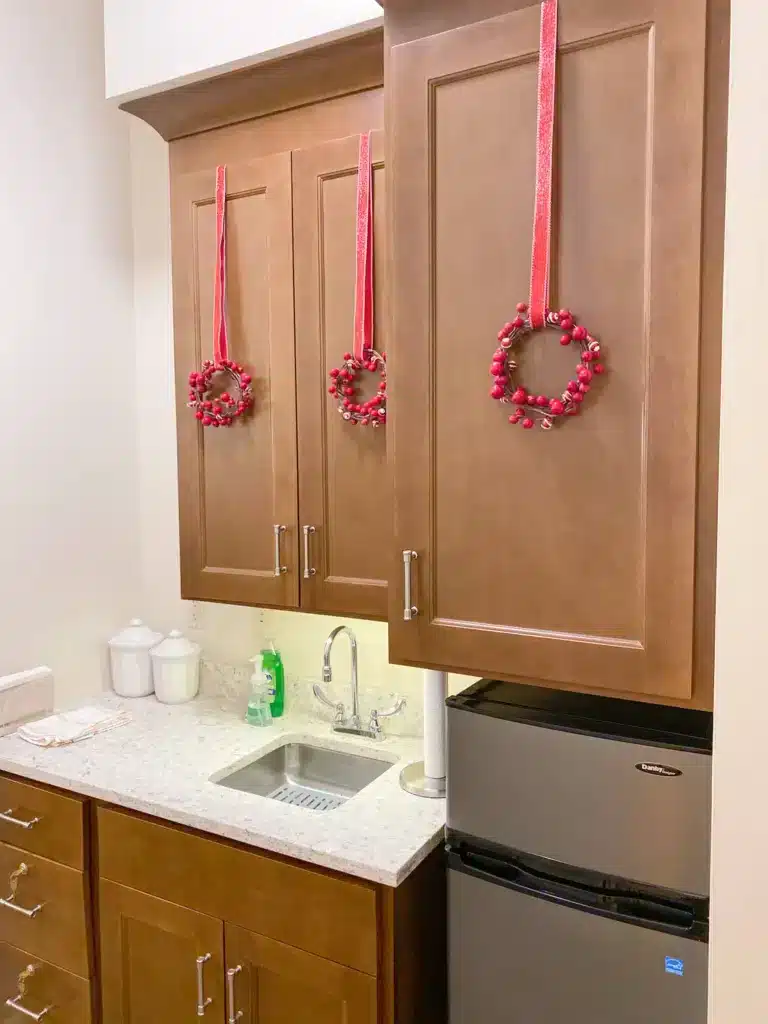
1. Hanging Ribbon Vertically
This is the most popular style, especially for holidays. You simply hang a ribbon from the top of the cabinet door, sometimes with an ornament or bow at the center.
Steps:
- Cut a length of ribbon at least 4 inches longer than the door height.
- Attach the top of the ribbon to the back of the cabinet with a small piece of tape or a removable adhesive hook.
- Let the ribbon hang down the front, centering it.
- For extra effect, add a bow or decoration at the center.
Tip: For double doors, mirror the ribbons on each side for a balanced look.
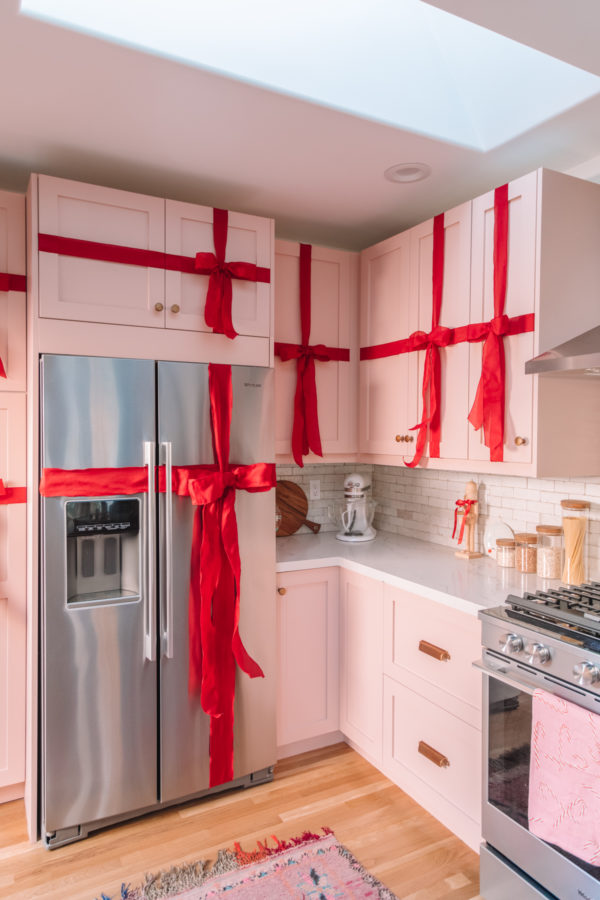
2. Wrapping Ribbon Around The Door
This method creates a “gift-wrapped” look.
Steps:
- Cut enough ribbon to go around the cabinet door both vertically and horizontally, plus extra for knots or bows.
- Wrap the ribbon tightly and secure it at the back with double-sided tape or a removable adhesive.
- Add a bow or embellishment where the ribbons cross, usually at the center.
Non-obvious Insight: If your cabinets open often, wrap only the door (not the entire cabinet box) so the ribbon doesn’t interfere with function.
3. Adding Ribbon Borders
If you want a more permanent accent, add ribbon just around the edge of each door or drawer.
Steps:
- Cut strips of ribbon to fit the length of each edge.
- Use double-sided tape or fabric glue (if you want a long-lasting effect) to attach the ribbon.
- Press firmly and smooth out any wrinkles as you go.
Common Mistake to Avoid: Overstretching the ribbon can cause puckering when the adhesive dries.
4. Creating Ribbon Bows
Bows add a festive or decorative touch.
Steps:
- Make a simple bow by forming two loops and tying them together, or buy pre-made bows.
- Attach with a dab of hot glue, a glue dot, or a twist tie hidden behind the bow.
- Place bows at the top, center, or handles of your cabinets.
Practical Tip: Avoid large, floppy bows on doors you use often—they can get caught or dirty easily.
Tools And Supplies You’ll Need
Gather your tools before you start for a smoother process:
- Ribbon (type and amount per your plan)
- Scissors (sharp for clean cuts)
- Measuring tape or ruler
- Double-sided tape, removable adhesive, or glue dots
- Hot glue gun (for permanent bows or heavy ribbons)
- Clothespins or binder clips (to hold ribbon while glue sets)
- Pencil (for marking positions)
- Step stool (if you have tall cabinets)
Pro Tip: Use a lighter or clear nail polish to seal the cut ends of synthetic ribbon. This prevents fraying and keeps your project looking neat.
Step-by-step Guide: Putting Ribbon On Kitchen Cabinets
Here’s a practical walkthrough for the most popular method—vertical hanging with a bow.
Step 1: Plan Your Design
Sketch your cabinet layout and decide where each ribbon will go. Do you want a single ribbon per door, or two? Will you add bows, ornaments, or just the ribbon?
Step 2: Measure And Cut Ribbon
Measure the height (and width, if wrapping) of each cabinet door. Cut all your ribbons at once to ensure consistency. Add 2-4 extra inches per piece for securing the ends or tying bows.
Step 3: Prepare The Ribbon Ends
To stop fraying, quickly pass the cut ends near a flame or apply a drop of clear nail polish. Allow to dry before attaching.
Step 4: Attach The Ribbon
If using tape:
- Place a small piece of double-sided tape on the back top edge of the door.
- Press the ribbon firmly onto the tape.
- Let the rest hang down the front.
If using hooks:
- Stick a removable adhesive hook to the inside top edge.
- Make a small loop at the end of the ribbon and hang it on the hook.
Step 5: Center And Straighten
Check that the ribbon is centered and straight. Adjust as needed before attaching the bottom or adding decorations.
Step 6: Add Bows Or Ornaments
Tie a bow at the desired height or attach a lightweight ornament with another piece of ribbon or a glue dot. Make sure these are secure but easy to remove if you want to change them seasonally.
Step 7: Secure The Bottom (optional)
For a very clean look, tape the bottom edge of the ribbon to the back of the door. This keeps the ribbon taut and prevents curling.
Extra Insight: If your cabinets get a lot of sunlight, use UV-resistant ribbon or tape. Some colors can fade quickly in direct light.
Credit: studiodiy.com
Advanced Ribbon Ideas For Kitchen Cabinets
If you want to go beyond simple vertical ribbons, try these creative options:
Layered Ribbons
Use two or more ribbons of different widths or textures layered together. For example, a narrow gold ribbon over a wider red ribbon can look especially festive or elegant.
Crisscross Patterns
Arrange ribbons in an X or diamond pattern on the door front. Secure where they cross using a small dab of glue or a decorative brad.
Seasonal Themes
- Spring: Pastels, florals, and light textures.
- Summer: Bright colors, fruit or lemon prints.
- Fall: Plaids, oranges, burlaps, or leaf prints.
- Winter/Holidays: Reds, greens, metallics, snowflakes, or velvet.
Monogram Or Letter Embellishments
Personalize your cabinets by attaching a ribbon with your family’s initials or a short word (like “Eat” or “Joy”) made from lightweight wood or cardboard.
Ribbon Tassels
Tie small tassels at the end of each ribbon for a playful touch. These can be bought or made from extra ribbon.
Keeping Ribbon Clean And Secure
Kitchen ribbons can get dusty or greasy, especially near stoves or sinks. Here’s how to keep them looking good:
- Spot clean with a damp cloth if you notice stains.
- Change or wash ribbons every few months, or more often in busy kitchens.
- Avoid placing ribbons near heat sources (stovetops, ovens) to prevent damage or fire risk.
- Check adhesives regularly—reapply tape or glue if you see ribbons coming loose.
- Store extra ribbon in a cool, dry place for easy replacement.
Permanent Vs Temporary Attachment Methods
Sometimes you want a ribbon look that lasts for months, while other times you want a quick seasonal change. Here’s a comparison:
| Attachment | Durability | Best For | Removal |
|---|---|---|---|
| Double-sided tape | 1-3 months | Seasonal/temporary | Easy, no residue |
| Removable adhesive hooks | 3-12 months | Reusable, heavier ribbons | Very easy, reusable |
| Hot glue | 6-12+ months | Permanent, heavy use | May damage finish |
| Fabric glue | 6-12+ months | Flat ribbon borders | Can leave residue |
Non-obvious Insight: Test any adhesive on a small hidden spot first. Some tapes or glues can discolor wood or paint, especially on older cabinets.
Matching Ribbon To Cabinet Styles
Not every ribbon works with every cabinet. Here are ideas for different kitchen styles:
- Modern/Minimalist: Thin, solid-color ribbons in white, gray, or black. Simple horizontal or vertical lines.
- Traditional: Satin or velvet in deep colors like burgundy, navy, or forest green.
- Farmhouse: Burlap or gingham ribbon. Try adding small metal or wood embellishments.
- Vintage/Cottage: Floral prints, lace-trimmed ribbons, or pastel grosgrain.
- Eclectic: Mix patterns and colors. Combine stripes, dots, and solids for a playful look.
Tip: Match ribbon with other textiles in your kitchen, like towels or curtains, for a pulled-together feel.
Ribbon Safety In Kitchens
While ribbon is safe for most decorative uses, remember these safety tips:
- Keep ribbons away from open flames or hot appliances.
- Avoid ribbons that dangle near food prep areas.
- For homes with small children or pets, choose ribbons that are firmly attached and avoid long, hanging ends that could be pulled or chewed.
Removing Ribbon And Cleaning Up
When you’re ready to remove or change your ribbons, do so carefully:
- Peel tape or adhesives slowly to avoid damaging cabinet finish.
- Use a little rubbing alcohol on a soft cloth to remove sticky residue.
- If you used glue, gently scrape with a plastic tool or your fingernail—never use metal.
- Wipe cabinets with a damp cloth to remove dust before your next decorating round.

Credit: www.amazon.com
Inspiring Real-life Examples
People use ribbons on kitchen cabinets in many creative ways. Here are a few examples:
- Holiday Redo: One family uses wide red velvet ribbons every December, adding jingle bells at the center of each bow for sound and sparkle.
- Spring Refresh: A blogger chose pastel organza ribbons and small faux flower clips to bring spring inside.
- Permanent Accent: A designer glued navy grosgrain ribbon as a border around each white cabinet door, matching with navy bar stools for a cohesive look.
If you’re looking for more inspiration, the holiday decorating section on Martha Stewart offers beautiful, practical ideas.
Troubleshooting: When Things Go Wrong
Ribbon projects are usually simple, but sometimes problems happen. Here’s how to fix them:
- Ribbon won’t stick: Clean the surface again, try a stronger adhesive, or use a hook.
- Ribbon sags or curls: Secure both the top and bottom, or use a stiffer ribbon.
- Adhesive damages cabinet: Test new adhesives, use removable options, and never leave glue on for longer than needed.
- Ribbon frays: Seal ends with heat or nail polish immediately after cutting.
Sustainable And Eco-friendly Ribbon Choices
If you want to decorate responsibly:
- Choose ribbons made from recycled polyester or cotton.
- Save and reuse ribbons from gifts.
- Avoid glitter or plastic-coated ribbons—they’re harder to recycle.
- Store used ribbons for next year’s decorations.
Ribbon On Kitchen Cabinets: Ideas For Every Season
Here are some quick ideas for year-round style:
- Valentine’s Day: Pink or red satin ribbons with small heart charms.
- Easter: Pastel organza ribbons, tiny faux eggs.
- Summer BBQs: Red gingham ribbons, mini wooden utensils as ornaments.
- Halloween: Orange and black, add bat or pumpkin shapes.
- Thanksgiving: Earthy tones, wide burlap, faux leaves.
- Winter Holidays: Metallic gold or silver, velvet, snowflakes, small bells.
Mix and match these ideas to keep your kitchen feeling fresh all year.
Frequently Asked Questions
How Do I Make Ribbon Stay On Kitchen Cabinets Without Damaging The Finish?
Use removable adhesives like Command hooks or double-sided tape made for walls. Avoid strong glues, and always test on a hidden area first. For most projects, removable tape gives a secure hold and comes off cleanly.
What Type Of Ribbon Is Best For Kitchens?
Polyester grosgrain or satin is best—they’re durable, easy to wipe clean, and hold their shape. Avoid delicate ribbons like silk or velvet near sinks or stoves, as they can stain or wear out quickly.
Can I Put Ribbon On Cabinets With Raised Panels Or Unusual Shapes?
Yes, but choose flexible ribbons and attach them only to flat sections. For raised panels, use narrow ribbon to outline the inner edge, or place bows at the top corners.
How Do I Stop Ribbon From Fraying At The Ends?
Seal ends with a lighter or clear nail polish right after cutting. For cotton or burlap ribbons, fold the cut end under and secure with glue to hide rough edges.
Is It Safe To Use Ribbon In The Kitchen?
Yes, as long as you keep ribbons away from open flames, stovetops, and food prep areas. For homes with pets or small children, avoid long hanging ribbons or secure them tightly to prevent accidents.
Adding ribbon to your kitchen cabinets is a small project with a big impact. With careful planning, the right materials, and a few expert tips, you can create a fresh look that fits your style, budget, and the season. Whether you’re dressing up for a party or just want to make your kitchen feel more like home, ribbons are a flexible, fun way to get creative.
Try out a few ideas, experiment with colors and textures, and enjoy the transformation every time you walk into your kitchen.