Painting kitchen cabinets to look like real wood might sound like a big challenge, but with the right steps, you can transform even the most outdated cabinets into a stunning, wood-like centerpiece. Many homeowners wish for the warmth and beauty of natural wood cabinets, but solid wood can be expensive or not practical for every kitchen. Thankfully, with some planning, patience, and attention to detail, you can create a convincing wood grain finish that fools the eye and adds value to your space.
This guide will walk you through everything you need to know to achieve this look. Whether you want a light oak, a rich walnut, or a classic cherry style, you’ll learn every step—from preparation to finishing touches. You’ll also discover tips from real-life projects, expert advice, and non-obvious tricks that even experienced DIYers sometimes miss.
By the end, you’ll be ready to tackle your own kitchen cabinets with confidence.
Understanding The Faux Wood Finish
Before picking up a brush, it’s important to know what a faux wood finish really is. Faux wood painting is a technique where you use paint and glaze to mimic the grain, texture, and color of real wood. It’s not just about using brown paint—you layer colors and use special tools to create the lines and patterns you see in natural wood.
There are several reasons this method is popular:
- It’s less expensive than buying solid wood cabinets.
- You can customize the look to match any wood type.
- It’s a sustainable choice, as you reuse existing cabinets.
But the most important thing to realize: prep and patience matter more than artistic skill. Anyone can learn this technique, but rushing or skipping steps will always show in the final result.
What You’ll Need: Tools And Materials
Gathering the right materials is the first step toward success. Here’s a breakdown of what you’ll need for painting kitchen cabinets to look like wood:
- Screwdriver (for removing doors and hardware)
- Cleaner/Degreaser (like TSP or Krud Kutter)
- Sandpaper (120 and 220 grit)
- Tack cloth or microfiber cloth
- Primer (bonding, stain-blocking type)
- Base coat paint (flat or satin, in a wood undertone color)
- Wood grain tool (often called a graining rocker)
- Glaze (water-based or oil-based, tinted in your wood color)
- Fine artist’s brushes (for detail)
- Foam rollers and brushes
- Painter’s tape
- Drop cloths
- Plastic sheeting (to protect counters/floors)
- Topcoat (polycrylic or polyurethane, non-yellowing)
You might also use:
- Wood filler (for repairing dings and holes)
- Putty knife
- Paint tray
A common mistake is buying only the paint and glaze. The prep tools—cleaner, sandpaper, primer—are what make the finish last and look like real wood.
Credit: www.lilyardor.com
Choosing Colors For A Realistic Wood Effect
Color choice is one of the most important parts of this project. Real wood isn’t just brown—it has undertones, highlights, and depth. Here’s how to pick the right shades:
- Base Coat: Choose a color that matches the undertone of your desired wood. For oak, go with a light tan or golden beige. For walnut, try a chocolate brown. For cherry, pick a warm reddish-brown.
- Glaze: This is your “wood grain” color. It should be a few shades darker than the base. You can mix glaze with paint to get the exact tone you want.
- Highlights: Some people add a lighter glaze for extra dimension, especially with woods like oak.
Here’s a quick reference for common wood looks:
| Wood Type | Base Coat Color | Glaze Color | Highlights |
|---|---|---|---|
| Oak | Beige/Golden Tan | Medium Brown | Light Cream |
| Walnut | Chocolate Brown | Deep Espresso | Light Tan |
| Cherry | Warm Reddish Brown | Dark Red-Brown | Soft Gold |
| Driftwood | Gray-Beige | Gray-Brown | White Wash |
Non-obvious tip: Always test your colors on a sample board before starting on your cabinets. Lighting changes how paint looks, and kitchen lights often add a yellow or blue tint.
Preparing Your Kitchen Cabinets
Preparation is the foundation of a professional-looking finish. Skipping prep leads to peeling paint, rough texture, or an obvious “fake” look.
1. Remove All Hardware And Doors
Take off every handle, knob, hinge, and door. Label each door and its location with painter’s tape (e. g. , “Top Left 1”) so you can put them back in the correct spot. Lay doors flat on a work surface.
2. Clean Thoroughly
Kitchens are full of grease. Use a strong degreaser and scrub all surfaces. If you skip this, paint will not stick properly.
3. Repair And Sand
Fill dents and holes with wood filler. Let dry, then sand everything with 120-grit sandpaper to dull the old finish. Follow with 220-grit for smoothness.
4. Remove Dust
Wipe down every surface with a tack cloth or damp microfiber cloth. Even a little dust can ruin the wood grain effect.
5. Protect Surfaces
Cover counters, floors, and walls with plastic sheeting and painter’s tape. Paint splatters are much easier to prevent than to clean up.
Beginner mistake: Not sanding enough. A glossy finish resists paint and makes it obvious the cabinets are not real wood.
Priming: The Secret To Lasting Results
Priming is not just another step—it’s essential for adhesion and for a smooth, even grain pattern.
- Use a bonding primer that’s made for slick surfaces.
- Apply with a foam roller for a smooth finish, and use a brush for corners.
- Let the primer dry fully (check the can for drying time).
- Sand lightly with 220-grit sandpaper between coats if needed.
Pro tip: Two thin coats of primer are better than one thick coat. Thin coats dry harder and smoother, which will make your wood grain look more realistic.
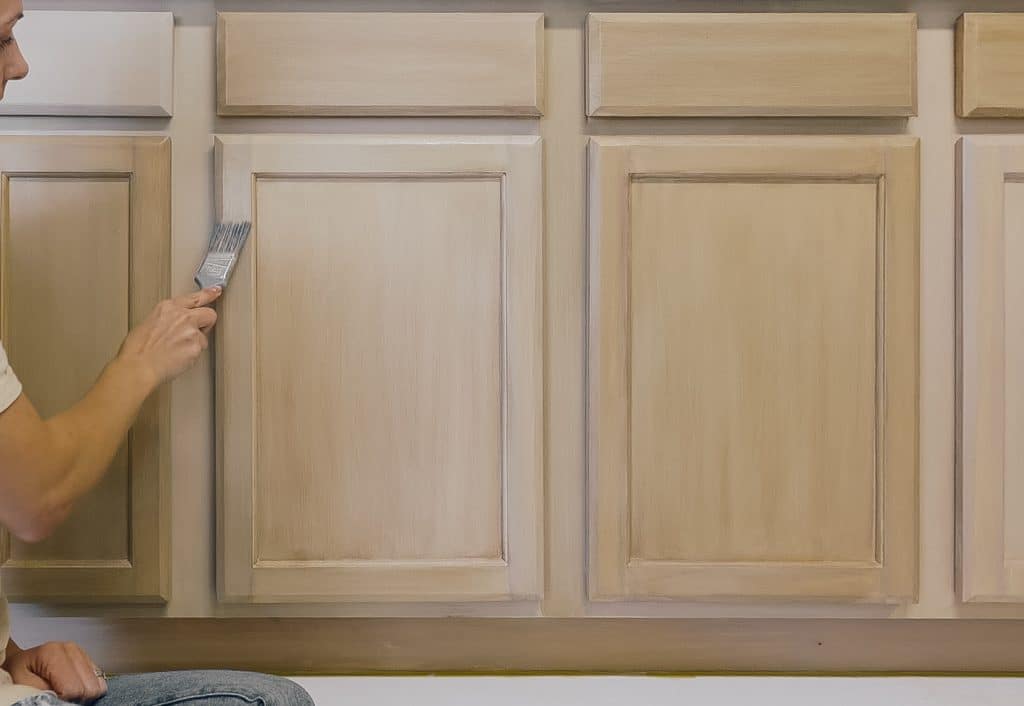
Painting The Base Coat
Your base coat sets the tone for the wood effect. Here’s how to get it right:
- Use a high-quality paint in a flat or satin finish. Glossy paint can make the grain look fake.
- Apply with a foam roller for flat areas and a brush for details.
- Work in thin, even coats. Let each coat dry fully before adding another.
- Two coats are usually enough for full coverage.
Let the paint cure overnight before moving to the next step. Rushing can cause smudges or peeling.
Expert insight: The direction you roll or brush matters. For the most realistic look, brush in the direction you want the “wood grain” to run.

Credit: thebeautyrevival.com
Creating The Wood Grain Effect
Here comes the fun—and most important—part. The wood grain tool is what transforms paint into a wood look.
1. Mix Your Glaze
Combine your glaze with the darker paint color you chose. The ratio depends on how transparent you want the grain to be. More glaze = more transparent.
2. Apply The Glaze
Work on one cabinet door at a time. Brush a thin, even layer of glaze over the surface.
3. Use The Wood Grain Tool
While the glaze is wet, drag the wood grain tool through the glaze in long, straight or slightly curved strokes. Rock the tool back and forth to create knots and variations.
Non-obvious trick: Don’t try to make every door identical. Real wood varies, so slight differences will look more natural.
4. Blend And Refine
Use a clean, dry brush or soft rag to soften any harsh lines. If you make a mistake, wipe off the glaze and start over—it’s very forgiving.
5. Let Dry
Allow the glaze to dry completely. This might take several hours or overnight.
Pro tip: Vertical strokes for door frames, horizontal for drawer fronts—match the direction real wood would run.
Adding Depth With Highlights And Shadows
For a truly realistic wood look, you may want to add extra highlights or shadows.
- To highlight, use a lighter glaze and a fine brush to add streaks along the “grain.”
- To deepen shadows, use a small amount of darker glaze in corners or knots.
- Blend gently with a soft brush so the effect is subtle.
This step is optional but makes a big difference for a high-end finish.
Sealing And Protecting Your Cabinets
Once you’re happy with the wood grain effect, protect your work with a durable topcoat.
- Use a clear polycrylic or non-yellowing polyurethane (choose water-based for lighter colors).
- Apply with a clean brush or foam roller.
- Two to three thin coats are best.
- Lightly sand between coats with 220-grit sandpaper for a smooth finish.
Wait at least 24 hours before reattaching doors and hardware. The finish will keep hardening for several days.
Real-world insight: Many DIYers skip the topcoat, but kitchen cabinets see a lot of moisture and handling. A good sealer prevents chips and stains.
Reassembling And Enjoying Your New Cabinets
Carefully reinstall doors, drawers, and hardware. Clean up your work area. Stand back and admire your new “wood” cabinets!
Most people are amazed by how real they look—especially with the depth and color variation you created.
Common Mistakes And How To Avoid Them
- Skipping sanding and cleaning: Paint won’t stick well, and the grain will look bumpy or uneven.
- Using the wrong paint or primer: Low-quality products chip and peel quickly.
- Rushing drying times: This leads to smudges, fingerprints, or peeling.
- Trying to make the grain “perfect”: Real wood has knots, lines, and variation—embrace the imperfections.
- Not sealing the finish: Unprotected paint is easily damaged by water, grease, or scrubbing.
Sample Timeline For A Standard Kitchen
Here’s a practical example for a typical kitchen with 20 cabinet doors and 6 drawers:
| Step | Time Needed | Notes |
|---|---|---|
| Remove & Label Doors | 1-2 hours | Keep hardware organized |
| Clean & Prep | 2-3 hours | Don’t rush degreasing |
| Sand & Prime | 3-4 hours + drying | Let primer dry fully |
| Base Coats | 3-4 hours + overnight cure | 2 coats minimum |
| Wood Grain Glaze | 4-6 hours | Work door by door |
| Highlights/Details | 2 hours (optional) | For extra realism |
| Topcoat | 2-3 hours + drying | 2-3 coats recommended |
| Reassembly | 1-2 hours | Be careful with new finish |
Total project time: About 4–6 days, allowing for drying between steps.
Tips For Different Cabinet Materials
Not all cabinets are wood. Here’s how to adjust your approach:
Laminate Or Melamine Cabinets
These surfaces are very smooth and resist paint.
- Use a high-adhesion bonding primer.
- Sand lightly to dull the surface first.
- Faux wood finishes can still look great, but test on a hidden area first.
Painted Or Previously Faux-finished Cabinets
- Remove any peeling or chipping old paint.
- Sand smooth and prime with stain-blocking primer.
- The wood grain effect may need extra coats to cover old colors.
Non-obvious insight: If you have a strong wood grain texture already on the cabinet (from oak, for example), you can let this texture show through your paint for added realism.
Maintenance And Durability Of Faux Wood Cabinets
A faux wood finish is durable when done right, but it’s not indestructible. Here’s how to keep your cabinets looking fresh:
- Wipe up spills quickly to prevent water damage.
- Clean with a gentle, non-abrasive cleaner.
- Avoid scrubbing with harsh pads or chemicals.
- Touch up chips with matching paint and glaze as needed.
- Reapply topcoat every few years in high-traffic kitchens.
With proper care, your painted cabinets can last 5–10 years or more.
When To Consider A Professional
This project is very DIY-friendly, but there are times when calling a pro makes sense:
- If you have a very large kitchen or complicated door shapes.
- If you want a specialty wood look, like burled walnut or zebrawood.
- If your cabinets are damaged and need structural repair.
Professional painters have access to industrial spray tools and specialty glazes, but you can achieve 90% of their look with the methods above.
Eco-friendly And Budget Benefits
Painting kitchen cabinets to look like wood is not just about beauty—it’s also eco-friendly and budget smart. You save money by keeping your existing cabinets out of the landfill. Plus, you avoid the environmental impact of new wood production.
Interesting fact: A full kitchen cabinet replacement can cost $10,000–$20,000. Faux wood painting, even with quality materials, usually costs $200–$500 for a standard kitchen.

Credit: retique.com
Inspiring Real-life Examples
Homeowners across the US have used this method to stunning effect. For example, Sarah from Ohio transformed her old white laminate cabinets into a rich “walnut” style for under $300. She says, “Guests always ask what kind of wood we installed—they can’t believe it’s paint.
”
Another popular example comes from DIY forums, where users share photos of their “before and after” kitchens. The most convincing results always come from those who spend extra time on prep and use multiple glaze layers for depth.
For more visual inspiration and professional advice, check out the guides at Better Homes & Gardens.
Frequently Asked Questions
Can I Paint Over Laminate Cabinets To Make Them Look Like Wood?
Yes, you can. The key is to use a high-adhesion bonding primer and sand the surface well. Test your paint and glaze on a small area first to ensure good results.
How Long Does The Wood Grain Painting Process Take?
The full process usually takes 4–6 days for a standard kitchen, allowing for drying times between steps. Rushing can ruin the effect, so plan for extra time if your kitchen is large or humid.
What Is The Best Way To Clean Faux Wood Painted Cabinets?
Use a gentle, non-abrasive cleaner and a soft cloth. Avoid harsh chemicals or scrubbing pads. Wipe spills quickly to protect the finish.
Will The Painted Finish Chip Or Peel?
If you prep, prime, and seal properly, the finish is very durable. However, heavy impacts or sharp objects can cause chips. Keep extra paint and glaze on hand for touch-ups.
Can I Change The Color Or Wood Style Later?
Yes, you can repaint and re-glaze your cabinets in a different wood tone if you change your mind. Just clean, sand, and prime the surface before starting a new finish.
Painting your kitchen cabinets to look like wood is a project that transforms your entire kitchen for a fraction of the cost of new cabinets. With patience, attention to detail, and the right materials, anyone can achieve a beautiful, convincing wood finish.
Whether you want a cozy country kitchen or a modern walnut look, these steps will help you get there—no carpentry required.