Painting unfinished kitchen cabinets is one of the most rewarding DIY projects you can tackle at home. If you want to transform your kitchen without spending thousands on a full renovation, learning how to paint unfinished cabinets is a smart move.
With the right tools and a clear plan, you can achieve a professional look and increase your home’s value. This guide will walk you step by step through the process, sharing practical tips and little-known advice along the way. By the end, you’ll feel confident about tackling your cabinets—even if you have no previous painting experience.
Why Paint Unfinished Kitchen Cabinets?
Unfinished kitchen cabinets are popular for several reasons. They are less expensive than pre-finished cabinets and give you the freedom to choose your own style and color. Painting them allows you to match your kitchen decor exactly and even use eco-friendly paints.
The process is not just about looks—it also protects the wood, making your cabinets last longer.
A big benefit is flexibility. You’re not stuck with factory colors or finishes, and you can experiment with trendy shades or timeless whites. This is especially useful if you plan to sell your house, as updated cabinets in a neutral color appeal to most buyers.
Even better, you can repaint them again in the future if your taste or kitchen style changes.
Many homeowners worry that painting is too difficult or time-consuming. In reality, with a bit of patience and the right method, anyone can do it. You don’t need special skills—just attention to detail, good preparation, and the willingness to follow each step carefully.
One thing people rarely mention: painting your own cabinets gives you a sense of pride every time you walk into your kitchen. You’ll know you made a real, visible improvement to your home.
Tools And Materials You’ll Need
Before you start, gather all the tools and materials. This will save time and avoid frustration later. For best results, quality tools are important. Here’s a list to get you started:
- Sandpaper (120, 180, and 220 grit)
- Sanding block or electric sander
- Vacuum and tack cloths
- Mild detergent and sponge
- Painter’s tape
- Drop cloths or plastic sheeting
- Paintbrushes (angled and straight)
- Foam rollers (for smooth finishes)
- Primer (stain-blocking if possible)
- Cabinet paint (high-quality acrylic or alkyd)
- Paint tray
- Stir sticks
- Screwdriver (to remove hardware)
- New cabinet hardware (optional)
You may also want a small container for screws, a pencil for marking, and a flashlight to spot missed areas. For those with sensitive skin, disposable gloves are helpful when cleaning and sanding.
Practical Tips
- Use synthetic brushes for water-based paints; natural bristles for oil-based paints.
- Buy extra sandpaper—you’ll need more than you think.
- A foam roller helps avoid brush marks.
- A headlamp or strong work light will help you see drips or missed spots, especially in corners or on the insides of doors.
Many beginners forget about the small extras—like painter’s pyramids for propping up doors, or a plastic wrap to keep brushes fresh between coats. These small investments make the process smoother and less stressful.
Safety And Preparation
Painting is messy. Protecting your workspace and yourself is key. Move everything you can out of the kitchen. Cover floors and counters. Open windows for fresh air, and wear a mask if you’re sensitive to dust or paint fumes.
It’s smart to keep pets and children out of the work area. Paint and sanding dust aren’t safe for them, and a busy kitchen can lead to mistakes. If you can, set up a “painting station” in a garage or extra room where doors can dry without being disturbed.
Remove Cabinet Doors And Hardware
Don’t try to paint cabinets while they’re still on the hinges. Remove all doors, drawers, and hardware (knobs, handles, hinges). Label each door and its hardware with a piece of tape so you know where everything goes later. Place screws and small parts in bags.
Taking time to label each part prevents headaches when reinstalling. Write a number or letter on masking tape and stick it on the top edge of each door (where it won’t show). Do the same for drawer fronts. For even easier reassembly, snap a quick photo of each cabinet before you start.
Clean Surfaces Thoroughly
Even unfinished wood gathers dust, grease, or fingerprints during storage and installation. Mix a small amount of mild detergent in warm water and wipe every surface. Rinse with clean water and let the wood dry completely.
Don’t skip this step—even tiny bits of dirt or oil will affect how paint sticks. Pay special attention to areas near the stove or sink, where grease is more likely. For stubborn spots, a little white vinegar can help, but rinse well.
Fill Gaps And Holes
Look for dents, nail holes, or cracks. Use wood filler to fill these areas. Once dry, sand smooth with 180-grit sandpaper. This step is easy to overlook but makes a huge difference in the final look.
Deep cracks may need more than one filling. If you see seams between panels, fill them for a seamless finish. Use your fingertip or a small putty knife to apply filler, and don’t forget to check the edges and corners.
Sanding: The Foundation Of A Smooth Finish
Sanding prepares the wood to accept primer and paint. Skipping or rushing this step leads to poor results. Start with 120-grit sandpaper. Go with the grain, not across it. For edges and detailed areas, use a sanding sponge or block.
After the first pass, move to 180-grit, then finish with 220-grit for a silky-smooth surface. Wipe all dust off with a vacuum and tack cloth. Any dust left on the surface will show up in your paint.
If your cabinets have raised panels or grooves, fold your sandpaper to fit into corners. Take your time—smooth wood now means a smooth finish later.
Key Insight
Many beginners sand only once. For the best finish, sand three times, using finer grit each time. It takes longer but gives a true professional look.
It’s tempting to skip the final sanding, but this is when you’ll notice rough spots or fibers standing up. Spending a few more minutes here makes painting much easier and prevents the “rough to the touch” feeling that ruins many DIY jobs.
Priming: Why It’s Essential
Primer seals the wood and helps paint stick. It also blocks stains and prevents tannins in the wood from bleeding through. For kitchen cabinets, use a stain-blocking primer—oil-based is best, but water-based works if you prefer low odor.
Apply primer with a brush in corners and a foam roller on flat areas. Let the primer dry fully (check the label for drying times). After the first coat, lightly sand with 220-grit sandpaper. Wipe away dust before applying a second coat if needed.
If you see any wood showing through after the first coat, a second coat of primer will help. This is especially important for knotty woods like pine, which can bleed sap for months. Don’t panic if the first coat looks uneven—primer often does.
The important thing is full, even coverage by the end.
Real-world Example
If your cabinets are made from oak, tannins can bleed through paint. Skipping primer almost always leads to yellow stains later.
Oak is also known for its grain. Some people like this texture, while others want a glass-smooth finish. If you want to hide the grain, fill it with a special grain filler before priming, or apply multiple coats of primer with sanding between each.
Choosing The Right Paint
Not all paints are created equal. For kitchen cabinets, durability matters. Look for acrylic enamel or alkyd paint. These paints are tough, washable, and resist chipping. Avoid basic latex wall paint—it won’t last on cabinets.
You can choose between a satin, semi-gloss, or gloss finish. Semi-gloss is the most popular because it’s easy to clean and reflects light nicely.
When choosing a color, remember that lighter shades make kitchens look bigger and cleaner, but darker colors can add drama and hide stains. Test your paint on a small board and let it dry completely—you may find the dry color looks different from what you expected.
Paint Comparison Table
Here’s a look at the main types of paint you might consider:
| Paint Type | Durability | Sheen | Drying Time | Best For |
|---|---|---|---|---|
| Acrylic Enamel | High | Satin/Semi-gloss | 4–6 hours | Kitchen cabinets |
| Alkyd | Very High | Semi-gloss/Gloss | 8–12 hours | Heavy-use kitchens |
| Latex | Medium | Any | 1–2 hours | Walls, not cabinets |
Painting: Step-by-step Process
Now comes the most exciting part. Painting cabinets is not difficult, but it does require patience. Rushing leads to drips, brush marks, and uneven coverage. Here’s how to do it right:
1. Set Up Your Work Area
Work on a flat, dust-free surface. Lay out cabinet doors on a drop cloth. Prop them up on painter’s pyramids or small blocks to keep them off the ground and make painting edges easier.
If you don’t have painter’s pyramids, use clean soup cans or small cups. Make sure you have enough space for all your doors to dry flat without touching each other. Good lighting and airflow help paint dry evenly and make it easier to spot mistakes.
2. Stir Your Paint
Paint settles in the can. Stir it thoroughly each time you pour some out. If using more than one can, mix them together for a consistent color.
If you take a break, cover the paint tray with plastic wrap. This keeps the paint from drying out and prevents dust or hair from getting in. Always check for lumps or dried bits before dipping your brush.
3. Apply The First Coat
Use a brush for corners and details. Roll flat surfaces with a foam roller. Apply paint in thin, even coats. Don’t overload your brush or roller.
Start with the back of the doors first—this way, if you get smudges or marks, they’ll be hidden when the doors are hung. Let the back dry completely, then flip and paint the front.
4. Let It Dry
Follow the manufacturer’s instructions. Most paints need at least 4–6 hours to dry between coats. Rushing this step is a common mistake.
If you’re painting in a humid area, drying may take longer. Use a fan or dehumidifier to help speed up the process, but avoid direct heat (like a hair dryer), which can cause cracking.
5. Lightly Sand Between Coats
Once the first coat is dry, sand lightly with 220-grit sandpaper. This removes any dust or brush marks and helps the next coat stick. Wipe clean before painting again.
This is a step often skipped by impatient painters—but it makes a huge difference in how smooth and professional your cabinets look. Sand gently, just enough to dull the shine.
6. Apply The Second (and Third) Coat
Repeat the same process. Most cabinets need two coats, but some colors or woods may require a third. Thin coats are better than thick ones.
If you’re covering a dark wood or bold primer, you might need a third coat. Check the surface in daylight for any streaks or thin spots before deciding you’re done.
7. Paint The Cabinet Boxes
While doors dry, paint the cabinet frames and boxes in place. Use painter’s tape to protect walls and counters.
Work from top to bottom and inside out. Start with the inside edges and move outward. This helps catch any drips before they dry.
8. Final Inspection
Check for missed spots, drips, or rough areas. Touch up as needed. Let everything cure fully before reassembly (see next section).
Use a flashlight to scan for small flaws, especially in corners or grooves. Small touch-ups now are much easier than fixing chips or scratches later.
Drying And Curing: Don’t Rush This Step
Paint feels dry to the touch after a few hours, but it isn’t fully cured. Curing is when paint hardens completely, making it tough and washable. Most cabinet paints need 7–14 days to cure fully. Don’t hang doors or install hardware until the paint is hard.
If you’re in a hurry, at least wait 2–3 days before light use.
During this time, avoid stacking doors or leaning anything against the painted surface. Even fingerprints can leave marks before paint is fully cured. If you must reassemble sooner, use soft gloves and handle everything gently.
Common Mistake
Many people hang cabinet doors too soon. This can cause paint to stick, peel, or dent. Patience here pays off for years to come.
This is one of the most common reasons DIY cabinet projects fail. If you see doors sticking or paint peeling when you open them, it’s a sign you rushed.
Credit: buildersupplyoutlet.com
Reassembling Your Cabinets
Once cured, reattach all doors and hardware. Use your labels to match each door to its original spot. If you want a fresh look, now is a great time to upgrade handles and knobs.
Check that doors open and close smoothly. Adjust hinges if needed. Clean up your work area and stand back to admire your new kitchen.
Take your time installing hardware. Tighten screws gently so you don’t chip the new paint. If you notice sticky spots, leave the doors open for another day or two to finish curing.
Cost Comparison: Diy Vs. Hiring A Pro
Painting cabinets yourself saves a lot of money, but how much? Here’s a simple cost comparison:
| Method | Average Cost | Time Required | Quality Control |
|---|---|---|---|
| DIY Painting | $150 – $300 (for tools and paint) | 2–4 days | High (if careful) |
| Professional Painter | $1,200 – $7,000 | 1–2 days | Very high |
If you have the time and patience, DIY is a smart way to upgrade your kitchen without breaking the bank.
Keep in mind, hiring a pro is faster and less stressful, but you’ll lose the satisfaction of a true DIY project. Also, some professionals use spray booths for a glassy finish, but you can get very close with careful rolling and brushing.

Credit: www.youtube.com
Troubleshooting Common Problems
Even with careful work, issues can happen. Here’s how to handle some of the most common problems:
Drips And Runs
These happen when too much paint is applied. While the paint is still wet, use your brush to smooth out drips. If dry, sand smooth and repaint.
If you spot a drip after it’s dry, don’t panic. Let it harden, sand it flat, and touch up just that area. It’s better to fix small mistakes now than to ignore them.
Brush Marks
Use a foam roller on flat areas to reduce marks. Sand lightly between coats.
If you still see brush marks after the final coat, try gently buffing with a brown paper bag once dry. It’s a little-known trick that smooths out minor imperfections.
Paint Peeling
This is usually from poor prep. Always clean, sand, and prime well.
If you see peeling, scrape away the loose paint, sand the area, and touch up with primer and paint.
Uneven Color
Mix your paint cans together before starting. Apply enough coats to cover the wood.
If you notice uneven color after everything dries, don’t be afraid to add another thin coat. Patience wins over frustration.
Advanced Tips For A Professional Finish
- Use a paint sprayer if you want a flawless, factory-like finish. This requires practice and good masking but gives amazing results.
- Tint your primer to match your paint color. This helps with coverage, especially for bold colors.
- Add a clear topcoat for extra durability. This is a must for high-use kitchens or if you have kids.
Another advanced trick: after your final coat of paint, let it dry for a day and then buff lightly with a very fine sanding sponge (320-grit or higher). This gives a silky, glass-like feel.
How Long Does It Last?
A well-painted cabinet can last 8–10 years before needing a touch-up. The secret is good prep, quality paint, and gentle cleaning. Avoid harsh chemicals and always wipe spills quickly.
Realistically, small chips or wear may happen near handles or at the base. Keep extra paint for quick touch-ups. With proper care, your cabinets will stay beautiful for years.
Eco-friendly And Health Considerations
If you’re sensitive to odors, choose low-VOC or no-VOC paints and primers. These products have less smell and are better for indoor air quality. Always ventilate your work area, and consider wearing gloves and a mask.
If you have allergies or asthma, look for “Green Seal” or “Greenguard” certified products. These are tested for indoor safety. Remember, even “safe” paints should be kept away from food and stored out of reach of children.

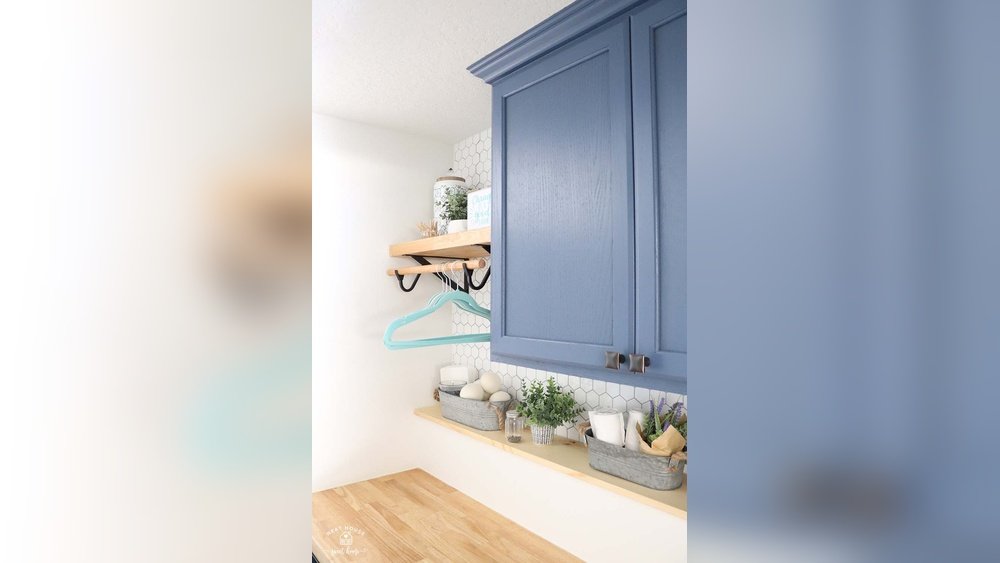
Credit: www.neathousesweethome.com
Creative Ideas: Go Beyond Basic Paint
Painting gives you options beyond a single color. You can add:
- Two-tone cabinets: Paint upper cabinets one color, lower cabinets another.
- Distressed finishes: Sand edges slightly for a rustic look.
- Stencils or patterns: Add unique details to doors or drawers.
Other creative touches include painting the insides of cabinets a fun color, or using chalkboard paint on one door for notes and lists. If you want a farmhouse vibe, try a “milk paint” finish or waxed effect.
Personal touches make your kitchen stand out.
When To Call A Professional
If your cabinets are damaged, warped, or made from materials like laminate, professional help may be best. Some finishes require special primers or techniques. If you feel overwhelmed, get a quote from a local painter first.
Also, if your kitchen is very large or open-concept, hiring a pro can save weeks of work. Some cabinet refinishers offer free color consultations or samples.
Sample Project Timeline
To help plan your project, here’s a realistic timeline for painting a medium-sized kitchen:
| Task | Estimated Time |
|---|---|
| Removing doors & hardware | 1–2 hours |
| Cleaning & prep | 2–3 hours |
| Sanding | 2–4 hours |
| Priming (including dry time) | 5–8 hours |
| Painting (2–3 coats, including dry time) | 12–24 hours |
| Curing | 3–14 days |
| Reassembly | 2–3 hours |
This schedule helps set realistic expectations and avoids frustration.
Non-obvious Insights For Beginners
- Humidity matters. High humidity slows drying and can cause issues with paint adhesion. Try to paint on dry, mild days if possible.
- Don’t forget the cabinet backs. Even if you can’t see them, painting the backs of doors and drawers protects the wood and gives a finished look.
Another overlooked point: always check for paint buildup around door edges. Too much paint here can cause doors to stick or not close fully.
Maintaining Your Painted Cabinets
Keep your new cabinets looking fresh with gentle cleaning. Use a soft cloth and mild soap. Avoid scrubbing or using abrasive pads. Touch up chips right away—don’t wait for them to get bigger.
For high-traffic kitchens, add felt pads to the inside corners of doors and drawers. This reduces slamming and protects your finish. Every few months, check for loose hardware and tighten as needed.
Recommended Resources
For extra tips, product guides, and inspiration, visit the This Old House kitchen cabinet painting guide. Their step-by-step videos are especially helpful for beginners.
Frequently Asked Questions
How Long Does It Take To Paint Unfinished Kitchen Cabinets?
The whole process, including drying and curing, takes about one week to complete. Actual painting may take 2–3 days, but you’ll need extra time for preparation, drying between coats, and final curing.
If your schedule is tight, consider painting in stages—do one section at a time so your kitchen is never fully out of use.
What Type Of Paint Is Best For Unfinished Kitchen Cabinets?
Use acrylic enamel or alkyd paint for best durability. These paints resist chipping and are easy to clean. Avoid standard wall paints, as they won’t last in a kitchen environment.
If you want a softer look, choose satin. For the shiniest, easy-to-wipe finish, semi-gloss or gloss is best.
Do I Need To Sand Unfinished Cabinets Before Painting?
Yes, sanding is essential. It smooths the wood and helps primer and paint stick. Skipping this step often leads to peeling or rough finishes.
For the smoothest finish, don’t forget to sand between every coat of primer and paint, not just at the start.
Can I Paint Cabinets Without Removing Doors And Hardware?
It’s possible, but not recommended. Removing doors and hardware gives you full access and a more professional finish. It also prevents paint from building up on hinges and handles.
If you must paint in place, tape off all areas you don’t want painted and be extra careful with drips.
How Do I Prevent Brush Marks On Painted Cabinets?
Use a foam roller on flat surfaces and brush only for detailed areas. Apply thin coats, sand lightly between each, and always follow the grain of the wood for the smoothest result.
If you see marks after the final coat, try buffing gently with a brown paper bag when the paint is dry.
Painting unfinished kitchen cabinets is a project that pays off for years. With care, patience, and a bit of creativity, you can transform your kitchen and enjoy the results every day.