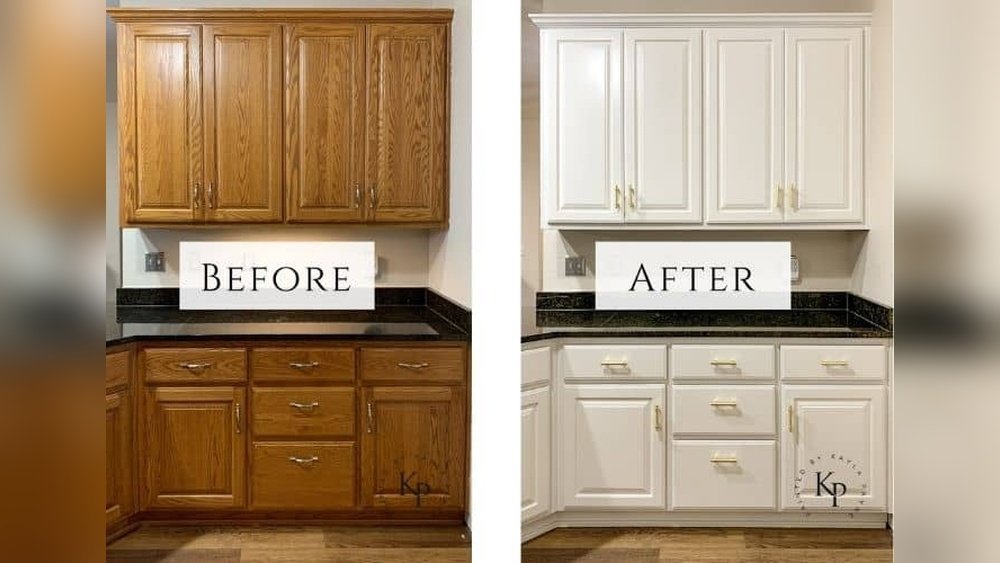
Painting your oak kitchen cabinets is one of the smartest ways to give your kitchen a dramatic makeover—without spending thousands of dollars. Many homeowners love the quality of solid oak, but dislike the dated look of their cabinets. The good news is that with the right methods, materials, and some patience, you can transform those yellowed or orange-toned cabinets into a fresh, modern showpiece.
Even if you have never done a big DIY project before, painting oak cabinets is a realistic goal.
This guide will walk you through every step, from planning and prep to the finishing touches. Along the way, you’ll find professional tips, practical insights, and answers to common problems. If you want a kitchen that looks brand new without the high cost of replacement, read on—you’re about to learn everything you need to know to paint oak kitchen cabinets like a pro.
Why Paint Oak Kitchen Cabinets?
Oak is strong, durable, and common in American kitchens. However, its heavy grain and dated finishes can make a space feel old-fashioned. Painting your cabinets offers several benefits:
- Cost Savings: Replacing cabinets can cost $8,000–$20,000. Painting usually costs under $300–$1,000 for materials.
- Customization: Choose any color to match your kitchen style.
- Increased Home Value: A modern kitchen can boost your home’s resale value.
- Sustainability: Refurbishing uses less material than buying new cabinets.
A recent survey by Houzz found that more than 50% of homeowners who update their kitchens choose to paint cabinets rather than replace them. Painted cabinets can make your home look newer and more attractive, especially if you plan to sell.
Understanding Oak Cabinets: Grain And Finish Challenges
Before you start, it’s important to know why painting oak cabinets can be tricky. Oak has a distinct grain pattern—deep lines and texture that often show through paint. Many people want a smooth, factory-like finish, but the grain can make the paint look uneven or rough.
Another issue is the old finish on oak cabinets. Most are coated with polyurethane or varnish. These create a slick surface that paint does not stick to well. If you skip the right prep steps, your new paint can peel or chip.
To get the best results, you need to:
- Fill or minimize the grain (if you want a smooth look)
- Remove or dull the old finish
- Use the right primer and paint
Not all paints or primers work well on oak. Below, you’ll find the exact materials and methods that professionals use for long-lasting, beautiful results.
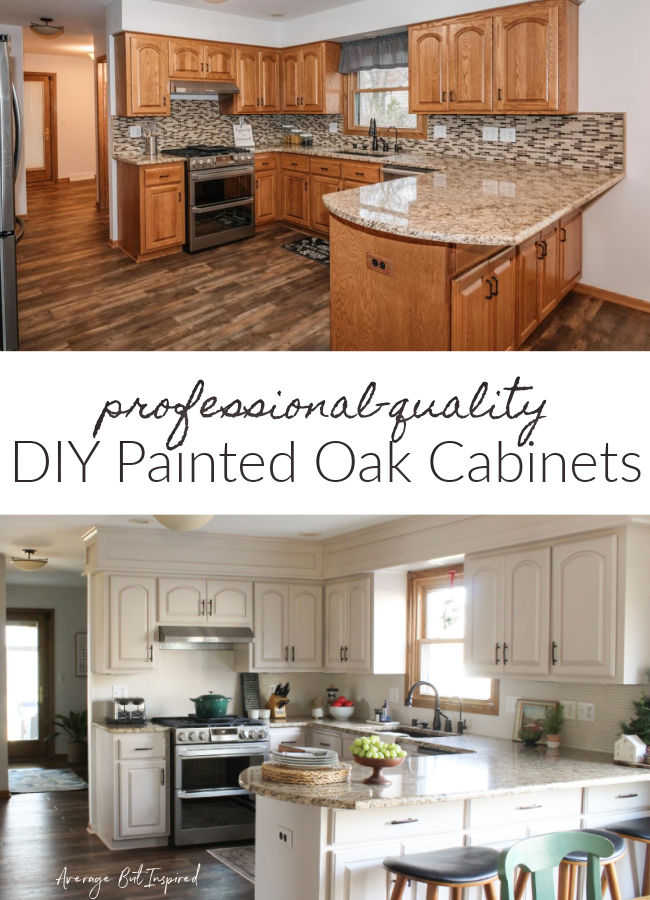
Credit: averageinspired.com
What You Need: Tools, Materials, And Safety
Gathering the right supplies before you start will save time and frustration. Here’s what you’ll need for a typical kitchen with 20–30 cabinet doors.
Essential Tools
- Electric sander (random orbital or palm)
- Vacuum with brush attachment
- Screwdriver set (for removing doors and hardware)
- Caulk gun (for filling seams, if needed)
- Putty knife
Materials
- Degreaser (like TSP substitute)
- High-quality wood filler (if you want a smoother finish)
- Sandpaper (80, 120, 220 grit)
- Stain-blocking primer (oil-based or shellac)
- Cabinet-grade paint (alkyd, acrylic urethane, or enamel)
- Tack cloths
- Painter’s tape
- Plastic sheeting (to protect floors and counters)
- Foam rollers and quality brushes
- New cabinet hardware (optional)
Safety
- Gloves
- Safety glasses
- Respirator mask (especially when sanding or using strong chemicals)
- Good ventilation
Bonus Tip: Don’t Skip The Mask And Goggles When Sanding. Oak Dust Can Irritate Your Eyes And Lungs.
Planning And Preparation: The Foundation For Success
The biggest mistake beginners make is rushing the preparation. Don’t do it! Most professional painters agree that 80% of the work is in the prep. If you want a finish that lasts for years, invest your time here.
Step 1: Clear And Protect Your Space
- Empty your cabinets and drawers.
- Move appliances and cover countertops with plastic sheeting.
- Lay drop cloths on the floor.
- Tape off walls, ceiling, and any surfaces you don’t want painted.
Step 2: Label And Remove Doors And Hardware
- Use sticky notes or masking tape to label each door and drawer so you know where they go later.
- Remove all doors, drawers, and hardware (hinges, knobs, pulls).
- Put screws and small parts in plastic bags—label them.
Non-obvious Insight: Take Photos Of How Hinges Are Attached. It Makes Reassembly Much Easier.
Step 3: Clean Every Surface
Kitchen cabinets collect grease and dirt. Use a degreaser like TSP substitute and scrub all surfaces, especially around handles and near the stove. Rinse with clean water and let dry.
Step 4: Repair And Fill Grain (optional)
If you want a smooth, modern look, you’ll need to fill the deep grain of oak. Here’s how:
- Use a flexible wood filler. Apply with a putty knife, pressing it into the grain.
- Let dry, then sand smooth.
- Wipe clean with a tack cloth.
Non-obvious Insight: Filling The Grain Is Not Required If You Want To Keep A Natural Wood Look Under Paint. But For A “factory Finish,” Filling Is Essential.
Step 5: Sand For Adhesion
Sand all surfaces lightly with 120–150 grit sandpaper. This removes gloss and helps primer stick. Use a vacuum and tack cloth to remove dust.
Comparison Of Sanding Methods
| Method | Time Required | Best For | Downside |
|---|---|---|---|
| Hand Sanding | Slow | Small kitchens, detail work | Labor intensive |
| Electric Sander | Faster | Large, flat areas | Hard to use on curves |
| Liquid Sander/Deglosser | Fastest | Quick surface prep | Less effective on heavy varnish |
Step 6: Caulk Seams And Fill Dents
If your cabinets have gaps between panels or dents, fill them with a paintable caulk or wood filler. Smooth with a finger or putty knife. Let dry fully.
Priming: The Secret To Long-lasting Paint
Priming is not optional on oak. The right primer blocks stains and prevents tannins (natural oak oils) from yellowing your paint. It also seals the wood grain for a smoother finish.
Choosing The Right Primer
- Oil-based primer: Most reliable for blocking stains and tannins.
- Shellac-based primer: Dries fast, great for tricky stains.
- Water-based primer: Easy cleanup, but less effective on oak.
Most professionals use Zinsser BIN (shellac-based) or Kilz Original (oil-based) for oak cabinets.
How To Apply Primer
- Stir the primer well.
- Use a quality brush for corners and a foam roller for flat surfaces.
- Apply a thin, even coat. Don’t overload the brush or roller.
- Let dry as directed (usually 1–2 hours for shellac, 4–6 for oil).
- Inspect for bleed-through. If you see dark spots, apply a second coat.
Tip: Sand Lightly With 220-grit Between Coats For A Super-smooth Base.
Common Primer Mistakes
- Skipping primer to save time—paint will not last.
- Using water-based primer on heavy oak grain—tannins may bleed through.
- Rushing primer to paint—wait for full dry time.
Painting Oak Cabinets: Step-by-step
Once your primer is dry and smooth, you’re ready to paint. This is where your kitchen starts to transform.
Step 1: Choose The Right Paint
Not all paints are created equal. For cabinets, you want:
- Acrylic urethane or alkyd enamel: Hard, durable, easy to clean.
- Satin or semi-gloss finish: Hides fingerprints, wipes clean.
- High-quality brands: Benjamin Moore Advance, Sherwin-Williams Emerald Urethane, Behr Alkyd.
Cheap wall paint will chip and stain—don’t use it.
Step 2: Stir And Strain Paint
Paint can settle or get lumps. Stir well and pour through a paint strainer for a flawless finish.
Step 3: Apply Paint In Thin Layers
- Use a brush for corners and a foam roller for flat areas.
- Apply thin coats—thick coats lead to drips.
- Let each coat dry fully (usually 4–6 hours) before recoating.
- Lightly sand with 320-grit between coats for extra smoothness.
- Apply 2–3 coats for full coverage.
Paint Application Comparison
| Tool | Finish Quality | Learning Curve | Best For |
|---|---|---|---|
| Brush | Good, but may show lines | Easy | Edges, corners |
| Foam roller | Very smooth | Easy | Flat panels |
| Sprayer | Factory-finish | Harder (setup/cleanup) | Whole doors, large kitchens |
Step 4: Let Paint Cure
Paint dries to the touch in hours, but takes 7–30 days to fully cure. Avoid heavy use for at least a week. Don’t install hardware or slam doors until paint is hard.
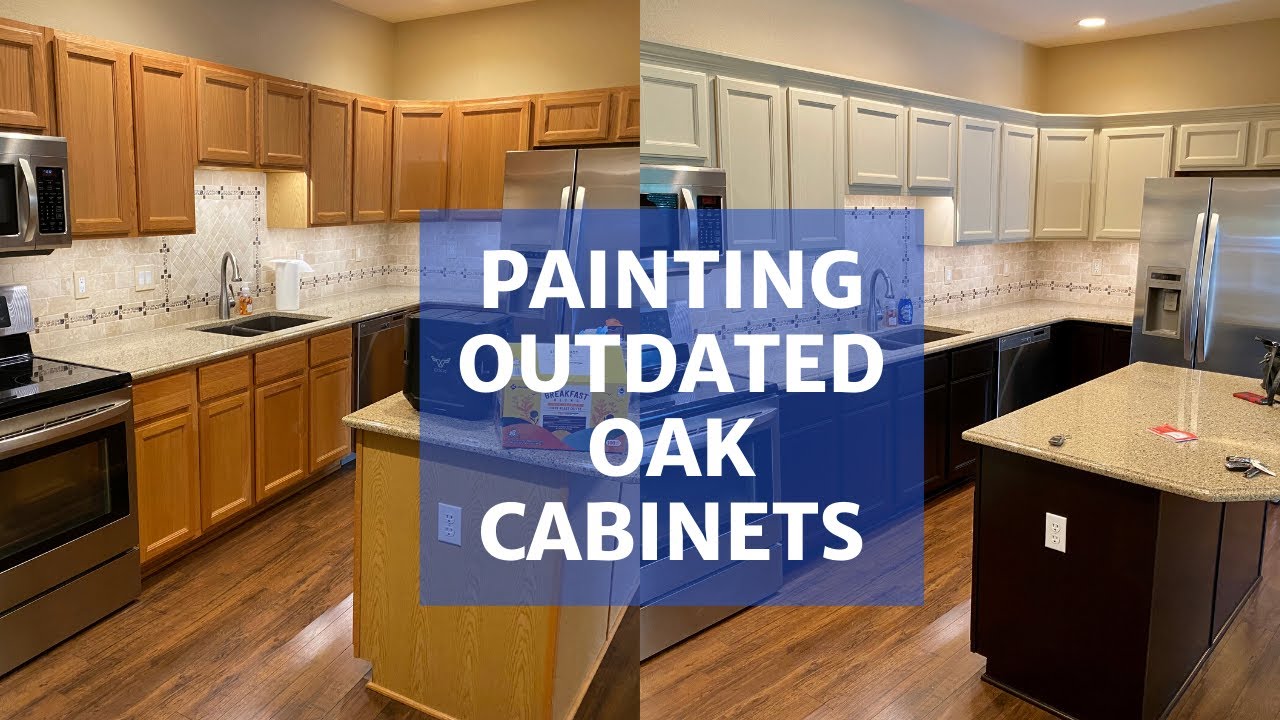
Credit: www.youtube.com
Reassembling And Finishing Touches
After your final coat is dry, your patience will pay off. Here’s how to wrap up your project the right way.
- Remove tape and plastic carefully to avoid peeling paint.
- Reattach doors and drawers using your labels and photos as a guide.
- Install hardware (consider upgrading for a modern look).
- Touch up any small chips with a brush.
- Clean up dust and leftover materials.
Example: Upgrading To Soft-close Hinges Or New Handles Can Make Your Painted Cabinets Look Custom And Expensive.
Maintenance: Keeping Painted Cabinets Beautiful
Painted oak cabinets are durable, but need care to stay looking great:
- Use gentle cleaners (mild soap and water, not harsh chemicals).
- Wipe up spills quickly to prevent stains.
- Avoid banging doors—use soft-close hardware if possible.
- Touch up chips with leftover paint immediately.
Regular cleaning and quick repairs will keep your cabinets looking new for years.
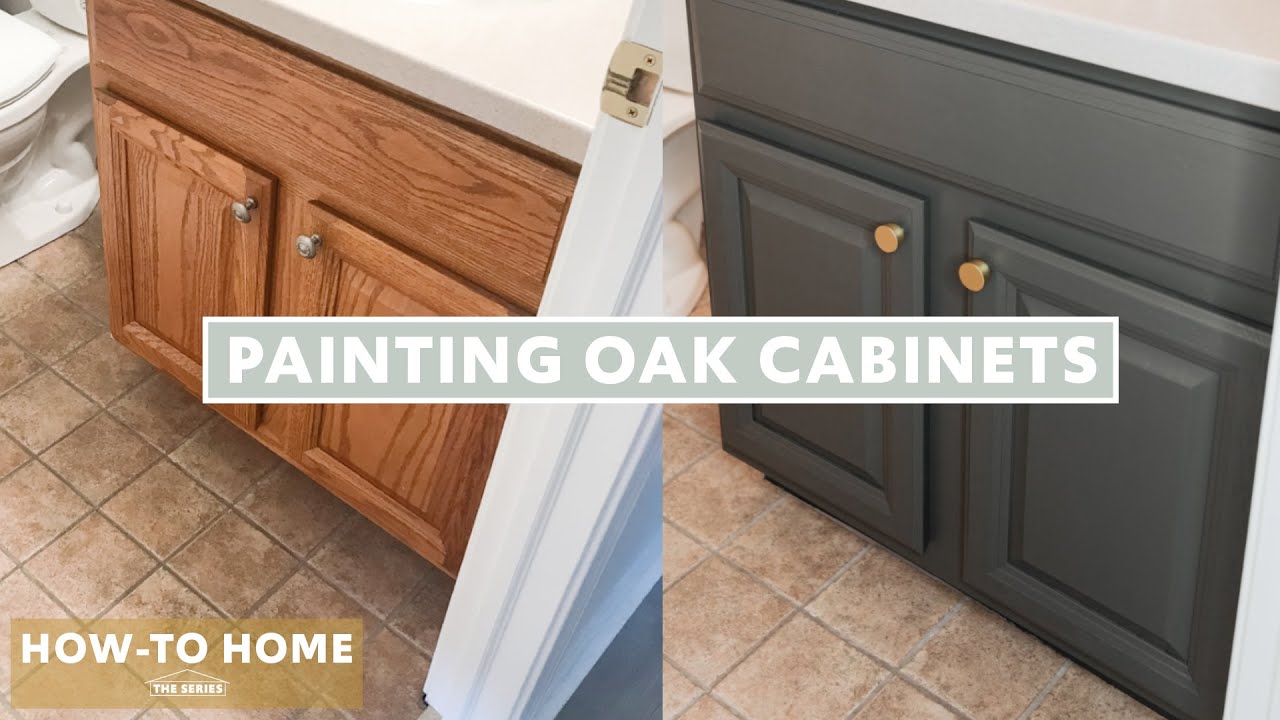
Credit: www.youtube.com
Common Mistakes And How To Avoid Them
Painting cabinets is not hard, but some mistakes can ruin your results. Watch out for these:
- Skipping prep steps: Not cleaning, sanding, or priming well leads to peeling and stains.
- Using the wrong paint or primer: Wall paint or latex primer won’t last.
- Applying thick coats: Causes drips and a rough texture.
- Not labeling parts: Reassembly becomes a nightmare.
- Rushing the process: Not letting coats dry leads to smudges and chips.
- Ignoring grain: If you want a smooth look but skip filling the grain, you’ll see texture.
- Painting in humid or cold conditions: Paint doesn’t cure well below 50°F or above 80% humidity.
- Not protecting surrounding areas: Paint splatters can be hard to remove from counters and floors.
Oak Cabinet Color Ideas And Trends
Choosing the right color can completely change your kitchen’s vibe. Here are some popular and classic options:
- Bright white: Makes a kitchen look clean and spacious.
- Warm gray: Modern but cozy.
- Navy blue: Trendy and pairs well with brass or gold hardware.
- Deep green: Bold and elegant.
- Greige (gray-beige): Timeless and easy to decorate around.
- Two-tone: Darker lower cabinets, lighter uppers for a designer look.
According to the National Kitchen and Bath Association, white and gray remain the most popular choices for painted cabinets, but bold colors are growing each year.
Cost Breakdown: Diy Vs. Professional
How much will this project cost? Here’s a typical breakdown for a DIY job:
| Item | DIY Cost | Pro Cost |
|---|---|---|
| Primer | $30–$50 | Included |
| Paint | $50–$120 | Included |
| Sandpaper/Filler | $20–$40 | Included |
| Tools | $50–$200 | Included |
| Labor | Free | $1,000–$3,500 |
| Total | $150–$400 | $1,000–$4,000 |
Hiring a professional is easier but much more expensive. DIY gives you control and big savings.
When To Call A Professional
Painting oak kitchen cabinets is very doable for most homeowners. However, you might want to hire a pro if:
- You want a factory-smooth finish with a sprayer and don’t have space or tools.
- Your cabinets are damaged or warped and need repair.
- You have a large kitchen and little time.
- You’re sensitive to fumes or dust.
Professional painters can finish in 3–5 days and guarantee results. But for most kitchens, a careful DIYer can get excellent results with patience.
Environmental And Health Considerations
Painting cabinets is safe if you follow basic guidelines:
- Ventilate well—open windows and use fans.
- Wear a respirator when sanding or using oil-based primers.
- Dispose of old paint and chemicals according to local regulations.
- Choose low-VOC paints for fewer fumes.
Modern cabinet paints and primers are much safer than older formulas, but caution is still smart, especially if children or pets are present.
Practical Tips For Success
- Work in small batches—paint 4–6 doors at a time to avoid confusion.
- Rest doors on painter’s pyramids or blocks so you can paint both sides without sticking.
- Number doors and frames with tape to prevent mix-ups.
- Use a brush for detail and a roller for large, flat areas.
- Let each coat dry fully—don’t rush.
- Keep leftover paint for easy touch-ups.
If you want more details on paint types and techniques, check out This Old House.
Frequently Asked Questions
How Long Does It Take To Paint Oak Kitchen Cabinets?
Most DIYers spend 5–7 days on the project, including prep, painting, and curing time. Larger kitchens or complex layouts may take longer. Rushing will hurt your results, so plan for at least a week.
Do I Need To Sand Oak Cabinets Before Painting?
Yes, sanding is essential. It removes gloss from the old finish and helps primer stick. Skipping sanding can lead to peeling or chipping paint.
How Do I Get A Smooth Finish On Oak Cabinets?
To get a smooth, factory-like finish:
- Fill the grain with wood filler
- Sand between each coat
- Use a high-quality foam roller or sprayer
- Apply thin coats of primer and paint
What Paint Finish Is Best For Kitchen Cabinets?
Satin or semi-gloss finishes are best. They are durable, easy to clean, and resist stains. Flat paints look dull and show marks more easily.
Can I Paint Over Varnished Or Stained Oak Cabinets?
Yes, but you must clean, sand, and prime first. Use a stain-blocking primer to prevent bleed-through. Painting directly over varnish will not last.
—
Painting your oak kitchen cabinets is a big project, but it’s one of the most rewarding DIY upgrades you can tackle. With careful prep, the right materials, and a bit of patience, you can achieve a stunning new look that will make your kitchen feel fresh and modern.
Whether you want a crisp white, a bold navy, or a trendy two-tone style, your old oak cabinets have a bright future ahead.