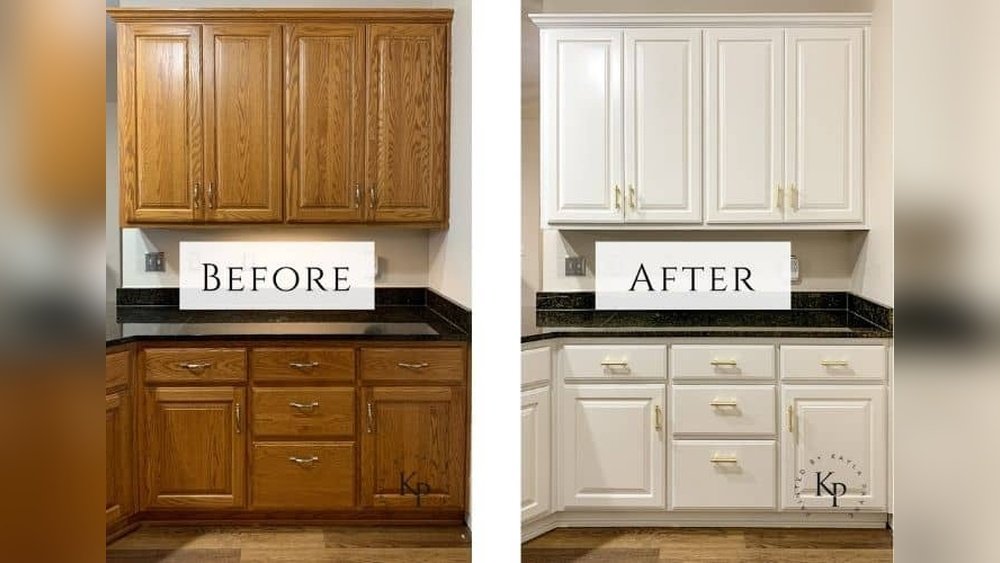
Painting oak kitchen cabinets is one of the most effective ways to refresh your kitchen without spending a fortune. Oak cabinets are durable, but their grainy texture and orange tones can look outdated. Many homeowners want a modern, smooth finish that brightens the space.
But painting oak isn’t as simple as grabbing a brush and paint. Oak’s open grain and hard finish require special preparation and the right techniques to achieve beautiful, long-lasting results.
If you’re thinking about tackling this project yourself, you might have questions: What products do I need? How do I hide the oak grain? What mistakes should I avoid? This guide will walk you through every step. With clear instructions, practical tips, and honest advice, you’ll understand how to transform your oak kitchen cabinets like a pro—even if you’ve never painted cabinets before.
Why Paint Oak Kitchen Cabinets?
Many kitchens built in the 1980s and 1990s feature oak cabinets. While strong and classic, oak often has a heavy grain pattern and golden hue that can make a kitchen look dated. Painting oak cabinets gives your kitchen a brand-new look without the high cost of replacement. It also lets you choose colors that match your style, whether that’s crisp white, soft gray, or bold navy.
Painting instead of replacing cabinets can save thousands of dollars. The average cost to replace kitchen cabinets is $8,000–$15,000, but painting them yourself usually costs under $500 in supplies. Plus, painting is a sustainable choice—it keeps good cabinets out of landfills and reduces waste.
What Makes Painting Oak Cabinets Different?
Oak is a unique wood. Its open grain means you can feel and see the texture, even under layers of paint. If you want a perfectly smooth, modern finish, you must fill that grain before painting. Oak also has tannins that can bleed through paint, causing yellow stains if you don’t use the right primer.
Many beginners skip important steps, thinking any paint will work. This often leads to chipping, peeling, and an uneven look. Understanding the challenges of oak helps you avoid frustration and get a professional-quality result.
Tools And Materials You’ll Need
Before starting, gather everything you need. Having the right products makes the process smoother and your results more durable.
Essential tools and materials:
- Screwdriver or drill (for removing cabinet doors and hardware)
- Painter’s tape
- Drop cloths or plastic sheeting
- Degreaser or TSP substitute
- Medium and fine grit sandpaper (100–220 grit)
- Sanding block or electric sander
- Vacuum and tack cloth
- Wood grain filler (optional, for a smooth finish)
- High-quality primer (stain-blocking, bonding)
- Cabinet paint (acrylic or alkyd, satin or semi-gloss finish)
- Good-quality angled paintbrush
- Small foam roller (smooth finish)
- Paint tray and liners
- New hardware (optional)
- Safety gear (gloves, mask, goggles)
Pro tip: Buy more sandpaper and tack cloths than you think you’ll need. Oak’s grain eats through sandpaper quickly.
Choosing The Right Primer And Paint
Not all paints and primers are created equal, especially for oak cabinets. Picking the wrong type can cause bleeding, poor adhesion, or fast wear.
Primer: Look for a stain-blocking, bonding primer designed for wood. Oil-based or shellac-based primers are best for oak because they block tannin bleed and stick to glossy finishes. Water-based primers are easier to clean but may not block stains as well.
Paint: Use a hard-wearing cabinet paint. Acrylic urethane or alkyd paints give a smoother finish and resist chips. Choose a satin or semi-gloss finish for easy cleaning.
Color: Light colors can brighten a kitchen but may show dirt more easily. Dark colors hide stains but can make a space feel smaller. Test a few samples in your kitchen’s lighting before committing.
How To Prepare Oak Cabinets For Painting
Preparation is the most important part of painting oak cabinets. Skipping steps or rushing here leads to poor results.
1. Remove Doors, Drawers, And Hardware
Take the cabinet doors off the frames. Remove all drawers. Label each door and drawer with masking tape (number them and note their location). Put the hardware (hinges, screws, handles) in labeled bags. This makes reassembly much easier.
2. Clean Thoroughly
Kitchens are greasy places. If you paint over grease, the paint will not stick and may peel. Use a strong degreaser or TSP substitute to wash all cabinet surfaces. Rinse with clean water and let dry.
3. Sand The Surfaces
Oak has a glossy finish that must be roughed up for primer to stick. Sand all surfaces with medium-grit sandpaper (100–150 grit) to remove shine. Sand in the direction of the wood grain. Vacuum dust, then wipe with a tack cloth.
Non-obvious tip: Pay extra attention to edges and corners, where grease and oils build up. These spots are common places for paint to peel.
4. Fill The Oak Grain (optional)
If you want a smooth, modern finish, fill the open grain. Use a wood grain filler. Apply it with a plastic scraper or old credit card, pressing it into the grain. Let dry, then sand smooth with fine-grit (220) sandpaper. Some people like seeing a hint of grain for a natural look and skip this step. It’s up to your style.
5. Fill Holes And Repair Damage
Fill any dents, scratches, or old hardware holes with wood filler. Let dry and sand smooth. Wipe away dust.
6. Mask And Protect
Tape off walls, countertops, and any areas you don’t want painted. Lay down drop cloths to protect the floor.
Applying Primer: Key To Success
Priming is not optional for oak cabinets. It locks in stains and gives paint something to stick to.
- Stir your primer well before using.
- Use a brush for corners and detailed areas, and a foam roller for flat surfaces.
- Apply a thin, even coat. Don’t overload the brush or roller.
- Let the first coat dry completely (follow the manufacturer’s instructions).
- Lightly sand with fine-grit (220) sandpaper for a smooth finish. Wipe away dust.
- Apply a second coat if needed. Oak often needs two coats of primer.
Non-obvious insight: Some primers dry quickly on the surface but remain soft underneath. Wait at least as long as the can says before sanding or recoating.
Painting Your Oak Cabinets
After priming, you’re ready for paint. Patience here makes a big difference.
- Stir your paint well. Do not shake the can, as it can create bubbles.
- Use a good-quality angled brush for edges, corners, and detailed areas.
- Use a small foam roller for large flat surfaces. This gives a factory-smooth finish.
- Apply thin, even coats. Thick coats can sag or peel.
- Let each coat dry fully before sanding lightly and adding the next coat.
- Most cabinets need 2–3 coats of paint for full coverage.
Pro tip: Paint the backs of doors first. Let dry, flip, then paint the fronts. This avoids smudges.
Drying And Curing: Don’t Rush
Paint feels dry to the touch in a few hours, but it’s not fully cured for days or weeks. Curing is when the paint hardens to its final durability.
- Wait at least 24–48 hours before reattaching doors and drawers.
- Avoid heavy use or cleaning for at least a week.
- Full cure time is often 2–4 weeks, depending on the paint and humidity.
Non-obvious insight: Even after paint feels dry, it’s soft underneath. If you stack items inside or close doors too hard, you can dent the finish.
Reassembling And Finishing Touches
Once the paint is cured, carefully reattach all doors and drawers. Use your labels to put everything back in the right place. Reinstall hardware—or upgrade to new handles and hinges for a fresh look.
Wipe cabinets gently with a damp cloth to remove any dust. Add bumpers to doors and drawers to protect the new finish.
Common Mistakes To Avoid
Painting oak cabinets isn’t hard, but many people make mistakes that ruin the result or waste time.
- Skipping prep steps: Not cleaning or sanding enough means paint will peel.
- Using the wrong primer: Latex primer allows tannins to bleed through oak.
- Not filling the grain: If you want smooth cabinets, skipping grain filler is a common regret.
- Thick paint coats: Heavy coats dry unevenly and may sag or chip.
- Reassembling too soon: Handling uncured paint leads to fingerprints and dents.
- Ignoring hardware: Old, outdated handles can make your painted cabinets look less fresh.
Cost And Time Estimates
Painting oak kitchen cabinets is a project that takes time, but offers big rewards.
| Step | Time (Hours) | Notes |
|---|---|---|
| Preparation | 5–8 | Includes cleaning, sanding, masking |
| Priming | 3–6 | Includes drying time between coats |
| Painting | 6–10 | Multiple thin coats for best finish |
| Drying/Curing | 24–48+ | Can use kitchen, but handle gently |
| Total Project | 3–7 days | Varies by kitchen size and drying time |
Cost estimate: Most DIYers spend $200–$500 on supplies. Hiring a pro can cost $3,000–$8,000.
Comparing Finishes: Satin Vs. Semi-gloss
Choosing the right paint finish affects both appearance and cleaning.
| Finish Type | Look | Durability | Cleaning Ease | Best For |
|---|---|---|---|---|
| Satin | Soft sheen, hides imperfections | Very good | Easy | Modern, subtle look |
| Semi-Gloss | Shinier, highlights details | Excellent | Very easy | Traditional, high-traffic kitchens |
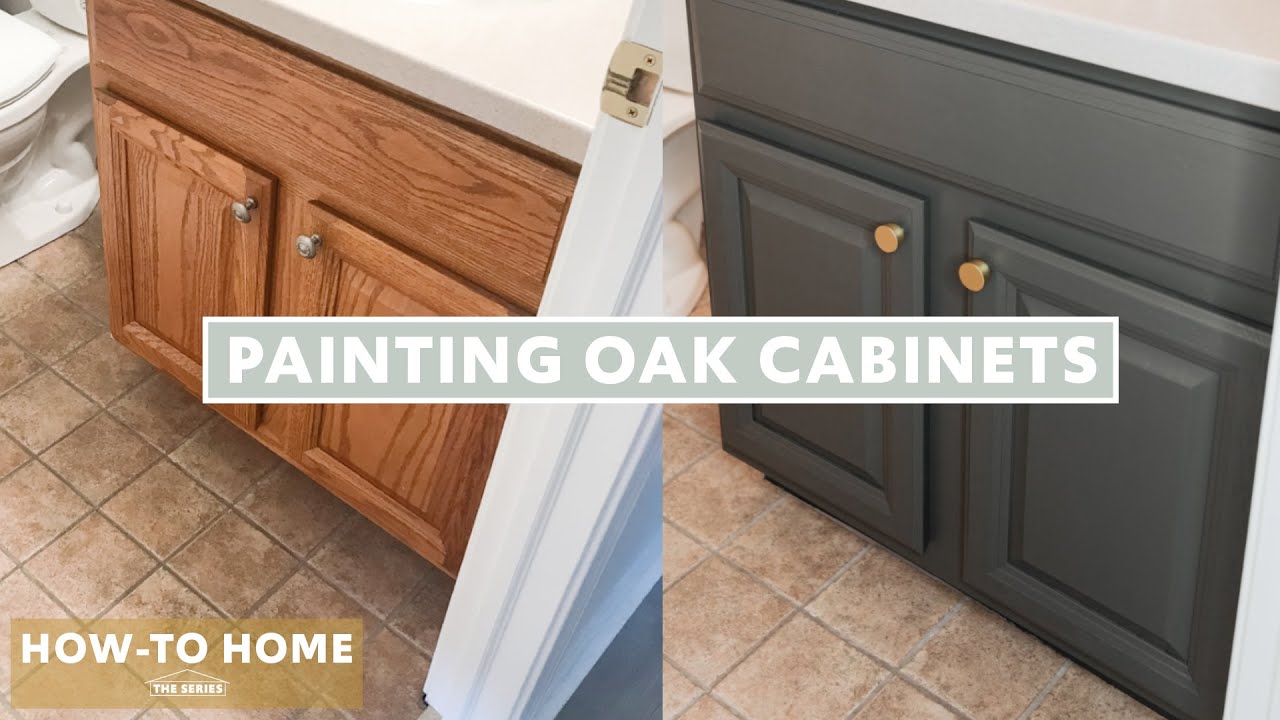
Credit: www.youtube.com
Oak Grain: To Fill Or Not To Fill?
This is one of the most personal choices. Some people love the character of oak grain under paint; others want a super-smooth, factory look.
| Option | Result | Effort | Best For |
|---|---|---|---|
| Filling Grain | Smooth, modern finish | High | Contemporary kitchens |
| Leaving Grain | Visible texture, natural look | Lower | Rustic/traditional styles |
Pro tip: Try painting one door with and one without grain filler to see which look you prefer.
Troubleshooting: Fixing Common Problems
Even with careful work, issues can pop up. Here’s how to handle the most common ones:
- Tannin stains or yellowing: This means the primer didn’t block the oak’s tannins. Sand lightly, re-prime with a shellac-based primer, then repaint.
- Peeling paint: Usually due to poor cleaning or sanding. Sand off the loose paint, clean well, re-prime, and repaint.
- Visible brush marks or roller texture: Too much paint or the wrong tool. Use a fine foam roller and apply thinner coats.
- Dust or bubbles in finish: Work in a dust-free space and avoid shaking paint cans.
Expert advice: Always keep a small jar of leftover paint for quick touch-ups.
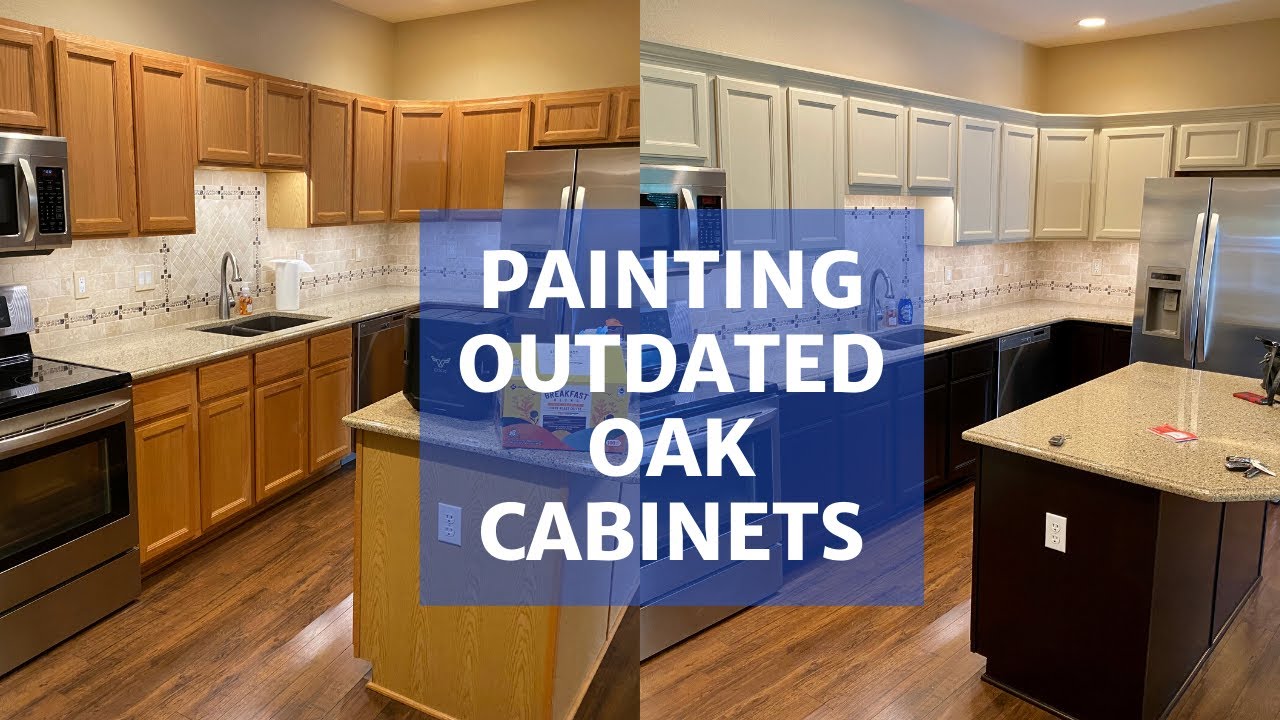
Credit: www.youtube.com
Maintenance Tips For Painted Oak Cabinets
Painted cabinets are easier to keep clean than stained wood, but they do need care.
- Wipe spills quickly with a damp cloth.
- Use gentle cleaners; avoid harsh chemicals or abrasive pads.
- Add felt bumpers to doors and drawers to protect the paint.
- Touch up chips or dings promptly.
Paint can fade or yellow over years, especially if exposed to strong sunlight or grease. Consider adding a clear topcoat for extra protection in busy kitchens.
When To Hire A Pro
DIY painting saves money, but sometimes hiring a professional makes sense. Consider a pro if:
- You have a large kitchen (more than 30 doors/drawers).
- You want a flawless, factory-like finish.
- You have little free time or no space for drying doors.
- Your cabinets are badly damaged and need repairs.
Professional painters use spray equipment for a smoother look, and many offer warranties on their work. Get several quotes before hiring.
Realistic Expectations: What Results To Expect
Painting oak cabinets can transform your kitchen, but it’s important to set realistic expectations. Even with the best prep and products, painted oak cabinets may not look exactly like new, factory-made cabinets. You may still see some grain texture or minor imperfections. However, most people are thrilled with the transformation—a brighter, more modern kitchen for a fraction of the cost.
If you want the absolute smoothest finish, be prepared to spend extra time on grain filling and sanding. If you prefer a hint of wood texture, the process is faster and easier.
Inspiring Color Ideas For Oak Cabinets
Choosing the right color can make your kitchen feel new again. Here are a few popular options:
- Crisp White: Clean, timeless, makes small kitchens look bigger.
- Soft Gray: Modern, hides dirt, pairs well with stainless appliances.
- Navy Blue: Bold and stylish, works well in large, bright kitchens.
- Muted Green: Soothing and fresh, great with brass or gold hardware.
- Charcoal: Dramatic, hides stains, best for open spaces.
Always test colors in your own kitchen before buying gallons. Lighting can change how colors look.
Safety Tips For Cabinet Painting
Painting is safe, but be aware of:
- Ventilation: Open windows and use fans, especially with oil or shellac primers.
- Protective gear: Wear gloves and a mask when sanding, cleaning, or using strong chemicals.
- Safe storage: Keep paint and solvents away from kids and pets.
Dispose of leftover chemicals at a local hazardous waste site, not down the drain.
Where To Learn More
For extra tips or questions, you can check home improvement forums or ask at your local paint store. The This Old House website has excellent cabinet painting tutorials and videos.

Credit: averageinspired.com
Frequently Asked Questions
How Long Does It Take To Paint Oak Kitchen Cabinets?
The whole process usually takes 3 to 7 days for a typical kitchen, including cleaning, sanding, priming, painting, and drying. Most of this time is waiting for coats to dry. Rushing any step can lead to poor results.
Do I Have To Fill The Oak Grain Before Painting?
No, it’s optional. If you want a super-smooth finish, use grain filler. If you don’t mind a little wood texture, you can skip this step. It depends on your style and how modern you want your cabinets to look.
Can I Use Regular Wall Paint On Cabinets?
It’s not recommended. Wall paints are not as durable or washable. Use a cabinet-grade acrylic or alkyd paint for best results. These paints are harder, resist chips, and clean up better.
How Do I Prevent Brush Marks Or Streaks?
Use a good-quality angled brush for corners and a small foam roller for flat surfaces. Apply thin coats and sand lightly between coats. Painting in thin layers is key to a smooth finish.
Is Painting Oak Cabinets Worth The Effort?
For most people, yes. It’s one of the best ways to update a kitchen on a budget. Painted oak cabinets can look fresh and modern, and the project is doable for most DIYers with patience and the right tools.
Transforming your oak kitchen cabinets is a project that takes time and care, but the payoff is a kitchen you’ll love walking into every day. With the right preparation, products, and techniques, you can achieve beautiful, lasting results—no professional required.