
Making an edge grain cutting board is more than just a woodworking project—it’s an introduction to craftsmanship, design, and practical kitchen tools. Many people want a sturdy, beautiful cutting board that will last for years, and creating one yourself can be both enjoyable and rewarding.
This guide will walk you through every detail, from selecting the wood to finishing and caring for your board. If you’re new to woodworking, don’t worry; you’ll find clear steps, expert advice, and tips that even some experienced makers often overlook.
What Is An Edge Grain Cutting Board?
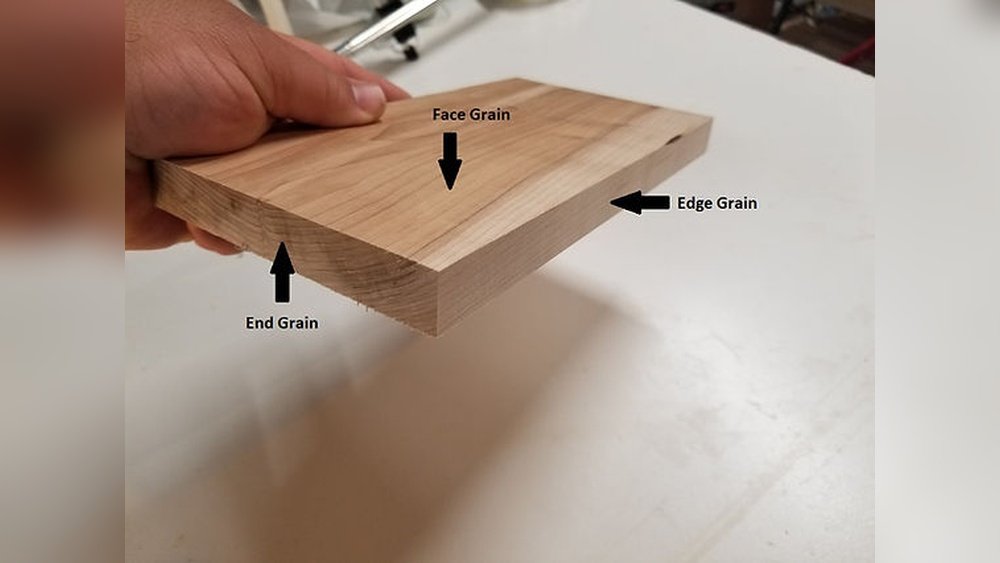
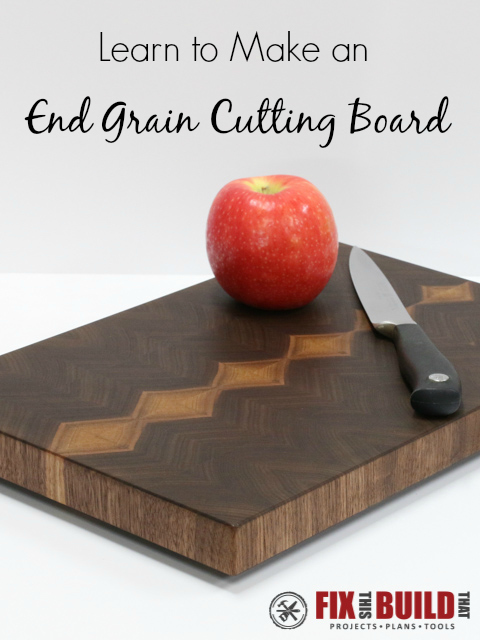
Before you start, it’s important to understand what makes an edge grain cutting board unique. Unlike end grain boards, where the wood’s growth rings are visible on the cutting surface, edge grain boards show the long edge of the wood strips on top. This makes them strong, resistant to warping, and less likely to dull your knife quickly. They’re also easier to make and require fewer special tools.
Edge grain boards are popular in home kitchens and professional settings. They balance durability, aesthetics, and ease of maintenance. Many chefs prefer them for daily use because they are lighter and easier to handle than end grain boards.
Tools And Materials You’ll Need
Preparation is key. Gathering everything ahead of time saves frustration and improves your results.
Essential Tools
- Table saw or circular saw – For ripping wood into strips.
- Miter saw or crosscut sled – For cutting strips to length.
- Planer – To smooth the wood and make all pieces the same thickness.
- Jointer – For straightening edges (optional but helpful).
- Clamps – At least 4–8 bar or pipe clamps.
- Random orbital sander – For smoothing the surface.
- Router (optional) – For rounding the edges.
- Drill – If you want to add handle holes.
- Tape measure and square – For accurate measurements.
- Pencil – For marking cuts.
Materials
- Hardwood boards: Choose from maple, walnut, cherry, beech, or oak. Avoid softwoods like pine—they’re not durable enough.
- Wood glue: Only use food-safe, waterproof glue (like Titebond III).
- Mineral oil and beeswax: For finishing and sealing.
- Sandpaper: 80, 120, 180, and 220 grit.
- Optional rubber feet: To keep the board stable and dry.
How Much Wood Do You Need?
For a board measuring about 16 x 12 x 1. 25 inches, you’ll need around 8 board feet of hardwood. It’s wise to buy 10% more to allow for mistakes or defects.
Safety Gear
- Safety glasses
- Hearing protection
- Dust mask
Non-obvious insight: Many beginners forget that wood species can affect not just look, but also how the board handles moisture and knife marks. For example, maple is naturally anti-microbial, making it a favorite for cutting boards.
Planning Your Cutting Board: Size, Pattern, And Design
Choosing the right size and layout makes a difference in daily use.
Deciding On Dimensions
Standard edge grain cutting boards are usually between 12–18 inches long, 10–14 inches wide, and 1–1. 5 inches thick. Make sure it fits your countertop and storage space.
Pattern And Layout
You can use one wood type for a classic look or mix species for contrast. Alternating maple and walnut strips creates a beautiful striped pattern. Each strip should be between 1–2 inches wide, but you can vary this for a custom design.
Pro tip: Always check the grain direction. Aligning the grain helps your board resist warping and cracking later.
Sketching Your Board
Draw a simple sketch on paper, marking each strip’s width and wood species. This step helps avoid mistakes during cutting and glue-up.
Preparing The Wood
Quality starts with preparation. Don’t rush—this step affects everything that follows.
Cutting Strips
- Rip boards to your chosen width using a table saw. Cut slightly wider than your final measurement to allow for planing.
- If your wood has rough edges or saw marks, use a jointer to straighten them.
Planing And Trimming
- Run each strip through a planer until all are the same thickness.
- Use a miter saw to cut the strips to length, a few inches longer than your finished board to allow for trimming.
Dry Fitting
Lay all strips side by side on a flat surface. Adjust the order until you’re happy with the pattern. Make sure the edges fit tightly—no gaps.
Marking For Assembly
Draw a triangle across the strips (with a pencil) to keep the order clear during glue-up.
Non-obvious insight: Let the wood acclimate in your workshop for at least 24 hours before working. This prevents sudden warping or moisture issues.
Credit: fixthisbuildthat.com
The Glue-up: Creating A Solid Panel
This step is where your cutting board takes shape. Patience and accuracy are essential.
Applying Glue
- Use a brush or roller to spread wood glue evenly on the edges of each strip. Don’t use too much—just enough to coat the surface without dripping.
- Stack the strips together, keeping the triangle marks aligned.
Clamping
- Place clamps underneath and on top of the assembly.
- Tighten evenly from the center outward. Watch for glue squeeze-out (a little is good; too much means you used too much glue).
- Use cauls (flat boards) above and below if you want to keep the surface extra flat.
Cleaning Excess Glue
- Wipe away excess glue with a damp cloth while it’s still wet, but don’t soak the wood.
- Leave the board clamped for at least 8 hours, or overnight.
Removing Clamps
- After the glue has dried, remove the clamps carefully.
- Scrape off any dried glue with a putty knife or scraper.
Flattening And Smoothing The Board
Your glued-up panel now looks like a rough cutting board. The next steps are to flatten and smooth both surfaces.
Planing And Sanding
- Run the board through a planer to flatten both sides. If you don’t have a planer, use a belt sander or hand plane, but be careful to keep it level.
- Start sanding with 80-grit paper and progress to 120, 180, and finally 220 grit. Spend extra time on the edges and corners.
Squaring And Trimming
- Use a crosscut sled or miter saw to trim the board to final length and square the ends.
- Check all corners with a square for perfect 90-degree angles.
Rounding The Edges (optional)
- A router with a 1/4-inch round-over bit gives a smooth, comfortable edge.
- If you don’t have a router, sand the edges by hand until they feel soft to the touch.
Adding Features: Juice Groove, Handles, And Feet
You can keep your board simple, or add features to make it even more useful.
Juice Groove
A juice groove is a shallow channel around the edge to catch liquids—great for cutting meats or juicy fruits.
- Mark the groove line about 1/2 inch from the edge.
- Use a router with a groove bit and a guide to cut an even channel.
- Sand the groove smooth by hand.
Handles
Handles make carrying and cleaning easier.
- For finger grooves, use a router or saw to cut shallow notches on each side.
- For holes, drill with a 1-inch Forstner bit near the edges.
Rubber Feet
Adding rubber feet keeps the board from sliding and allows air under the board, which prevents moisture buildup.
- Screw or glue rubber feet to each corner on the underside.
Practical tip: Don’t add feet if you want to use both sides of the board.
Finishing: Sealing And Protecting Your Board
Finishing is what makes your board beautiful and food-safe. Never skip this step.
Sanding To Perfection
- Wipe the board with a damp cloth to raise the wood grain, then sand again with 220-grit paper. This prevents roughness after the first wash.
Applying Finish
- Use food-safe mineral oil. Avoid vegetable or olive oil—they can turn rancid.
- Pour a generous amount of oil on the board and rub with a clean cloth, covering all surfaces and edges.
- Let the oil soak for 20–30 minutes, then wipe off excess.
- Repeat 2–3 times for best results.
Beeswax Finish (optional)
- Mix melted beeswax with mineral oil for a richer, longer-lasting finish.
- Rub onto the board and buff with a soft cloth.
Drying And Curing
- Let the board sit overnight before using.
- Reapply oil every few weeks, or when the board looks dry.
Non-obvious insight: Always finish both sides of the board, even if you only use one. This helps balance moisture and prevents warping.
Cleaning Up And Final Checks
Before calling your project finished, inspect your board carefully.
- Run your hand over all surfaces to check for rough spots or glue residue.
- Test the board for wobble—if it rocks, sand the bottom until flat.
- Clean all tools and your workspace.
Taking time with the final details shows pride in your work.
Comparing Edge Grain, End Grain, And Face Grain Boards
Understanding the difference between edge grain, end grain, and face grain helps you choose the best board for your needs. Here’s a quick comparison:
| Type | Durability | Knife Friendliness | Maintenance | Appearance |
|---|---|---|---|---|
| Edge Grain | High | Good | Easy | Striped pattern |
| End Grain | Very High | Excellent | Moderate | Checkerboard |
| Face Grain | Medium | Fair | Easy | Wide plank look |
Common Mistakes And How To Avoid Them
Even careful woodworkers make mistakes. Here are the most frequent problems and how to solve them.
Using The Wrong Wood
Softwoods like pine or cedar are too porous and can harbor bacteria. Always use hardwoods like maple, walnut, or cherry.
Uneven Clamping Pressure
If clamps are not tightened evenly, your board may warp or twist. Place clamps above and below, and tighten from the center outward.
Not Allowing For Wood Movement
Wood expands and contracts with humidity. Finish both sides and store the board flat to reduce warping.
Skipping The Final Sanding
If you stop sanding at 120 or 180 grit, the board may feel rough after washing. Always finish with 220 grit, or even higher if you want a silky feel.
Using The Wrong Finish
Only food-safe mineral oil and beeswax should touch your board. Never use finishes like polyurethane or standard varnish—they’re not safe for food contact.
Maintenance: Keeping Your Board Beautiful For Years
A well-made edge grain cutting board can last decades if you care for it properly.
Daily Cleaning
- Wash with warm, soapy water after each use.
- Never soak in water or put in the dishwasher—it will warp and crack.
- Wipe dry immediately.
Monthly Oiling
- When the board looks dry, reapply mineral oil.
- For extra protection, buff with a beeswax and oil blend.
Dealing With Stains And Odors
- Rub stains with coarse salt and half a lemon, then rinse.
- For odors, wipe with a baking soda paste, rinse, and dry.
Storing Your Board
- Store upright or on feet to allow airflow.
- Never leave in a damp area or near a heat source.
Repairing Scratches Or Small Cracks
- Sand lightly with 220-grit paper, then reapply oil.
- For deeper cracks, fill with a mixture of sawdust and wood glue, sand, and refinish.
Non-obvious insight: Rotate the board regularly so that wear is even on all sides. This helps prevent deep grooves and keeps your board looking new.

Credit: www.youtube.com
Customizing Your Edge Grain Cutting Board
Personal touches make your board unique and special.
Adding Inlays Or Decorative Elements
- Use strips of contrasting wood (like a thin line of cherry in a maple board) for a striking look.
- For more advanced projects, inlay thin pieces of brass or resin.
Laser Engraving
Many woodshops offer laser engraving for names, dates, or designs. This makes your board a perfect gift.
Creative Shapes
Cutting boards don’t have to be rectangles. Try curves, handles, or even animal shapes for a fun twist—just remember, the more complex the shape, the more difficult the sanding and finishing.
Troubleshooting: What If Something Goes Wrong?
Even with care, mistakes happen. Here’s how to fix common problems.
Gaps Between Strips
- Mix fine sawdust with wood glue and fill gaps before final sanding.
- For large gaps, cut a thin strip of matching wood and glue it in place.
Uneven Surface
- Use a hand plane or belt sander to flatten high spots.
- Always check for flatness with a straightedge before finishing.
Stubborn Glue Stains
- Scrape gently with a sharp chisel or razor blade.
- Sand the area, then reapply oil.
Warping After Use
- Place the board on a flat surface and add weight for a few days.
- Sand flat again if needed; always finish both sides.
Sample Project: Maple And Walnut Edge Grain Board
If you want to try making a classic two-tone board, here’s a quick overview.
Materials
- 3 strips of maple (1.5 x 16 x 1.25 inches)
- 2 strips of walnut (1.5 x 16 x 1.25 inches)
- Food-safe glue, mineral oil
Steps
- Arrange the strips in a maple-walnut-maple-walnut-maple pattern.
- Glue and clamp as described above.
- Plane, sand, and finish.
- Add handles or feet if desired.
The result is a stylish, professional-looking board that highlights the beauty of both woods.
Cost Comparison: Store-bought Vs. Diy
Making your own edge grain cutting board is often more affordable—and much more satisfying—than buying a premium board. Here’s a comparison:
| Item | DIY Cost | Store-Bought |
|---|---|---|
| Hardwood (8 board feet) | $40–$60 | Included |
| Glue, Finish, Supplies | $15–$25 | Included |
| Premium Cutting Board | N/A | $120–$250 |
| Total (DIY) | $55–$85 | $120–$250 |
Making your own board saves money and lets you choose the exact size, wood, and design you want.
Sustainability And Safety Considerations
Choosing sustainably harvested hardwood is better for the environment. Look for wood certified by organizations like the Forest Stewardship Council (FSC).
For food safety, always use non-toxic, food-safe finishes. Avoid using reclaimed wood unless you know its history—it could have been treated with chemicals or contaminated.
For more information on wood safety for food contact, see this Wikipedia resource.
Frequently Asked Questions
How Long Does It Take To Make An Edge Grain Cutting Board?
From start to finish, the process usually takes two days. Most of that time is waiting for glue and finish to dry. Actual working time is about 4–6 hours, depending on your tools and experience.
Can I Use Any Type Of Wood For A Cutting Board?
No. Only use hardwoods like maple, walnut, cherry, or beech. Softwoods and exotic woods may be unsafe or damage knives.
How Often Should I Oil My Cutting Board?
For the first month, oil once a week. After that, once a month or whenever the board looks dry. Frequent oiling keeps the wood sealed and prevents cracks.
Why Does My Cutting Board Warp Or Crack?
Warping and cracking are caused by moisture imbalance. Always finish both sides, never soak your board, and store it upright or on feet to allow airflow.
Is An Edge Grain Cutting Board Better Than Plastic?
Edge grain boards are more durable, easier on knives, and look much nicer than plastic. However, plastic boards are easier to sanitize in the dishwasher. Both have their place, but many chefs prefer wood for daily prep.
Making an edge grain cutting board is a project that teaches valuable woodworking skills and provides a tool you’ll use every day. With careful planning and attention to detail, you can create a board that not only works beautifully but also looks fantastic in your kitchen.
Whether you keep it simple or add custom touches, your handmade board will be a source of pride for years to come.

Credit: www.youtube.com