
Many people trust their Asko dishwasher to keep their kitchen running smoothly. But even reliable machines can have problems, like standing water in the bottom after a cycle. Maybe you’ve noticed your dishes are not as dry as before, or there’s an odd smell coming from inside. These are signs your dishwasher isn’t draining properly. Fixing this yourself can save money and prevent bigger issues.
Draining an Asko dishwasher may sound technical, but it’s manageable if you follow the right steps. This article explains how to do it safely and completely. You’ll learn why dishwashers fail to drain, what tools you need, and how to handle different Asko models.
Whether you’re facing a simple clog or suspect a faulty part, this guide will walk you through everything in clear language. Let’s get started so you can restore your dishwasher’s performance and avoid a call to the repair shop.
Why Dishwashers Fail To Drain
Before you start draining your Asko dishwasher, it’s smart to understand common causes of drainage problems. Knowing these reasons helps you fix the real issue and prevent it from coming back.
- Clogged filter or drain hose: Food, grease, or small objects can block the water flow.
- Faulty drain pump: If the pump doesn’t work, water stays inside.
- Blocked air gap: Not all kitchens have an air gap, but if you do, it can get blocked.
- Garbage disposal issues: For dishwashers connected through a garbage disposal, a clog here can affect drainage.
- Incorrect installation: Sometimes the hose isn’t positioned right, causing water to flow back.
- Electrical faults: A tripped breaker or loose wire can stop the drain pump.
Non-obvious insight: Sometimes, a new garbage disposal is installed without removing the knockout plug. This blocks the dishwasher’s drain path. Also, using too much detergent can create extra suds, which slow down draining.
Safety First: Preparing To Drain Your Asko Dishwasher
Safety matters when working with water and electricity. Here’s how to get ready:
- Unplug the dishwasher: Either unplug it directly or turn off the circuit breaker.
- Turn off water supply: Find the shut-off valve under your sink.
- Remove dishes and racks: Empty everything from the dishwasher to avoid damage.
- Have towels ready: Water may spill when you remove parts.
Tip: Put on rubber gloves to protect your hands from sharp edges or dirty water.
Basic Tools And Supplies You’ll Need
Gather these items before starting:
- Screwdriver set (usually Phillips and flat-head)
- Bucket or bowl to catch water
- Old towels for spills
- Pliers for hose clamps
- Flashlight to see inside the unit
- Toothbrush or small brush for cleaning
Most Asko dishwasher models need only basic tools for draining and cleaning. If your model is newer, check the user manual for any special needs.
Step-by-step Guide: Draining An Asko Dishwasher Manually
If your dishwasher won’t drain, follow these steps. These work for most Asko models, including D5436, D5534, D5556, and newer lines.
1. Turn Off Power And Water
- Unplug the dishwasher or switch off the breaker.
- Turn off the water valve under the sink.
2. Remove Standing Water
- Open the dishwasher door.
- Use a cup or small bowl to scoop out as much water as possible.
- Place towels on the floor to catch any spills.
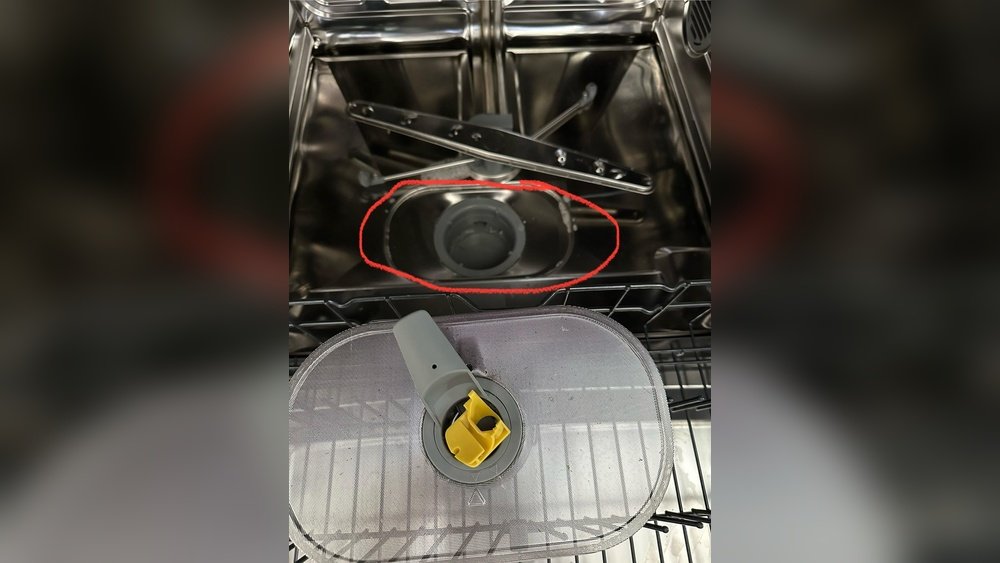
3. Take Out Lower Dish Rack And Filter
- Pull out the bottom rack and set it aside.
- Locate the filter unit at the bottom center. Most Asko dishwashers have a round or rectangular filter.
- Twist or lift the filter out, depending on your model.
4. Clean The Filter
- Rinse the filter under warm running water.
- Scrub with a toothbrush to remove food bits and grease.
- Check for cracks or tears; replace if damaged.
5. Check And Clean The Drain Area
- Shine a flashlight into the drain hole.
- Use your fingers (wear gloves) or a brush to remove visible debris.
- Look for glass, seeds, or plastic pieces.
6. Inspect And Clear The Drain Hose
- Find the drain hose at the back of the dishwasher.
- Loosen the clamp with pliers and disconnect the hose (have a bucket ready).
- Blow air through the hose or use a long flexible brush to clear blockages.
7. Check The Garbage Disposal (if Connected)
- Make sure the knockout plug was removed when the unit was installed.
- Run the disposal to clear any clogs.
8. Reassemble And Test
- Reattach the hose and filter.
- Return the dish rack.
- Turn the power and water back on.
- Run a short cycle to check if draining works.
Troubleshooting: If Your Asko Dishwasher Still Won’t Drain
If you followed the steps above and water remains, the problem could be deeper. Here’s how to troubleshoot further:
1. Check The Drain Pump
- Listen for a humming or grinding sound during the drain cycle.
- Remove the kickplate at the bottom front of the machine (usually with screws).
- Locate the drain pump (consult your manual for the exact spot).
- Disconnect power, then check for debris inside the pump impeller.
- Spin the impeller by hand; it should move freely.
Insight: Sometimes small bones, glass, or food can jam the pump. If the pump is damaged or doesn’t run, it may need replacing.
2. Inspect The Air Gap
If your kitchen sink has a small cylindrical fitting (the air gap), remove the cover and clean out debris inside with a brush or stream of water.
3. Examine The Check Valve
Some Asko models have a check valve to prevent backflow. If this gets stuck, water won’t drain properly. You may need to remove it (usually near the drain pump or hose) and clean or replace it.
4. Electrical And Control Panel Issues
- Check your home’s circuit breaker.
- Inspect the control panel for error codes (refer to your Asko manual).
- Reset the dishwasher by unplugging for 5-10 minutes.
Model-specific Draining Tips For Asko Dishwashers
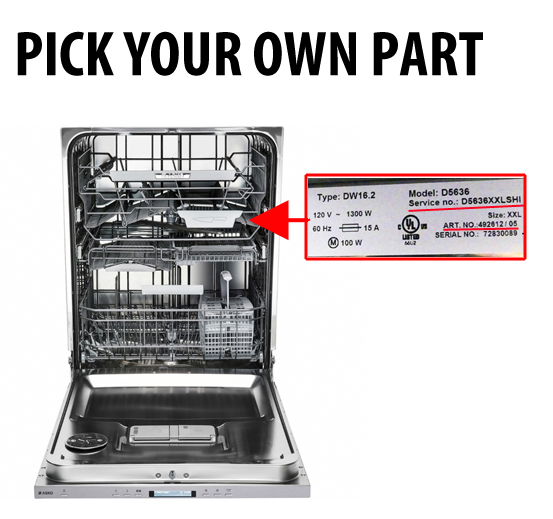
Asko designs change over time, so draining methods can vary. Here’s a quick comparison of popular Asko models and their draining parts:
| Model | Filter Location | Drain Pump Access | Special Note |
|---|---|---|---|
| D5436 | Bottom center | Front kickplate | Manual filter removal |
| D5556 | Bottom right | Front panel (screw) | Magnetic float switch |
| DBI663IS | Bottom center | Rear panel (difficult) | Sensor-controlled drain |
| D5534 | Bottom center | Front kickplate | Simple filter twist |
Tip: Always check the user manual for your specific model before taking panels off. Some newer models have sensors that trigger error codes if parts are not replaced correctly.

Credit: www.youtube.com
Signs Your Dishwasher Needs Draining
Sometimes it’s not obvious when your Asko dishwasher needs to be drained. Look for these warning signs:
- Standing water after a wash cycle.
- Bad odors from inside.
- Water leaks onto the floor.
- Dishes not drying properly.
- Error codes on the control panel (like F11 or F12).
If you see these signs, act quickly. Letting water sit can cause mold, bacteria, and even damage your kitchen floor.
Preventing Future Drain Problems
Once you’ve fixed the draining issue, take steps to keep your dishwasher running smoothly.
1. Clean The Filter Regularly
- Remove and rinse the filter every week if you use the dishwasher daily.
- For less frequent use, clean it at least once a month.
2. Scrape And Rinse Plates
- Remove large food pieces before loading dishes.
- Avoid putting bones, seeds, or paper labels in the dishwasher.
3. Use The Right Detergent
- Too much soap or the wrong kind can cause excess suds and blockages.
- Stick to detergents marked for automatic dishwashers.
4. Run Hot Water First
- Before starting the dishwasher, run the kitchen tap until water is hot. This helps break down grease and prevents clogs.
5. Inspect Hoses And Connections
- Every few months, check the drain hose for kinks or buildup.
- Ensure the hose is looped upward (high loop) to stop backflow.
Non-obvious insight: Hard water can lead to mineral buildup in hoses and parts. If you live in a hard water area, use a dishwasher cleaner monthly to remove limescale.
When To Call A Professional
Some problems are too complex or risky to fix yourself. Contact a qualified technician if:
- The drain pump makes loud, unusual noises or doesn’t run at all.
- Error codes keep appearing after resets and cleaning.
- There are leaks from inside the door or under the machine.
- You feel uncomfortable handling electrical parts.
A pro can diagnose electrical faults, faulty sensors, or replace major components safely.
Understanding Error Codes Related To Draining
Many Asko dishwashers display error codes. Here are the most common draining-related ones:
| Error Code | Possible Cause | Action |
|---|---|---|
| F11 | Drainage problem detected | Check filter, hose, pump |
| F12 | Water inlet issue (can affect draining) | Check water supply and filters |
| F54 | Blocked pump or sensor issue | Clean pump and reset |
| F55 | Pump failure | May need pump replacement |
Check your user manual for the full list and steps specific to your model.
Step-by-step Example: Draining A Flooded Asko Dishwasher
To make things clearer, here’s a real-world example using the Asko D5534 model:
- Unplug the dishwasher and turn off the water.
- Open the door and remove both racks.
- Scoop out water with a cup into a bucket.
- Remove the filter by twisting it counterclockwise.
- Clean the filter thoroughly under running water.
- Shine a flashlight into the drain area and pull out any debris.
- Disconnect the drain hose from the back (use pliers for the clamp).
- Blow through the hose to clear any clog. Rinse with water if needed.
- Reconnect the hose, filter, and racks.
- Turn power and water back on. Run the rinse cycle to test.
If water still doesn’t drain, move on to checking the pump or call a technician.
Common Mistakes To Avoid When Draining An Asko Dishwasher
Even careful people can make errors. Here are mistakes to watch for:
- Forgetting to unplug the dishwasher before starting. This is dangerous.
- Not removing all water before opening hoses or pumps, leading to spills.
- Losing screws or small parts when removing panels.
- Forcing parts back into place; Asko parts usually fit smoothly.
- Skipping the user manual; models differ, so check yours for specifics.
- Using sharp tools inside the drain area, which can damage seals.
Comparing Asko Dishwasher Draining To Other Brands
You might wonder how Asko’s draining system compares to other dishwashers. Here’s a quick look:
| Brand | Filter Access | Drain Pump Location | Ease of Manual Drain |
|---|---|---|---|
| Asko | Front bottom, easy | Front/rear panel | Moderate |
| Bosch | Front bottom, twist-out | Front panel | Easy |
| GE | Side or bottom | Bottom panel | Moderate |
| Samsung | Bottom, under spray arm | Front kickplate | Hard |
| Whirlpool | Bottom, snap-in | Front panel | Easy |
Insight: Asko dishwashers are built for durability and quiet operation, but sometimes this means internal parts are harder to reach than brands like Bosch or Whirlpool.
Environmental Tip: Reusing Drain Water
If your dishwasher is full of clean or soapy water (not greasy), you can use it to clean floors, patios, or even flush toilets. Just scoop it out with a bucket instead of pouring it down the drain. This small step helps save water, especially in areas with shortages.
Credit: www.askoapplianceparts.com
Maintenance Schedule For A Healthy Asko Dishwasher
A simple routine helps prevent drainage issues:
- Weekly: Rinse the filter, wipe the door seal.
- Monthly: Run an empty cycle with dishwasher cleaner to remove buildup.
- Every 6 months: Inspect and clean the drain hose, check for leaks.
- Annually: Have a technician inspect if you notice recurring problems.
Mark these tasks on your calendar or phone reminder to keep your dishwasher working like new.
Real-world Example: Cost Of Professional Repair Vs Diy
Let’s compare the cost if you drain your Asko dishwasher yourself versus hiring a pro:
- DIY Drain and Clean: $0 (if you already have basic tools)
- Professional Service Call: $100–$200 for visit and cleaning
- Pump Replacement: $50–$150 for part, plus $100 labor if needed
Most clogs are fixable at home. But if you’re unsure, the safety and warranty protection of a professional is worth the cost.
For more details on dishwasher maintenance and repairs, you can visit the official Asko support site.

Credit: perthappliancespares.com.au
Frequently Asked Questions
Why Is There Water Left In My Asko Dishwasher After Every Cycle?
This usually means a clogged filter or drain hose. Remove and clean the filter, check the hose for kinks or blockages, and make sure the garbage disposal (if connected) isn’t clogged. If the problem continues, the drain pump may be faulty.
How Often Should I Clean The Filter And Drain System In My Asko Dishwasher?
Clean the filter every week for daily use, or at least once a month for less frequent use. Check and clean the drain hose every 6 months. Regular cleaning prevents most drainage problems.
What Should I Do If My Asko Dishwasher Shows Error Code F11?
Error code F11 means there’s a drainage issue. Start by unplugging the machine, removing standing water, cleaning the filter, and checking the drain hose. If the code won’t clear, the drain pump or a sensor may need professional repair.
Can I Use Chemicals To Unclog My Asko Dishwasher Drain?
Avoid strong chemicals like drain openers, as these can damage plastic parts and seals. Instead, use hot water, vinegar, or a dishwasher cleaner. For tough clogs, disconnect and manually clean the hose.
Is It Safe To Drain My Asko Dishwasher Myself?
Yes, it’s safe if you turn off power and water first. Follow the steps in this guide and wear gloves. If you feel unsure or see electrical problems, call a professional.
Draining your Asko dishwasher is a practical skill that saves money and keeps your kitchen running smoothly. With regular maintenance and the steps above, you can handle most drainage issues at home, avoid bad smells, and keep your dishes sparkling clean.