
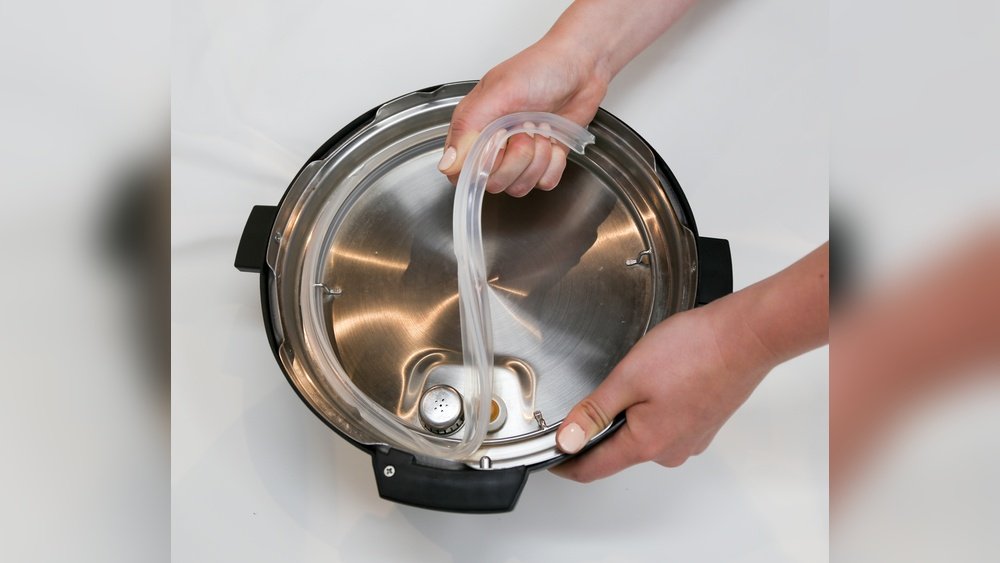
How To Install Sealing Ring On Instant Pot
If you own an Instant Pot, you already know how it makes cooking faster and easier. But many users struggle with one simple thing: installing the sealing ring correctly. This small silicone ring plays a big role in the safety and performance of your Instant Pot. If it’s not fitted properly, the pot won’t build pressure, recipes may fail, and you could even have a messy kitchen accident.
Learning how to install the sealing ring on your Instant Pot is essential for every user, whether you’re a beginner or an experienced cook. In this guide, I’ll show you every step, share expert tips, and answer common questions. You’ll also learn how to choose the right ring, how to spot problems, and how to care for your sealing ring so it lasts longer.
Let’s get started and make sure your Instant Pot works perfectly every time.
What Is The Sealing Ring And Why Is It Important?
The sealing ring is a thick, flexible silicone band that sits inside the Instant Pot’s lid. Its job is simple but crucial: it creates an airtight seal, which lets the pot build up pressure and cook food quickly.
If the sealing ring is missing, loose, or damaged, your Instant Pot won’t work as designed. Steam will escape, pressure won’t build, and the cooking process can be unsafe. This ring also helps to keep flavors locked in, so your food tastes better.
Key Roles Of The Sealing Ring
- Pressure Retention: Keeps steam inside, allowing pressure to build.
- Safety: Prevents leaks and dangerous steam escapes.
- Flavor Control: Stops strong odors and flavors from mixing.
Types Of Sealing Rings: Know Before You Buy
Not every sealing ring fits every Instant Pot. There are different sizes and colors, and choosing the wrong one is a common mistake. Here’s what you need to know before buying a replacement or a spare.
| Instant Pot Model | Ring Size | Ring Color Options | Material |
|---|---|---|---|
| 3 Quart (Mini) | 7-inch | Clear, Red, Blue | Food-grade silicone |
| 6 Quart (Most Popular) | 8.5-inch | Clear, Red, Blue | Food-grade silicone |
| 8 Quart (Large) | 9.5-inch | Clear, Red, Blue | Food-grade silicone |
| 10 Quart (Max) | Not Standard | Clear | Food-grade silicone |
Tips For Choosing The Right Sealing Ring
- Check your Instant Pot model and size (usually written on the bottom of the cooker).
- Buy only Instant Pot-branded or certified third-party rings for best results.
- Consider buying two different colors—one for savory food and one for desserts.
When Should You Replace The Sealing Ring?
You don’t need to replace the sealing ring after every use, but it’s not a part that lasts forever. Here’s how to know when it’s time for a new one:
- Odor: If the ring keeps strong smells even after cleaning, it’s time to replace it.
- Cracks or Deformation: Any visible damage means the ring can’t seal properly.
- Loss of Elasticity: If it feels stiff or stretched out, it won’t work well.
- Regular Use: Instant Pot recommends replacing the ring every 12-18 months, or sooner if you use the pot daily.
Tools And Materials You’ll Need
Installing a sealing ring is simple and does not require special tools, but having the right items ready will make the process easier.
- New sealing ring (correct size for your Instant Pot)
- Mild dish soap and warm water for cleaning
- Dry towel or paper towels
- Instant Pot lid (clean and dry)
- Optional: Food-safe gloves (for those sensitive to silicone)
Step-by-step Guide: How To Install Sealing Ring On Instant Pot
Getting the sealing ring installed the right way is easy if you follow these clear steps. Don’t rush—spending a minute to fit it correctly is safer and saves time later.
1. Clean Your Hands And The Ring
Start with clean, dry hands. Wash the new sealing ring in warm, soapy water to remove any manufacturing residue. Dry it completely with a towel.
2. Remove The Old Sealing Ring
Open your Instant Pot lid. On the underside, you’ll see the old ring fitted into a round groove. To remove it:
- Grab a section of the ring and gently pull it outward.
- Work your way around the lid, pulling the ring out of the groove.
- Set the old ring aside for cleaning or disposal.
3. Inspect The Groove
Check the circular groove where the ring sits. Make sure it’s clean and dry. Even a small bit of food or oil can stop the new ring from sealing properly. Wipe with a damp cloth if needed.
4. Align The New Ring
Take your new ring and line it up with the groove. Notice that the ring has a slightly raised edge—this should fit snugly inside the groove all the way around.
5. Press The Ring Into Place
- Start at one point on the lid and press the ring down into the groove.
- Move around the lid, pressing the ring firmly into the groove every few inches.
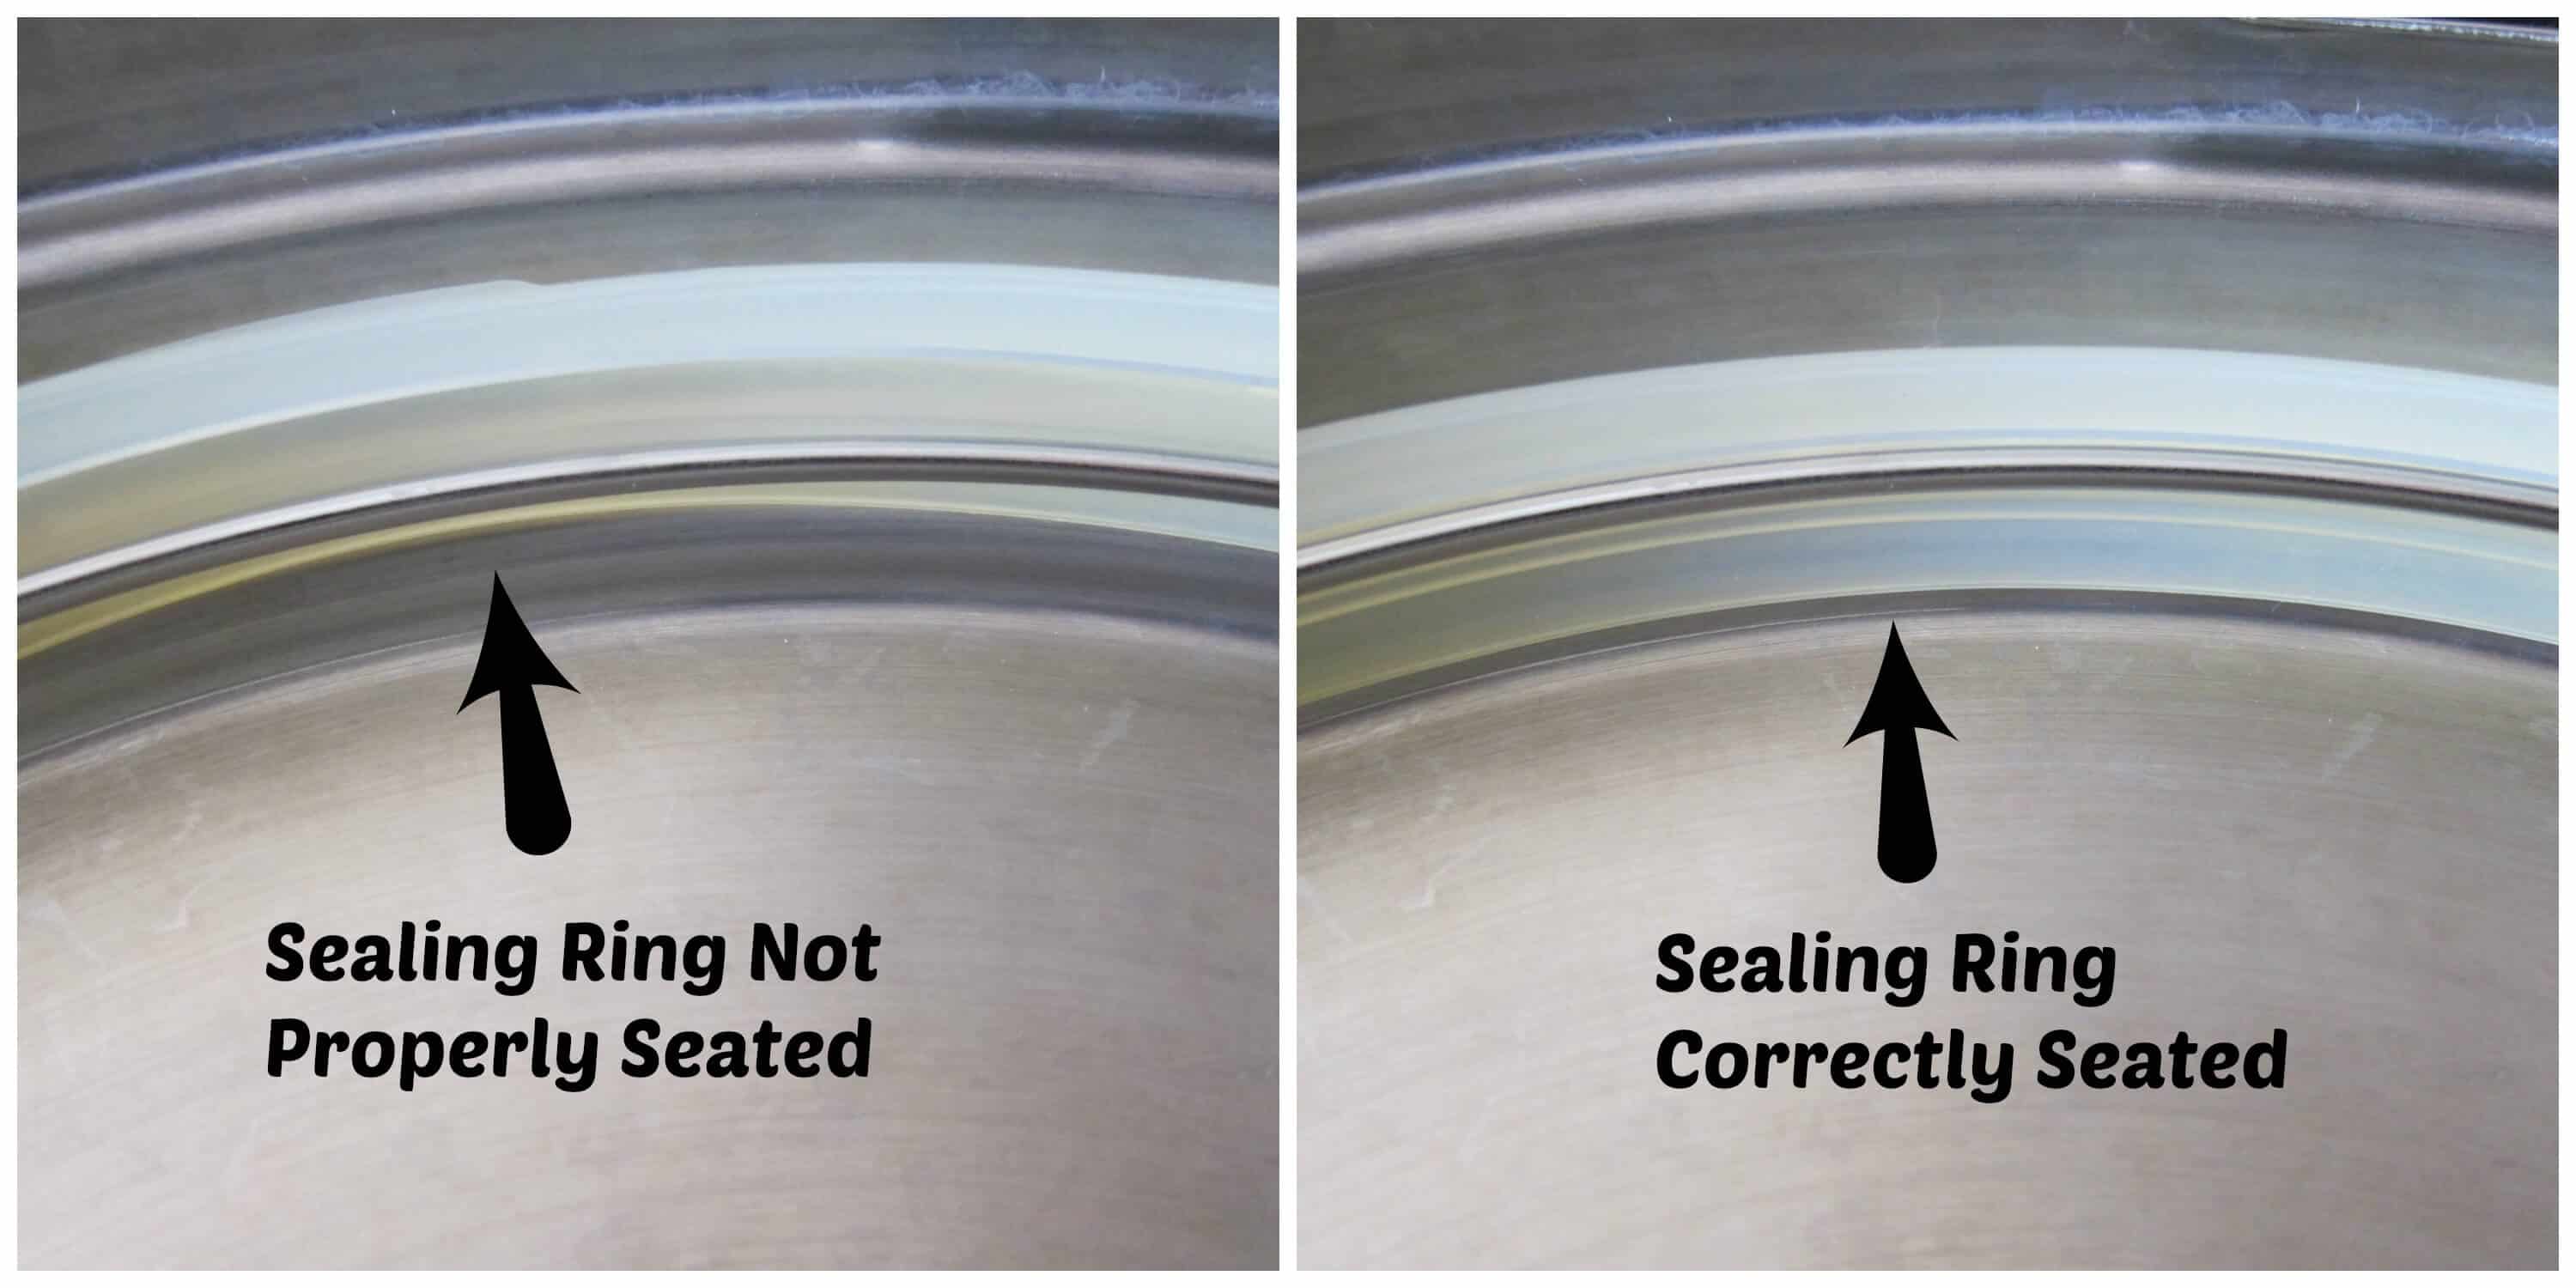
- Check that the ring is flat, not twisted or bulging anywhere.
6. Double-check The Fit
Run your fingers around the ring. Make sure it’s evenly seated all the way around. The ring should feel secure and not move easily.
7. Test The Lid
Place the lid back on your Instant Pot and twist it closed. If the lid closes smoothly and the ring doesn’t slip out, it’s installed correctly.
8. Do A Water Test
Before cooking food, it’s smart to do a simple water test:
- Add 2-3 cups of water to the pot.
- Close the lid and set the Instant Pot to “Pressure Cook” for 2 minutes.
- If the pot comes to pressure and doesn’t leak steam from the sides, your ring is installed perfectly.
Common Mistakes When Installing The Sealing Ring
Many users think installing the ring is foolproof, but a few common errors can cause big problems:
- Not seating the ring fully: If the ring isn’t in the groove all the way, steam will escape.
- Twisting or folding: A twisted ring won’t make a good seal.
- Using the wrong size: Even a small size difference will prevent sealing.
- Not cleaning the groove: Bits of old food or oil can block the seal.
Credit: magroadvogados.com
How To Tell If The Sealing Ring Is Installed Correctly
Sometimes it’s hard to know if you did it right. Here are simple signs your sealing ring is correctly installed:
| Sign | What It Means |
|---|---|
| Ring sits flat in groove | Even seal, no leaks expected |
| Ring doesn’t slip when touched | It’s tight enough for a good seal |
| Lid closes smoothly | No obstruction from the ring |
| Water test passes | Pressure builds, no steam leaks |
If you notice the lid is hard to close, or you see steam leaking from the sides during use, check your sealing ring immediately.
Caring For Your Sealing Ring: Cleaning And Maintenance
A clean, well-maintained sealing ring lasts longer and works better. Here’s how to care for it:
Routine Cleaning
- After every use, remove the ring and wash it with mild soap and warm water.
- Let it air dry completely before reinstalling.
Deep Cleaning For Odors
- Soak the ring in a mix of 1 cup vinegar and 1 cup water for 15-30 minutes.
- Rinse well and dry.
Avoid These Mistakes
- Don’t use harsh cleaners or bleach—they can damage the silicone.
- Don’t put the ring in direct sunlight for long periods (can cause hardening).
- Don’t stretch or twist the ring too much.
Storing The Sealing Ring
Store the ring in the lid, but keep the lid upside down. This helps air flow and prevents odors. Some users store their ring separately, especially if cooking both sweet and savory dishes.
Why Sealing Ring Odor Happens And How To Prevent It
Silicone is great for sealing, but it can absorb strong smells like garlic or spices. Here’s what you can do:
- Use one ring for savory, one for sweet dishes.
- Store the ring with a piece of lemon peel or baking soda nearby to absorb odors.
- Clean the ring right after cooking strong-smelling food.
Troubleshooting: When Pressure Doesn’t Build
Sometimes, after installing a new sealing ring, you might notice your Instant Pot is not building pressure. Here’s what to check:
- Is the ring the right size and fully seated? Double-check for gaps.
- Is the steam release handle set to “Sealing”? If not, pressure escapes.
- Is the float valve clean and moving freely? Blocked valves stop pressure.
- Is the lid closed correctly? Look for any obstruction.
- Is the sealing ring damaged? Even new rings can have defects.
A helpful tip: If you’re ever unsure, do a water test before cooking food.

Credit: www.youtube.com
Sealing Ring Installation: Myths And Real-world Examples
Many Instant Pot users believe that any silicone ring will do. But only Instant Pot-certified rings are tested for fit and safety. Using off-brand or incorrect rings can cause pressure loss or even damage your pot.
One common myth is that a new ring must be “broken in. ” In reality, a new ring works best when clean and properly installed. If you notice a strong plastic smell from a new ring, simply wash and air it out before use.
Here’s a real example: A user tried to cook beans, but the pot never built pressure. After checking everything, the cause was a sealing ring that was twisted and not seated evenly. Once installed correctly, the pot worked perfectly. This shows how a small detail can change your Instant Pot experience.
Comparing Sealing Rings: Official Vs. Aftermarket Brands
Many users wonder if they can save money by buying generic sealing rings. Let’s compare official and aftermarket options:
| Feature | Official Instant Pot Ring | Aftermarket Ring |
|---|---|---|
| Material Safety | Certified food-grade silicone | Varies (not always certified) |
| Fit | Guaranteed for your model | Sometimes too loose/tight |
| Durability | 12-18 months typical | 6-12 months typical |
| Warranty | Backed by Instant Pot | Usually none |
| Price | Higher | Lower |
Non-obvious tip: Some cheap rings may look similar but use lower-quality silicone that can fail under high pressure or absorb odors faster. Always check reviews and buy from trusted sellers.
Expert Tips For Safe And Easy Sealing Ring Installation
- Warm the ring slightly in hot water before installing. It becomes more flexible and easier to fit.
- After installing, twist the ring gently around the groove to make sure it’s not twisted or bunched up.
- If cooking for people with allergies, always use a freshly cleaned ring and lid to prevent cross-contamination.
- Mark your rings with a permanent marker or colored band to keep track of which one is for savory or sweet recipes.
How Long Does A Sealing Ring Last?
Most Instant Pot sealing rings last 12 to 18 months with regular use. If you cook daily or make a lot of spicy dishes, it’s smart to change the ring every year. A ring that looks fine on the outside may still lose its elasticity over time, which can cause subtle leaks or trouble building pressure. Always keep a spare ring on hand.
Installing Sealing Ring On Different Instant Pot Models
While the basic installation steps are the same, some models have small differences:
- Duo Series: Standard groove, easy fit.
- Ultra and Max: Slightly wider groove, so make sure the ring is pressed in evenly.
- Mini Models (3-quart): Smaller, tighter fit—take extra care to seat the ring evenly.
If your Instant Pot has a different release valve or lid design, always check the manual for model-specific advice.
Safety Reminders: Pressure And Sealing Ring Use
The sealing ring is a safety device. If it’s not installed correctly, your Instant Pot may not work or could even be dangerous. Never use the pot if you see cracks, tears, or if the ring is loose. Steam leaks can burn skin and damage kitchen surfaces.
Always let the pot cool before removing the ring, and never force the ring out or in. If you feel resistance, check for leftover food or debris.
Environmental Tips: Recycling Old Sealing Rings
Silicone is not always accepted in regular recycling bins. Check with your local recycling center for options. Some companies offer mail-in silicone recycling programs. If your old ring has no food or chemical contamination, it can sometimes be reused for non-food uses, like jar openers or craft projects.
Why Regular Sealing Ring Checks Are Essential
It’s easy to forget about the sealing ring, but regular checks are important. A worn or loose ring is the most common reason for Instant Pot pressure problems. Including a quick ring check in your cooking routine saves time and prevents meal disasters.
The Science Behind The Sealing Ring
The Instant Pot uses pressure to cook food much faster than traditional methods. The sealing ring is the key to trapping steam inside the pot, raising the temperature and speeding up cooking. Even a tiny gap or twist in the ring can break the seal and stop the process.
Fun fact: At sea level, water boils at 212°F (100°C), but under pressure in the Instant Pot, it can reach 239°F (115°C) or more. This is only possible with a perfect seal, thanks to the silicone ring.
Useful Resources For Instant Pot Users
If you want more details or troubleshooting help, visit the official Instant Pot website or check their user forums. For in-depth science on pressure cooking, see this article from Wikipedia.

Credit: instaextras.com
Frequently Asked Questions
How Often Should I Replace My Instant Pot Sealing Ring?
You should replace the sealing ring every 12 to 18 months, or sooner if you notice cracks, loss of elasticity, or stubborn odors that don’t wash out. Heavy users may need to change it yearly.
Can I Use My Instant Pot Without The Sealing Ring?
No, the pot won’t build pressure without the sealing ring. Cooking without it can be unsafe and will result in undercooked food or liquid leaks.
Why Does My Sealing Ring Smell Bad?
Silicone can absorb strong food odors. To reduce smells, wash the ring soon after use, soak it in vinegar and water, or keep two rings (one for savory, one for sweet dishes).
How Do I Know If The Sealing Ring Is Installed Correctly?
The ring should sit flat in the lid’s groove, not move easily, and pass the water test (pot builds pressure with no steam leaks). The lid should close smoothly without resistance.
Are Aftermarket Sealing Rings Safe To Use?
Some aftermarket rings are safe, but quality varies. Always buy from trusted brands and check that the ring is food-grade silicone, fits your model, and passes pressure tests.
Installing and caring for your Instant Pot sealing ring may seem like a small thing, but it has a big effect on safety, cooking results, and the life of your appliance. By following these steps, tips, and checks, you’ll get reliable performance every time you cook. Happy pressure cooking!