Many homeowners want their kitchens to feel bigger, brighter, and more stylish. Installing mirrors on your kitchen backsplash is a creative way to achieve this. Mirrors can reflect natural light, make a small kitchen seem more spacious, and add a unique design feature.
But placing mirrors in a kitchen is not the same as hanging one in your living room. There are special steps, choices, and safety details to consider. This guide gives you everything you need to know about how to install mirrors on your kitchen backsplash—so you can get a beautiful, lasting result with confidence.
Why Choose Mirrors For Kitchen Backsplash
Mirrored backsplashes are not only about looks. They offer practical benefits that make a real difference in your kitchen.
Visual Expansion
A mirror reflects both light and space. If you have a small or narrow kitchen, a mirrored backsplash can make it feel twice as large. The effect is especially strong in galley or apartment kitchens.
More Natural Light
Kitchens often lack enough natural light. Mirrors bounce light around, making the whole room brighter. Even a single window can feel doubled in effect.
Modern And Timeless Style
Mirrors suit both ultra-modern and classic kitchens. Their neutral color and reflective surface work with almost any cabinet or countertop material.
Easy To Clean
A mirror is non-porous. This means it does not absorb stains or odors like tile grout might. A simple glass cleaner and cloth will remove most splatters.
Hides Imperfections
Mirrors can hide uneven walls or old tile. Because they create a flat, seamless look, they are ideal for covering up minor wall problems.
Insight: Many people do not realize that mirrors can also make your kitchen safer. By reflecting the cooking area, you can keep an eye on children or watch for boiling pots behind you.
Types Of Mirrors For Kitchen Backsplash
Not all mirrors are equal. The type you choose will affect both appearance and safety.
Clear Mirror
A standard clear mirror offers maximum reflection. It makes your kitchen feel as large and bright as possible. However, it also shows fingerprints and smudges more easily.
Tinted Mirror
Tinted mirrors (gray, bronze, or other colors) create a softer look. They reflect less light, which can add warmth or mood to your kitchen.
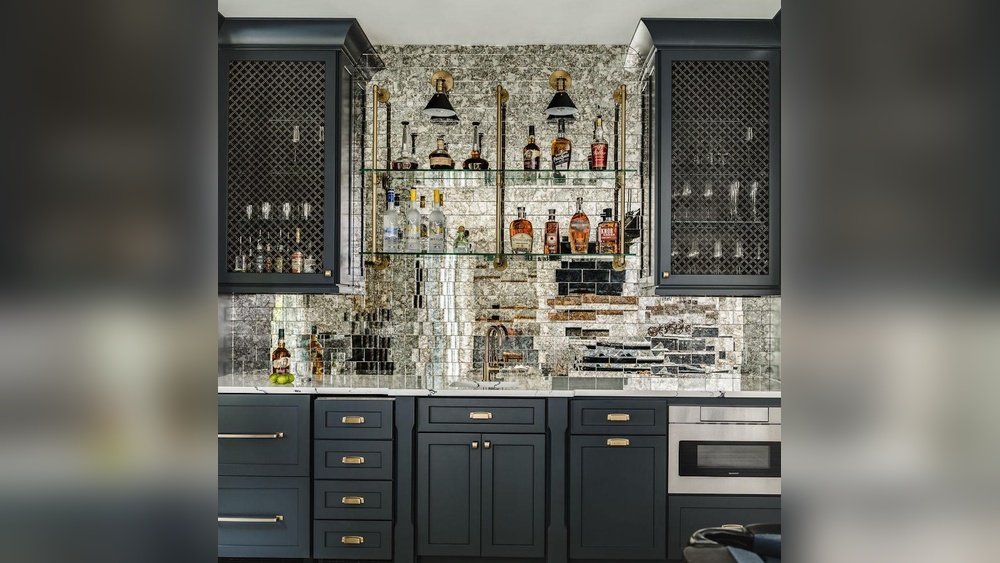
Antiqued Mirror
Antiqued mirrors have a mottled, aged look. This style works well in vintage or rustic kitchens. It also hides fingerprints and water spots.
Beveled Mirror
A beveled edge adds a touch of elegance. The edges are cut at an angle, which catches the light and adds a subtle detail.
Toughened Or Tempered Mirror
Safety is important in a kitchen. Toughened mirrors are heat-resistant and less likely to shatter. This is the best choice near stoves or ovens.
Custom Cut Vs. Tiles
You can choose large custom-cut pieces or small mirror tiles. Large pieces offer a seamless look, while tiles can create patterns or make installation easier.
Non-obvious Insight: Many beginners forget that mirrored tiles need perfect alignment. Small mistakes in spacing or leveling are much more visible with mirrors than with regular tiles.
Here is a quick comparison of the main types:
| Mirror Type | Best For | Drawbacks |
|---|---|---|
| Clear Mirror | Modern, bright spaces | Shows smudges easily |
| Tinted Mirror | Warmth, mood lighting | Less light reflection |
| Antiqued Mirror | Vintage, rustic style | More expensive |
| Toughened/Tempered | High-heat areas | Higher cost |
| Beveled Mirror | Elegant detail | Harder to clean edges |
Planning Your Mirrored Backsplash
Before you buy materials or start installation, planning is key. Good planning prevents costly mistakes and ensures a perfect fit.
Measure Your Space
Use a metal tape measure, not a cloth one, for more accuracy. Measure the length and height of the backsplash area. Remember to measure around outlets, windows, or cabinets.
Write down each measurement and double-check. Mistakes here mean wasted money on custom-cut glass.
Decide On Mirror Layout
- Full-Sheet: One large mirror piece. Clean look, but heavy and harder to install.
- Tiles: Smaller mirrors (square, rectangular, hexagonal, etc.). Easier for DIY, but needs careful alignment.
- Panels: Medium-sized pieces, often with beveled edges or patterns.
Sketch your backsplash on paper, marking outlets and edges. This will help you (or your glass supplier) plan the cuts.
Consider Edge Finishes
Sharp mirror edges can be dangerous. Choose from:
- Polished edge: Smooth, safe, and simple.
- Beveled edge: Decorative, adds style.
- Framed: Adds a border, but takes up space.
Factor In Electrical Outlets
Mirrors must be cut to fit around outlets, switches, or other fixtures. If you use full-size sheets, professional cutting is a must.
Choose Adhesive And Backing
Regular construction glue may not work for mirrors. Use mirror mastic or adhesives made for glass. Some mirrors need a special moisture-proof backing, especially behind sinks.
Practical Tip: Always buy 10% more mirror tiles than you think you need. Breakage and cutting mistakes are common.
Tools And Materials Needed
Having the right tools makes the job smoother and safer. Here is what you will need for most mirror backsplash projects:
- Mirror tiles or panels (cut to size)
- Mirror adhesive (mirror mastic, not regular glue)
- Painter’s tape
- Measuring tape
- Level
- Pencil or marker
- Notched trowel (for spreading adhesive)
- Caulk gun (if using adhesive tubes)
- Glass cleaner and cloth
- Safety gloves and goggles
- Plastic shims or spacers
- Utility knife
- Silicone sealant (for edges and seams)
- Caulk smoothing tool (optional)
- Drop cloth or cardboard (to protect counters)
If you are installing large panels:
- Suction cups (for lifting heavy glass)
- Drill with glass bit (for outlet cutouts)
Insight: Many people forget to check that their adhesive is “mirror-safe.” Some glues eat away at the silver backing, causing black spots over time.

Credit: www.amazon.com
Step-by-step Guide: Installing Mirrors On Kitchen Backsplash
Proper installation is the key to a long-lasting, beautiful mirrored backsplash. Follow these steps for the best results.
1. Prepare The Wall Surface
A mirror will show any bumps or holes behind it. For a flat, safe surface:
- Remove any old tiles, glue, or debris.
- Fill holes and sand rough spots.
- Clean the wall with soap and water. Let it dry fully.
- If the wall is very uneven, install a thin plywood backer panel for a flat surface.
2. Dry Fit The Mirror Tiles Or Panels
Before using adhesive, lay out all pieces to check fit:
- Place tiles or panels on the counter, in order.
- Check that all cutouts for outlets or switches are correct.
- Mark any adjustments needed.
3. Mark Your Layout
Use a level and pencil to draw guidelines on the wall. Start from the center or a key edge (like under a window) for a balanced look.
- Mark the height of the backsplash.
- Mark vertical lines for tile edges, if using tiles.
- Outline outlet or switch locations.
4. Apply The Adhesive
Use mirror mastic or an adhesive approved for mirrors.
- Read the adhesive instructions. Some need “curing” before placing the glass.
- For tiles, use a notched trowel to spread adhesive on the wall.
- For large panels, apply adhesive in vertical stripes (not dots) to prevent air pockets.
Safety Tip: Never use construction adhesive with solvent. It can damage the mirror backing.
5. Place The Mirror Tiles Or Panels
- Start from the bottom center and work outwards.
- Press each tile or panel firmly into place.
- Use plastic shims or spacers to keep even gaps (if needed).
- Use painter’s tape to hold pieces while the adhesive sets.
If using large panels, suction cups are a must for safe lifting. Get help—mirrors are heavy and break easily.
6. Cutouts For Outlets And Fixtures
If your mirror needs cutouts:
- Measure twice before marking the cut.
- Use a glass supplier for custom-cut panels whenever possible.
- If cutting is needed, use a drill with a glass bit at low speed. Wear gloves and goggles.
7. Check For Level And Alignment
Use a level after placing each row. Adjust before the adhesive sets. With mirrors, even small misalignments show clearly.
8. Seal Edges And Joints
Once the adhesive is dry (usually 24 hours), seal all edges with clear silicone sealant.
- Run a thin bead along the top, sides, and bottom.
- Smooth with a caulk tool or wet finger.
This keeps water out, protects the backing, and prevents mold.
9. Clean The Surface
Wipe the mirrors with glass cleaner and a soft cloth. Remove all fingerprints, tape, and dust.
Pro Tip: Wait until the adhesive is fully cured before heavy cleaning. Early cleaning can shift tiles.
Safety Considerations
Kitchen backsplashes see heat, steam, and daily activity. Mirrors must be installed and finished safely.
- Always use tempered glass behind stoves. Regular glass can shatter from heat.
- Edges should be polished or beveled to prevent cuts.
- Use only adhesives labeled safe for mirrors.
- Seal all edges, especially near sinks, to prevent water damage.
- Wear gloves and goggles when handling or cutting glass.
- If your kitchen is in an earthquake-prone area, use extra mirror mastic and mechanical fasteners.
Beginner Mistake: Never install a mirror directly behind a gas range without checking building codes. Some areas require a minimum distance or a heat shield.

Credit: apollotile.com
Common Mistakes And How To Avoid Them
Many DIYers make the same errors with mirrored backsplashes. Here is how to avoid the most common problems:
- Skipping Wall Prep: Uneven walls lead to cracked glass or gaps. Always smooth and clean the wall first.
- Wrong Adhesive: Regular glue can destroy the mirror’s backing. Only use mirror mastic or adhesives marked as mirror-safe.
- Poor Measurement: Small errors in measuring or marking can mean expensive re-cuts.
- Not Using Spacers: Without spacers, tiles may shift or squeeze together as adhesive dries.
- Rushing Installation: Adhesive needs time to set. Moving tiles too soon causes misalignment.
- Not Sealing Edges: Water damage is a big risk in kitchens. Always seal all edges with silicone.
- Ignoring Safety Gear: Handling mirror without gloves and goggles risks serious injury.
- Improper Support for Large Panels: Large mirrors are heavy and break easily. Use suction cups and never lift alone.
- Not Planning for Outlets: Outlets and switches must be cut out before installation. Cutting after mounting can crack the glass.
Tip: If in doubt, consult a glass professional for large or complex installations.
Cost Breakdown And Time Estimates
Mirrored backsplashes can be affordable or expensive, depending on your choices. Here’s what to consider.
Materials
- Mirror tiles: $8–$25 per square foot
- Custom-cut panels: $20–$80 per square foot
- Mirror mastic: $8–$15 per tube
- Silicone sealant: $5–$10 per tube
Labor
- DIY: Free, but budget for tools (about $50–$100 if you need trowels, suction cups, etc. ).
- Professional install: $10–$30 per square foot (higher for custom cuts or difficult layouts).
Time Needed
- Small kitchen (20 sq ft): 4–8 hours for DIY, plus drying time.
- Large kitchen or complex layout: 1–2 full days.
Here’s a comparison of costs for different backsplash options:
| Backsplash Material | Material Cost (per sq ft) | DIY Difficulty | Cleaning |
|---|---|---|---|
| Mirror Tile | $8–$25 | Medium | Easy |
| Custom Mirror Panel | $20–$80 | Difficult | Very Easy |
| Ceramic Tile | $5–$30 | Medium | Medium |
| Stainless Steel | $15–$40 | Hard | Easy |
Non-obvious Insight: Cheap mirror tiles often have thin silver backing. These can quickly develop black spots if exposed to steam or cleaning chemicals. Investing in higher-quality glass pays off in the long run.

Credit: www.domino.com
Design Ideas And Inspiration
Mirrored kitchen backsplashes offer many creative options. Here are a few ideas to help you find a style that fits your home:
- Full-length backsplash: One large mirror panel from counter to cabinet for a modern, seamless look.
- Subway mirror tiles: Classic subway tile shape, but in mirror, for a blend of old and new.
- Antiqued mirror mosaic: Small, irregular pieces for a vintage or rustic effect.
- Beveled-edge panels: Adds subtle sparkle and a high-end feel.
- Geometric patterns: Hexagon, chevron, or diamond-shaped mirror tiles for a bold statement.
- Framed mirror sections: Divide the backsplash into framed panels for a “window” effect.
- Mirror with accent tile: Combine mirror with marble or glass tiles for extra texture.
Example: In a small apartment kitchen, a single sheet of clear mirror doubled the sense of space and reflected light from a window, turning a dark corner into a bright focal point.
Cleaning And Maintenance
Mirrored backsplashes are easy to maintain if you follow a few simple rules:
- Daily cleaning: Use a mild glass cleaner and a soft cloth. Avoid rough sponges or abrasive cleaners.
- Remove splatters quickly: Grease and food stains are easier to clean before they dry.
- Check edges regularly: Reseal with silicone if you see gaps or peeling.
- Avoid harsh chemicals: Ammonia-based cleaners can damage the mirror’s backing.
- Do not hang heavy items: Avoid using suction hooks or adhesives that could pull on the glass.
Tip: For a streak-free finish, wipe the mirror with a microfiber cloth in a zig-zag pattern.
When To Call A Professional
Some mirror backsplash projects are not DIY-friendly. Hire a professional if:
- You want a single, large panel with complex cutouts.
- Your wall is very uneven or damaged.
- The backsplash is directly behind a gas range.
- You are not comfortable handling heavy or sharp glass.
- Local building codes require special materials.
Professional installers have tools for precise cuts and safe handling. They can also guarantee a seamless finish and proper sealing.
For more detailed safety codes and building standards, you can visit the National Fire Protection Association.
Environmental And Long-term Considerations
Mirrored glass is recyclable. However, the adhesive and backing may make recycling difficult. Whenever possible:
- Choose low-VOC adhesives for better indoor air quality.
- Select mirrors with eco-friendly silvering processes.
- Dispose of broken glass safely, following local guidelines.
Insight: Mirrors can last decades if well installed. However, water damage or poor adhesive is the main reason for failure, not physical breakage.
Frequently Asked Questions
How Do I Cut A Mirror For Outlet Holes?
Cutting mirrors for outlets is best done by a professional glass shop. They use special tools to cut precise holes without cracking the glass. If you must cut at home, use a diamond glass drill bit at low speed, keep the area wet, and wear safety gear.
Can I Use Regular Glue Or Construction Adhesive For Mirrors?
No. Regular glues can react with the mirror’s silver backing and cause black spots or peeling. Always use mirror mastic or adhesives labeled safe for mirrors.
Is A Mirrored Backsplash Safe Behind A Stove?
If you use tempered glass and follow building codes, a mirrored backsplash can be safe behind most stoves. Never use regular (non-tempered) glass behind a gas range, and always check your local requirements.
How Do I Keep My Mirrored Backsplash Clean And Streak-free?
Use a soft microfiber cloth and a gentle glass cleaner. Avoid paper towels or abrasive pads. Wipe in a zig-zag pattern and dry the surface to prevent streaks.
What Should I Do If A Mirror Tile Cracks Or Chips?
Remove the damaged tile carefully (use gloves), clean the area, and apply a new tile with mirror mastic. Seal the edges with silicone. If the crack is in a large panel, call a professional for safe removal and replacement.
Mirrored backsplashes bring a touch of luxury and brightness to any kitchen. With careful planning, the right tools, and attention to detail, you can achieve a stunning result that is both practical and beautiful. Take your time, measure twice, and enjoy the transformation in your kitchen.