A steaming cup of coffee can turn a slow morning into a good day. But what if your coffee maker suddenly stops working the way it should? Many people face problems with their coffee machine’s filter basket, especially with the spring mechanism inside. When the coffee filter basket spring breaks or sticks, your coffee can overflow, drip slowly, or not brew at all. Fixing this small part can save you the cost of buying a new coffee maker and help you enjoy your favorite drink at home. This guide will show you, step by step, how to fix a coffee filter basket spring, from understanding its role to practical repair methods, using simple language and clear advice.
Understanding The Coffee Filter Basket Spring
A coffee filter basket holds the coffee grounds and allows hot water to pass through, creating your coffee. The spring in the filter basket is a small but important part. Its main job is to control a tiny valve at the bottom of the basket. This valve opens when you place the carafe (coffee pot) under the basket, letting coffee drip down. When you remove the carafe, the spring closes the valve to stop coffee from spilling.
Without a working spring, the filter basket can cause many problems:
- Coffee overflows onto the hot plate.
- Water leaks from the basket when you remove the pot.
- Brewing stops or slows down.
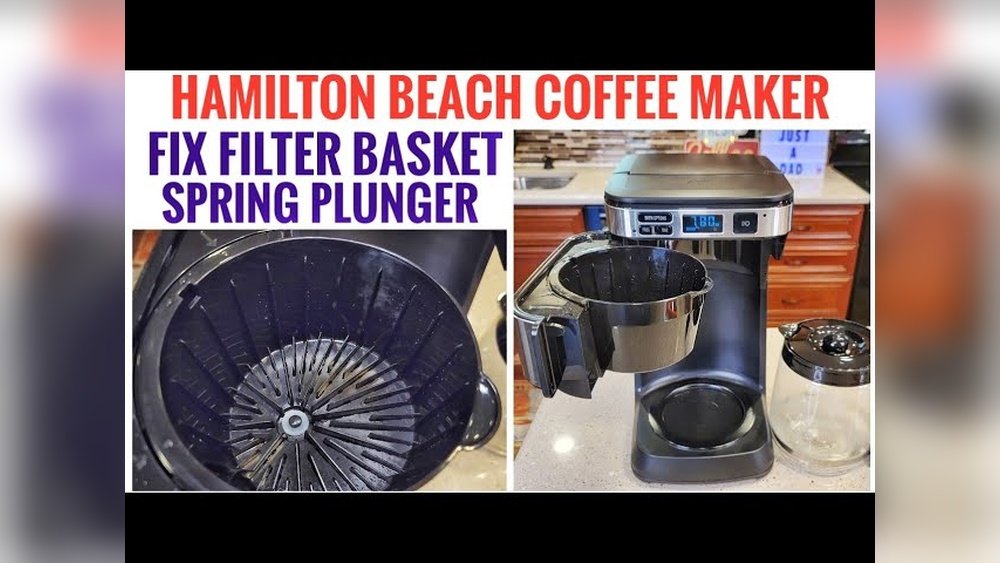
Many coffee makers from brands like Keurig, Mr. Coffee, and Hamilton Beach use this spring valve system. While the designs may look a little different, the basic function is the same.
Common Problems With Coffee Filter Basket Springs
Knowing the most common issues will help you diagnose and fix your coffee maker quickly.
1. Spring Loses Tension
Over time, the spring can stretch or lose its “bounce,” so it cannot close the valve tightly.
2. Spring Gets Stuck
Coffee grounds, minerals from water, or sticky coffee oils can make the spring or valve stick.
3. Spring Breaks Or Snaps
A broken spring won’t move the valve at all, causing leaks or no flow.
4. Valve Misalignment
Sometimes, the spring is fine, but the valve or basket is not seated correctly, so the mechanism does not work.
5. Rust Or Corrosion
Metal springs can rust, especially if you live in a humid place or don’t clean your coffee maker often.
Tools And Materials You Will Need
Before you start, gather some basic tools and materials. Having everything ready will make the repair smoother.
- Small flathead screwdriver
- Needle-nose pliers
- Paper towels or a clean cloth
- Mild dish soap
- White vinegar (for cleaning)
- Replacement spring (if needed; check your coffee maker’s model)
- Small brush (like an old toothbrush)
- Bowl or tray (to hold small parts)
- Cotton swab
If you do not have the exact replacement spring, you can sometimes use a pen spring as a temporary fix. However, always try to get the right part for long-term use.
Safety Precautions Before You Begin
Working with a coffee maker is generally safe, but it’s best to follow these simple rules:
- Unplug the coffee maker before starting any repair.
- Let the machine cool down if it was recently used.
- Keep small children and pets away from your workspace.
- Avoid using harsh chemicals for cleaning.
Credit: www.youtube.com
Step-by-step Guide: How To Fix A Coffee Filter Basket Spring
1. Remove And Inspect The Filter Basket
Take out the filter basket from your coffee maker. This is the part that usually holds the paper or mesh filter and the coffee grounds.
- Turn the basket upside down.
- Look for a small round or oval valve at the bottom center.
- Press gently on the valve to see if it moves up and down.
If the valve does not move, or feels loose, the spring may be stuck, broken, or missing.
2. Disassemble The Valve Mechanism
Most filter baskets have a snap-in or twist-off bottom cover holding the spring and valve.
- Use a small flathead screwdriver to carefully pry off the bottom cover.
- Place all small parts in a bowl or tray.
- Gently lift out the valve and spring.
Take note of how everything fits together. Taking a photo can help you remember the order when reassembling.
3. Clean The Parts Thoroughly
Often, the spring and valve stick due to coffee oils or mineral buildup.
- Soak the spring, valve, and cover in warm water with a little mild dish soap.
- Use a brush to scrub away residue.
- For tough mineral buildup, soak the parts in white vinegar for 10–15 minutes.
- Rinse well with clean water and dry with a paper towel.
Cleaning can sometimes fix the problem without needing new parts.
4. Inspect The Spring And Valve
Look closely at the spring:
- Is it stretched out or has lost its shape?
- Is it broken or rusted?
- Does the valve have cracks or chips?
If the spring or valve is damaged, you will need to replace it. If only dirty, a good cleaning is often enough.
5. Replace The Spring (if Needed)
If you have a replacement spring:
- Place the new spring in the same position as the old one.
- Make sure it sits flat and does not wobble.
- Insert the valve on top of the spring.
If you don’t have a replacement, you can try using a spring from a ballpoint pen as a short-term fix. Cut it to the same length as your original spring.
6. Reassemble The Filter Basket
- Fit the bottom cover back onto the basket.
- Make sure all parts are aligned and secure.
- Press the valve to check that it moves smoothly and springs back into place.
If it feels stiff, double-check that no debris is left inside.
7. Test The Repair
- Put the filter basket back in your coffee maker.
- Fill the water tank and run a cycle with just water (no coffee grounds).
- Watch for leaks or slow dripping.
- Remove and replace the carafe to see if the valve opens and closes correctly.
If everything works, you are done! If not, check each step again.
Table: Comparing Common Filter Basket Spring Problems And Solutions
Here’s a quick look at the most frequent issues and how you can solve them:
| Problem | Symptoms | Solution |
|---|---|---|
| Spring Stuck | Valve does not move, coffee overflows | Clean with soap and vinegar |
| Spring Broken | Valve stays open or closed, leaks or no flow | Replace spring |
| Rust/Corrosion | Spring looks orange or flaky | Replace with stainless steel spring |
| Valve Misaligned | Valve does not fully close, slow drip | Re-seat valve and spring |
When To Replace The Whole Filter Basket
Sometimes, a filter basket is too damaged to fix:
- The plastic is cracked or warped.
- The valve hole is broken.
- The spring mount is missing.
Replacement baskets are usually cheap and easy to find online or at appliance stores. Make sure you buy the right size and shape for your coffee maker model.
How To Find The Right Replacement Spring
If you need a new spring, you can search by your coffee maker brand and model. Check the user manual or the manufacturer’s website for parts numbers.
Most springs are:
- Made of stainless steel (better for rust resistance)
- About 1–2 cm long
- Medium tension
If you cannot find the exact part, take your old spring to a hardware store. Many stores sell small springs for appliances. Try to match the length, thickness, and tension.

Credit: www.ifixit.com
Table: Replacement Spring Options By Coffee Maker Brand
Choosing the correct spring is easier if you know your coffee maker’s brand.
| Brand | Common Spring Size | Where to Buy |
|---|---|---|
| Keurig | 1.2 cm, stainless steel | Official website, Amazon |
| Mr. Coffee | 1.5 cm, medium tension | Manufacturer, hardware stores |
| Hamilton Beach | 1.3 cm, stainless steel | Online parts retailers |
| Black+Decker | 1.4 cm, stainless steel | Appliance parts stores |
Tips For Keeping Your Coffee Filter Basket Spring In Good Shape
A little routine care can prevent most spring problems.
1. Clean The Basket After Each Use.
Wipe away coffee oils and grounds to stop buildup.
2. Soak In Vinegar Monthly.
Vinegar removes minerals that can make the spring stick.
3. Dry Thoroughly.
Leaving the basket wet can cause rust or mold.
4. Use Filtered Water.
Hard water leaves more minerals behind, which can clog the valve and spring.
5. Handle Gently.
Don’t use force when removing or cleaning the basket, as springs are delicate.
Non-obvious Insights For A Lasting Fix
Many people overlook these key points:
- The wrong spring tension can ruin your coffee.
If the replacement spring is too strong, the valve will not open easily, making the coffee drip too slowly or not at all. If it’s too weak, the valve may leak or not close, causing spills.
- Coffee oils can act like glue.
Even if you clean with water, sticky oils can remain. Use a little dish soap and a brush to remove all residue from the spring and valve.
- Some filter baskets have a hidden O-ring.
If your valve still leaks after fixing the spring, check for a small rubber O-ring or gasket. If it is worn or missing, replace it to get a tight seal.
Table: Symptoms Of A Bad Spring Vs. Other Coffee Maker Problems
It’s easy to think your coffee maker is broken when only the basket spring is the issue. Here’s how to tell:
| Symptom | Likely Cause | What to Check |
|---|---|---|
| Leaking from bottom of basket | Spring issue or valve misalignment | Inspect and clean spring, check valve position |
| Machine won’t brew at all | Clog in water line | Descale machine, check manual |
| Slow drip, weak coffee | Spring too strong or clogged valve | Test spring tension, clean valve |
| Basket overflows | Spring stuck, too many grounds, or paper filter folded | Clean spring, use proper filter and grounds amount |
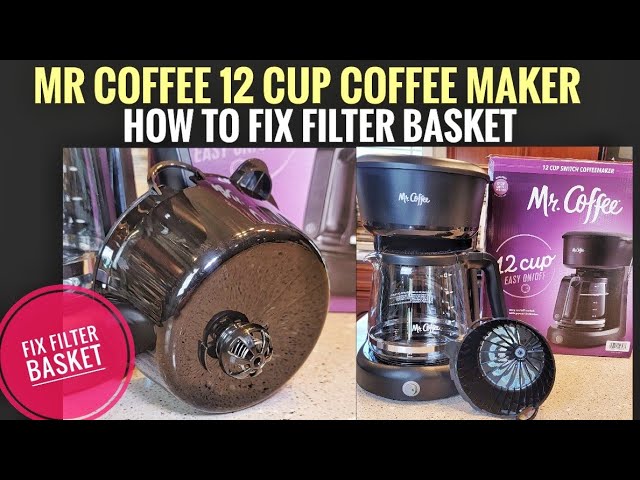
Real-world Example: Fixing A Mr. Coffee Basket
Let’s say you have a Mr. Coffee machine, and after brewing, you notice coffee leaking when you remove the carafe.
- Unplug the machine and let it cool.
- Remove the filter basket, flip it, and press the valve. It does not move.
- Pry off the basket’s bottom cover using a small screwdriver.
- The spring is visible but looks rusty and stuck.
- Remove the spring and valve, soak them in vinegar, and scrub gently.
- The spring is still weak. Replace it with a matching spring from the hardware store.
- Reassemble everything, making sure the valve moves freely.
- Test the machine with water only—no more leaks.
This process can be applied to most popular coffee makers with minor changes.
What If The Coffee Maker Still Leaks?
If your coffee maker still leaks after fixing the basket spring, consider these possibilities:
- The carafe is not sitting properly, so the valve cannot close.
- The filter basket is cracked or warped.
- The O-ring or gasket is missing.
- There’s a clog in the coffee maker’s water path (try descaling).
If you try these steps and still have problems, contact the manufacturer’s customer support or check their troubleshooting guides.

Credit: www.amazon.com
When Should You Call A Professional?
Most coffee filter basket spring repairs are easy and safe to do at home. However, you should consider a professional repair if:
- The spring or valve is not accessible (sealed design).
- The coffee maker is still under warranty (DIY repair may void it).
- The problem involves electrical parts or wiring.
For expensive or complex machines, professional service can protect your investment.
Where To Get More Help
Many coffee maker brands provide free guides and videos on their websites. YouTube also has step-by-step repair videos for common models. For detailed technical support, visit the official site of your coffee maker or check resources like iFixit.
Frequently Asked Questions
Why Does My Coffee Maker Leak When I Remove The Pot?
This usually happens if the filter basket spring or valve is stuck open or broken. When you remove the carafe, the spring should push the valve closed, stopping the coffee from dripping. If it leaks, clean or replace the spring and check the valve alignment.
Can I Use Any Spring To Replace The Coffee Filter Basket Spring?
You must use a spring with similar size and tension. A pen spring can work as a short-term fix, but for best results, use one designed for your coffee maker model. Wrong tension can cause leaks or slow brewing.
How Often Should I Clean The Filter Basket And Spring?
Clean the filter basket after every use. Deep clean the spring and valve with vinegar at least once a month, or more often if you use hard water. Regular cleaning prevents buildup and extends the life of the spring.
Is It Safe To Fix The Coffee Filter Basket Spring Myself?
Yes, it’s safe if you unplug the coffee maker and let it cool first. The spring and valve are mechanical parts. Avoid touching any electrical components. If your machine is under warranty, check the terms before repairing.
Where Can I Buy A Replacement Coffee Filter Basket Spring?
Check the manufacturer’s website, appliance parts stores, or online marketplaces like Amazon. Bring your old spring to a hardware store if you need help finding the correct size.
A working coffee filter basket spring means better coffee and fewer messes. With a little care and the right steps, you can fix most problems at home and enjoy your favorite brew every morning.