Milk kefir grains are living cultures that transform ordinary milk into a tangy, probiotic-rich drink. For many, caring for these grains becomes a daily ritual, but what happens when life gets busy or you need a break? Storing milk kefir grains the right way is the key to keeping them healthy, potent, and ready for future use.
Many new kefir makers get nervous about storage, but with the right steps, it’s easy to protect these valuable grains for days, weeks, or even months.
This guide explores everything you need to know about storing milk kefir grains. You’ll learn short-term and long-term storage methods, what supplies to use, how storage affects grain health, and how to revive grains after a break. You’ll also find practical tips, common mistakes to avoid, and answers to frequent questions.
Whether you’re a beginner or an experienced kefir maker, you’ll discover best practices and insights that help you keep your grains strong and productive for years.
Understanding Milk Kefir Grains
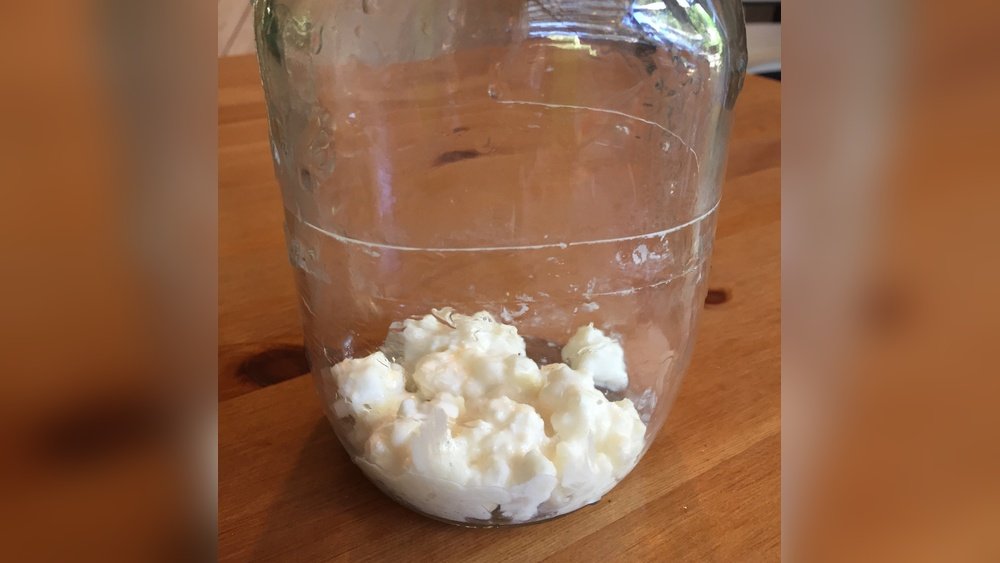
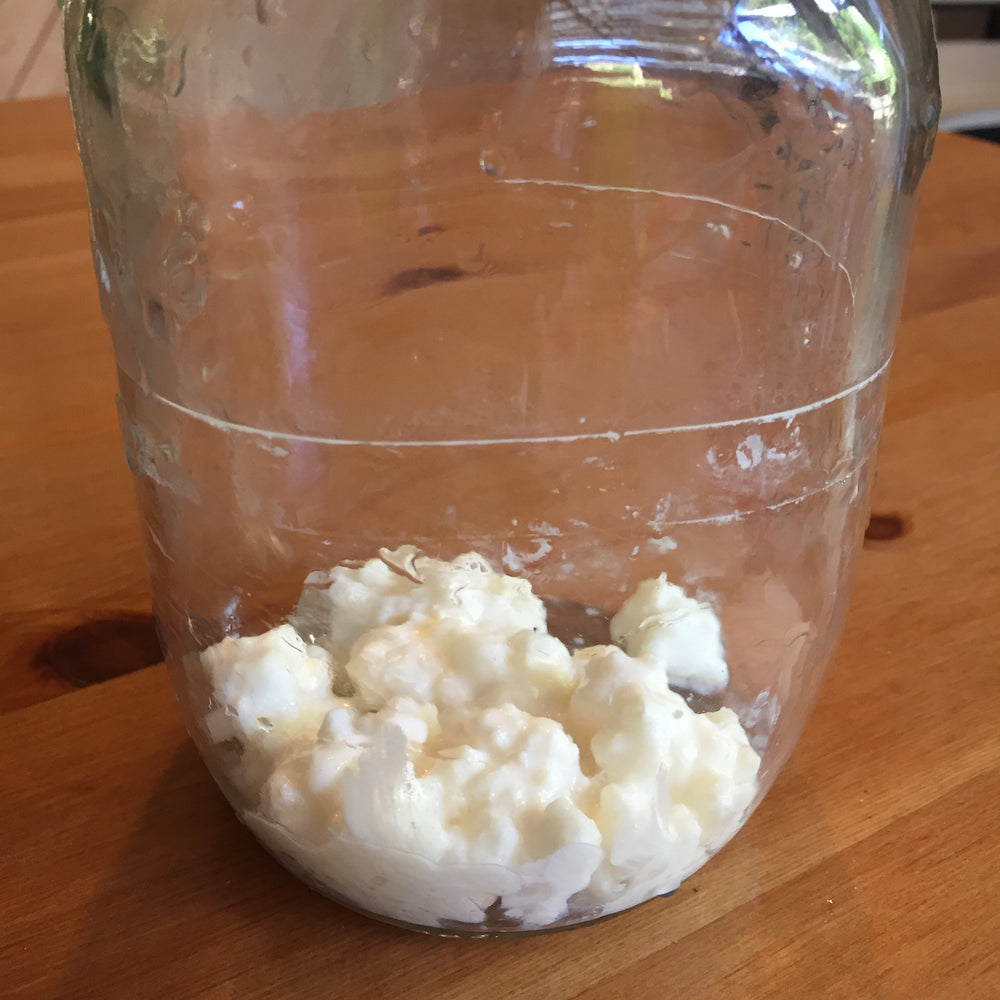
Before you store kefir grains, it helps to know what they are. Milk kefir grains are not grains like wheat or rice. They are small clusters made of proteins, polysaccharides, and a mix of bacteria and yeast. This unique mix is what turns milk into kefir.
The grains look like tiny cauliflower florets, usually white or cream-colored, and feel a bit rubbery or squishy.
The health of your kefir grains depends on their environment. They need food (milk sugars) and the right temperature to thrive. If conditions change too much, the grains can go dormant or even die. Proper storage methods protect them during breaks and help ensure they bounce back quickly.
Why Proper Storage Matters
Storing milk kefir grains is not just about keeping them alive. The way you store them affects their strength, flavor, and fermentation ability. Improper storage can lead to weak grains, off flavors, or contamination. Losing your grains means starting over, so it’s worth learning how to do it right.
Common reasons to store kefir grains include:
- Going on vacation or a business trip
- Reducing fermentation frequency
- Taking a break for health or dietary reasons
- Saving extra grains for backup or sharing
Understanding storage options helps you choose the best method for your situation.
Short-term Storage (up To 2 Weeks)
If you need to pause kefir making for a few days or up to two weeks, short-term storage is enough. This method keeps your grains in good shape and makes restarting easy.
Storing In The Refrigerator With Milk
The simplest way is to leave the grains in fresh milk and refrigerate them. Cold slows their activity but doesn’t stop it completely.
Steps:
- Place kefir grains in a clean glass jar.
- Add enough fresh milk to fully submerge the grains (typically 1-2 cups).
- Cover the jar loosely with a lid or cloth. This allows some airflow, but keeps out dust.
- Place the jar in the refrigerator (ideally at 36–40°F or 2–4°C).
Tips:
- Use whole milk for best results.
- If storing longer than 7 days, change the milk once per week to prevent spoilage.
Why this works: The cold slows the fermentation, so the grains consume lactose more slowly. This keeps them healthy without over-fermenting the milk.
What To Expect
When you take the grains out of the fridge, they may need 1-2 batches to fully reactivate. The first batch might taste sour or weaker than usual—this is normal. Just strain and use the grains as usual.
Common Mistakes In Short-term Storage
- Using old milk: Always use fresh milk to avoid spoilage.
- Sealing the jar too tightly: Pressure can build up and harm the grains.
- Forgetting to change the milk if storing for more than a week.
Long-term Storage (2 Weeks To Several Months)
If you need to store grains for more than two weeks, choose a method that keeps them dormant without damaging them. There are three main ways: refrigeration with milk, freezing, or drying.
Storing In The Refrigerator With Fresh Milk (extended)
You can keep grains in the fridge with milk for up to a month, but change the milk every 7–10 days.
Steps:
- Put grains in a clean jar with fresh milk.
- Label the jar with the date.
- Every 7–10 days, strain the grains, discard old milk, and refill with fresh milk.
This method is simple but requires someone to care for the grains if you are away for a long time.
Freezing Milk Kefir Grains
Freezing is a good way to store grains for several months. It’s not perfect—freezing can stress the grains—but most will survive if handled correctly.
Steps:
- Rinse grains gently in non-chlorinated water or fresh milk to remove old milk residue.
- Pat grains dry with a paper towel.
- Place grains in a small freezer bag or airtight container.
- Add a little powdered milk to coat the grains. This protects them from freezer burn.
- Seal the container, label it with the date, and freeze.
How long: Grains can stay frozen for up to 6 months. Some enthusiasts report success after a year, but revival is easier within 3–6 months.
Revival: Thaw grains in the fridge, then place in fresh milk at room temperature. It may take several batches for full activity.
Drying Milk Kefir Grains
Drying is the best way to store grains long-term with minimal maintenance. Dried grains can last up to a year or more.
Steps:
- Rinse grains in filtered, non-chlorinated water.
- Place grains on a clean paper towel or unbleached parchment paper.
- Air dry in a safe, cool, and shaded place (avoid direct sun and heat).
- Turn grains every few hours for even drying.
- When grains are hard and brittle, transfer to an airtight container.
- Optionally, add a little powdered milk to help prevent sticking.
Storage: Keep dried grains in a cool, dry place or the refrigerator.
Revival: Rehydrate grains in fresh milk at room temperature. It may take up to a week for full activity to return.
Comparison Of Long-term Storage Methods
Here’s a quick look at how the main methods compare:
| Method | Preparation Effort | Storage Duration | Revival Time | Risk of Grain Loss |
|---|---|---|---|---|
| Refrigeration with Milk | Low | 1–2 months | 1–3 days | Low |
| Freezing | Medium | 3–6 months | 3–7 days | Medium |
| Drying | High | 6–12 months | 5–10 days | Medium |

Credit: www.youtube.com
How To Revive Stored Kefir Grains
Reviving grains after storage is easy, but patience is key. The process depends on how you stored them.
After Refrigeration
Take grains out, strain off old milk, and put them in fresh milk at room temperature (68–75°F or 20–24°C). The first batch may be weak—discard it and use the next batch as usual.
After Freezing
Thaw grains in the refrigerator (never at room temperature, as sudden temperature change can harm them). Once thawed, rinse if needed, then place in fresh milk. Allow 2–5 batches for grains to fully recover.
After Drying
Rehydrate by soaking grains in a small amount of milk for 24 hours at room temperature. Replace the milk daily. It may take up to a week for grains to regain their full strength and normal taste.
How To Know If Grains Have Revived
- Grains increase in size or multiply
- Milk thickens and turns tangy within 24 hours
- The kefir smells fresh and slightly yeasty
If grains do not revive after 7–10 days, they may have died during storage. Using backup grains or sharing with friends is a good idea for this reason.
Supplies And Containers For Safe Storage
The right supplies help avoid contamination and keep grains healthy. Here’s what you need:
- Glass jars: Best for all storage methods; they do not react with the culture.
- Plastic strainers: Metal can hurt grains over time.
- Plastic or silicone spatulas: For stirring or removing grains gently.
- Airtight containers or freezer bags: Necessary for freezing or drying.
- Paper towels or parchment paper: For drying grains.
- Fresh, whole milk: Best for feeding and reviving grains.
- Powdered milk: Optional; helps protect during freezing or drying.
Avoid using metal containers or strainers, as some metals can react with the acids in kefir and harm the grains over time.
How Storage Affects Grain Health And Fermentation
Storing grains changes their balance. Cold or dry conditions slow down the bacteria and yeast, and sometimes weaker strains die off. This can affect the flavor and texture of your kefir for the first few batches after revival.
What Changes To Expect
- Sourness: The first batch after storage may taste less tangy.
- Texture: Kefir may be thinner or grainier until grains adapt.
- Fermentation speed: Grains may take longer to thicken milk at first.
These changes are normal. After a few cycles, healthy grains return to their usual performance.
Storing Extra Or Backup Grains
It’s wise to keep extra grains as backup. Milk kefir grains multiply over time, so you can split and store some for emergencies, share with friends, or experiment with different milks.
How to store backups:
- Dry or freeze a small batch and label with the date.
- Rotate backups every 6–12 months to ensure you always have fresh, viable grains.
- Store backups away from strong odors, as kefir grains can absorb smells.
Practical Tips For Success
- Use fresh, whole milk for storage and revival. Skim or plant-based milks are less nourishing.
- Label jars with the storage date and method.
- Check for mold before using stored grains. Healthy grains are creamy white and never fuzzy, green, or black.
- Start with small test batches after revival to check grain health.
- Never store grains in sweetened or flavored milks. Additives can harm the culture.
Common Mistakes To Avoid
- Storing grains in the freezer without drying or using powdered milk: This increases ice damage.
- Leaving grains at room temperature without milk: They will starve and die.
- Forgetting stored grains: Set reminders to change milk or check on long-term storage.
- Storing in metal containers: Can cause off flavors and harm grains.
- Using chlorinated water for rinsing: Chlorine kills helpful bacteria.
Credit: www.yemoos.com
Advanced Storage: Sharing And Mailing Kefir Grains
If you want to mail grains to a friend or share with others, drying is the safest method. Dried grains travel well and are less likely to spoil during shipping.
Steps for mailing:
- Dry grains as described above.
- Place in a small, airtight plastic bag.
- Add a little powdered milk if desired.
- Mail in a padded envelope with instructions for revival.
This method is used by kefir communities worldwide to keep cultures alive and spreading.
Troubleshooting Storage Problems
What If Grains Smell Bad After Storage?
Unpleasant odors (like rotten eggs or mold) are a sign of contamination. Discard the grains and start with a backup.
What If Grains Turn Pink Or Orange?
Healthy grains are white to cream-colored. Pink, orange, or green means contamination—throw them away.
What If Grains Stop Multiplying?
Storage stress can slow growth. Give them time, feed regularly, and avoid extreme temperatures. If they remain inactive after several weeks, they may be damaged.
Table: Signs Of Healthy Vs. Unhealthy Kefir Grains
| Healthy Grains | Unhealthy Grains |
|---|---|
| White or creamy color | Pink, orange, green, or black spots |
| Firm, rubbery texture | Slimy, mushy, or crumbly texture |
| Fresh, yeasty smell | Rotten, musty, or foul odor |
| Multiply over time | No growth or shrinking |

Credit: www.youtube.com
How To Store Kefir Milk (not Grains)
Sometimes people confuse storing kefir milk with storing grains. Kefir milk (the drink) can be kept in the fridge for up to two weeks. The flavor may become stronger over time, but the drink remains safe if it smells and tastes normal.
- Keep kefir milk in a glass jar with a loose lid.
- If making flavored kefir, add fruits or sweeteners only before drinking, not during storage.
When To Start Over With New Grains
Even with the best care, grains sometimes die or become contaminated. If your grains stop working or develop bad smells or colors, it’s best to discard them and start with a new batch. Buying grains from a trusted source or getting some from a friend is the safest way. You can learn more about kefir and its health benefits from this Wikipedia article.
Frequently Asked Questions
How Long Can Milk Kefir Grains Be Stored In The Fridge?
You can store grains in the fridge with fresh milk for up to 2–4 weeks. For best health, change the milk every 7–10 days. For longer storage, consider freezing or drying.
Can I Freeze Milk Kefir Grains Without Damaging Them?
Yes, but freezing does stress the grains. Use powdered milk as a coating and always freeze in an airtight container. Most grains survive, but some may not revive fully.
How Do I Know If My Stored Grains Are Still Alive?
After revival, healthy grains will thicken milk and create a tangy smell within 24–48 hours. If the milk stays thin, smells bad, or grains look discolored, they may not have survived.
Is It Safe To Dry Kefir Grains In The Oven Or Dehydrator?
No. High heat kills the bacteria and yeast. Air drying at room temperature is safe; never use heat above 90°F (32°C).
Can I Store Kefir Grains In Water Instead Of Milk?
No. Milk kefir grains need lactose to survive. Water storage starves the grains and changes their balance. Use milk or, for backup, dry or freeze the grains.
Caring for milk kefir grains may seem tricky at first, but with proper storage, you’ll always have a healthy supply for delicious homemade kefir. Whether you need a short break or want to keep backups for the future, these methods help protect your grains and your investment in gut health.
With these tips and a little practice, you’ll never worry about losing your kefir grains again.