Putting an electrical outlet inside a drawer may sound unusual, but it’s becoming a smart solution for modern homes. People want clean counters, safe charging spots, and less clutter. Hidden outlets in drawers give you a way to charge devices, plug in hair dryers, or power small appliances without messy cords.
But this project is not as simple as drilling a hole and adding a socket. It requires careful planning, the right tools, and knowledge of safety and building codes.
This guide explains, step by step, how to put an outlet in a drawer. Whether you’re hoping to add a charging station in your kitchen, a power outlet in your bathroom vanity, or a spot for devices in your home office, you’ll find everything you need here.
We’ll cover tools, planning, safety, wiring, and troubleshooting. You’ll also find tips from real experiences and get answers to common questions. Let’s get started so your next home upgrade is not only useful but also safe and reliable.
Why Install An Outlet In A Drawer?
Hidden power outlets aren’t just a design trend. They solve real-life problems that most people face:
- Reduce visible clutter: No more tangled wires across your kitchen or bathroom counters.
- Safer charging: Devices can charge out of sight, away from water and spills.
- More convenience: You can plug in hair tools, toothbrushes, or phones without searching for open outlets.
- Better organization: Everything stays in one place, making your space feel bigger and tidier.
Many new homes and high-end remodels include these outlets as a standard feature. If you’re doing a kitchen or bathroom update, it’s the perfect time to add one. Even in existing cabinets or desks, a retrofit is possible with the right know-how.
Can You Legally And Safely Put An Outlet In A Drawer?
Before you grab your drill, it’s important to understand the rules. In the US, all electrical work must follow the National Electrical Code (NEC) and local building codes. The main concerns are safety, wiring methods, and protecting the outlet from damage.
- GFCI protection is required for outlets in kitchens and bathrooms.
- Outlets must be tamper-resistant if children may have access.
- Flexible cords must not get pinched, stretched, or damaged by the moving drawer.
- Some areas may require a permit and a licensed electrician.
If you’re unsure, always call your local building department or a professional electrician. Doing electrical work incorrectly can lead to fires, injuries, or failed inspections. Even advanced DIYers should get their work checked.

Credit: www.dockingdrawer.com
Planning Your Outlet-in-a-drawer Project
A good plan is the key to a successful, safe installation. Here’s what you need to consider before you start:
Choose The Right Drawer
Not every drawer is suitable. Ask yourself:
- Is there enough space for the outlet and wiring?
- Does the drawer move smoothly with enough clearance behind it?
- Will you use the drawer for devices, tools, or small appliances?
- Is it close to an existing power source?
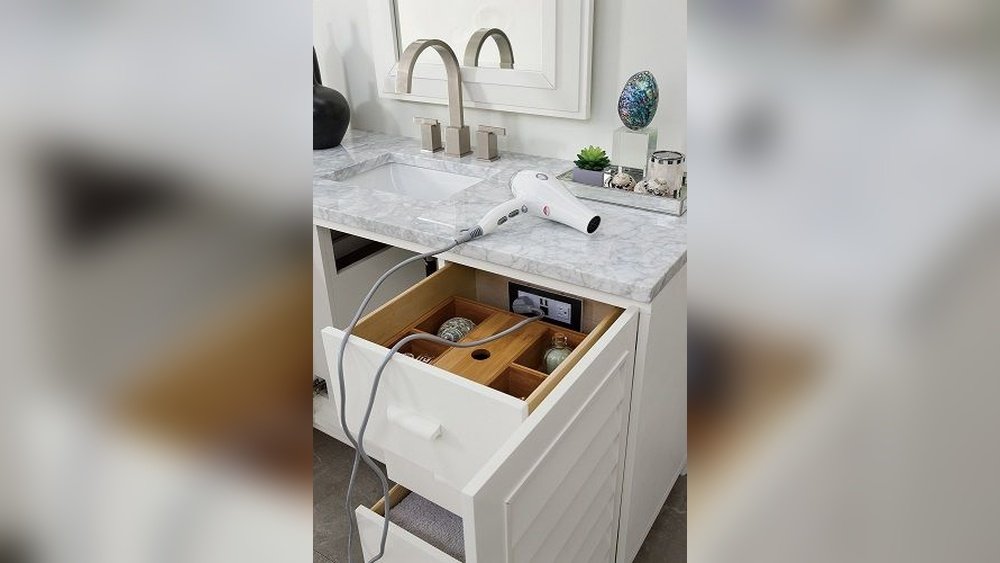
For charging phones or toothbrushes, most top drawers in bathrooms or kitchens work well. For hair dryers, you may want a deeper vanity drawer.
Select The Best Outlet Type
Common choices are:
- Standard electrical outlet (duplex): For devices using a regular plug.
- GFCI outlet: Required in wet areas (kitchens, bathrooms, laundry rooms).
- USB charging outlet: For charging phones or tablets without an adapter.
Some outlets combine GFCI and USB. Look for tamper-resistant models for extra safety.
Find A Power Source
You need to connect the new outlet to an existing electrical circuit. The best sources are:
- An existing wall outlet nearby
- The wire feeding your vanity or kitchen cabinet lights
- A dedicated circuit if the drawer will power high-wattage devices (like hair dryers)
Do not overload a circuit. Calculate the total amps that will be used. If you’re unsure, check the breaker rating or ask an electrician.
Plan For Cable Movement
The biggest challenge is that drawers open and close. The power cord or wire to the outlet must move safely without getting pinched or worn.
You have two main options:
- Flexible cord with strain relief: A heavy-duty extension cord runs from the back of the outlet box to a hole in the cabinet. It bends as the drawer moves.
- Special retractable cable systems: Used in some commercial kitchens, but costly.
Most DIYers use a flexible cord with the right supports and strain relief connectors.
Gather Permits And Inspections
If your area requires a permit for electrical work, get it before starting. This protects your home insurance and ensures safety. Most inspectors will check:
- Proper wire size and type
- GFCI protection
- Secure mounting of boxes and outlets
- Safe cable routing
Tools And Materials You’ll Need
Having the right tools and supplies saves time and prevents mistakes. Here’s a full list:
Tools:
- Drill and drill bits (wood and metal)
- Wire strippers and cutters
- Screwdriver set (Phillips and flat)
- Utility knife
- Tape measure
- Level
- Pencil or marker
- Hole saw (1 1/4” to 2” for cord holes)
- Fish tape or stiff wire (for pulling cables)
- Stud finder (optional, for wall outlets)
Materials:
- Electrical outlet (GFCI, standard, or USB combo)
- Electrical box (shallow, metal or plastic)
- 12 or 14-gauge stranded wire (UL-rated for flexible use)
- Heavy-duty extension cord (if using plug-in method)
- Wire nuts and electrical tape
- Strain relief connectors (cord grips)
- Faceplate for outlet
- Mounting screws
- Cable clamps or zip ties
- Wood screws (for mounting box)
- Safety goggles and gloves
Some people use prewired in-drawer outlets (like Docking Drawer or Rev-A-Shelf). These kits include all parts and are UL-listed, but cost more than DIY.

Credit: www.amazon.com
Step-by-step Guide: How To Put An Outlet In A Drawer
Let’s go through the process, one step at a time.
1. Turn Off The Power
Go to your home’s breaker panel and turn off the circuit you’ll be working on. Double-check with a voltage tester at the outlet or wires to be sure there’s no power.
2. Mark The Location
Open the drawer and decide where the outlet will go. It’s usually best on the side or back of the drawer box, not the bottom.
- Make sure there’s enough room for the box and outlet.
- Mark the outline of the electrical box on the drawer.
- Mark the spot on the back of the cabinet for the cord hole.
3. Drill The Holes
- Use a drill and hole saw to cut a hole in the back of the cabinet (where the cord will come through).
- Drill pilot holes for the electrical box screws in the drawer.
- If using a metal box, use the right size knockout punch for the cord entry.
4. Install The Electrical Box
- Mount the box inside the drawer using wood screws.
- The box should sit flush or slightly recessed.
- Attach the strain relief connector to the box (where the cord enters).
- If using a surface-mount box, make sure it’s secure and won’t hit the cabinet frame.
5. Run The Flexible Cord
- Feed the flexible cord (or heavy-duty extension cord) through the cabinet hole and into the box.
- Leave enough slack for the drawer to open fully, but not so much that it tangles.
- Secure the cord inside the box with the strain relief connector.
- Use cable clamps or zip ties to keep the cord from getting caught.
Pro tip: Use a fabric or rubber-jacketed cord rated for 15 amps or more. Avoid household lamp cords—they’re too weak.
6. Wire The Outlet
- Strip the insulation from the cord wires.
- Connect black (hot) to brass screw, white (neutral) to silver screw, green (ground) to green screw.
- Tighten all screws well.
- If using a GFCI or USB outlet, follow the wiring diagram included with the outlet.
Check that there are no loose strands or exposed copper.
7. Attach The Faceplate
- Screw the outlet into the box.
- Snap on or screw down the faceplate.
- Make sure everything sits flat and nothing sticks out.
8. Connect To Power
- If you’re hardwiring, connect the other end of the cord to your power source (outlet or junction box).
- If you’re using the plug-in method, attach a plug to the cord and plug it into a nearby wall outlet.
- Secure the cord along the back of the cabinet so it doesn’t get pinched.
9. Test The Outlet
- Turn the power back on at the breaker.
- Test the outlet with a device or outlet tester.
- For GFCI, press the test and reset buttons to confirm it works.
- Open and close the drawer several times to check the cord movement.
10. Final Safety Checks
- Look for any signs of pinched wires, loose screws, or strain on the cord.
- Make sure the outlet is not overloaded (no hair dryers and curling irons at the same time on a 15A circuit).
- If you have kids, use outlet covers for extra safety.
Common Problems And How To Avoid Them
DIYers often run into some trouble when adding outlets to drawers. Here’s how to avoid the most common mistakes:
Not Enough Clearance
If the drawer hits the outlet or box, it won’t close. Always measure twice and dry-fit the box before drilling.
Overloading The Circuit
Plugging in too many high-wattage devices can trip the breaker or create a fire risk. Add up the amps of all devices you’ll use, and check your circuit’s rating.
Cord Pinching
Flexible cords must not get caught, stretched, or pinched. Use proper strain relief connectors and enough slack. Open and close the drawer several times to confirm.
Using The Wrong Outlet Type
In bathrooms and kitchens, GFCI outlets are required by code. Regular outlets are not safe near water.
Poor Connections
Loose wires or poor connections can cause heat and fires. Always tug on wires gently to check, and use only UL-listed parts.
Advanced Options: Prewired Drawer Outlets And Smart Upgrades
If you prefer a ready-made solution, consider a prewired in-drawer outlet kit. These are UL-listed, easy to install, and include all needed safety features.
Comparing Diy Vs. Prewired Kits
Here’s a quick look at the differences:
| Feature | DIY Installation | Prewired Kit |
|---|---|---|
| Cost | $30–$70 | $80–$250 |
| Safety Rating | Depends on skill | UL-listed, tested |
| Installation Time | 2–4 hours | 1–2 hours |
| Features | Basic outlet | GFCI/USB/tamper-resistant |
| Warranty | None | 1–3 years |
Kits from brands like Docking Drawer or Rev-A-Shelf are popular for their safety and easy installation.
Adding Smart Features
With technology improving, you can add:
- Smart outlets: Control by phone or voice assistant.
- Built-in USB-C ports: Charge new devices without adapters.
- Auto shut-off: Turns off power after a set time for safety.
These smart upgrades cost more but add convenience and value to your home.
Real-world Examples And Mistakes To Avoid
Many homeowners have shared their experience with in-drawer outlets. Here are a few insights:
- A kitchen remodeler installed a GFCI outlet in a top drawer for phone charging. They used a flexible extension cord with strain relief and routed the cord along the side of the cabinet, out of the way of hinges and runners.
- In a bathroom vanity, a DIYer used a prewired kit to power a hair dryer and toothbrush. The kit included a safety breaker and tamper-resistant outlets, which passed inspection easily.
- One common error: Forgetting to check for obstructions behind the drawer. Some people drilled into water lines or hit screws, causing leaks or damage. Always check behind the drawer before drilling.
Practical tip: Open and close the drawer at each step of the process. This helps you spot problems early, not after you’ve finished wiring.
Safety, Codes, And Inspections
Electrical safety is not just about following instructions. Here are some must-know facts:
- GFCI outlets are required by code in all kitchens, bathrooms, laundry rooms, garages, and unfinished basements.
- All outlets in homes built after 2008 must be tamper-resistant (they have shutters inside the slots).
- Use only UL-listed boxes, cords, and outlets for safety.
- Flexible cords must be protected from abrasion (use bushings or rubber grommets where cords pass through holes).
- Never use indoor-only cords in damp or wet areas.
- Always get a final inspection if your city or state requires it.
For more details on US electrical codes, see the official National Electrical Code.
Table: Which Outlet Type For Which Drawer?
To help you decide, here’s a quick reference:
| Location | Best Outlet Type | Special Requirements |
|---|---|---|
| Kitchen | GFCI/USB Combo | GFCI protection, tamper-resistant |
| Bathroom | GFCI | GFCI protection, tamper-resistant |
| Home Office | USB Outlet | Tamper-resistant |
| Bedroom | Standard/USB | Tamper-resistant |

Credit: the-diy-life.com
Practical Tips And Insights Most People Miss
Some advice you won’t find in every guide:
- Label the circuit you connect to, so you remember which breaker controls your drawer outlet.
- If you use the outlet for hair tools, include a heat-resistant mat in the drawer to prevent burns.
- Keep a short power cord (less than 3 feet inside the drawer) to avoid tangling.
- If your devices have large “wall wart” plugs, choose an outlet with extra space or a sideways orientation.
- Always test GFCI outlets monthly by pressing the test button. They can fail over time.
Maintenance And Long-term Use
After installation, keep your outlet working safely by:
- Checking the cord for wear or damage every few months.
- Listening for buzzing or feeling for warmth—these are signs of a problem.
- Keeping the drawer clean and free of liquid spills.
- Unplugging high-wattage devices when not in use.
If you notice any issues, turn off the power and call a qualified electrician.
Frequently Asked Questions
Is It Legal To Put An Electrical Outlet Inside A Drawer?
Yes, you can add an outlet inside a drawer if you follow the National Electrical Code (NEC) and local rules. You must use GFCI protection in kitchens and bathrooms, tamper-resistant outlets, and proper strain relief for cords. Always check your local building department for special rules.
Do I Need An Electrician, Or Can I Do This Myself?
If you have basic electrical skills and your city allows DIY work, you can do this yourself. However, for hardwired installations or if a permit is required, hiring a licensed electrician is safer and may be required by law.
What Is The Safest Way To Run Power To A Moving Drawer?
The safest method is using a UL-listed flexible cord with a strain relief connector, routed so it never gets pinched or stretched. Prewired kits are safest for most homeowners. Never use lamp cords or run rigid wires to a moving drawer.
Can I Plug A Hair Dryer Or Curling Iron Into A Drawer Outlet?
Yes, but the outlet and circuit must support the wattage. Hair dryers use up to 15 amps, so check your circuit’s rating. Always use a GFCI outlet in bathrooms or near water, and never run multiple high-wattage devices at once.
What Are The Most Common Mistakes With Drawer Outlets?
People often skip GFCI protection, use weak cords, or let the wire get pinched. Other mistakes include overloading the circuit, using non-tamper-resistant outlets, or failing to secure the box. Follow code and test your work before regular use.
Adding an outlet to a drawer is a practical way to keep your home organized and safe. With careful planning, the right tools, and attention to safety, you can create a hidden power solution that makes life easier every day.
If you ever feel unsure, always consult a professional—your safety and peace of mind are worth it.