
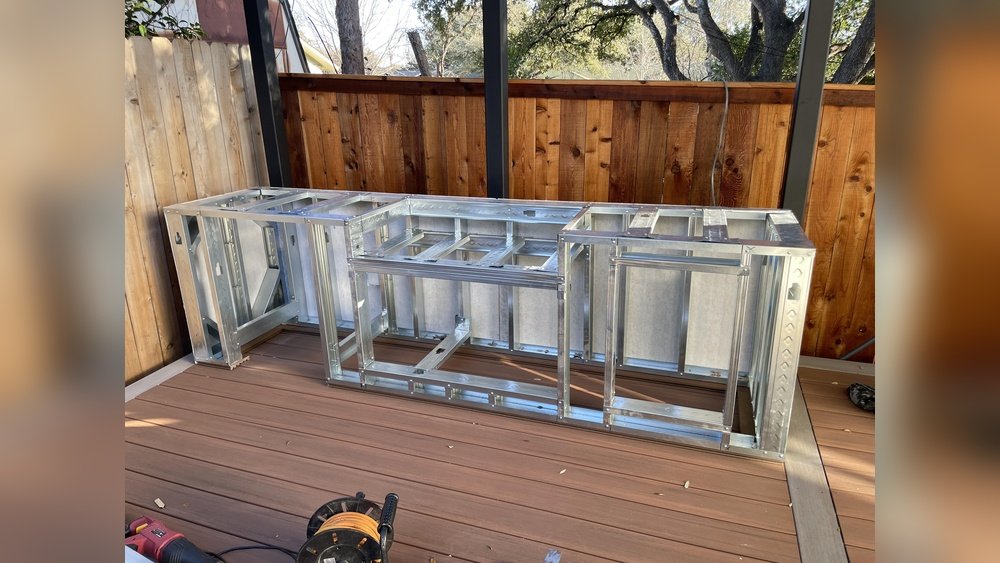
Building an outdoor kitchen is one of the best ways to expand your living space and make the most of your backyard. Imagine grilling with friends, preparing pizza under the open sky, or just relaxing with family while food sizzles nearby. But many homeowners worry about cost, complexity, and how weather might damage their investment. Here’s the good news: building an outdoor kitchen with metal studs solves many of these challenges. Metal framing is strong, fire-resistant, and won’t rot or warp like wood. With the right guidance and preparation, you can create a custom outdoor kitchen that lasts for years and fits your budget.
In this guide, you’ll discover everything you need to design, plan, and build an outdoor kitchen using metal studs. We’ll cover the tools, materials, layout ideas, step-by-step construction, common mistakes, and smart tips that most beginners miss. You’ll also find comparisons, practical examples, and a helpful FAQ at the end.
Whether you’re a hands-on DIYer or planning your first big home project, this article will guide you from idea to finished kitchen with confidence.
Why Build With Metal Studs?
Outdoor kitchens need to handle rain, sun, insects, and fire. While wood framing is familiar, it comes with risks outdoors. Metal studs—usually made from galvanized steel—are specially designed for harsh environments.
Key Benefits
- Fire resistance: Metal studs don’t burn, making them safer near grills and smokers.
- Moisture proof: They won’t rot, twist, or swell from rain or humidity.
- Insect proof: Termites and carpenter ants can’t damage steel.
- Precision: Metal studs are perfectly straight, giving your kitchen clean lines and level surfaces.
- Lightweight: Easier to move and handle than heavy lumber.
Common Concerns
Some people worry metal studs are hard to cut or assemble. In reality, you only need basic tools like tin snips, a drill, and self-tapping screws. With careful planning, even first-timers can get great results.
Planning Your Outdoor Kitchen
A successful outdoor kitchen starts with smart planning. Before you buy materials, think about how you’ll use the space, what appliances you want, and how everything fits together.
Define Your Needs
Ask yourself:
- How many people will you cook for?
- Do you want just a grill, or also a sink, fridge, or pizza oven?
- Will you need storage for utensils, spices, or dishes?
- Do you want a bar counter or eating area?
Write down your must-haves and nice-to-haves. This will guide your design and budget.
Choose The Right Location
The spot you pick matters. Look for:
- Level ground: Makes framing and installation much easier.
- Shelter from wind: Prevents smoke and protects appliances.
- Access to utilities: Water, gas, and electricity are easier to add if close by.
- Safe distance from structures: Most codes require grills to be several feet from your home or fences.
Sketch A Layout
Make a simple drawing on paper. Mark where the grill, counters, and other features will go. Measure the space and double-check each appliance’s size. This is your chance to experiment—move things around before building.
Set A Realistic Budget
Prices vary depending on appliances, countertops, and finishes. A basic outdoor kitchen with metal studs, concrete board, and tile may cost $2,000–$5,000, while high-end setups run much more. Always plan for a 10–15% buffer for unexpected expenses.
Tools And Materials You’ll Need
Before you start building, gather all the tools and materials. This prevents delays and helps you avoid costly mistakes.
Essential Tools
- Tape measure (25 ft or longer)
- Level (24–48 inches)
- Chalk line
- Tin snips (for cutting metal studs)
- Cordless drill and impact driver
- Self-tapping screws (1¼” and 2″ for metal studs)
- Metal stud crimper or pliers (optional but helpful)
- Carpenter’s square
- Safety glasses and gloves
- Hammer drill (for anchoring to concrete slabs)
Materials
- Metal studs: Usually 25-gauge galvanized steel, available at home improvement stores.
- Track (U-shaped channel): Holds the bottom and top of the studs.
- Cement backer board: For covering frames before adding stone, tile, or stucco.
- Exterior-grade fasteners: For attaching panels and finishes.
- Weatherproofing materials: Flashing tape, silicone caulk, and sealants.
- Countertop material: Tile, granite, or concrete.
- Finishing materials: Stone veneer, brick, tile, or stucco.
Appliance And Fixture Considerations
- Grill and side burners (built-in or freestanding)
- Outdoor-rated refrigerator or ice maker
- Sink and faucet (with water supply and drainage)
- Storage doors and drawers (stainless steel is best)
- Lighting and electrical outlets (outdoor-rated only)
For more appliance details, see Consumer Reports.
Step-by-step Construction Process
This section guides you through the entire build. Each step is designed for clarity and safety, so don’t skip ahead or take shortcuts.
1. Prepare The Site
Clear the area of grass, rocks, and debris. If building on soil, pour a concrete slab at least 4 inches thick and reinforced with rebar. For pavers or decks, check weight limits and local codes. Mark the outline of your kitchen with chalk or stakes.
2. Layout And Mark The Frame
Use your sketch as a guide. Lay out the U-shaped metal track on the slab for the base. Double-check that corners are square (use the 3-4-5 triangle method for accuracy). Mark openings for appliances, storage, and plumbing.
3. Cut And Assemble Metal Studs
Wear gloves—metal edges are sharp. Measure and cut studs to length with tin snips. Place the studs every 16 inches for strength, or 12 inches for heavy countertops. Attach studs to the top and bottom track with self-tapping screws.
Pro tip: If your counter will support a heavy grill or pizza oven, double up the studs under those areas.
4. Anchor The Frame
Drill holes in the bottom track and use concrete anchors to secure it to the slab. This prevents shifting and adds earthquake and wind resistance. Check that the frame is perfectly level before moving on.
5. Frame Openings For Appliances
Make special frames for grills, fridges, and cabinets. Measure each item and follow the manufacturer’s clearance recommendations. Leave at least 1/8 inch extra on each side for easy installation.
6. Add Bracing And Supports
Install horizontal braces at countertop height (usually 36 inches) and at the top of the frame. Add extra bracing where you plan to mount doors, drawers, or heavy items.
7. Run Utilities (if Needed)
If adding a sink, fridge, or outlets, now is the time to rough in plumbing and electrical lines. Use only outdoor-rated wiring and waterproof boxes. Hire a licensed pro for gas lines or major electrical work.
8. Install Cement Backer Board
Cut cement board panels to fit the frame. Attach with exterior screws every 6–8 inches. Stagger seams and tape corners with mesh tape and thinset mortar for a solid, weatherproof shell.
9. Finish With Stone, Tile, Or Stucco
Choose a weatherproof finish that matches your style and budget:
- Tile: Durable and easy to clean, but grout must be sealed.
- Stone veneer: Looks natural and holds up well.
- Stucco: Classic look, often cheaper than stone.
- Brick: Durable but heavier, so frame must be strong.
Apply thinset mortar, press on your finish, and let cure as directed.
10. Install Countertops
Countertops can be tile, granite, concrete, or stainless steel. Make sure the frame is level and can support the weight. Use a waterproof membrane under the top, especially for porous materials like concrete.
11. Mount Appliances And Fixtures
Slide in the grill, fridge, and storage doors. Connect water, gas, and electricity as needed. Seal all gaps with high-temperature silicone to keep out pests and rain.
12. Test Everything
Check for leaks, loose screws, or wobbly surfaces. Test all appliances and utilities. Fix any issues before calling the job done.

Credit: www.reddit.com
Design And Layout Ideas
Outdoor kitchens come in all shapes and sizes. Here are some popular layouts and what works best for each.
Straight-line Kitchen
All appliances and counters are in a single row. Best for narrow spaces or patios. Easy to build and budget-friendly.
L-shaped Kitchen
Counters turn a corner, creating more prep space and a natural separation for cooking and serving. Great for larger patios.
U-shaped Kitchen
Encloses three sides, giving maximum counter and storage space. Perfect for serious cooks or frequent entertaining.
Island Kitchen
A standalone unit in the center of your patio. Allows access from all sides. Works well for open layouts and social gatherings.
Non-obvious tip: Think about wind direction. Place your grill so smoke blows away from seating areas. Also, plan for shade—direct sun can make cooking uncomfortable.
Comparison: Metal Studs Vs. Wood Framing
Many DIYers still use wood for outdoor kitchens. Here’s how the two options stack up:
| Factor | Metal Studs | Wood Framing |
|---|---|---|
| Fire Resistance | Excellent | Poor |
| Moisture Resistance | Will not rot or warp | Can rot, swell, or split |
| Insect Resistance | 100% termite-proof | Vulnerable to insects |
| Weight | Lightweight | Heavier |
| Cost | Moderate to high | Low to moderate |
| Ease of Cutting | Tin snips or saw | Standard saw |
| Durability (Outdoors) | Very high | Low unless treated |

Credit: www.youtube.com
Common Mistakes To Avoid
Many outdoor kitchens fail because of simple errors. Watch out for these:
- Skipping permits: Always check local codes before starting. Some cities require permits for plumbing, gas, or electrical work—even for outdoor projects.
- Weak frames: Underestimating the weight of countertops or appliances can lead to sagging or collapse. Always overbuild in high-stress areas.
- No waterproofing: Even “outdoor” materials can be damaged by water. Seal seams, edges, and penetrations with high-quality caulk or tape.
- Poor appliance fit: Measure every item twice. Custom appliances often need more clearance than you expect.
- Ignoring airflow: Grills and burners need proper ventilation. Always follow manufacturer instructions for vent panels and air gaps.
- Wrong fasteners: Use only exterior-grade screws and anchors. Interior screws will rust and fail quickly.
- Lack of utility planning: It’s easier to add water or power before you build than after. Plan utility runs early.
Non-obvious insight: Don’t forget access panels. You’ll need to reach plumbing, gas lines, or electrical connections for maintenance. Hidden panels can save you future headaches.
Weatherproofing And Maintenance
Your outdoor kitchen will last longer with good weather protection. Here’s how to keep it in top shape:
Sealing And Caulking
Apply silicone caulk around all seams, edges, and cutouts. Use flashing tape behind finish materials where water might leak in.
Covering Appliances
Use grill covers and appliance covers when not in use. This prevents rust and keeps bugs out.
Cleaning
Sweep debris from countertops and wipe down surfaces regularly. Clean stainless steel with mild soap and water—never use steel wool.
Seasonal Checks
Inspect caulking, grout, and finish materials each season. Re-seal grout lines and check for cracks before winter.
Cost Breakdown Example
Here’s a real-world cost estimate for a 10-foot straight-line outdoor kitchen with a grill, fridge, and tile countertop:
| Item | Approximate Cost |
|---|---|
| Metal studs & track | $350 |
| Cement backer board | $200 |
| Fasteners & anchors | $80 |
| Tile countertop (installed) | $700 |
| Stone veneer finish | $600 |
| Built-in grill | $800 |
| Outdoor fridge | $400 |
| Sink & faucet | $180 |
| Miscellaneous materials | $200 |
| Total (approx.) | $3,510 |
Note: Labor is not included. Doing it yourself saves thousands.
Practical Tips For Success
- Work in stages: Finish the frame before starting on cement board or finishes. This makes adjustments easier.
- Label every part: Mark studs, tracks, and panels with a marker so you don’t mix up pieces.
- Dry-fit appliances: Place each appliance in its opening before final assembly. Adjust if needed before finishing.
- Ask for help: Large panels and countertops are heavy. Two people make the job safer and faster.
- Check for square often: Use a carpenter’s square at each step. Small errors add up over a long run.
- Keep plans handy: Keep your drawing on-site for quick reference.
Safety Reminders
Building with metal studs is safe if you follow basic rules:
- Wear gloves—metal edges can cut skin easily.
- Use safety glasses when cutting or drilling.
- Keep children and pets away from the worksite.
- Turn off power and water before connecting appliances.
- Follow all local codes and manufacturer instructions.
When To Call A Professional
Some tasks are best left to licensed pros, such as:
- Running natural gas or propane lines
- Connecting electrical circuits
- Complex plumbing (especially for drainage)
- Heavy stone or concrete countertop installation
If you’re unsure, it’s better to ask for help than risk safety.
Real-life Example: A Family’s Diy Metal-stud Outdoor Kitchen
The Martinez family in Texas wanted a durable, modern outdoor kitchen for their backyard barbecues. They chose metal studs for the frame, installed a built-in grill, fridge, and sink, and finished with stone veneer and granite countertops.
What went well: The project took three weekends. The metal frame was light enough for two people to move, and went together faster than expected. They used self-tapping screws and labeled every stud.
Challenges: Cutting cement board made a lot of dust, so they wore masks and did all sawing outdoors. They almost forgot to add vent panels behind the grill—an inspector caught this during a walkthrough.
Total cost: $4,200, including appliances. They saved about $3,000 by doing it themselves.
Outdoor Kitchen Metal Stud Sizes And Spacing
Choosing the right size and spacing for your metal studs is critical. Here’s a quick reference:
| Application | Recommended Stud Size | Spacing |
|---|---|---|
| Standard countertops | 2.5″ x 1.25″ (25 gauge) | 16″ on center |
| Heavy countertops (granite/concrete) | 3.5″ x 1.625″ (20–22 gauge) | 12″ on center |
| Support for appliances | Double 2.5″ or 3.5″ studs | As needed |
| Island overhangs | 3.5″ x 1.625″ (20 gauge) | 12″ on center + bracing |
Always use heavier gauge (lower number) for high-stress areas.

Credit: www.youtube.com
Frequently Asked Questions
What Gauge Metal Studs Should I Use For An Outdoor Kitchen?
For most outdoor kitchens, 25-gauge galvanized metal studs are strong enough for standard counters and finishes. If you plan to use very heavy countertops (like granite or concrete), consider 20–22 gauge for main supports.
Do I Need A Permit To Build An Outdoor Kitchen With Metal Studs?
Many cities require a permit for outdoor kitchens, especially if you add plumbing, gas, or electricity. Always check with your local building department before starting. Skipping permits can lead to fines or problems when selling your home.
Can I Use Regular Drywall Over Metal Studs Outdoors?
No. Regular drywall will absorb moisture and quickly fall apart outdoors. Always use cement backer board or another exterior-rated sheathing over metal studs.
How Do I Cut Metal Studs Safely?
Wear gloves and safety glasses. Use tin snips for straight cuts, or a metal-cutting blade in a circular saw for bigger jobs. Deburr edges with a file to prevent cuts.
How Long Will A Metal Stud-framed Outdoor Kitchen Last?
With proper weatherproofing and maintenance, a metal stud outdoor kitchen can last 20 years or more. Galvanized steel resists rust, insects, and fire better than wood.
Building an outdoor kitchen with metal studs is a smart investment for comfort, safety, and home value. With careful planning and the right approach, you’ll enjoy years of outdoor cooking and entertaining—rain or shine.