Adding cabinets above your existing cabinets is a smart way to increase kitchen storage without a full remodel. Many kitchens have a gap between the top of the cabinets and the ceiling. This space often collects dust but can be transformed into useful storage or a design feature.
If you want your kitchen to look custom-built and maximize vertical space, learning how to add cabinets above existing cabinets is a valuable skill.
You might think this project is only for professional carpenters or expensive contractors, but that’s not true. With careful planning and some basic tools, many homeowners can do it themselves. This guide will walk you through each step, from deciding whether this project fits your kitchen to choosing the right cabinets, measuring, installation, and finishing touches.
You’ll also find practical tips and answers to common questions that most beginners don’t consider. Let’s help you create a kitchen that feels larger, looks more stylish, and works better for daily life.
Why Add Cabinets Above Existing Cabinets?
Adding cabinets above your current cabinets brings more than just extra storage. Here are some key benefits:
1. Maximize Storage
Most kitchens have unused space above cabinets. Installing extra cabinets gives you room for less-used items like holiday dishes, small appliances, or bulk pantry goods.
2. Improve Appearance
Gaps above cabinets can make your kitchen look unfinished. Cabinets that reach the ceiling create a built-in, high-end look.
3. Reduce Dust
The space above cabinets often collects dust and grease. Cabinets close this gap and make cleaning easier.
4. Increase Home Value
Upgraded kitchens attract buyers. More storage and a custom look can raise your home’s resale value.
5. Display Space
Glass-door cabinets above can display nice dishes, plants, or decor.
Many people miss that these upper cabinets can also help with kitchen acoustics. By covering the open space, sound doesn’t bounce around as much, making your kitchen quieter.
Can You Add Cabinets Above All Existing Cabinets?
Not every kitchen is right for this project. Here’s what to check before starting:
- Ceiling Height
The best results come with ceilings at least 9 feet high. If your ceiling is 8 feet, the space may be too small for extra cabinets.
- Cabinet Structure
Your current cabinets must be sturdy and level. If they are loose or uneven, upper cabinets may not fit well.
- Wall Type
The wall behind your cabinets must support the weight of new cabinets. Drywall over studs is best. Plaster walls can work, but brick or concrete will need special anchors.
- Obstructions
Check for vents, pipes, or electrical wires in the gap.
- Crown Molding
If you have decorative molding, you’ll need to remove or modify it.
It’s often overlooked that older homes sometimes have sloped ceilings or walls that are not straight. If so, you’ll need extra time for adjustments.
Planning Your Upper Cabinets
A successful project starts with careful planning. Let’s look at the main steps.
Measure Your Space
Accurate measurements are critical. Here’s how:
- Measure the height from the top of your existing cabinets to the ceiling.
- Measure the width of each cabinet section.
- Measure the depth of your current cabinets (usually 12 or 24 inches).
- Check if the wall is straight by using a level.
Write down all numbers. It’s smart to measure twice.
Decide Cabinet Size
Upper cabinets above existing ones are often shorter. Common sizes are 12, 15, or 18 inches tall. Choose a height that fills the space but leaves at least half an inch from the ceiling.
Depth usually matches the lower cabinets, but if space is tight, you can use shallower cabinets (9 or 12 inches).
Width should match the cabinets below for a seamless look.
Cabinet Types
You have several options:
- Stock Cabinets
Pre-made, most affordable, and available at big stores.
- Semi-Custom
More size choices and finishes.
- Custom Cabinets
Made to fit exactly, most expensive.
For most kitchens, stock or semi-custom is enough. You can also use wall cabinets as upper cabinets; just pick the right size.
Style And Finish
To blend new cabinets with old, match:
- Color and finish
- Door style
- Hardware (handles/knobs)
If you can’t match perfectly, consider painting all cabinets for a uniform look.
Budget
Costs vary:
- Stock cabinets: $100–$400 each
- Semi-custom: $300–$700 each
- Custom: $700+ each
Don’t forget extra expenses: hardware, paint, tools, and possible electrical work.
Tools And Materials You’ll Need
Gathering the right tools and materials saves time. Here’s what you’ll need:
Tools
- Tape measure
- Level (2-4 ft)
- Stud finder
- Screwdriver or drill
- Drill bits
- Wood screws (2-3 inch)
- Pry bar (for removing molding)
- Hammer
- Clamps
- Ladder or step stool
- Pencil
Materials
- Cabinets (chosen style and size)
- Cabinet mounting rail or ledger board (optional, but helps with alignment)
- Trim or molding (for finishing gaps)
- Paint or stain (if needed)
- Shims (for leveling)
- Wood filler or caulk
It’s easy to forget things like shims or a long level. These small items make installation much simpler.
How To Add Cabinets Above Existing Cabinets: Step-by-step
Let’s break the process into clear steps. Take your time and follow them closely.
1. Prepare The Area
Remove everything from your countertops. Cover counters and floors with drop cloths to protect from dust and scratches.
If you have crown molding, carefully pry it off. If you plan to reuse it, set it aside.
Clear out anything above the cabinets.
2. Locate Studs And Mark Placement
Use a stud finder to mark the wall studs above your cabinets. This is where you’ll anchor the new cabinets.
Mark the height of the new cabinets on the wall. Draw a level line as a guide.
If you’re using a mounting rail or ledger board, attach it along the bottom line. This board temporarily supports the cabinets during installation.
3. Assemble Cabinets
If cabinets come flat-packed, assemble them according to instructions. Install doors and hardware after mounting for easier handling.
4. Test Fit And Adjust
Lift each cabinet into place to check fit. Use shims to level if the ceiling or wall is uneven.
If you have uneven walls (common in old homes), you may need to trim the back edge of the cabinets for a tight fit.
5. Secure Cabinets To Wall
Lift the first cabinet onto the ledger board. Drill pilot holes through the back into wall studs. Secure with 2.5-inch wood screws.
Install the next cabinet. Clamp it to the first one, drill through the side walls, and screw them together.
Repeat for all cabinets. Remove the ledger board when done.
6. Attach Cabinets To Existing Cabinets (if Needed)
For extra stability, you can screw the new cabinets to the top edge of the old ones. Drill a pilot hole from inside the upper cabinet down into the top of the lower cabinet frame, then secure with a screw.
Don’t overtighten—too much pressure can crack the cabinet.
7. Fill Gaps And Add Trim
There may be small gaps between the cabinets and ceiling or wall. Use matching trim or molding for a finished look.
Caulk tiny gaps for a seamless appearance.
8. Paint Or Stain
If you want all cabinets to match, now is the time to paint or stain. Remove hardware and doors, then paint in a well-ventilated area.
Let everything dry fully before reattaching.
9. Reinstall Doors And Hardware
Hang doors and add handles or knobs. Adjust hinges so doors are straight.
10. Clean Up
Remove drop cloths, wipe down cabinets, and put everything back on your counters.
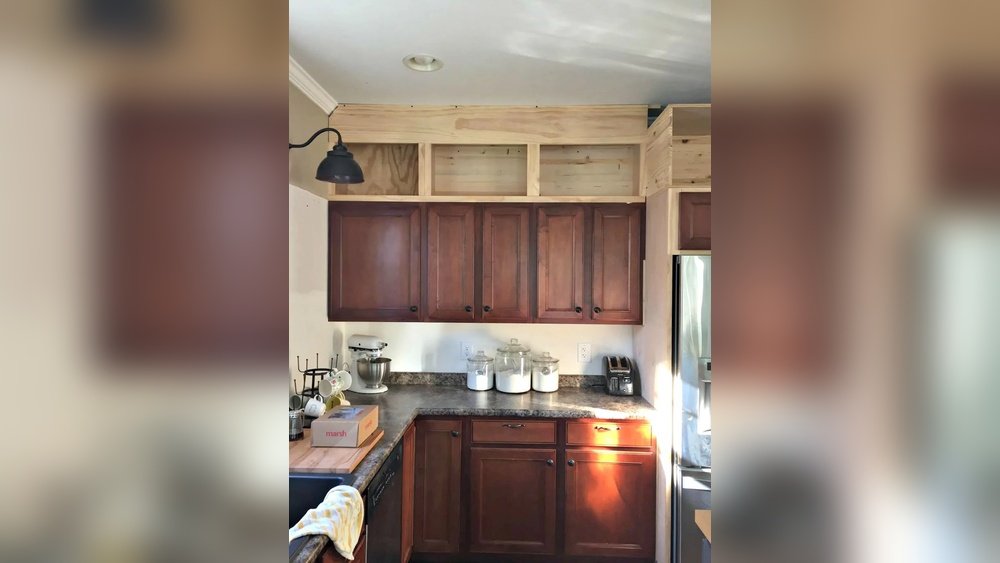
Real-life Example: Before And After
Imagine a kitchen with 36-inch cabinets and 18 inches of space above. The homeowner adds 15-inch cabinets above, plus a 3-inch crown molding.
Before:
- 36-inch cabinets, 18-inch gap, looks unfinished
- Dust and clutter collect above cabinets
After:
- 36-inch base cabinets, 15-inch upper cabinets, 3-inch molding, reach the ceiling
- Extra storage for seasonal dishes
- Seamless, custom look
Most people are surprised how much bigger and more modern their kitchen feels with this upgrade.

Credit: www.thriftydecorchick.com
Common Mistakes And How To Avoid Them
Even skilled DIYers can make mistakes. Watch out for these:
1. Wrong Measurements
Double-check all numbers before buying cabinets. If unsure, make a cardboard template to test fit.
2. Not Anchoring To Studs
Cabinets are heavy. Always screw into wall studs, not just drywall.
3. Ignoring Uneven Surfaces
Old walls and ceilings are rarely perfect. Use shims and check with a level at every step.
4. Mismatch In Style Or Color
If new cabinets don’t match, paint all cabinets the same color for a unified look.
5. Forgetting About Lighting
Upper cabinets can block ceiling lights. Plan for under-cabinet lighting if needed.
6. Overtightening Screws
This can split wood. Tighten until snug, not more.
7. Skipping Finishing Touches
Trim and caulk make the project look professional. Don’t skip these steps.
One insight most people miss: If your ceiling is not level, start installation at the highest point. This avoids awkward gaps and uneven lines.
When To Call A Professional
Adding cabinets above existing cabinets is possible as a DIY project, but some situations call for expert help:
- Very high ceilings (above 10 feet)
- Heavy cabinets (solid wood or glass-front)
- Walls that need repair
- Electrical or ductwork changes
- Custom cabinet installation
If you’re unsure, a professional can ensure safety and a perfect fit.
Cost Comparison: Diy Vs Hiring A Pro
Here’s a comparison to help you decide:
| Option | Average Cost (for 4 cabinets) | What’s Included | Time Needed |
|---|---|---|---|
| DIY | $600 – $1,200 | Cabinets, hardware, paint, tools | 1-2 days |
| Professional | $1,500 – $3,500 | Cabinets, labor, finishing | Half to 1 day |
DIY saves money but takes more time. Pros finish faster and can handle tricky jobs.
Tips For Matching New Cabinets To Old
Seamless results need attention to detail. Here’s how to make new and old cabinets look like one unit:
- Order color samples for paint or stain before buying.
- Choose simple door styles for new cabinets if you can’t match exactly.
- Replace all hardware so knobs and pulls match.
- Add crown molding that runs across both old and new cabinets.
- Use filler strips to close gaps if cabinets are slightly different sizes.
If the wood grain doesn’t match, painting everything a solid color is easier than staining.
Alternative Ideas If You Can’t Add Cabinets
Not every kitchen can fit extra cabinets above. Here are some other ways to use that space:
1. Open Shelves
Install floating shelves for plants, cookbooks, or decor.
2. Decorative Baskets Or Boxes
Store items in attractive containers above the cabinets.
3. Backlit Display
Add lights and display art, glassware, or seasonal items.
4. Extend Molding
Run large crown molding to the ceiling for a polished look.
These options still make the space useful and stylish.
Maintenance And Upkeep
Upper cabinets don’t need much maintenance, but here are a few tips:
- Dust regularly with a microfiber cloth.
- Check for loose screws every few months.
- Clean doors with mild soap and water.
- Touch up paint or stain as needed.
If you install lights, replace bulbs as soon as they dim.

Credit: penniesforafortune.com
Data Table: Cabinet Sizes And Ceiling Heights
To help you plan, here’s a quick reference for cabinet sizes and recommended ceiling heights:
| Ceiling Height | Base Cabinet Height | Upper Cabinet Height | Space Above Cabinets | Ideal Upper Add-On Height |
|---|---|---|---|---|
| 8 ft (96″) | 36″ | 30″ | 12″ | 12″ or open space |
| 9 ft (108″) | 36″ | 36″ | 18″ | 15″-18″ |
| 10 ft (120″) | 36″ | 42″ | 18″-24″ | 18″-24″ |
Always leave at least a half-inch gap to the ceiling for settling and expansion.
Safety Tips
Working above your head brings risks. Keep these safety tips in mind:
- Use a sturdy ladder or step stool.
- Have someone help lift heavy cabinets.
- Wear safety glasses when drilling.
- Don’t work above your head for long—take breaks.
- Check for wires or pipes before drilling.
A common mistake is working alone. Cabinets can be heavy and awkward—ask a friend for help.

Credit: www.youtube.com
Environmental Considerations
If you care about eco-friendly choices, consider:
- Low-VOC paints for less indoor pollution.
- Recycled materials for cabinets.
- LED lighting under cabinets for energy savings.
Don’t forget to recycle old crown molding or cabinet parts if removed.
How To Add Glass Or Decorative Doors
Want a custom touch? Glass or decorative doors look great on upper cabinets.
- Choose frosted or clear glass for a light, airy feel.
- Use muntins (wood strips) for a classic look.
- Add interior lighting to highlight displays.
Most cabinet companies sell glass door options, or you can replace solid panels with glass at a local glass shop.
Lighting Tips For Upper Cabinets
Upper cabinets can cast shadows. Here’s how to keep your kitchen bright:
- Install LED strip lights under the new upper cabinets.
- Use puck lights inside glass-front cabinets.
- Choose daylight bulbs for bright, even light.
Some newer systems use remote controls for easy operation.
Timeline: How Long Does It Take?
Here’s a typical timeline for adding cabinets above existing ones:
| Task | Time Needed |
|---|---|
| Measure and plan | 2-3 hours |
| Order cabinets and materials | 1-3 weeks (delivery time) |
| Remove molding and prep area | 1 hour |
| Install cabinets | 4-6 hours |
| Paint, trim, and finish | 2-4 hours |
Most of the waiting time is for cabinets to arrive. The actual installation is a weekend project for most homeowners.
Resources For Finding Cabinets
You can find suitable cabinets at:
- Home improvement stores (Home Depot, Lowe’s)
- Kitchen specialty shops
- Online retailers (IKEA, Wayfair)
- Local cabinetmakers (for custom options)
Some companies offer online planners to help you visualize the finished look. For design inspiration and more advanced planning, check out Houzz.
Frequently Asked Questions
How Do I Match New Cabinets To My Old Cabinets?
Try to match the door style, color, and finish. If you can’t, painting all cabinets the same color is an easy way to unify the look. Replace hardware on both old and new cabinets for consistency.
Can I Add Upper Cabinets If My Kitchen Has A Bulkhead?
A bulkhead is a boxed-in area above cabinets, often hiding pipes or wires. You’ll need to remove the bulkhead before adding cabinets. Check for hidden utilities inside before demolishing.
Should I Use Stock Or Custom Cabinets For Above-cabinet Installation?
Stock cabinets are cheaper and work for most kitchens. Use custom cabinets if you have unusual sizes or want a perfect match.
How Much Space Should I Leave Between The New Cabinets And The Ceiling?
Leave at least half an inch for settling and to allow for caulking. Some people like a small gap for a finished trim piece.
Is It Worth Hiring A Professional For This Project?
If your walls or ceiling are uneven, or if you want a flawless look, a pro can help. For most DIYers with basic skills, this is a manageable project.
Adding cabinets above existing cabinets gives your kitchen more storage, a high-end look, and better use of space. With good planning, careful measuring, and attention to detail, you can complete this project and enjoy the benefits for years to come.