How To Adjust Mandoline Slicer
Mandoline slicers are one of the most useful kitchen tools for anyone who wants to cut fruits and vegetables quickly and evenly. But for many people, adjusting a mandoline slicer can be confusing. The process seems simple, but if you do it wrong, you might end up with uneven slices, damaged food, or even a cut finger.
Understanding how to adjust a mandoline slicer safely and correctly is important for both home cooks and professionals.
This article will guide you through every step of adjusting your mandoline slicer. Whether you have a basic handheld model or a professional, multi-blade slicer, you’ll learn how to set it up, choose the right thickness, use the different blades, and avoid common mistakes.
Along the way, you’ll get tips that even experienced cooks sometimes overlook. By the end, you’ll feel confident using your mandoline to get perfect slices every time.
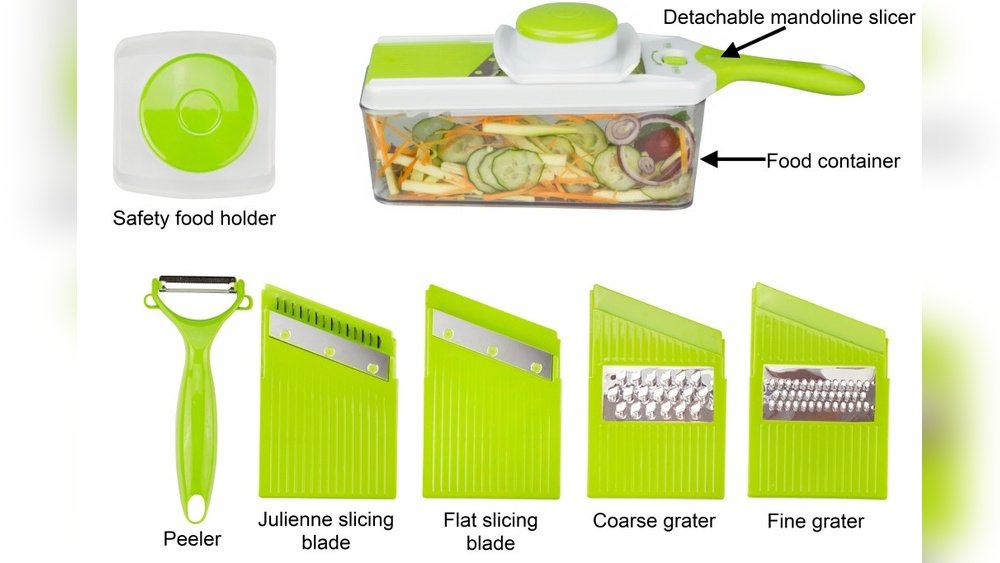
Understanding The Mandoline Slicer
Before making adjustments, it helps to know the basic parts of a mandoline slicer and how they work. While designs vary, most mandolines have three main sections:
- Main platform: The flat surface where you place the food.
- Blade section: The sharp blade that does the cutting, sometimes adjustable for different thicknesses.
- Adjustment controls: These may be knobs, levers, or sliders that change the height of the blade or swap out blades.
Some mandolines come with extra julienne blades or wavy blades for different types of cuts. More advanced models may have several settings for thickness and cut style.
Why Use A Mandoline Slicer?
A mandoline gives you:
- Uniform slices: Every piece is the same thickness, so food cooks evenly.
- Speed: You can slice large amounts of food quickly.
- Versatility: With different blades, you can make chips, matchsticks, waffle cuts, and more.
But to get these benefits, you must adjust your mandoline correctly. If the blade is set too high, slices are thick and uneven. If it’s too low, the food might not cut at all. That’s why learning to adjust your mandoline is so important.
Types Of Mandoline Slicers And Their Adjustment Mechanisms
Mandolines come in different designs, and each has its own way of adjusting thickness and blades. Here’s how they compare:
| Type | Adjustment Method | Typical Uses | Ease of Adjustment |
|---|---|---|---|
| Simple Handheld | Manual slide, fixed or limited settings | Basic slicing (cucumbers, carrots) | Easy |
| Classic French | Knobs or screws for precise blade height | Thick/thin slices, julienne, crinkle cut | Moderate |
| Multi-Blade Adjustable | Dial or lever for thickness, interchangeable blades | Wavy, waffle, matchstick, various vegetables | Varies (usually easy) |
| Electric Mandoline | Digital or push-button controls | High-volume slicing, advanced cuts | Very easy |
Handheld models are simple but limited. Classic French mandolines offer more control, but require careful adjustment. Multi-blade mandolines are popular for home cooks because they balance versatility and ease of use.
Preparing To Adjust Your Mandoline Slicer
Before you start adjusting your mandoline, take these key steps:
- Clean and inspect your mandoline. Make sure all parts are clean and free of debris. A dirty slicer can affect the adjustment and food safety.
- Read the manual. Each mandoline is a little different. If you have the instruction booklet, review it to find where the adjustment knobs, levers, or blades are located.
- Check the safety features. Modern mandolines usually come with a food holder or guard. Always use this to protect your fingers.
- Set up on a stable surface. Place your mandoline on a cutting board or non-slip mat. Stability helps you make precise adjustments and prevents accidents.
Step-by-step Guide: How To Adjust Mandoline Slicer
Here is a detailed guide to adjusting the main features of a mandoline slicer.
1. Selecting And Installing The Blade
Most mandolines come with one or more blade types. The most common are:
- Straight blade: For basic slicing.
- Julienne blade: For thin, matchstick cuts.
- Wavy or crinkle blade: For decorative slices, like crinkle-cut fries.
To install or swap the blade:
- Unclip or unscrew the blade (some use a release button or lever).
- Slide the new blade into its slot, making sure it snaps into place.
- Double-check that the blade is locked and secure. A loose blade is dangerous.
Pro tip: Always handle blades by the dull edge to avoid cuts. Wear cut-resistant gloves if possible.
2. Adjusting Slice Thickness
This is the most important adjustment. Slice thickness usually ranges from about 1 mm (paper-thin) up to 7 mm (about 1/4 inch) or more.
Common thickness settings:
| Thickness | Ideal For |
|---|---|
| 1-2 mm | Potato chips, cucumber salad, garnishes |
| 3-4 mm | Tomato slices, apple chips, onions for sautéing |
| 5-7 mm | Au gratin potatoes, zucchini for grilling |
To adjust:
- Knob or dial: Turn to the desired number (often labeled in mm or fractions of an inch).
- Slider: Move the slider until it clicks into the position you want.
- Screw mechanism: Loosen, raise or lower the platform or blade, then retighten.
Test with a piece of food before slicing a whole batch. Sometimes, the real slice is slightly thicker or thinner than the setting.
Non-obvious insight: If your mandoline does not have labeled thickness settings, use a ruler to measure the gap between the blade and platform. This helps you repeat the same cut next time.
3. Changing To Specialty Blades
If your mandoline has julienne, crinkle, or waffle blades, you’ll need to swap them in when needed.
- Remove the main slicing blade as described above.
- Insert the specialty blade, making sure it is firmly seated.
- Some mandolines have two blades in place at once (main slicing plus julienne). In this case, flip or rotate the second blade into position.
Practical tip: Not all foods work well with specialty blades. Soft, watery items like tomatoes can fall apart on julienne blades. Use firm vegetables for best results.
4. Adjusting Angle And Platform
Some professional mandolines allow you to change the angle of the slicing platform. A steeper angle makes slicing easier for hard vegetables, while a shallower angle gives more control with soft foods.
- Find the angle adjustment lever or screw (often underneath or on the side).
- Adjust until the platform tilts to your desired angle.
- Re-tighten or lock the lever.
For most home cooks, the default angle works well. But if you’re slicing a lot of carrots or sweet potatoes, a steeper angle can reduce hand fatigue.
5. Using The Food Holder Or Guard
The food holder is an important safety feature. It also helps you use the entire vegetable or fruit, minimizing waste.
- Place the food into the holder, aligning the spikes or pins with the food.
- Press down so the holder grips the food firmly.
- Slide the holder and food together over the blade.
Never try to slice by hand, especially as you get close to the blade. Even professionals use the holder to avoid injuries.
Common mistake: Some users skip the holder to save time, but this increases the risk of deep cuts. Always use the guard, especially for small or round foods.

Credit: device.report
Fine-tuning Your Mandoline For Best Results
Once you understand the basics, you’ll notice small adjustments make a big difference in your results. Here’s how to fine-tune your mandoline:
Test Cuts
Before slicing a large batch, do a few test slices:
- Try different thickness settings until you get the result you want.
- Test with the actual food you plan to use. A cucumber and a potato slice differently.
- Check the uniformity. If slices are uneven, recheck that the blade is locked in place and the food is flat against the platform.
Matching Cut Style To Recipe
Different recipes need different slices. For example:
- Potato gratin: Even, medium-thick slices (3-4 mm).
- Stir-fry: Thin julienne strips.
- Apple chips: Very thin, even slices.
Adjust the blade and thickness to match your recipe before you start slicing.
Adjusting For Food Size And Shape
Some foods are too large or small for the mandoline’s platform. If needed:
- Cut large items (like cabbage or eggplant) into halves or quarters.
- Use the holder for small foods like radishes or garlic.
- For long items (like carrots), cut to fit the holder.
Proper adjustment helps you get consistent results and keeps your hands safe.
Cleaning And Maintaining The Adjustment Mechanisms
A mandoline will only adjust smoothly if it’s kept clean and well-maintained.
After Each Use
- Remove the blade carefully and rinse under warm water.
- Clean the adjustment knobs and sliders. Small food bits can get stuck and make the mechanism stiff.
- Dry all parts completely before putting the mandoline away. This prevents rust.
Deep Cleaning
Once a month, take apart the mandoline and clean the adjustment controls with a brush or toothpick. This removes hidden food particles.
Non-obvious insight: A sticky adjustment knob or lever can lead to uneven slices and even damage the slicer. Regular cleaning makes adjusting much easier.
Safety Precautions When Adjusting Mandoline Slicers
Mandolines are sharp—one slip, and you can get a serious cut. Here’s how to stay safe:
- Always use the food holder or guard. Never try to adjust or clean while the blade is exposed.
- Wear cut-resistant gloves if you need to touch the blade.
- Keep fingers away from the adjustment area when changing blades or thickness.
- Lock the blade in place before you begin slicing.
- Store blades safely. Loose blades can cut you or damage the mandoline.
Accidents often happen when people rush or skip safety steps. Take your time, and double-check your adjustments before slicing.
Troubleshooting Common Mandoline Adjustment Problems
Even with practice, you might run into some issues. Here’s how to solve the most common mandoline adjustment problems:
Slices Are Uneven
- The blade may not be installed correctly. Remove and reinstall.
- The adjustment knob might be loose. Tighten it securely.
- The food may not be flat on the platform. Cut a flat base before slicing.
Food Sticks Or Won’t Slice
- The blade could be dull. Sharpen or replace it.
- The food might be too soft (like overripe tomatoes). Use firmer produce.
- The platform might be set too high for the food’s size. Lower the blade.
Adjustment Mechanism Is Stuck
- Food particles may be blocking the knob or slider. Clean thoroughly.
- Rust could be causing stiffness. Dry the mandoline fully after washing.
Blade Will Not Lock In Place
- Check for debris in the locking area.
- Make sure you are using the correct blade for your model.
- If it still won’t lock, check the manual or contact the manufacturer.
Advanced Tips For Mandoline Adjustment
After you master the basics, try these advanced tips:
- Stacking slices: For large batches, slice one layer, then adjust thickness for the next. This helps if you want both thick and thin pieces for the same dish.
- Double blades: Some mandolines let you use two blades at once (e.g., straight and julienne). Practice adjusting both for creative cuts.
- Precision recipes: For sushi or carpaccio, use a ruler to measure slices and adjust the mandoline until you get the exact thickness every time.
- Waffle cuts: To make waffle fries, rotate the food 90 degrees between each pass. Adjust the thickness for a crisp or soft finish.
Pro tip: Write down your favorite thickness settings for each recipe. This saves time the next time you cook the same dish.
Comparison Of Popular Mandoline Adjustment Systems
Many brands offer unique adjustment systems. Here’s a quick comparison of some popular options:
| Brand/Model | Adjustment Type | Ease of Use | Unique Features |
|---|---|---|---|
| OXO Good Grips | Dial knob, labeled thickness | Very easy | Non-slip feet, easy cleaning |
| Benriner Japanese Mandoline | Screw for blade height | Moderate | Very sharp blade, compact |
| De Buyer French Mandoline | Lever, multiple blades | Advanced | Professional build, many cut options |
| Cuisinart Mandoline | Slider, labeled settings | Easy | Wide platform, dishwasher safe |
Some models are better for beginners, while others offer more precise adjustment for chefs. Choose based on your comfort and how often you plan to use the mandoline.

Credit: www.amazon.com
Mistakes To Avoid When Adjusting Mandoline Slicer
Avoid these common errors to get the best results:
- Forgetting to lock the blade: Always make sure the blade is secure before slicing.
- Choosing the wrong thickness: Start thinner than you think. You can always make it thicker, but you can’t make slices thinner after cutting.
- Skipping the test slice: Always do a test before slicing the whole batch.
- Not cleaning after use: A dirty mandoline is hard to adjust and can grow bacteria.
- Using the wrong food for the blade: Soft foods break on julienne or wavy blades. Stick to firm produce.
How To Choose A Mandoline With Easy Adjustment
If you’re buying a new mandoline, pay attention to these features:
- Clear thickness settings: Dials or sliders labeled in mm or inches are best.
- Simple blade change system: Look for snap-in or magnetic blades for easy swapping.
- Stable platform: Wide, non-slip feet make adjusting and slicing safer.
- Easy-to-clean mechanism: Fewer crevices mean less food gets stuck.
Read reviews and check for demonstration videos online. For example, the Wikipedia page on mandolines explains the different models and their features.
Real-world Example: Adjusting For Different Recipes
Let’s see how adjusting your mandoline works in practice:
- Potato Chips: Start with the straight blade, set thickness to 1-2 mm. Test a slice. If it’s too thick, lower the blade.
- French Fries: Switch to julienne blade, set thickness to 5 mm. Adjust blade height until fries are the size you want.
- Cucumber Salad: Use straight blade, 2-3 mm setting. If cucumbers are soft, chill them first for firmer slices.
- Waffle Fries: Insert wavy blade, set thickness to 3-4 mm. Slice, then rotate food 90 degrees and slice again for the waffle pattern.
Each recipe may need a small adjustment, but following the steps above gives you control and great results.
Frequently Asked Questions
What Is The Safest Way To Adjust A Mandoline Slicer?
The safest way is to unplug electric models, use cut-resistant gloves, and always remove the blade before cleaning or changing settings. Never adjust while the slicer is set up for slicing—do it before you start, and always use the food holder or guard.
Can I Adjust My Mandoline Slicer While Slicing?
No, you should never adjust the thickness or change blades while slicing. Pause, remove the food, make your adjustment, then continue. This prevents accidents and ensures the settings are correct.
Why Are My Slices Not Uniform After Adjusting The Mandoline?
Uneven slices usually mean the blade is not seated properly, the adjustment knob is loose, or the food is not flat against the platform. Check all parts, tighten the controls, and always cut a flat base on your food before slicing.
How Often Should I Clean The Adjustment Mechanism?
Clean the adjustment mechanism after every use, especially if small food pieces or juices get inside. Deep clean the entire mandoline at least once a month to keep the controls moving smoothly and prevent rust or bacteria growth.
What Foods Should I Avoid Slicing With A Mandoline?
Avoid very soft foods (like overripe tomatoes or cooked vegetables) and anything with a pit or stone. These can damage the blade or cause it to slip. Use the mandoline mainly for firm fruits and vegetables for best results.
Mandoline slicers are powerful tools, but proper adjustment makes all the difference. With the right setup, you’ll get even, professional slices every time—making your kitchen work faster, safer, and more enjoyable.

Credit: www.amazon.com