Remodeling your kitchen is exciting, but it can turn daily life upside down. Suddenly, your cooking space is gone, and you need to figure out how to prepare meals without a stove, sink, or counter. Many people think a kitchen remodel means endless takeout, but a well-planned temporary kitchen can keep your household running smoothly and save money. Setting up this space is not just about stacking a microwave and some paper plates—it’s about creating a safe, functional area where you can cook, clean, and store food during the remodel.
Most families underestimate how long a kitchen remodel takes. According to the National Kitchen and Bath Association, the average kitchen renovation lasts 6-12 weeks, sometimes longer. Eating out every day is expensive and unhealthy. A smart temporary kitchen helps you control costs and maintain normal routines. It also reduces stress, as you won’t have to search for every fork or ingredient. In this guide, you’ll learn how to plan, set up, and manage a temporary kitchen that meets your needs. Along the way, you’ll discover practical tips, essential supplies, and clever solutions to common problems. Let’s make sure your kitchen remodel feels less like chaos and more like a fresh start.
Assess Your Needs And Space
Before you start moving appliances, take a moment to plan. Think about who will use the temporary kitchen and how often. Will you need space for children’s snacks, or just for adults? Do you have pets that need feeding? Make a list of what you cook most often—breakfasts, lunches, dinners, and drinks.
This helps you identify the appliances and tools you truly need.
Next, look for the best location in your home. Popular choices include the garage, basement, dining room, or even a corner of the living room. The area should be away from construction dust and noise, and close to electrical outlets. If possible, pick a spot near a bathroom or laundry room for water access. Don’t forget safety: avoid places where children or pets might get hurt.
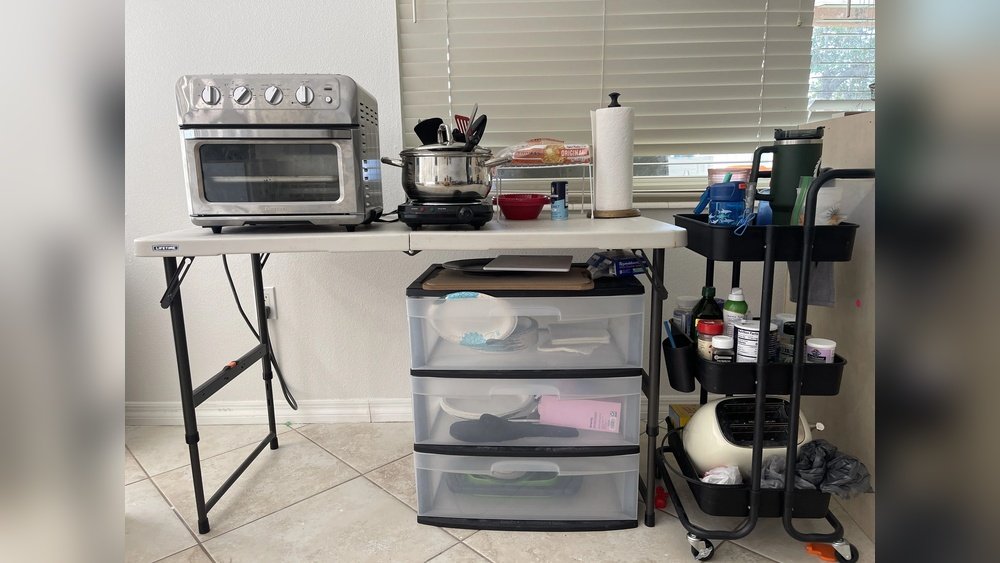
Measure the space carefully. Make sure there is enough room for a table, chairs, appliances, and storage. Small homes may need creative solutions—folding tables, rolling carts, or even outdoor setups. Remember, the goal is to create a space that is comfortable and easy to clean, not just functional.
Choose Essential Appliances And Equipment
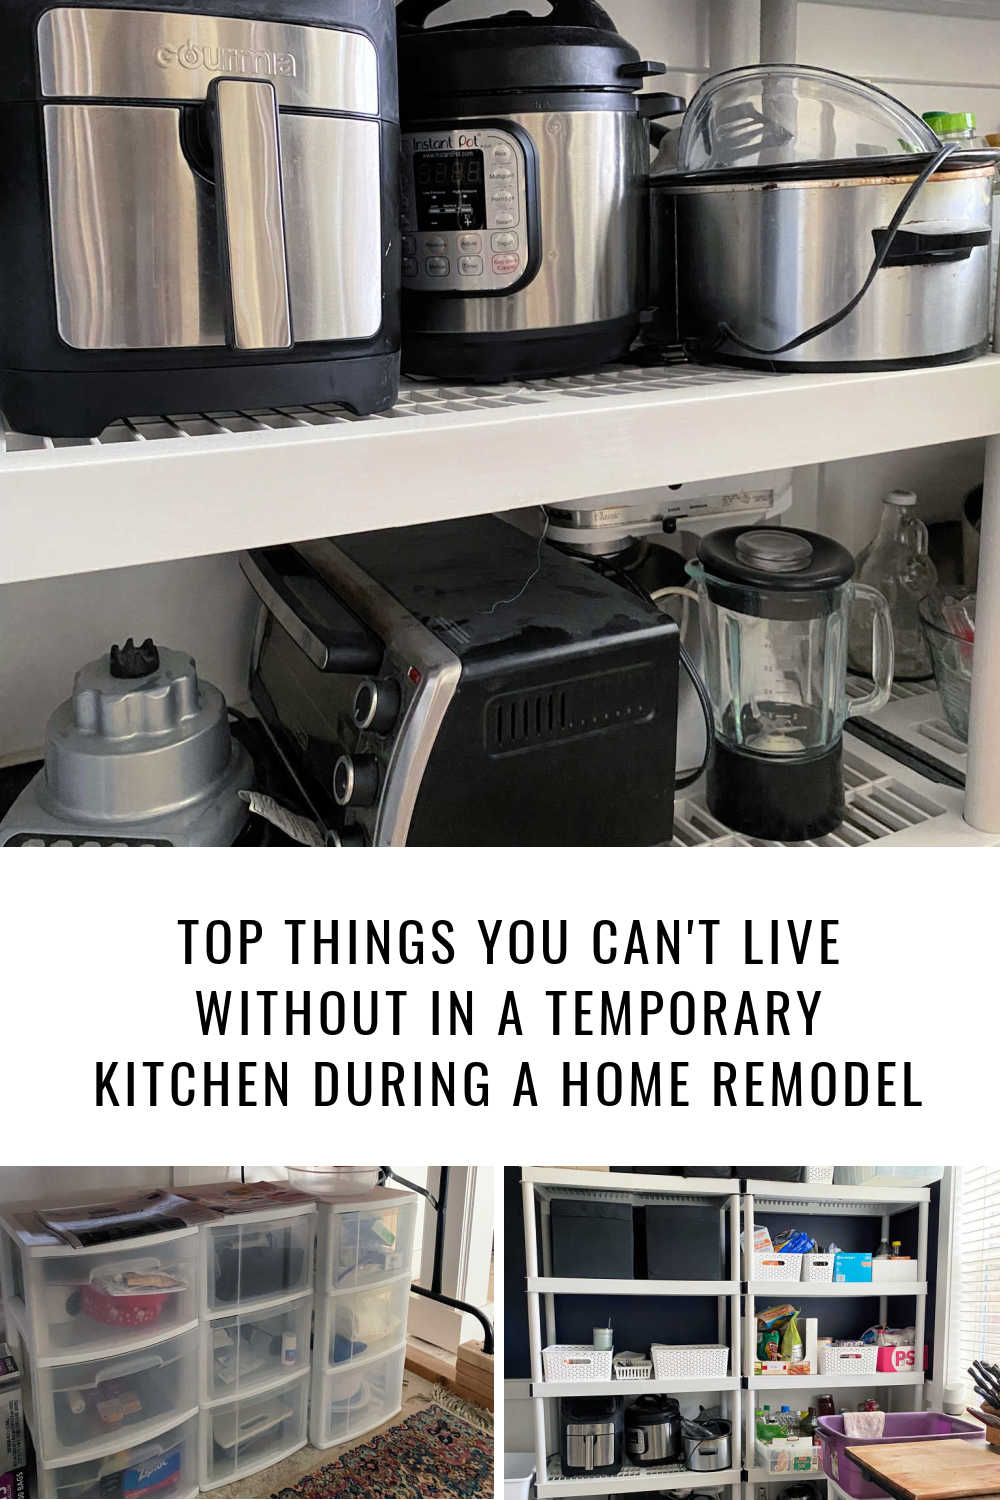
You don’t need every appliance from your main kitchen. Focus on versatile, compact tools that can handle most meals. Here are some must-haves:
- Microwave: Heats leftovers, cooks simple meals, and boils water.
- Toaster oven or air fryer: Bakes, toasts, and roasts. Air fryers are popular because they use less oil and cook quickly.
- Hot plate or portable induction cooktop: Lets you boil, sauté, or fry food.
- Electric kettle: Great for tea, coffee, and instant soups.
- Slow cooker or Instant Pot: Cooks stews, soups, rice, and even pasta with minimal supervision.
- Mini fridge: Essential for keeping milk, eggs, leftovers, and snacks fresh.
- Coffee maker: Keeps mornings normal.
If you have access to outdoor space, a grill is a powerful tool for cooking meat, vegetables, and even pizza. Some families use their outdoor grill as the main cooking appliance during a remodel.
Don’t forget basic cooking tools:
- Cutting board
- Chef’s knife
- Mixing bowls
- Measuring cups and spoons
- Spatula, ladle, tongs
- Can opener
- Peeler
It’s tempting to bring everything, but stick to essentials. Too many items create clutter and confusion.
Organize Food Storage And Supplies
A temporary kitchen needs smart storage. You won’t have your usual cabinets, so plan for both dry and cold storage.
Dry Storage Solutions
Use plastic bins, baskets, or cardboard boxes for storing food, utensils, and cookware. Stackable bins are useful for maximizing vertical space. Label each container so you can find things quickly.
Keep commonly used items within easy reach—breakfast cereal, snacks, coffee, tea, and bread. Store less-used items (like baking ingredients) further away.
Cold Storage Solutions
A mini fridge is helpful, but it may not fit everything. If you need more space, use a cooler with ice packs for overflow. For longer remodels, consider renting a larger fridge or freezer.
To avoid waste, buy smaller quantities of perishables. Plan meals so you use up ingredients before they spoil.
Cleaning Supplies
Include dish soap, sponges, paper towels, and garbage bags. For longer remodels, set up a plastic tub or basin for washing dishes. If you have a laundry sink nearby, use it for rinsing and washing.
Plan Your Temporary Kitchen Layout
A clear layout saves time and keeps the area safe. Think about the “work triangle”—the space between cooking, cleaning, and food storage. Try to keep appliances, prep space, and storage close together but not crowded.
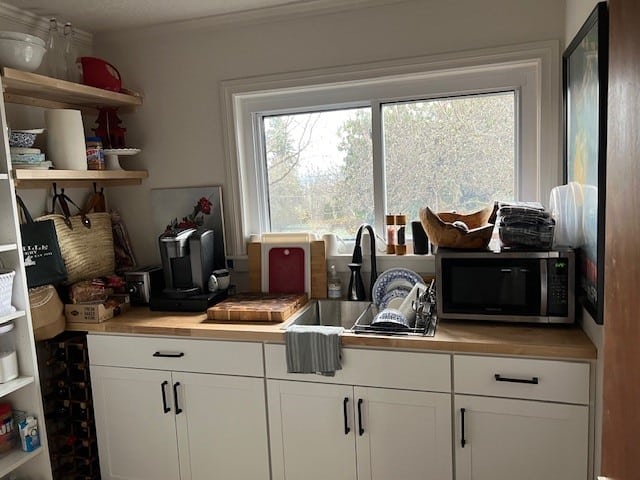
Place the mini fridge near the prep area. Put the microwave and cooktop on a sturdy table or cart. Store utensils and dishes nearby. If you have children, keep sharp items out of reach.
Leave enough space for movement. If you can, set up a small dining area with folding chairs and a table. This helps keep meal routines normal.
If your space is very limited, use vertical storage like hanging racks or shelves. Rolling carts are great for moving supplies when needed.
Set Up Water And Cleaning Solutions
Water access is often the biggest challenge. If your temporary kitchen is near a bathroom or laundry room, use the sink for washing dishes and hands. If not, set up a plastic tub or basin for cleaning.
Fill a large jug with water for cooking and drinking. For washing, use disposable wipes, paper towels, and spray bottles. If you have a dishwasher in another room, use it for cleaning plates and utensils.
Keep cleaning supplies organized in a bucket or basket. Change dish towels often to prevent germs. Set up a trash can and recycling bin nearby.
For longer remodels, some people rent a portable sink. These sinks connect to a faucet or hose and provide basic water access. If you’re remodeling in summer, consider setting up an outdoor washing station.
Create A Safe And Comfortable Space
Safety is crucial. Make sure electrical cords are out of the way and appliances are on sturdy surfaces. Never overload outlets—use surge protectors if needed. Keep hot appliances away from edges where they could be knocked over.
Childproof the area if you have young kids. Store sharp tools high up, and lock away cleaning supplies.
Comfort matters too. Use a fan or heater if the area is too hot or cold. Good lighting is essential—bring in a lamp or use overhead lights. If noise is a problem, use headphones or soft music.
Keep the area clean and tidy. A messy space increases stress and makes cooking harder.
Manage Meal Planning And Preparation
Cooking in a temporary kitchen is easier with meal planning. Choose simple recipes that use few ingredients and minimal equipment. Plan meals for the week and shop with a list.
Focus on one-pot meals, slow cooker recipes, and microwave-friendly dishes. Sandwiches, salads, pasta, and stir-fries are good options. Avoid recipes that need lots of pots or baking sheets.
Meal prep is helpful. Cut vegetables, marinate meat, and cook rice ahead of time. Store leftovers in labeled containers to avoid confusion.
If you miss baking, use a toaster oven or air fryer for small batches. Some air fryers can bake muffins, cookies, and bread.
Here are a few practical meal ideas:
- Oatmeal or cereal for breakfast
- Sandwiches or wraps for lunch
- Pasta, stir-fry, or slow cooker stew for dinner
Don’t forget snacks and drinks. Keep fruit, nuts, and bottled water handy.
Control Costs And Reduce Waste
Remodels often increase food costs. Takeout is expensive, and wasted groceries add up. A temporary kitchen helps control spending.
Buy only what you need for the week. Choose ingredients that work in several meals—rice, eggs, canned beans, pasta, and vegetables. Avoid buying bulk items unless you have storage.
Use leftovers creatively. Turn roast chicken into soup, rice into stir-fry, or vegetables into omelets.
For longer remodels, track your spending. Keep receipts and review them weekly. This helps you spot waste and adjust your shopping.
Reduce waste by using reusable plates, cups, and utensils. Disposable items are convenient, but they cost more and create trash.
Compare Temporary Kitchen Solutions
Depending on your home and needs, you have several options for setting up a temporary kitchen. Here’s a comparison of three common setups:
| Setup Type | Pros | Cons | Best For |
|---|---|---|---|
| Indoor (Dining/Living Room) | Easy access, climate control, safe | Limited water access, noise from construction | Families with young children |
| Garage/Basement | More space, away from dust, possible water access | Can be cold/hot, less comfortable | Larger families, longer remodels |
| Outdoor (Patio/Backyard) | Fresh air, easy grilling, less indoor mess | Weather issues, limited appliances | Summer remodels, grill lovers |
Each setup has strengths and weaknesses. Choose what fits your home, climate, and family needs.
Essential Supplies Checklist
It’s easy to forget key items when setting up a temporary kitchen. Here’s a checklist to keep you organized:
- Mini fridge or cooler
- Microwave, toaster oven, or air fryer
- Hot plate or induction cooktop
- Electric kettle
- Slow cooker or Instant Pot
- Coffee maker
- Cutting board, knives, and utensils
- Mixing bowls, measuring cups
- Plates, cups, and cutlery
- Dish soap, sponges, towels
- Trash bags, recycling bin
- Storage bins, baskets
- Water jug or bottles
- Cleaning wipes and spray
- First aid kit
Customize this list for your needs. If you have children, add snack containers and baby feeding tools.
Credit: www.rachelteodoro.com
Tips For Making Your Temporary Kitchen Work
Setting up is just the start. Here are some practical tips to keep your temporary kitchen running smoothly:
- Keep it simple: Don’t try to cook complex recipes. Stick to meals that use few steps.
- Clean as you go: Small spaces get messy fast. Wipe counters and wash dishes after each meal.
- Stay organized: Use labels and baskets. Group similar items together.
- Rotate appliances: If you have limited outlets, plug in only what you need.
- Involve the family: Let kids help with setup and meal prep. It makes the transition easier.
- Use outdoor space: If possible, grill or eat outside to reduce indoor mess.
- Plan for emergencies: Keep a fire extinguisher and first aid kit nearby.
- Stay flexible: Some days will be chaotic. Be ready to adjust your routine.
Many homeowners overlook the importance of ventilation. Cooking in a small space can create smoke or odors. Open windows or use a fan to keep air fresh.
The Role Of Temporary Kitchens In Health And Wellbeing
A remodel is stressful, but a temporary kitchen helps keep life normal. Cooking at home is healthier than eating out, and it keeps routines stable for children and adults.
According to the USDA, home-cooked meals have lower calories and sodium compared to restaurant food. Families who cook together also report better mental health and stronger relationships.
Your temporary kitchen is more than a place to make food—it’s a hub for family time and comfort during a stressful period. Create a space where you can relax, talk, and share meals.
%20(2)-1.png)
Credit: www.mclennancontracting.com
How To Transition Back After The Remodel
When your new kitchen is ready, it’s tempting to move everything back at once. But a smooth transition makes life easier.
Start by cleaning and organizing the new kitchen. Move in appliances and tools gradually. Review which items you used most in the temporary kitchen—these should be easy to access in your new space.
Take time to deep clean storage bins and baskets before returning them. Donate or recycle items you no longer need.
Celebrate the new kitchen with a special meal. Invite family and friends to enjoy your new space.
Common Mistakes And How To Avoid Them
Many families make mistakes when setting up a temporary kitchen. Here’s how to avoid them:
- Overpacking: Bringing too many appliances creates clutter. Stick to essentials.
- Ignoring water access: Without water nearby, cleaning becomes a hassle. Plan ahead.
- Poor layout: Crowded spaces are unsafe and stressful. Make sure there is room to move.
- Skipping meal planning: Without a plan, you’ll waste food and spend more money.
- Neglecting safety: Overloaded outlets and sharp tools are dangerous. Use surge protectors and childproof storage.
One non-obvious insight: Don’t forget about air quality. Construction dust can get everywhere. Use an air purifier or keep windows open to protect your family.
Another overlooked tip: Set up a small “command center” with a calendar, shopping list, and meal plan. This keeps everyone informed and reduces confusion.
Credit: www.neilkelly.com
Data On Kitchen Remodels And Temporary Kitchens
Remodeling is common in the US. According to the Joint Center for Housing Studies at Harvard, Americans spend over $15 billion a year on kitchen renovations. Most projects last between 2 and 3 months.
Families who set up a temporary kitchen report 40% lower food costs compared to those who rely on takeout. Health and satisfaction levels are higher, especially for families with children.
Here’s a look at average spending and timeframes:
| Remodel Type | Average Cost | Average Duration | Temporary Kitchen Usage |
|---|---|---|---|
| Minor Remodel | $8,000 | 4-6 weeks | 75% |
| Major Remodel | $25,000 | 8-12 weeks | 90% |
These numbers show the importance of planning for a temporary kitchen.
Real-life Examples And Success Stories
Many homeowners have found creative ways to set up a temporary kitchen. One family in Chicago used their garage, adding a folding table, mini fridge, and hot plate. They set up a washing station with buckets and managed to cook daily meals for six weeks.
Another couple in Texas remodeled in summer and used their backyard. They cooked on a grill, washed dishes in an outdoor sink, and ate under the patio. The fresh air made the experience enjoyable.
A single parent in New York used the laundry room, placing a microwave and kettle on top of the washing machine. With careful planning, they kept food costs low and maintained a routine for their children.
These stories show that with creativity and planning, a temporary kitchen can fit any home.
Frequently Asked Questions
How Do I Choose The Best Location For My Temporary Kitchen?
Pick a space away from construction dust and noise, with easy access to electrical outlets and water. Common spots include the garage, basement, dining room, or even outdoors. Consider safety and comfort for all family members.
What Appliances Are Most Important In A Temporary Kitchen?
Focus on versatile, compact appliances like a microwave, toaster oven or air fryer, hot plate, and mini fridge. If you drink coffee or tea, include a coffee maker and electric kettle. Choose appliances based on your favorite meals.
How Can I Wash Dishes Without A Kitchen Sink?
Use a bathroom, laundry room, or set up a plastic tub with water. For longer remodels, consider renting a portable sink. Cleaning wipes and disposable plates can help, but reusable items are better for reducing waste.
What Are Some Meal Ideas For A Temporary Kitchen?
Simple meals work best: oatmeal, sandwiches, salads, pasta, stir-fries, slow cooker stews, grilled meats and vegetables. Avoid recipes that need lots of pots or baking sheets. Plan meals ahead to save time and money.
Is It Possible To Stay Healthy During A Kitchen Remodel?
Yes. Cooking at home is healthier than eating out. Use fresh ingredients, plan balanced meals, and keep snacks handy. A temporary kitchen helps maintain routines and supports mental health during stressful times.
Setting up a temporary kitchen during a remodel takes effort, but the rewards are clear—lower costs, healthier meals, and less stress. With the right planning and supplies, you can turn this challenging time into an opportunity for creativity and family bonding. For more tips on home remodeling, visit Houzz Magazine. Your new kitchen will be ready soon, but your temporary setup can keep life running smoothly until then.