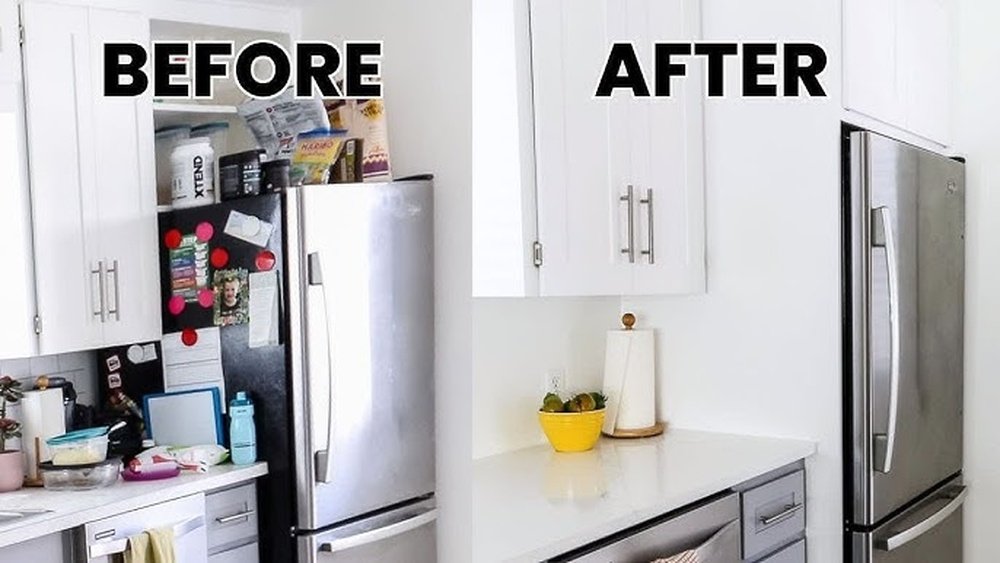
Many homeowners want their kitchen to look neat and stylish. One way to achieve a smooth and elegant appearance is to cover your refrigerator with a cabinet. This method hides the bulky look of the fridge and blends it with the rest of your kitchen. But covering a refrigerator with a cabinet is not just about placing a box around it. You must consider proper ventilation, accessibility, style, and safety.
People often think this task is only for professionals. In reality, with careful planning and the right tools, you can do it yourself or work closely with a contractor. This guide will walk you through everything you need to know.
From planning and design choices to installation and maintenance, you’ll find details that even many experienced DIYers might miss. If you want your kitchen to look like those in magazines, read on to learn how to cover your refrigerator with a cabinet the right way.
Why Cover Your Refrigerator With A Cabinet?
Hiding your refrigerator behind a cabinet is not just about looks. There are several practical reasons, and knowing them helps you make a better choice.
- Aesthetic improvement: Cabinets create a seamless, unified appearance. Your kitchen looks modern and coordinated, especially in open-plan homes.
- Easy cleaning: Dust and crumbs often gather around open fridge sides. Cabinets block these spaces, making cleaning easier.
- Added protection: Cabinets can protect the fridge from bumps, scratches, and direct sunlight, which can affect its efficiency.
- Increased home value: A well-designed, built-in kitchen can raise your home’s resale value.
But there are also important technical reasons to plan carefully. Refrigerators need airflow. If you don’t consider this, your fridge might overheat and use more energy. Understanding the balance between style and function is key.
Types Of Refrigerator Cabinet Designs
Before you start, it’s important to decide which cabinet style fits your kitchen and needs. There are three common options:
1. Full Built-in Cabinet
This style fully encloses the refrigerator. The cabinet matches your kitchen units, and the fridge is hidden behind cabinet doors. It’s often used with “panel-ready” fridges, which are designed for this purpose.
Pros:
- Seamless look
- Maximum noise reduction
Cons:
- Costly and complex to install
- Harder to replace the fridge later
2. Fridge Enclosure With Exposed Door
Here, the cabinet surrounds the sides and top, but the fridge’s own door is visible and accessible. This is common for standard refrigerators and is easier to do for existing kitchens.
Pros:
- Fits most regular fridges
- Easier access and replacement
Cons:
- Not as seamless as full built-in
- Door color may not match cabinets
3. Partial Cabinet (above And Sides Only)
If you can’t fully enclose the fridge, a partial cabinet might work. This design covers the top and one or both sides, creating a built-in look without major changes.
Pros:
- Simple and affordable
- Allows good airflow
Cons:
- Less hidden
- Sides may not match exactly
Planning Your Refrigerator Cabinet Project
Good results start with good planning. Here’s what you need to think about before picking up any tools.
Measure Your Refrigerator And Space
Accurate measurements are crucial. A mistake here can ruin the whole project.
- Width, height, and depth: Measure your fridge from side to side, top to bottom, and front to back. Include handles and any controls that stick out.
- Clearances: Check the manufacturer’s manual for required clearances (space around the fridge) for airflow. Most need at least 1-2 inches at the sides and top, and 2-4 inches at the back.
- Surrounding area: Measure the space in your kitchen, including walls, counters, and any nearby doors.
Choose Your Cabinet Material
Not all materials are suitable for enclosing a fridge.
- Plywood: Strong and holds screws well. Good for custom builds.
- MDF (medium-density fiberboard): Smooth and easy to paint, but can swell with moisture.
- Solid wood: Looks great but can warp with kitchen humidity.
- Melamine: Easy to clean but needs edge protection.
Non-obvious insight: Use moisture-resistant plywood or MDF. Kitchens can get humid, and regular boards may swell or split over time.
Decide On Cabinet Style
Cabinet doors can be:
- Overlay: Cover the cabinet face frame, showing little wood.
- Inset: Fit inside the frame for a flush look.
- Slab: Flat, modern panels.
Match the style to your other cabinets for a consistent look.
Plan For Ventilation
Fridges give off heat. Cabinets must have enough airflow, or the fridge will work harder and wear out faster.
- Leave a gap at the top or back for hot air to escape.
- Use vent grilles in the cabinet if possible.
Extra tip: Some people forget to check where their fridge’s coils are (back or underneath). This changes where you need to leave gaps.
Budgeting
Here’s a rough cost comparison for different cabinet approaches:
| Cabinet Type | DIY Cost Range | Pro Installation Cost | Time Required (DIY) |
|---|---|---|---|
| Full Built-In | $800 – $2,500 | $2,000 – $5,000+ | 2-3 days |
| Fridge Enclosure (Exposed Door) | $300 – $1,000 | $1,000 – $2,500 | 1-2 days |
| Partial Cabinet | $150 – $500 | $500 – $1,200 | Several hours |
Prices vary by location and materials.
Tools And Materials Needed
Having the right tools makes the job smoother. Here are the essentials:
- Measuring tape
- Pencil and notepad
- Level
- Drill and bits
- Circular saw or table saw
- Screwdriver set
- Stud finder (for wall mounting)
- Wood glue (optional)
- Cabinet screws
- Wood filler and sandpaper
- Hinges (if adding doors)
- Paint or cabinet finish
Non-obvious insight: A clamp set helps hold panels steady during assembly, especially if you’re working alone.
Credit: sweeten.com
Step-by-step: How To Cover A Refrigerator With A Cabinet
Now let’s get practical. The following steps cover the most common case: building a cabinet enclosure with an exposed fridge door. If you’re doing a full built-in, you’ll add extra steps for mounting cabinet doors.
1. Prepare The Area
Clear the space around your fridge. Move it away from the wall if possible. Turn off the power if you need to move electrical outlets.
Check the floor for level. If the floor is uneven, your cabinet may not align properly.
2. Mark The Cabinet Layout
On the wall and floor, mark the exact footprint of the planned cabinet using a pencil. Double-check your measurements. Mark studs in the wall for secure attachment.
3. Cut And Assemble The Cabinet Panels
Cut side panels, a top panel, and a back brace (if needed) from your chosen material. Sand the edges for a smooth finish.
Assemble the panels:
- Attach the side panels to the top panel using screws or cam locks.
- Add a back brace near the top for strength, but keep the area behind the fridge mostly open for airflow.
If you want, paint or finish the panels before assembly. This can give a cleaner look.
4. Install The Cabinet Frame
Stand the assembled frame in place. Use a level to check for straightness.
Attach the sides to the wall at the studs using long cabinet screws. For best strength, use at least two screws per side panel.
If you have a low ceiling, build the cabinet in place rather than moving it fully assembled.
5. Add The Refrigerator
Carefully slide the refrigerator into the enclosure. Make sure there’s enough clearance for the door to open fully.
Check for:
- Ventilation gaps: There should be space above and/or behind.
- Power access: The cord should reach the outlet easily.
- Water line: If your fridge has an ice maker, leave access for the water line.
6. Install Cabinet Doors (optional)
If you’re creating a full built-in, now is the time to install the doors. Use strong, adjustable hinges. Make sure the doors align perfectly and open wide enough.
For a panel-ready fridge, follow the manufacturer’s instructions for attaching cabinet panels to the fridge doors.
7. Add Trim And Finishing Touches
Use matching trim or molding to cover any small gaps between the cabinet and walls or ceiling. Fill screw holes with wood filler and touch up with paint.
If you used vent grilles, make sure they’re clear and not blocked by items on top of the fridge.
8. Test And Inspect
Plug in and turn on the fridge. Let it run for a few hours. Check:
- The fridge operates normally (not overheating)
- Doors open and close smoothly
- Cabinet is sturdy and doesn’t flex
If you notice any heat build-up, you may need to increase ventilation.
Common Mistakes To Avoid
Many DIYers make errors that lead to problems later. Here are the most frequent ones:
- Ignoring manufacturer clearances: Every fridge is different. If you don’t leave enough space, you can void the warranty.
- Blocking airflow: Even a small vent can make a big difference in efficiency and life span.
- Wrong material choice: Using non-moisture-resistant wood can lead to swelling or mold.
- Poor measurements: Cabinets that are too tight make it hard to remove or replace the fridge.
- Not anchoring to studs: Cabinets attached only to drywall can come loose and damage your kitchen or injure someone.
- Forgetting the water line: If your fridge has water or ice, make sure you can access the shut-off valve.
Extra insight: Many people forget to check the swing of the fridge door. If your cabinet is too close on one side, the door may not open wide enough to remove shelves or bins.
.jpg)
Credit: themerrythought.com
Choosing The Right Style For Your Kitchen
When selecting the look of your cabinet, consider these points:
- Modern kitchens: Go for flat-panel or slab doors. Simple handles or push-to-open hardware keep the look clean.
- Traditional kitchens: Raised-panel doors, crown molding, and warm wood stains work well.
- Small kitchens: A partial cabinet can give a built-in feel without making the room look crowded.
Color matching tip: If you can’t find an exact match for your existing cabinets, choose a slightly lighter or darker shade. A small difference can look intentional and stylish.
How To Handle Ventilation Properly
Ventilation is the most overlooked part of building a refrigerator cabinet. Without it, your fridge may overheat, use more power, and break down faster.
Types Of Ventilation Solutions
| Ventilation Method | How It Works | Where to Use | Pros | Cons |
|---|---|---|---|---|
| Top Vent Gap | Leaves open space above fridge for hot air to escape | All types | Simple, no extra parts | Visible gap, dust can collect |
| Rear Vent Gap | Leaves open space behind fridge | When fridge is not flush to wall | Hidden from view | Takes up more kitchen depth |
| Vent Grilles | Installs grilles in cabinet panels | Full built-in | Professional look, good airflow | Extra cost, must keep clean |
| Toe Kick Vent | Vent installed at bottom of cabinet | Panel-ready/built-in fridges | Almost invisible | Harder to install, easy to block with clutter |
Practical tip: Clean vents every few months. Dust buildup reduces airflow and can increase your energy bill by up to 15%.
Custom Vs. Ready-made Cabinets
You can build your own cabinet or buy a pre-made one. Each has benefits and drawbacks.
Custom Cabinets
- Fits any space: Great for odd-shaped kitchens or unusual fridge sizes.
- Flexible design: Choose your own materials, colors, and details.
- More work: Requires more time, skill, and tools.
Ready-made Cabinets
- Quick install: Many are available from large hardware stores.
- Consistent quality: Factory-built for standard fridge sizes.
- Less flexible: May not fit perfectly in unique kitchens.
Non-obvious insight: Some big-box stores let you order custom-sized panels and doors, combining speed with a custom fit.
When To Hire A Professional
DIY can save money, but some jobs need a professional touch. Hire a pro if:
- You’re not confident with power tools or measuring.
- Your kitchen walls are not straight, or floors are uneven.
- You want a full built-in with custom panels.
- You need electrical or plumbing changes.
A professional can often finish the job in less time and with fewer mistakes.
Maintenance And Care After Installation
Once your fridge cabinet is done, keep it in top shape with these steps:
- Clean around the cabinet and vent areas every few months. Use a vacuum or soft brush.
- Check for signs of moisture or leaks inside the cabinet, especially if you have an ice maker.
- Inspect door operation regularly. Hinges and handles can loosen over time.
- Repaint or touch up any chipped or scratched areas to keep it looking new.
If you notice the fridge running more often than before, check all ventilation paths for blockages.
Examples From Real Kitchens
Here are a few real-life examples to inspire your project:
- Small city apartment: Used a partial cabinet with a light color to make the space feel bigger. Open shelves above the fridge added storage.
- Modern farmhouse: Chose a full built-in with vertical shiplap doors and black hardware. Matched the fridge panel to the pantry for a unified look.
- Rental kitchen: Installed side panels and a top shelf only, using removable fasteners. Easy to take down when moving out.
- Large family kitchen: Built a double fridge enclosure with custom cabinets above for rarely used items.
These examples show you don’t need a huge budget or a fancy designer to get a polished look.
.jpg)
Credit: themerrythought.com
Troubleshooting: What If Something Goes Wrong?
Even with careful planning, problems can happen. Here’s how to handle common issues:
- Cabinet doesn’t fit: Double-check your measurements. You may need to trim panels or add filler strips.
- Fridge runs hot: Improve ventilation. Add larger grilles or increase gaps.
- Door won’t open fully: Check for obstructions. You may need to adjust the cabinet sides or move the fridge slightly forward.
- Cabinet wobbles: Make sure it’s anchored to wall studs and the floor is level.
If you need more help, consult your fridge’s manual or a kitchen design specialist.
Environmental Impact And Energy Savings
A well-designed fridge cabinet can actually lower your energy use. By protecting the fridge from direct sunlight and blocking drafts, you help it run more efficiently. But poor ventilation can do the opposite.
Data point: According to the U.S. Department of Energy, fridges in hot or poorly ventilated spaces can use up to 30% more power. Over five years, this can add $100 or more to your utility bills.
To make your cabinet more eco-friendly:
- Use low-VOC paints or finishes.
- Choose cabinets made from sustainably sourced wood.
- Keep vents clear for efficient cooling.
For more on appliance energy use, see this U.S. Department of Energy guide.
Frequently Asked Questions
How Much Space Should I Leave Around The Fridge For Ventilation?
Most manufacturers recommend at least 1-2 inches on the sides and top, and 2-4 inches at the back for proper airflow. Always check your fridge’s manual—some newer models need less, while older ones may need more.
Can I Cover Any Refrigerator With A Cabinet, Or Do I Need A Special Model?
You can cover most standard refrigerators with a cabinet enclosure. However, for a full built-in look with cabinet doors, you need a panel-ready refrigerator designed for that purpose. Regular fridges usually work best with side and top cabinets only.
Will Building A Cabinet Around My Fridge Void The Warranty?
If you follow the manufacturer’s clearance and ventilation guidelines, your warranty should remain valid. Ignoring these can lead to overheating and may void the warranty. Always save your manual and ask the manufacturer if you’re unsure.
What Type Of Wood Is Best For Building A Refrigerator Cabinet?
Moisture-resistant plywood is usually the best choice. It’s strong, holds screws well, and resists warping. For painted cabinets, MDF is also common but must be sealed well to prevent swelling.
Is It Possible To Remove A Built-in Fridge Later If I Need To Replace It?
Yes, but make sure your cabinet design allows for easy removal. Leave at least 1 inch of clearance on each side and avoid attaching cabinet trim directly to the fridge. Modular or removable side panels make replacement much easier.
—
Covering your refrigerator with a cabinet is a smart way to improve both the look and function of your kitchen. With careful planning, the right materials, and attention to ventilation, you can build a stylish enclosure that lasts for years.
Whether you do it yourself or hire a professional, the results will make your kitchen stand out. Start planning today, and enjoy a cleaner, more beautiful kitchen tomorrow.