Using an Uncrustable cutter might sound like a simple kitchen task, but for many parents, sandwich lovers, and meal preppers, it’s a small tool that makes a big difference. This round, handheld gadget turns ordinary sandwiches into neat, sealed snacks—just like the ones you see in the freezer aisle.
But there’s more to using an Uncrustable cutter than just pressing down on bread. With a few techniques and tips, you can create perfect, crustless sandwiches that stay fresh, look appealing, and make lunchtime easier.
Learning to use an Uncrustable cutter can benefit anyone: busy parents, kids learning basic cooking skills, or adults who want to prep meals for work or school. This guide dives deep into every aspect of the process. You’ll learn what an Uncrustable cutter is, how to choose the right one, step-by-step instructions for making sandwiches, cleaning tips, creative uses, troubleshooting, and answers to common questions. By the end, you’ll be confident about using this simple tool to make your kitchen routine smoother and more fun.
What Is An Uncrustable Cutter?
An Uncrustable cutter is a small kitchen gadget designed to cut and seal sandwiches. It removes the bread crust and seals the edges, creating a round or shaped sandwich pocket. The name comes from the popular frozen sandwiches called “Uncrustables,” but you don’t need to buy them—making your own is usually healthier and cheaper.
These cutters are especially helpful for:
- Kids who dislike bread crusts
- Packing no-mess sandwiches for lunchboxes
- Creating snacks for trips, picnics, or parties
Uncrustable cutters come in different materials like plastic, stainless steel, or silicone. They may have various shapes—round, heart, star, or even animal faces. Most have two parts: a cutter for removing crust and a sealer for pressing the bread edges together.
Why Use An Uncrustable Cutter?
You might wonder if a simple knife can do the same job. While you can cut crusts with a knife, Uncrustable cutters offer extra benefits.
- Consistent Shape and Size: Each sandwich turns out uniform, which is perfect for portion control or presentation.
- Sealed Edges: The bread is pressed together, keeping fillings inside and preventing leaks.
- Time Saving: Quick, one-step action replaces slow cutting and sealing by hand.
- Kid-Friendly: Kids love fun shapes, and sealed sandwiches are easier for small hands.
- Less Waste: The cutter removes just the crust, leaving more of the sandwich for eating.
Many parents notice their kids eat more when the sandwiches look appealing and are easy to hold. For meal preppers, homemade Uncrustables freeze and thaw well, making them ideal for advance planning.
Credit: www.amazon.in
Types Of Uncrustable Cutters
Not all cutters are the same. Choosing the right one depends on your needs, the bread you use, and your child’s preferences.
| Type | Material | Shape Options | Best For |
|---|---|---|---|
| Basic Round | Plastic/Steel | Circle | Classic PB&J or deli sandwiches |
| Novelty Shapes | Plastic/Silicone | Hearts, stars, animals | Picky eaters, themed parties |
| Multi-Size Sets | Plastic/Steel | Small/large rounds, squares | Different bread sizes, snacks |
| Built-in Sealer | Plastic | Any | All-in-one, fast use |
When choosing, consider:
- Bread Size: Some cutters are too large for small slices, leaving little bread.
- Ease of Cleaning: Stainless steel is dishwasher safe; some plastics may warp in heat.
- Durability: Steel lasts longer, but plastic offers fun shapes and is safer for kids.
- Edge Design: A deeper sealer works better for thick fillings.
It’s also important to check if the cutter creates a tight seal. A poor sealer leaves gaps, and fillings might spill out.
Step-by-step Guide: How To Use An Uncrustable Cutter
Making the perfect crustless sandwich isn’t just about pressing down and hoping for the best. Follow these steps for great results every time.
1. Gather Your Ingredients And Tools
Before you start, have everything ready:
- Uncrustable cutter (with sealer if separate)
- Fresh sandwich bread (soft, not dry)
- Fillings (peanut butter, jelly, ham, cheese, etc.)
- Butter knife or spoon
- Cutting board
Tip: White bread works best, but whole wheat or multigrain can also work if they’re soft. Hard or thick bread doesn’t seal as well.
2. Prepare The Bread
Lay two slices of bread flat on your board. If the bread is very thick, gently flatten it with a rolling pin or your hand. This helps the edges seal better later.
Non-obvious insight: Slightly stale bread cracks when pressed. Always use fresh, soft bread for the best seal.
3. Add Your Filling
Spread your filling in the center of one slice. Leave at least a half-inch (about 1. 3 cm) border around the edge. Don’t overfill—too much spreads out and prevents sealing.
Example: For peanut butter and jelly, use about 1 tablespoon of each. Place peanut butter first (it stops jelly from soaking the bread).
4. Top With Second Bread Slice
Carefully place the second slice on top. Try to align the edges so the sandwich is even.
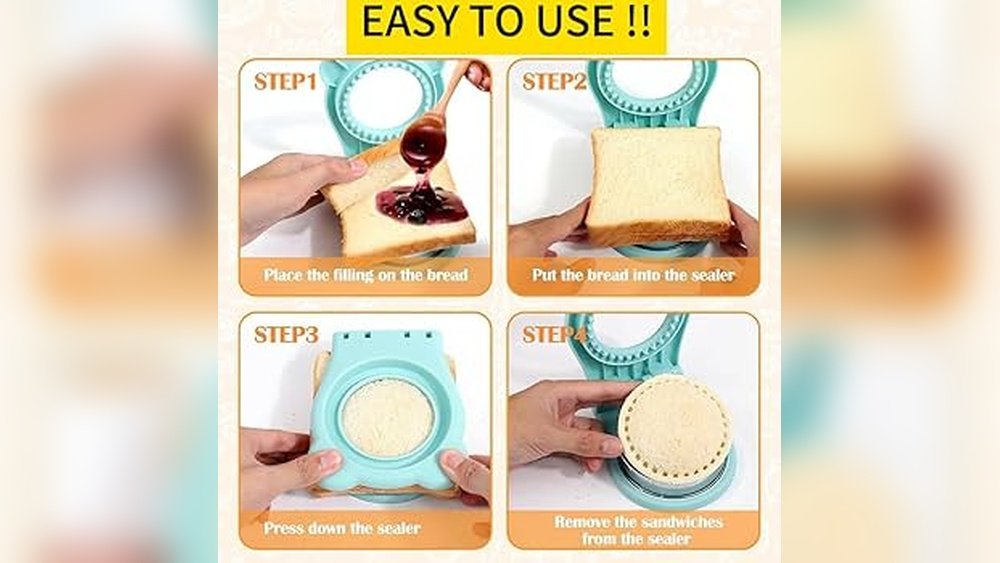
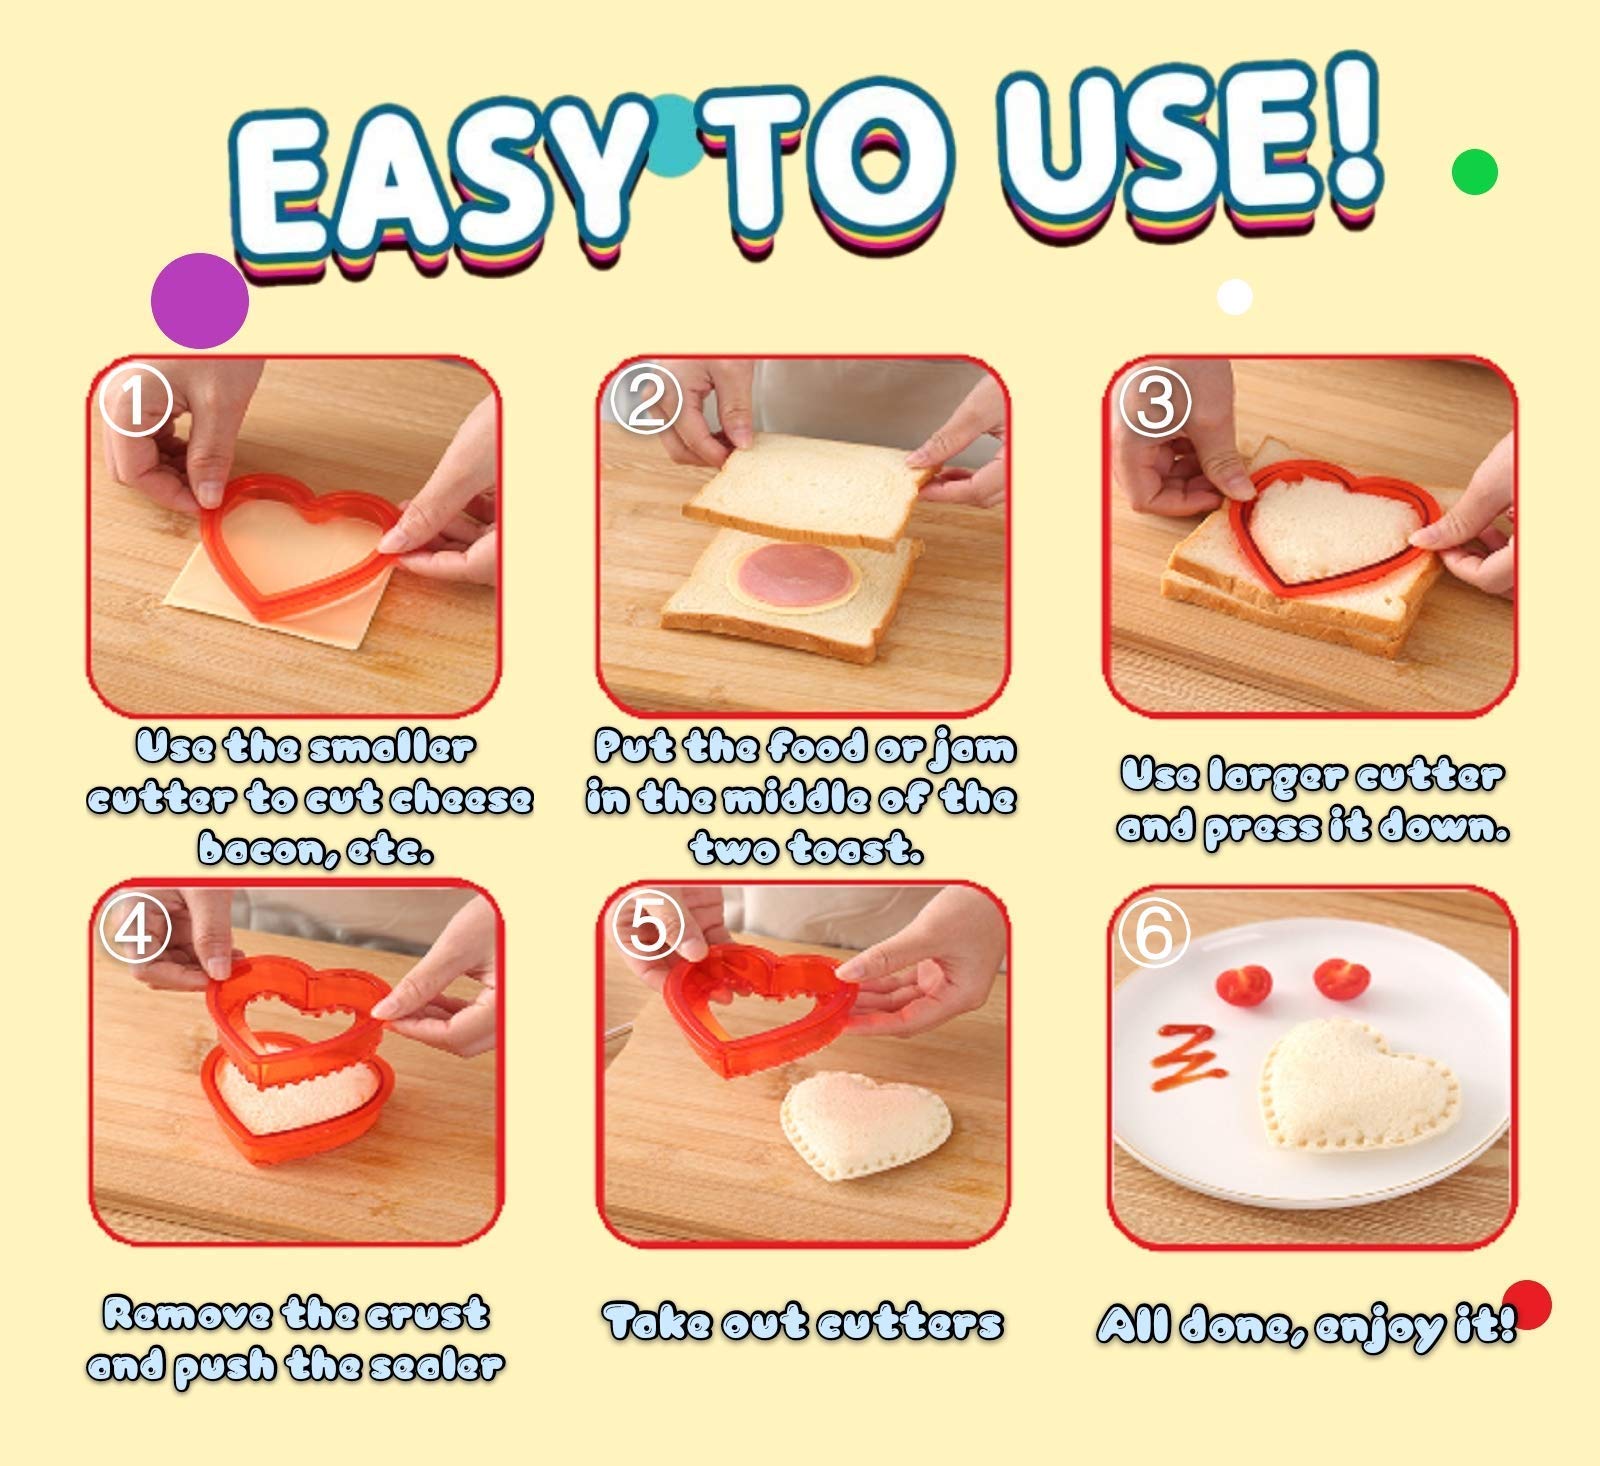
5. Cut And Seal
Position the Uncrustable cutter over the center of the sandwich. Press down firmly to cut through both layers. If your cutter has a separate sealer, remove the outer ring and press the sealer into the cut sandwich. Hold for 2–3 seconds.
Practical tip: Twist gently while pressing to ensure a full cut and seal. If the cutter sticks, wiggle slightly.
6. Remove The Sandwich
Lift the cutter and check your sandwich. The crust should come away easily, leaving a round, sealed sandwich. If any edges are open, press again with the sealer.
7. Store Or Serve
Eat right away or wrap in plastic and refrigerate. For meal prep, place in freezer bags and freeze for up to two months.
Common Mistakes To Avoid
Even a simple tool has a learning curve. Here are mistakes beginners often make:
- Using dry or thick bread: It cracks instead of sealing.
- Overfilling: Fillings leak out and make a mess.
- Not pressing long enough: The seal is weak, and the sandwich falls apart.
- Wrong bread size: Too small, and the cutter won’t fit.
- Cutting before filling: Always fill, then cut. Pre-cut bread can’t be sealed.
If you see fillings at the edges, next time use a little less. If the crust is hard to remove, your bread may be too thick.
Tips For Perfect Uncrustable Sandwiches
Small changes make a big difference in your results.
- Seal while bread is fresh: The longer bread sits out, the harder it is to seal.
- Try different fillings: Nut butters, chocolate spread, cream cheese, deli meat, or thinly sliced fruit.
- For freezing: Place sandwiches on a tray to freeze individually, then store together.
- Label bags: If you make many flavors, write contents and date on each bag.
- Microwave for 10 seconds: If frozen, this softens the bread for immediate eating.

Credit: www.walmart.com
Creative Uses For Uncrustable Cutters
You’re not limited to sandwiches. These cutters work with many foods.
- Mini Pies: Fill with cooked apple, cherry, or pumpkin pie filling, then bake.
- Cheese Toasts: Make grilled cheese rounds, then toast in a pan.
- Breakfast Pockets: Fill with scrambled eggs, cheese, or cooked sausage.
- Dessert Treats: Spread Nutella and bananas, or marshmallow fluff and strawberries.
- Snack Packs: Use tortillas or flatbread, fill with hummus and veggies, cut and seal.
Non-obvious insight: Some cutters work on pancakes or pastry dough, creating fun breakfast or dessert options.
Cleaning And Caring For Your Uncrustable Cutter
A clean cutter lasts longer and works better. Here’s how to keep it in top shape:
- Wash after each use: Rinse with warm, soapy water to remove crumbs and filling.
- Check for dishwasher safety: Many plastic cutters can go on the top rack. Steel parts may rust if not dried quickly.
- Use a brush: Small grooves can trap food. A soft brush or old toothbrush helps.
- Dry fully before storing: Moisture causes mold or rust.
If you notice any cracks or damage, replace the cutter to avoid sharp edges.
Comparing Store-bought Vs. Homemade Uncrustables
Making your own sandwiches has clear benefits. See the comparison below:
| Feature | Store-Bought Uncrustables | Homemade with Cutter |
|---|---|---|
| Cost per sandwich | $0.60–$1.00 | $0.25–$0.40 |
| Ingredients control | Limited (pre-set) | Full (choose your own) |
| Fillings variety | Few options | Unlimited (sweet/savory) |
| Freshness | Frozen | Fresh or frozen |
| Allergy-friendly | Rare | Easy (custom) |
Homemade sandwiches are usually cheaper, fresher, and safer for allergies or picky eaters. The only trade-off is a few extra minutes of prep.
How To Choose The Best Uncrustable Cutter
If you’re ready to buy a cutter, keep these points in mind:
- Size: Measure your bread first. Most cutters need at least 4 inches (10 cm) of flat space.
- Sealing power: Read reviews about how well the cutter seals. Some brands work better on different breads.
- Ease of use: Look for cutters that aren’t too heavy or hard to press.
- Kid-safe features: Rounded edges are better for children.
- Easy to clean: Fewer grooves mean less food stuck inside.
- Material safety: BPA-free plastic or food-grade steel are the best.
Popular brands include Savoychef, Mamas Select, and Wonder Sandwich. Prices range from $8 to $20, depending on size and style.
Fun Sandwich Ideas Using An Uncrustable Cutter
If you want to make lunchtime exciting, try these combinations:
- Classic PB&J: Peanut butter and strawberry jelly.
- Turkey & Cheese: Thin turkey slices, cheddar, and a dab of mustard.
- Apple Cinnamon: Apple slices and cream cheese with a sprinkle of cinnamon sugar.
- Pizza Pockets: Marinara sauce, shredded mozzarella, and pepperoni.
- Hummus & Veggie: Hummus and thin cucumber or carrot slices.
- Nutella & Banana: Chocolate hazelnut spread and banana coins.
- Egg Salad: Egg salad with a pinch of paprika.
- Chicken Salad: Diced chicken, mayo, and diced celery.
- Sunbutter & Grape Jelly: Sunflower seed butter for nut-free schools.
- Tuna Melt: Tuna salad and a slice of cheese (toast before sealing).
Try making a different sandwich each day for variety. Kids can help choose fillings and shapes, making them more likely to eat their lunch.
Freezing And Storing Homemade Uncrustables
One of the best features is how well these sandwiches freeze. Here’s the best way to store them:
- Wrap individually: Use plastic wrap or sandwich bags. Squeeze out all air.
- Flash freeze: Lay sandwiches on a tray, not touching, and freeze for 2 hours.
- Store in freezer bags: After initial freezing, place sandwiches in large freezer bags.
- Label and date: Write the type and date for easy identification.
- Thawing: In the morning, take out and place in lunchboxes. By lunchtime, they’re soft and ready to eat.
Non-obvious insight: For best texture, avoid fillings that are watery (like tomatoes or fresh greens), which become soggy after freezing.
Comparing Different Brands Of Uncrustable Cutters
Here’s a look at popular brands and how they compare for daily use:
| Brand | Material | Shapes | Sealing Quality | Price Range |
|---|---|---|---|---|
| Savoychef | Plastic/Steel | Round, heart, star | Very Good | $10–$18 |
| Mamas Select | Plastic | Round, square | Good | $8–$15 |
| Wonder Sandwich | Plastic | Round only | Excellent | $12–$20 |
| Generic | Plastic | Various | Fair | $5–$12 |
Wonder Sandwich is known for the tightest seal, but Savoychef offers more shape options. Generic brands are cheaper but may not last as long.
Teaching Kids To Use An Uncrustable Cutter
One of the joys of this tool is how easy it is for children. With supervision, even young kids can help in the kitchen.
- Show safe hand placement: Hold the cutter, not the blade.
- Let them press: Kids love the action of pressing and sealing.
- Use soft fillings: Peanut butter or cream cheese is easier to spread.
- Make it a game: Who can make the best seal? Who chooses the next filling?
Kids who help make their lunch are more likely to eat it, and they learn basic cooking skills along the way.

Credit: www.justataste.com
Uncrustable Cutters For Special Diets
If you need to avoid allergens or follow a special diet, homemade sandwiches are safer.
- Gluten-free bread: Works if the bread is soft. Flatten gently before sealing.
- Nut-free spreads: Try Sunbutter, Wowbutter, or cream cheese.
- Dairy-free options: Use hummus, turkey, or fruit spreads.
- Low-carb wraps: Some cutters work on tortillas or low-carb flatbreads.
Always check with your school or workplace for allowed foods.
Cleaning Hacks For Sticky Fillings
Peanut butter, jelly, or melted cheese can stick to your cutter. Here’s how to clean up fast:
- Soak in warm water: Loosens dried filling.
- Use a toothpick: For stubborn spots in grooves.
- Dishwasher tip: Place on the top rack only.
- Vinegar rinse: Removes odors from cheese or onion fillings.
Dry thoroughly to prevent bacteria growth, especially in plastic cutters.
Where To Buy Uncrustable Cutters
You can find these cutters at most kitchen stores, big box retailers, or online. Some top places include Amazon, Walmart, and Target. For specialty shapes, check Etsy or small kitchenware shops.
For more on the product and its history, see the Uncrustables Wikipedia page.
Frequently Asked Questions
What Bread Works Best With An Uncrustable Cutter?
Soft, fresh sandwich bread is best. White bread seals most reliably, but soft whole wheat or potato bread also works. Avoid thick or crusty breads, as they won’t seal well.
Can You Freeze Homemade Uncrustables?
Yes, homemade Uncrustable sandwiches freeze well for up to two months. Wrap tightly and store in freezer bags. Thaw at room temperature for 2–3 hours or overnight in the fridge.
Why Does My Sandwich Fall Apart After Sealing?
Usually, the bread is too dry or there’s too much filling. Use fresh, soft bread, and don’t overfill. Press firmly and hold for a few seconds to ensure a good seal.
Are Uncrustable Cutters Safe For Kids?
Most plastic cutters with rounded edges are safe for children with supervision. Avoid steel cutters for young kids, as they may have sharper edges. Teach kids proper hand placement.
What Else Can I Make With An Uncrustable Cutter Besides Sandwiches?
You can use them for mini pies, breakfast pockets, cheese toasties, and even dessert treats like Nutella with fruit or marshmallow sandwiches. Some people use them on tortillas, pancakes, or pastry dough for fun shapes.
Making crustless, sealed sandwiches at home is easy with the right tools and a little practice. Whether you want to save money, control ingredients, or just add fun to mealtime, an Uncrustable cutter is a smart addition to any kitchen.
With the steps, tips, and creative ideas shared here, you’ll get the most from this handy gadget, meal after meal.