Turning cabinets into drawers is a smart way to make your kitchen, bathroom, or workspace more functional. Many people struggle to reach the back of deep cabinets, losing valuable storage space and wasting time searching for items. By converting cabinets into drawers, you can easily organize, access, and maximize every inch of your storage.
This project might sound challenging, but with careful planning and the right tools, it can be done by motivated DIYers or with the help of a professional. In this guide, you’ll learn everything you need to know—from planning and measuring to choosing materials and installation.
You’ll also discover tips most beginners overlook, common mistakes to avoid, and how to decide if this upgrade is right for you.
Why Turn Cabinets Into Drawers?
Traditional cabinets often waste space. When you open a cabinet door, items at the back are hard to see and reach. Many people just pile things in, which leads to clutter and frustration. Drawers, on the other hand, pull out smoothly, letting you see and grab everything without bending or stretching.
This isn’t just about comfort—it’s about making your daily life easier.
Upgrading cabinets with drawers also adds value to your home. Real estate experts agree that well-designed storage is a top selling point. If you plan to sell your house in the future, this upgrade can set your home apart.
Planning The Project
Before you start removing cabinet doors or buying materials, good planning is essential. Think about which cabinets will benefit most from drawers. Kitchens and bathrooms are common choices, but don’t forget laundry rooms, home offices, or garages.
Assess Your Cabinets
Start by checking the structure. Not all cabinets are suitable for conversion. Look for these features:
- Sturdy frame: Cabinets should be solid, not flimsy or damaged.
- Enough depth: Most drawers need at least 18 inches of depth.
- No major obstructions: Pipes or wires can limit your options.
It’s also important to check if the cabinet is face-frame or frameless. Face-frame cabinets have a wood frame around the opening, while frameless cabinets (common in Europe) do not. Drawer hardware and measurements will be different for each type.
Decide On Drawer Types
There are several ways to add drawers to cabinets:
- Full pull-out drawers: These replace shelves and slide out completely.
- Sliding trays: Shallow trays that pull out, often used for pots or pans.
- Double drawers: One drawer in front of another, using the full depth.
Each type has pros and cons. Full pull-out drawers offer the most storage, while sliding trays are easier to install. Consider your storage needs and the items you plan to keep inside.
Make A Sketch
Draw your cabinets on paper, noting their width, height, and depth. Mark where you want each drawer or pull-out. This will help you visualize the changes and avoid mistakes.
Measuring And Choosing Drawer Sizes
Getting accurate measurements is crucial. Incorrect sizing leads to drawers that don’t fit or function well.
- Width: Measure the inside width of the cabinet. Subtract space for drawer slides—usually about 1 inch per side.
- Height: Decide how many drawers you want. Leave enough space above each for easy access. Standard drawer heights range from 4 to 10 inches.
- Depth: Measure from the back wall to the cabinet front, minus the door and frame if present.
For example, if your cabinet is 24 inches deep and has a ¾-inch frame, your drawer box should be about 22½ inches deep.
Example Measurement
Suppose you have a base cabinet that is 30 inches wide, 24 inches deep, and 34½ inches high. You want three drawers. Your calculations might look like this:
- Width: 30 inches – 1 inch (left slide) – 1 inch (right slide) = 28 inches
- Height: 34½ inches (total) – 1½ inches (base and top clearance) = 33 inches for drawers
- Divide 33 inches by 3 = about 11 inches per drawer (allowing for the drawer bottom and space between drawers)
- Depth: 24 inches – 1 inch (door and frame) = 23 inches
Non-obvious insight: Always measure with cabinet doors removed if you plan to discard them. If doors stay, measure with them open to ensure drawers clear the hinges.
Tools And Materials Needed
The right tools make this project smoother and safer. Here’s what you’ll need for most cabinet-to-drawer conversions:
- Tape measure
- Pencil and notepad
- Drill and drill bits
- Level
- Screwdriver (manual or electric)
- Saw (circular or jigsaw) for cutting panels
- Clamps
- Wood glue
- Screws
- Drawer slides (ball-bearing or soft-close)
- Drawer box kits or plywood/MDF for custom boxes
- Drawer fronts (or reuse cabinet doors)
- Sandpaper or sander
- Paint or finish (optional)
- Safety gear (gloves, goggles, mask)
Practical tip: Pre-made drawer kits can save time, but custom boxes allow a perfect fit. If you’re new to woodworking, consider a kit for your first project.
Choosing Drawer Slides
Drawer slides are the hardware that lets your drawers move in and out smoothly. There are three main types:
- Side-mount slides: Attach to the sides of the drawer and cabinet. Easy to install and strong, but take up more space.
- Undermount slides: Hidden under the drawer. Offer a sleek look and soft-close options but are more expensive.
- Center-mount slides: Sit under the center of the drawer. Used for lightweight drawers only.
Here’s a quick comparison:
| Type | Strength | Ease of Installation | Visibility | Cost |
|---|---|---|---|---|
| Side-mount | High | Easy | Visible | Low–Medium |
| Undermount | High | Moderate | Hidden | High |
| Center-mount | Low | Easy | Hidden | Low |
Non-obvious insight: Soft-close slides prevent slamming and last longer, but require very precise installation. Slight misalignment can cause sticking.
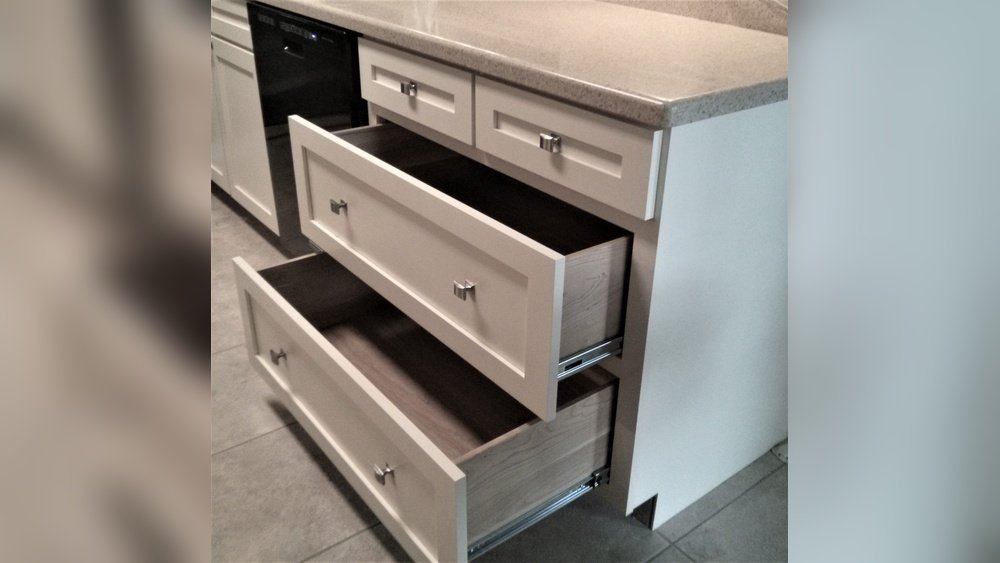
Removing Cabinet Shelves And Doors
You need a clean, empty space before adding drawers.
- Remove everything: Take out all items from the cabinet.
- Unscrew doors: If you’re replacing doors with drawer fronts, unscrew hinges and set doors aside. If reusing the doors as drawer fronts, label each one.
- Take out shelves: Most shelves rest on pegs or are screwed in. Remove pegs or unscrew from the sides.
If the shelf is glued or nailed, use a flat pry bar gently. Avoid damaging the cabinet box.

Credit: www.fromhousetohome.com
Building Drawer Boxes
You can buy ready-made drawer boxes or build your own for a custom fit. DIY boxes require more tools and skills but allow you to use strong materials and maximize space.
Materials For Drawer Boxes
- Plywood: Strong and stable, ½-inch or ¾-inch thick.
- MDF: Cheaper, smooth surface, but not as strong as plywood.
- Solid wood: Looks great but can warp if not sealed.
Example: For most kitchens, ½-inch plywood sides and a ¼-inch bottom are standard.
Steps To Build A Drawer Box
- Cut panels: Cut four sides (front, back, two sides) and a bottom to your measured size.
- Assemble sides: Use wood glue and screws or nails to join the sides. Check for square corners with a carpenter’s square.
- Attach bottom: Lay the box upside down and attach the bottom panel with glue and screws/nails.
- Sand edges: Smooth all rough edges with sandpaper.
- Finish: Paint, stain, or seal as desired.
Practical example: For a 28-inch wide by 23-inch deep drawer, cut two 28-inch front/back pieces and two 22-inch side pieces (subtracting material thickness). The bottom should match the finished box size.
Installing Drawer Slides
Installing slides accurately is the key to smooth, long-lasting drawers.
- Mark slide positions: Use a level and pencil to mark where the slides will go inside the cabinet. Both slides must be at the same height and parallel.
- Attach slides to the cabinet: Screw the cabinet side of the slides in place. Use a block or template to keep them level.
- Attach slides to the drawer: Position the other side of the slide on the drawer box, making sure both are even.
- Test fit: Slide the box in and out. It should move smoothly with no binding.
- Adjust if needed: Make small adjustments before attaching drawer fronts.
Pro tip: For heavy items, choose slides rated for at least 75 pounds. Some slides extend fully, so you can reach everything at the back.
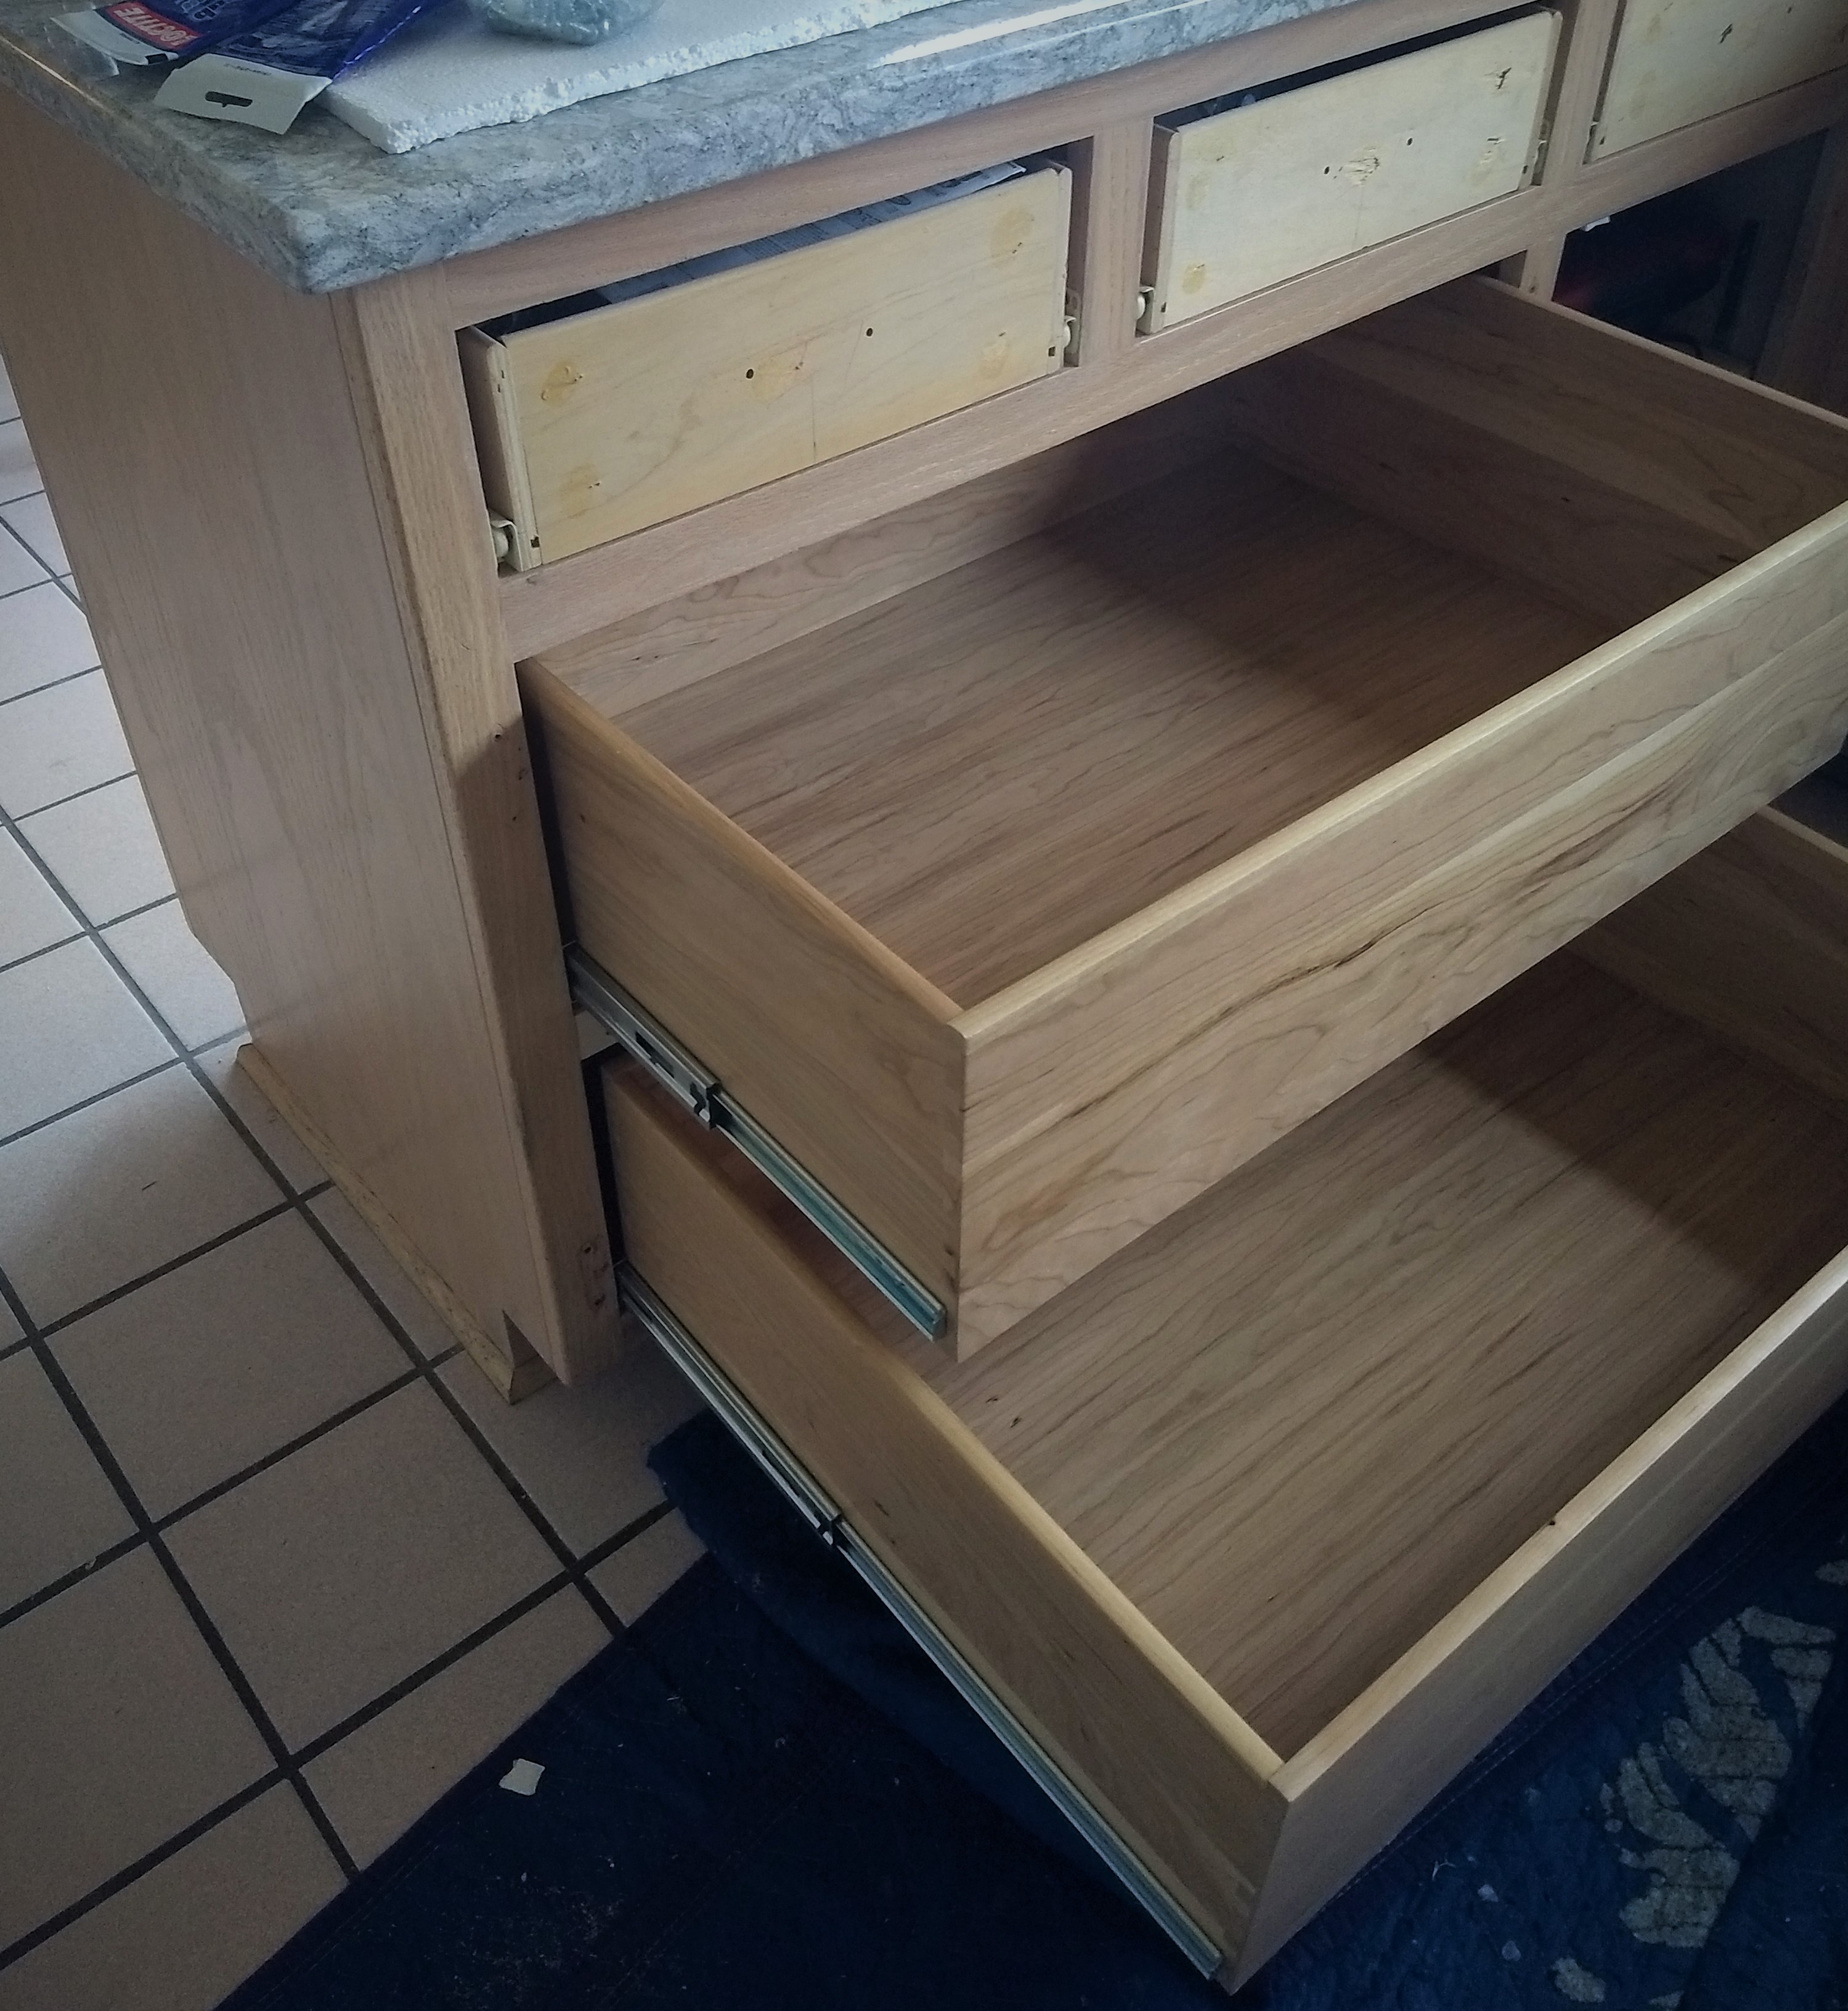
Credit: www.kitchencraftsman.net
Attaching Drawer Fronts
Drawer fronts give your project a finished look. You can buy new fronts, make your own, or reuse the old cabinet doors.
Reusing Cabinet Doors
If the doors are in good shape and the right size, repurposing them saves money and matches the rest of your kitchen.
- Cut to size: Trim the doors to fit the drawer box if needed.
- Drill new holes: Fill old hinge holes with wood filler and sand smooth. Drill new holes for drawer pulls.
- Attach: Use screws from inside the drawer box to secure the front. Use clamps to hold the front in place while you screw.
Making New Drawer Fronts
If you want a new look, buy or make fronts from matching wood or MDF. Finish to match your cabinets.
- Measure carefully: Each front should be slightly larger than the drawer box to cover gaps.
- Paint or stain: Finish the fronts before attaching.
- Attach pulls or knobs: Drill and mount hardware before installing the front.
Common mistake: Not aligning drawer fronts evenly. Use spacers or a template for consistent gaps.
Painting And Finishing
A fresh finish protects your drawers and adds style. Sand all surfaces before applying paint, stain, or sealant.
- Use primer for painted finishes, especially on MDF.
- Apply at least two coats of paint or stain, with light sanding between coats.
- Seal with polyurethane for durability, especially in kitchens or bathrooms.
Let everything dry fully before loading drawers.
Organizing New Drawers
The real benefit of drawers is better organization. Think about what you’ll store and how often you use each item.
- Shallow drawers: Great for utensils, tools, or small items.
- Deep drawers: Ideal for pots, pans, or cleaning supplies.
- Dividers: Add trays or organizers to keep items separated.
Example: In a kitchen, use top drawers for cutlery, middle for plates or bowls, and bottom for heavy pots.
Cost Breakdown
Converting cabinets into drawers can be affordable or a high-end upgrade, depending on your materials and tools.
| Item | Low-End Cost | High-End Cost |
|---|---|---|
| Drawer Slides (per set) | $10 | $50 |
| Drawer Box (per drawer) | $15 | $60 |
| Drawer Front | $10 | $40 |
| Paint/Finish | $5 | $20 |
| Tools (if needed) | $0 (already owned) | $150+ |
A typical three-drawer conversion can cost between $120 and $400, depending on quality and whether you buy or build.
When To Hire A Professional
Some projects are best left to experts. Hire a pro if:
- Your cabinets are custom-built or have unusual sizes.
- You lack tools or woodworking experience.
- Plumbing or electrical work is needed.
- You want a factory-finish look.
A skilled carpenter can complete the job quickly and safely, but costs will be higher.
Common Mistakes To Avoid
Even careful DIYers make mistakes. Watch for these problems:
- Measuring errors: Double-check all measurements before cutting or drilling.
- Poor slide alignment: Slides must be exactly parallel for drawers to move smoothly.
- Weak materials: Cheap plywood or thin MDF can sag under weight.
- Overloading drawers: Heavy items need strong slides and box construction.
- Skipping the finish: Unfinished wood absorbs moisture and stains.
Practical tip: Always test-fit each drawer before final installation. Small adjustments now prevent bigger problems later.

Credit: www.youtube.com
Advanced Options
If you’re ready for a bigger project, consider these upgrades:
- Soft-close hardware: Eliminates slamming and extends drawer life.
- Pull-out trash bins: Hide garbage and recycling inside a drawer.
- Hidden outlets: Install electrical outlets inside drawers for charging devices.
- Custom organizers: Built-in dividers or spice racks.
These features make your new drawers even more useful and modern.
Comparing Cabinets And Drawers
Still deciding if drawers are right for you? Here’s a quick side-by-side look:
| Feature | Cabinets | Drawers |
|---|---|---|
| Accessibility | Low (hard to reach back) | High (full extension) |
| Organization | Poor (items stacked) | Excellent (items sorted) |
| Installation | Already in place | Requires work |
| Cost | Low (existing) | Medium–High (upgrade) |
| Resale Value | Average | Higher |
Maintaining Your New Drawers
Once your drawers are installed, keep them working smoothly:
- Clean slides regularly: Dust and crumbs can cause sticking.
- Lubricate slides: Use silicone spray every six months.
- Check screws: Tighten loose hardware as needed.
- Avoid overloading: Don’t exceed the weight rating for slides and box.
With basic care, your drawers can last for decades.
Environmental Impact
Upgrading rather than replacing cabinets is eco-friendly. You reduce waste by reusing materials, and drawers make it easier to organize and avoid buying duplicate items. If you need new wood, choose FSC-certified or recycled materials for a greener project.
Non-obvious insight: Repurposed cabinet doors as drawer fronts save trees and reduce landfill waste. If you remove old shelves, use them for garage storage or donate to a local reuse center.
Real-world Examples
Many homeowners have improved their kitchens with drawer conversions:
- Busy families: Parents with young kids appreciate easy access to dishes and snacks.
- Elderly homeowners: Drawers reduce bending and strain, making kitchens safer for seniors.
- Home cooks: Chefs can organize spices, utensils, and pans efficiently.
Case study: One homeowner in Seattle replaced three under-counter cabinets with full-extension drawers. Prep time for meals dropped by 20% because everything was easier to see and reach.
Safety Considerations
Always use safety gear when working with power tools. Keep children and pets away during the project. If your cabinets are near plumbing or electrical lines, turn off power and water before starting work.
Pro tip: Install child safety latches if you have young children. Drawers can pinch fingers or be used for climbing.
Final Checklist Before You Start
To help you prepare, review these key steps:
- Choose which cabinets to convert.
- Measure carefully and sketch your plan.
- Select drawer type and hardware.
- Gather tools and materials.
- Remove doors and shelves.
- Build or buy drawer boxes.
- Install slides and test fit.
- Attach drawer fronts and hardware.
- Paint or finish as needed.
- Organize your new space.
Frequently Asked Questions
How Long Does It Take To Turn Cabinets Into Drawers?
A simple one-cabinet conversion can take about 3–5 hours if you have all the tools and materials ready. Larger projects or custom builds may take a weekend. If you are new to DIY, allow extra time for measuring and adjustments.
Can I Reuse My Old Cabinet Doors As Drawer Fronts?
Yes, many people reuse cabinet doors. Trim them to fit, fill old holes, and drill new ones for handles. This saves money and keeps your kitchen style consistent. Just make sure the doors are not warped or damaged.
Are Drawers Better Than Cabinets For Storage?
For most people, drawers offer better accessibility and organization. You can see and reach all your items easily. Cabinets may be better for storing large or tall items, but for daily use, drawers are often more practical.
What Weight Can A Typical Drawer Hold?
Standard slides can hold 50–75 pounds. Heavy-duty slides handle up to 100 pounds. Always check the rating before loading heavy items like pots or tools. Overloading can bend the slides or break the box.
Do I Need Professional Help To Convert Cabinets To Drawers?
Many DIYers can handle this project with patience and basic tools. If your cabinets are custom, have unusual sizes, or involve plumbing/electrical work, hiring a professional is wise. Quality installation ensures smooth operation and a polished look.
Upgrading your cabinets with drawers is a rewarding project that transforms your space. With careful planning and attention to detail, you’ll enjoy organized, accessible storage for years to come. For more ideas on home improvement, visit This Old House.