Spray painting kitchen cabinets can completely change the look of your kitchen. It gives cabinets a smooth, factory-like finish that brushes and rollers cannot match. But before you start spraying, one critical step stands between you and a professional result: taping off your cabinets. Careful masking ensures clean lines, protects your walls and floors, and keeps overspray from ruining hardware or glass. Many beginners rush this process or use the wrong materials, leading to paint leaks, sticky tape residue, or hours of extra cleanup.
This guide takes you through every detail of taping off kitchen cabinets for spray painting. You’ll learn which materials really work, the exact steps to follow, and strategies professionals use for efficient, frustration-free masking. Whether you’re a first-time DIYer or want to improve your technique, this article covers everything you need—no step skipped, no guesswork left.
Why Proper Taping Matters
Taping off your kitchen cabinets isn’t just about neatness. It protects surfaces you don’t want painted, like countertops, appliances, backsplashes, and hardware. Even a light overspray can stick to these areas and be difficult or impossible to remove later. Paint can drift further than you think, especially with HVLP or airless sprayers.
Poor taping can let paint seep under the edges, creating a ragged line that ruins the finished look. If you skip taping, you may spend hours scraping, sanding, or replacing damaged surfaces. Proper taping is also essential for safety—spray paint can create slippery floors and hazardous fumes if not controlled.
Two non-obvious benefits of good taping:
- Faster cleanup: Removing tape leaves sharp lines and less mess, so you don’t waste time fixing errors.
- Better adhesion: Masked areas stay clean, so new caulk or hardware sticks well after painting.
Gathering Your Materials
Before you begin, assemble all supplies. This reduces interruptions and prevents mistakes from searching for tools mid-job. Here’s what you need:
- Painter’s tape (not general masking tape): Choose brands like 3M ScotchBlue or FrogTape. Look for tape labeled for “delicate surfaces” or “multi-surface” if your cabinets have fresh paint or sensitive finishes.
- Masking film or plastic sheeting: 0.4 to 0.6 mil thickness is ideal. Specialty masking film clings to surfaces and resists paint bleed.
- Brown builder’s paper or kraft paper: Good for floors and countertops.
- Drop cloths: For large areas and floor protection.
- Utility knife or razor blade: For trimming tape and plastic.
- Scissors
- Small putty knife or plastic card: For pressing tape into corners.
- Degreaser or mild soap and clean rags: To clean surfaces before taping.
- Gloves and a mask: To protect your hands and lungs from dust.
- Ladder or step stool: For reaching high cabinets.
- Tape measure: For cutting plastic or paper to size.
- Permanent marker: To label masked areas if needed.
Recommended Tape And Film Comparison
Here’s a quick comparison of popular painter’s tapes and masking films:
| Product | Surface Type | Residue-free Removal | Paint Bleed Resistance |
|---|---|---|---|
| 3M ScotchBlue | Multi-surface | Up to 14 days | Good |
| FrogTape | Delicate & Regular | Up to 21 days | Excellent (PaintBlock tech) |
| Generic Masking Tape | Rough surfaces | 1-2 days | Poor |
Tip: Do not use standard masking tape from an office supply store. It often leaves sticky residue or tears your cabinet finish.
Cleaning And Preparing Surfaces
Paint and tape stick best to clean, dry surfaces. Grease, dust, or old tape residue can cause tape to peel up or paint to bleed under. Here’s how to prepare:
- Wipe down all cabinet faces, frames, and surrounding walls with a degreaser or mild soap solution. Kitchen cabinets often collect invisible oils that ruin adhesion.
- Rinse with clean water and dry thoroughly. Do not tape over damp wood.
- Remove items from counters, inside cabinets, and above cabinets to give yourself space.
- Label or photograph cabinet hardware and doors if you’ll remove them for spraying.
Non-obvious insight: Pay extra attention to the underside of upper cabinets and trim. These areas often get missed but collect the most grease and dust.
Removing And Masking Hardware
For a professional look, remove all hardware—knobs, handles, and hinges—before taping. If you can’t, mask them carefully.
Removing Hardware
- Use a drill or screwdriver to take off all knobs and pulls. Store them in labeled bags to avoid mix-ups.
- Remove hinges if you plan to spray doors and frames separately.
- For lazy susans or corner cabinets, take photos before removal to remember placement.
Masking Hardware You Can’t Remove
- Cut small squares of masking film or paper.
- Wrap each piece tightly around the hardware.
- Secure with painter’s tape at the base.
- Press edges down with your fingernail or putty knife to avoid leaks.
Pro tip: For hinges or other metal parts you cannot remove, specialized masking tape discs are available that fit most screw heads and hardware shapes.
Masking Glass Insets And Openings
Some cabinets have glass doors or open shelving. Masking these areas requires extra care:
- Cut masking film or paper slightly larger than the glass area.
- Tape edges carefully, pressing the tape firmly onto the glass and frame.
- Use a utility knife to trim excess film for a perfect fit.
- For open shelves, tape along the inner edges where you do not want paint to reach.
- Double-check for gaps by running your finger along all taped edges.
Non-obvious insight: Always mask glass before taping the frame, not after. This creates a cleaner seal and prevents paint from creeping between the frame and glass.
Masking The Walls And Ceiling
Paint overspray can travel several feet, so protect any wall or ceiling within the spray zone.
- Apply painter’s tape along the edge where the cabinet meets the wall or ceiling.
- Attach masking film or plastic sheeting to the tape, covering at least 2-3 feet of wall above and beside each cabinet.
- If cabinets touch the ceiling, tape a plastic sheet flat against the ceiling to avoid lines.
- For textured walls or ceilings, use a putty knife to press tape into the grooves.
Pro tip: Overlap plastic or paper by several inches at each seam to prevent gaps. Spray paint can find even the smallest opening.
Masking Countertops And Backsplashes
Countertops are especially vulnerable to paint drips and overspray. Protect them with care:
- Run a strip of painter’s tape along the edge where the cabinet meets the countertop.
- Lay brown builder’s paper or plastic sheeting across the countertop surface, taping it down to prevent shifting.
- If you have a tile backsplash, tape each grout line close to the cabinet for a crisp line.
- For sinks, faucets, or outlets near cabinets, wrap them in plastic and secure with tape.
Countertop Masking Materials Comparison
| Material | Paint Resistance | Residue Risk | Ease of Removal |
|---|---|---|---|
| Brown Builder’s Paper | High | None | Very Easy |
| Plastic Sheeting | Moderate-High | Low | Easy |
| Newspaper | Low | Ink transfer possible | Moderate |
Tip: Avoid using newspaper for masking—paint can bleed through, and ink may transfer to surfaces.
Masking Floors
Spray painting can create a fine mist that settles on floors, making them sticky or slippery.
- Sweep or vacuum floors to remove debris that may tear masking materials.
- Roll out drop cloths or heavy plastic sheeting, covering the area under and in front of cabinets.
- Tape edges to baseboards for full protection.
- For tile or wood floors, use brown paper as a first layer, then plastic on top for best results.
- Overlap seams and tape them securely to prevent trip hazards.
Masking Inside Cabinets (if Needed)
If you’re spraying frames while doors are off, you may need to mask the cabinet interiors.
- Cut masking film or plastic to fit the inside opening.
- Tape edges to the frame, pressing tightly into corners.
- For shelves, remove them if possible. If not, cover with paper and secure with tape.
- Label each masked section to keep track of which cabinets are covered.
Non-obvious insight: If you plan to paint only the faces and not the inside, use cardboard inserts cut to size and hold them in place with painter’s tape. This is faster and reusable.
Masking Appliances And Fixtures
Don’t overlook appliances near your cabinets. Stainless steel, glass, and plastic all attract paint overspray.
- Move small appliances out of the room if possible.
- For stoves, refrigerators, or dishwashers, drape with plastic sheeting and tape edges to the floor.
- For built-in microwaves or ovens, mask control panels and handles separately with small pieces of tape and film.
- For under-cabinet lighting, cover fixtures and wires with plastic, taping securely.
Creating Clean Lines And Sharp Edges
The key to professional-looking results is a sharp paint line where the cabinet meets walls, counters, or trim.
- Use high-quality painter’s tape, pressing down firmly with a plastic card or putty knife.
- Avoid stretching tape as you apply it; this causes it to lift later.
- Overlap tape segments by 1/4 inch to prevent gaps.
- When spraying, angle the sprayer away from the tape edge, not toward it.
- Remove tape while paint is slightly wet (not fully dry) for the cleanest edge.
Pro tip: Test your tape on a hidden area first, especially on old or delicate finishes, to check for adhesion and easy removal.
Tips For Speed And Efficiency
Masking can take several hours, but these strategies save time without sacrificing quality:
- Work in sections: Tape and mask one area fully before moving to the next, reducing errors.
- Pre-cut materials: Cut film, paper, or tape strips in advance to your most common sizes.
- Delegate tasks: If possible, have one person tape edges while another covers large areas.
- Label masked areas: Use a marker to note cabinet numbers or hardware locations, so you don’t forget what’s under each mask.
- Use dispenser tools: A tape-and-film dispenser speeds up masking long runs, like under cabinets or along floors.

Credit: www.youtube.com
Common Mistakes To Avoid
Many beginners make simple errors that ruin their paint job or make cleanup a nightmare. Watch out for these pitfalls:
- Using cheap tape: Generic masking tape often leaves sticky residue or peels up during spraying.
- Rushing the prep: Skipping cleaning means tape won’t stick, and paint will bleed under.
- Not sealing edges: Failing to press tape down lets paint seep under.
- Over-taping: Covering too much makes it hard to remove tape cleanly or see your progress.
- Waiting too long to remove tape: Dried paint can tear, leaving ragged edges.
Step-by-step Taping Process
Here’s a complete workflow for taping off kitchen cabinets:
- Clear the area: Remove furniture, dishes, and decor from the kitchen.
- Clean all surfaces: Degrease and dry cabinets, walls, counters, and floors.
- Remove hardware: Take off knobs, handles, and as much hardware as possible.
- Mask hardware and glass: For anything you can’t remove, mask tightly with tape and film.
- Tape cabinet edges: Apply painter’s tape along all edges where paint should stop.
- Apply masking film or paper: Cover walls, counters, floors, and appliance surfaces, securing with tape.
- Mask inside cabinets: If spraying frames with doors off, tape inside openings as needed.
- Double-check seals: Run your hand along all tape edges to check for loose spots or gaps.
- Label masked areas: Mark hardware, doors, or masked sections for easy reassembly.
- Set up ventilation: Open windows or set up fans, but ensure air won’t blow dust onto sticky tape.
Non-obvious insight: Always start masking from the top of the cabinet area and work downward. This way, plastic and paper overlap correctly, and paint drips or dust won’t sneak under the masking.

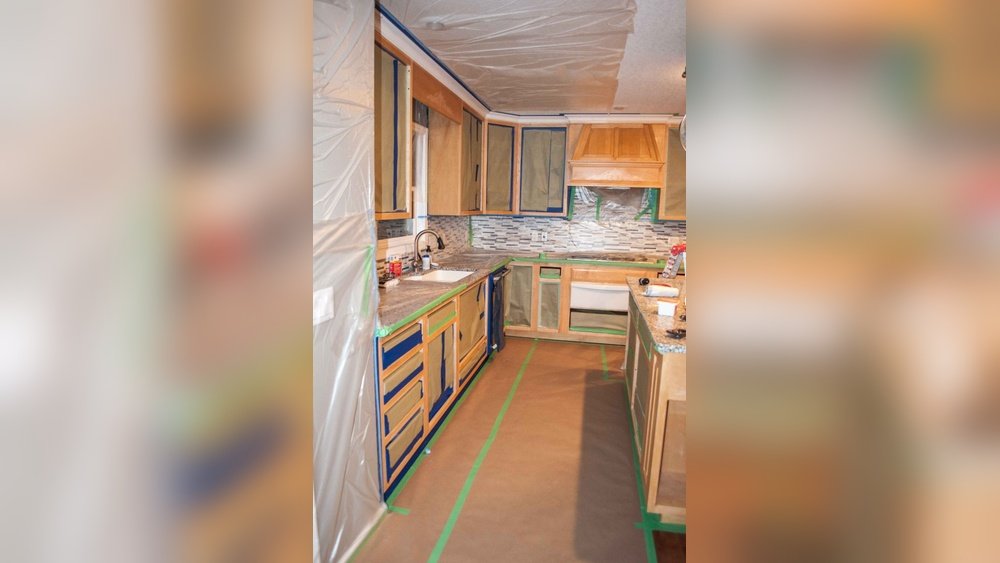
Credit: madewithgraceandgrit.com
When To Tape: Timing Your Prep
Taping should be the last step before painting, but not rushed. Plan your project so you can paint soon after masking. Leaving tape on for days can lead to adhesive sticking or peeling.
- Ideal tape time: Mask 1–2 hours before painting, once all cleaning and sanding is done.
- Humidity and temperature: In humid conditions, tape may loosen faster. Check edges before spraying.
- If you need to pause: Re-press tape edges before painting if more than 24 hours have passed.
Removing Tape After Painting
Proper tape removal is as important as application for a clean finish.
- Remove tape while paint is still tacky: This is usually 20–60 minutes after spraying, depending on paint type.
- Pull tape at a 45-degree angle: This reduces the risk of tearing.
- Go slowly: If paint starts to lift, use a utility knife to score along the edge first.
- Dispose of masking materials safely: Painty plastic and paper can be slippery or stain floors.
Tip: If you see paint bled under the tape, don’t panic. Let it dry fully, then scrape gently with a razor blade or touch up with a small brush.
Advanced Masking Techniques
For those seeking a truly flawless result or working on complex cabinet shapes, try these advanced methods:
- Pre-taped masking film: This comes with tape already attached to plastic film, speeding up wide-area coverage.
- Liquid masking products: Brush-on liquid mask can cover glass or hardware and peels off after painting.
- Static-cling film: For glass or high-gloss surfaces, static film requires no adhesive.
- Custom-cut templates: Use cardboard or foam board templates for repetitive shapes or multiple cabinets.
Estimated Time And Effort
Spray painting kitchen cabinets is a multi-day job, but masking takes a large share of the time.
| Kitchen Size | Masking Time (1 person) | Masking Time (2 people) |
|---|---|---|
| Small (10–15 doors) | 2–3 hours | 1.5–2 hours |
| Medium (16–25 doors) | 3–4 hours | 2–2.5 hours |
| Large (26+ doors) | 4–6 hours | 2.5–4 hours |
Tip: Set aside a full afternoon for masking. Rushing leads to mistakes that take longer to fix than careful prep.
Safety Considerations
Spray painting introduces fine particles and fumes. Proper masking helps, but also consider:
- Ventilation: Open windows and use exhaust fans, but avoid strong drafts that lift masking film.
- Personal protection: Wear gloves and a mask when handling tape, especially after cleaning with chemicals.
- Disposal: Masking materials with paint residue must be disposed of according to local regulations.
For more on spray painting safety, see the US EPA guide.
Troubleshooting Tape Issues
Sometimes, even with good prep, problems arise:
- Tape won’t stick: Surface may be dirty or oily. Clean again and use a higher-adhesion tape.
- Tape pulls up paint: Paint may not be fully cured or the tape is too strong. Use delicate-surface tape and test first.
- Paint bleeds under tape: Tape edges may not be sealed. Press down with a putty knife and avoid spraying directly at the tape edge.
- Tape leaves residue: Remove tape sooner, or use a brand known for clean removal.
Final Checks Before Spraying
Before you start painting:
- Walk around the kitchen and check every edge, corner, and seam for gaps or loose tape.
- Check that all hardware, appliances, and floors are completely covered.
- Ensure there’s a clear path for moving around with the sprayer.
- Test your sprayer on a scrap piece to adjust pressure and pattern—never on the masked cabinets first.
Frequently Asked Questions
How Long Does It Take To Tape Off Kitchen Cabinets For Spray Painting?
The time depends on your kitchen’s size and your experience. For an average kitchen (16–25 doors), expect 3–4 hours if working alone. With help, it may take 2 hours. Rushing can double your cleanup time, so go slow and check every edge.
What Is The Best Tape To Use For Masking Cabinets?
Painter’s tape made for delicate or multi-surfaces, such as 3M ScotchBlue or FrogTape, is best. These tapes stick well but remove easily and resist paint bleed. Avoid generic masking tape, which often leaves residue or tears finishes.
Can I Use Newspaper Or Plastic Bags For Masking?
Newspaper is not recommended—it can let paint through and ink may transfer. Plastic bags are not ideal since they shift easily and are hard to tape flat. Use masking film, plastic sheeting, or builder’s paper for better protection and ease of removal.
Should I Remove The Tape Before Or After The Paint Dries?
For the cleanest edge, remove tape while the paint is still tacky—typically 20–60 minutes after spraying. If the paint dries fully, score along the tape edge with a blade to prevent tearing.
What If Paint Bleeds Under The Tape?
If you notice paint bleed, let it dry completely. Then, carefully scrape away excess with a razor blade or use a small brush for touch-ups. Prevent future bleed by pressing tape edges firmly before spraying.
Masking off kitchen cabinets for spray painting is a task that rewards patience and attention to detail. It’s the foundation for a finish you’ll be proud to show off. With the right materials, careful prep, and these professional tips, you’ll achieve sharp lines, easy cleanup, and a flawless look—no matter your experience level.

Credit: www.tools4painting.com