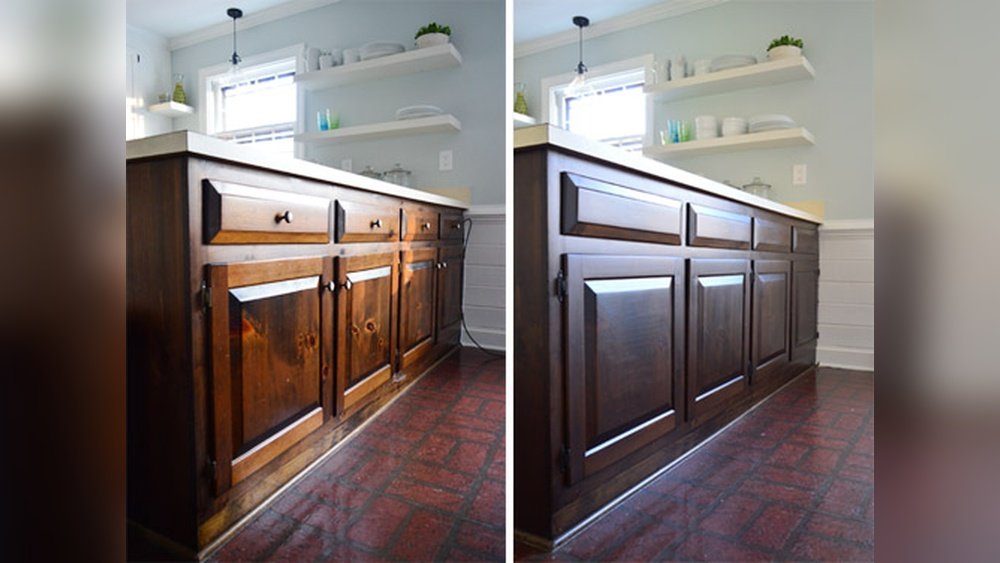
Staining kitchen cabinets darker is one of the most effective ways to give your kitchen a fresh and modern look without the cost of full replacement. Whether your cabinets are old and faded or you simply want a new style, a deep, rich stain can transform their appearance.
This process is not only affordable but also allows you to customize the finish to match your taste. Many homeowners worry about the difficulty, but with the right approach, even beginners can achieve professional results. In this guide, you’ll learn everything you need to know to stain kitchen cabinets darker—from preparation and choosing the right stain, to applying it and avoiding common mistakes.
By the end, you’ll feel confident to start your own cabinet makeover.
Understanding Staining Vs. Painting
Before starting, it’s important to understand what staining does compared to painting. Painting covers the wood completely, hiding its natural texture. Staining, on the other hand, enhances the natural grain, letting the beauty of the wood shine through. Dark stains add depth and richness, making cabinets look elegant and sometimes even new. If your cabinets are made from real wood (not laminate or MDF), staining is usually the best way to achieve a darker look that feels warm and classic.
Assessing Your Cabinets
Not all cabinets are suitable for staining. You need to check the material first. Most stains work best on solid wood or wood veneers. If your cabinets are made of laminate or have a heavy varnish, staining may not be possible without extra steps.
To check:
- Open a cabinet door and look at the edges. Real wood will show grain patterns. Laminate will look smooth and artificial.
- Try scratching a hidden area lightly. If you see wood underneath, staining is possible.
- If unsure, ask a local hardware store or contractor.
If your cabinets are paint-coated, you’ll need to remove all paint before staining. This can take extra time and effort.
Choosing The Right Stain
Picking the right stain is crucial for a great result. Stains come in many types and colors:
- Oil-based stains: Offer deep color and long-lasting results. Best for large projects, but need more ventilation.
- Water-based stains: Dry faster and are easier to clean up. Good for smaller kitchens or eco-friendly needs.
- Gel stains: Thick and easy to use, perfect for beginners. Stick well to vertical surfaces.
Popular dark stain colors include espresso, walnut, mahogany, and dark cherry. Each gives a different mood to your kitchen.
Dark Stain Color Comparison
Here’s a table showing how popular stain colors compare in appearance and durability:
| Stain Color | Appearance | Durability | Best for |
|---|---|---|---|
| Espresso | Very deep brown, almost black | High | Modern kitchens |
| Walnut | Rich, classic brown | High | Traditional look |
| Mahogany | Dark reddish-brown | Medium-High | Elegant style |
| Dark Cherry | Deep red tones | Medium | Warm atmosphere |
When choosing, consider your kitchen’s lighting. Dark stains can make a small kitchen feel cozy, but too dark in a poorly lit room can feel gloomy. Always test a sample before committing.
Gathering Materials And Tools
Getting the right materials makes the process smoother and safer. Here’s what you’ll need:
- Stain (oil, water, or gel-based)
- Wood conditioner (for soft woods like pine, prevents blotchy finish)
- Sandpaper (80, 120, and 220 grit)
- Tack cloth (removes dust)
- Brushes (foam or bristle)
- Clean rags
- Rubber gloves
- Painter’s tape
- Drop cloths
- Screwdriver (for removing cabinet doors)
- Safety goggles and mask
- Polyurethane or clear finish (for protection)
Some beginners skip wood conditioner, but it’s a critical step for an even color. Don’t forget safety gear—stains can have strong fumes.
Preparing Your Cabinets
Preparation is the key to a smooth, professional result. Most mistakes happen because people rush this step.
Step-by-step Preparation
- Remove all cabinet doors, drawers, and hardware.
- Use a screwdriver to take off hinges and handles. Label each door and its hardware to make reassembly easy.
- Clean surfaces thoroughly.
- Grease and dirt can ruin your stain. Use a mix of water and mild soap, then dry completely.
- Sand all surfaces.
- Start with 80-grit to remove old finish, then 120-grit, and finally 220-grit for smoothness.
- Always sand in the direction of the wood grain, not against it.
- Wipe down with a tack cloth.
- This removes all dust and small particles.
- Apply painter’s tape.
- Protect walls, countertops, and any area you don’t want stained.
Many beginners miss the importance of thorough sanding. Even tiny bits of old finish can make the stain look uneven or splotchy.
Applying Wood Conditioner
Wood conditioner helps the stain soak in evenly, especially on soft woods like pine or maple. If you skip this step, the stain can look patchy.
- Use a brush or cloth to apply the conditioner.
- Wait 15-30 minutes (as the label recommends), but don’t let it dry completely before staining.
- Wipe off any excess conditioner.
Experienced DIYers know that timing matters. If the conditioner dries fully, it won’t work as well.
Staining The Cabinets
Now comes the most exciting part—changing the color of your cabinets. This step requires patience and attention.
How To Apply Stain
- Stir the stain well.
- Don’t shake the can; stirring mixes the pigments evenly.
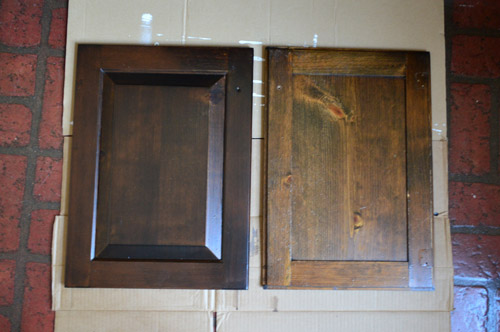
- Test on a hidden spot.
- This shows how the stain will look on your wood.
- Apply stain with a brush or clean rag.
- Follow the wood grain for best results.
- Start with a thin coat; you can always add more.
- Let the stain sit for 5-15 minutes.
- The longer it sits, the darker the color. For a deep color, wait closer to 15 minutes.
- Wipe off excess with a clean rag.
- Don’t leave pools or streaks.
- Let dry as directed.
- Most stains need 24 hours to dry fully.
For a darker finish, apply a second or even third coat. Wait for each coat to dry before applying the next.
Common Staining Mistakes
Many beginners rush this step or use too much stain at once. This can cause sticky surfaces or uneven color. Always wipe off extra stain and let each coat dry fully.
Applying A Protective Finish
Stain alone isn’t enough for durability. Kitchen cabinets face heat, moisture, and frequent touching. You need a protective finish, usually polyurethane.
- Choose between water-based (clear, dries fast) or oil-based (slightly amber, very tough).
- Apply with a clean brush in thin, even coats.
- Allow each coat to dry, then lightly sand with 220-grit sandpaper between coats.
- Apply 2-3 coats for best protection.
If you skip the clear finish, your stain can wear off quickly, and cleaning will be harder.
Reassembling Your Cabinets
Once everything is dry, carefully reattach the doors, drawers, and hardware. Make sure to handle surfaces gently to avoid scratches.
- Use your labels to match doors to their correct location.
- Tighten screws, but don’t overtighten.
- Clean any fingerprints or dust.
This step can seem simple, but skipping labels often leads to mismatched doors or hardware.
Practical Tips For A Professional Look
Experienced DIYers and pros use a few tricks to make cabinets look even better:
- Use high-quality brushes and rags. Cheap tools can leave marks or lint.
- Work in a well-lit space. Good lighting shows missed spots or uneven color.
- Keep your workspace dust-free. Dust can ruin both stain and finish.
- Don’t rush drying times. Each layer needs proper drying for a hard, smooth finish.
- Check for drips or runs. Smooth them out quickly before they dry.
Here’s a comparison table of common tools for staining and their effects:
| Tool | Pros | Cons | Best Use |
|---|---|---|---|
| Foam brush | No brush marks, easy to use | Can tear easily | Small surfaces, corners |
| Bristle brush | Good coverage, durable | Can leave marks | Large flat areas |
| Clean rag | Control over stain, smooth finish | Can miss small details | General application, wiping excess |
Credit: www.younghouselove.com
Troubleshooting: Fixing Staining Problems
Even with good preparation, sometimes things don’t go as planned. Here are solutions for common problems:
- Uneven color: Sand the area again, reapply wood conditioner and stain.
- Sticky surfaces: Wipe off extra stain, let it dry longer, then apply finish.
- Blotchy finish: Use a gel stain, which covers uneven areas better.
- Too light: Add another coat of stain, wait longer before wiping off.
Many beginners believe more stain will always mean darker color, but letting the stain sit longer (within the safe period) often works better.
Cleaning Up And Maintenance
Staining creates mess—protect your kitchen and clean up properly.
- Dispose of rags safely; stain-soaked rags can catch fire.
- Clean brushes with mineral spirits (oil-based) or water (water-based).
- Remove painter’s tape carefully to avoid pulling off new finish.
- Ventilate the room for a day or two.
For maintenance, wipe cabinets with a damp cloth, avoid harsh cleaners, and touch up scratches as needed.
How Long Does Staining Take?
The total time depends on cabinet size and drying times. Here’s a general timeline:
- Preparation: 3-5 hours (including sanding)
- Conditioner: 30 minutes
- Staining: 2-4 hours (plus drying overnight)
- Protective finish: 4-6 hours (with drying between coats)
- Reassembly: 1-2 hours
Plan for 2-3 days total, mostly waiting for drying.
Cost Breakdown
Staining is usually cheaper than replacing or painting cabinets.
- Stain: $10–$30 per quart
- Conditioner: $15–$20
- Brushes/rags: $10–$15
- Sandpaper/tack cloth: $10
- Protective finish: $15–$40
- Miscellaneous (tape, drop cloths): $20
Total: $80–$120 for a medium-sized kitchen.
Hiring a professional can cost $800–$2,000, so DIY is much more affordable.
Advanced Tips For Deep, Even Color
If you want an extra-dark, high-end look, try these strategies:
- Tinted polyurethane: Mix a small amount of stain into your clear finish for added depth.
- Layering stains: Apply two different stain colors—first a medium brown, then a darker one.
- Glazing: After staining, use a glaze to add richness and highlight wood grain.
Professional cabinet makers sometimes use these advanced methods for luxury kitchens.
Safety Precautions
Stains and finishes contain chemicals. Always:
- Work in a well-ventilated area.
- Wear gloves, goggles, and a mask.
- Keep children and pets away.
- Store products safely after use.
A non-obvious insight: Many people forget about fire risk from oil-soaked rags. Always store used rags in a metal container or wash them immediately.

Credit: www.thekimsixfix.com
When To Call A Professional
Sometimes, DIY isn’t the best option. If your cabinets are very damaged, or you want a flawless high-gloss finish, a professional can help. They have tools and experience to fix deep scratches, match colors, and apply finishes perfectly.
For most homeowners, staining is doable. But for rare woods or historic cabinets, consult a pro.
Environmental And Health Considerations
Some stains release volatile organic compounds (VOCs), which can be harmful. Choose low-VOC or water-based stains if you’re sensitive. Always read labels and follow instructions.
If you want more information on safe products, you can check guides from the EPA Safer Choice program.
Real-life Examples
Let’s look at two homeowners who stained their cabinets darker:
- Sarah from Texas wanted a modern look. She used espresso gel stain. Her biggest challenge was sanding old varnish. She found that applying two thin coats gave a smoother finish than one thick coat.
- Mike from Ohio had maple cabinets. He used water-based walnut stain and finished with clear polyurethane. He learned to wait longer between coats for a deeper color.
Both said the hardest part was patience. Rushing drying times led to sticky surfaces.
Comparing Staining To Other Cabinet Updates
Staining is just one way to update cabinets. Here’s how it compares to painting and refacing:
| Method | Cost | Time | Durability | Appearance |
|---|---|---|---|---|
| Staining | Low | 2-3 days | High | Natural wood look |
| Painting | Medium | 2-4 days | Medium | Solid color, no wood grain |
| Refacing | High | 1-2 weeks | Very high | New doors, any style |
Staining is best for those who love wood grain and want a change without spending much.

Credit: www.reddit.com
Frequently Asked Questions
How Many Coats Of Stain Should I Apply For A Darker Finish?
Usually, 2-3 coats are enough for a deep, rich color. Always wait for each coat to dry before applying the next. If you want even darker, let the stain sit longer before wiping. Don’t apply too many coats or the wood can look muddy.
Can I Stain Cabinets That Are Already Painted?
Staining over paint won’t work. You must remove all paint by sanding or stripping before staining. Paint blocks the stain from reaching the wood. If your cabinets are laminate, staining is not possible unless you use special products.
How Do I Avoid Blotchy Or Uneven Stain?
The best way is to sand thoroughly and use a wood conditioner before staining. Always apply stain evenly, follow the wood grain, and wipe off excess. Testing on a hidden spot helps you see how the stain will look.
How Long Should I Wait Before Using My Kitchen Again?
Allow the cabinets to dry for 24-48 hours after the last coat of protective finish. This ensures the finish is hard and won’t get damaged. Don’t hang heavy items or clean aggressively for a week.
What’s The Easiest Stain Type For Beginners?
Gel stains are easiest for beginners. They’re thick, don’t drip, and cover surfaces evenly. Foam brushes work well with gel stains and help avoid streaks.
Staining kitchen cabinets darker is a rewarding project that can transform your kitchen’s look. With careful preparation and patience, you can achieve a professional finish that lasts for years. Remember to choose the right stain, follow each step closely, and protect your cabinets with a clear finish.
The process is affordable, safe if done carefully, and gives you a custom result you’ll love. If you need extra guidance, professional resources and local hardware stores are always available to help.