Sharpening a Japanese knife is a craft that goes far beyond simply keeping a blade in working order. Many cooks, whether at home or in a professional kitchen, know that the right edge on a Japanese knife can transform chopping, slicing, and even the joy of cooking itself.
But sharpening these knives is not the same as sharpening Western knives. The steel, the grind, and the angle all make a difference. Getting it right means understanding a blend of tradition, science, and technique.
For anyone who cares about their tools, knowing how to sharpen a Japanese knife is a skill that pays off every day. You’ll notice vegetables cut cleaner, meats slice smoother, and your prep work feels easier. Yet, many people hesitate because they worry about damaging the knife or believe sharpening is too difficult.
This guide will break down the process, tools, and secrets—so you can keep your Japanese knives in top condition, even if you’re just starting out.
Understanding Japanese Knives
Japanese knives have a reputation for being extremely sharp, delicate, and precise. These blades are made from harder steel than most Western knives. This hardness lets them hold a sharper edge, but it also means they can be more brittle and require careful sharpening.
There are two main types of Japanese knives: single bevel and double bevel. Double bevel knives have an edge on both sides and are easier for beginners. Single bevel knives, common in traditional sushi and sashimi knives, have an edge only on one side. They allow for ultra-precise cuts but need more advanced sharpening techniques.
Japanese knives are also sharpened at a shallow angle (typically 10–15 degrees per side) compared to Western knives, which are usually sharpened at 20–22 degrees per side. This angle is critical for their cutting performance but also means the sharpening process needs more attention.
Japanese Vs. Western Knives
Here’s a quick comparison between Japanese and Western knives to help you understand why sharpening them is different:
| Feature | Japanese Knives | Western Knives |
|---|---|---|
| Steel Hardness (HRC) | 60–65 | 54–58 |
| Edge Angle | 10–15° | 20–22° |
| Bevel | Single or Double | Double |
| Sharpening Frequency | Lower (with proper care) | Higher |
| Sharpening Tool | Whetstone preferred | Sharpening steel or stone |
The Tools You Need
Sharpening a Japanese knife requires the right tools. Using the wrong equipment can damage the blade or wear it down too quickly. Here’s what you’ll need:
- Whetstones: Also called water stones, these are the gold standard for sharpening Japanese knives. They come in different grits, which control how much metal is removed.
- Nagura Stone: A small stone used to clean and condition the surface of your whetstone. It keeps the stone cutting efficiently.
- Flattening Stone: Over time, whetstones develop dips from use. A flattening stone levels your whetstone to ensure a consistent sharpening surface.
- Water Container: Whetstones need to be soaked in water before use.
- Towel: For drying your knife and hands during the process.
- Sharpening Guide (Optional): A small clip that helps you keep a consistent angle. Useful for beginners.
Whetstone Grit Guide
Japanese knife sharpening usually involves more than one stone. The grit number tells you how fine or coarse the stone is:
| Grit | Type | Purpose |
|---|---|---|
| 220–400 | Coarse | Repair chips, fix very dull edges |
| 1000–2000 | Medium | Regular sharpening |
| 3000–8000 | Fine | Polishing and finishing |
Preparing To Sharpen
Before you start, set up your area. Find a stable, well-lit surface. Lay down a towel to keep your stones from sliding and to absorb water. Soak your whetstones for 10–15 minutes. This step is important. If the stone is not fully soaked, it won’t cut properly or evenly.
Check your knife. Is it very dull, or does it just need a touch-up? For a very dull knife, start with a coarse stone. For regular maintenance, a medium stone (1000–2000 grit) is enough.
Also, make sure your stone is flat. An uneven stone will sharpen the blade unevenly. Run the flattening stone over your whetstone in a circular motion if needed.
Understanding Angles And Pressure
The sharpening angle is one of the most important factors when working with Japanese knives. Most double bevel Japanese knives are sharpened at 12–15 degrees per side. Single bevel knives usually have a 10–12 degree angle on the sharpened side and are flat on the other.
If you’re new to sharpening, use a simple trick: stack three coins (about 5mm) under the spine of the knife as you place it on the stone. This gives you a rough 12–15 degree angle.
Pressure matters, too. Use gentle, even pressure. Too much force can damage the edge or remove too much material. Too little and you won’t sharpen effectively.
Credit: www.reddit.com
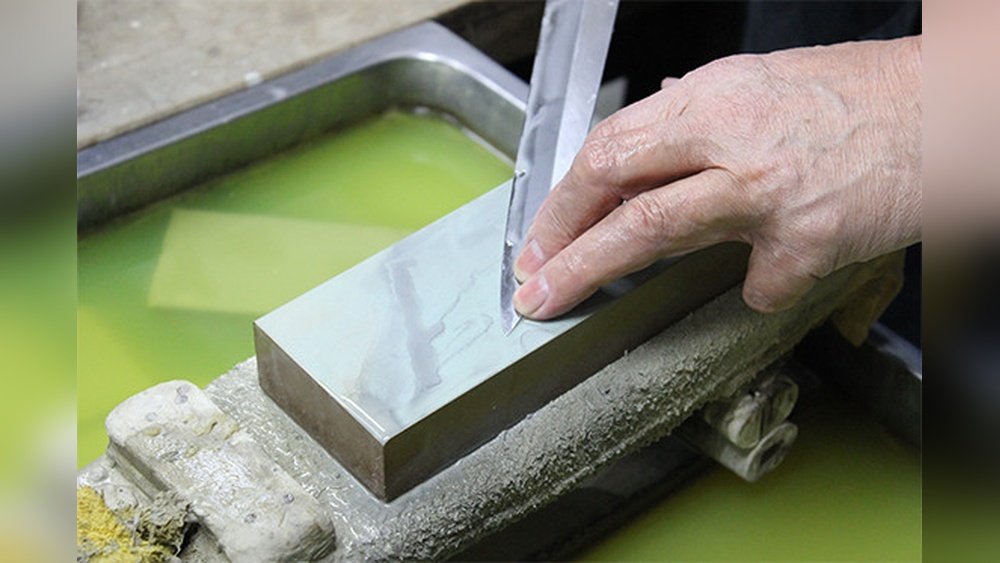
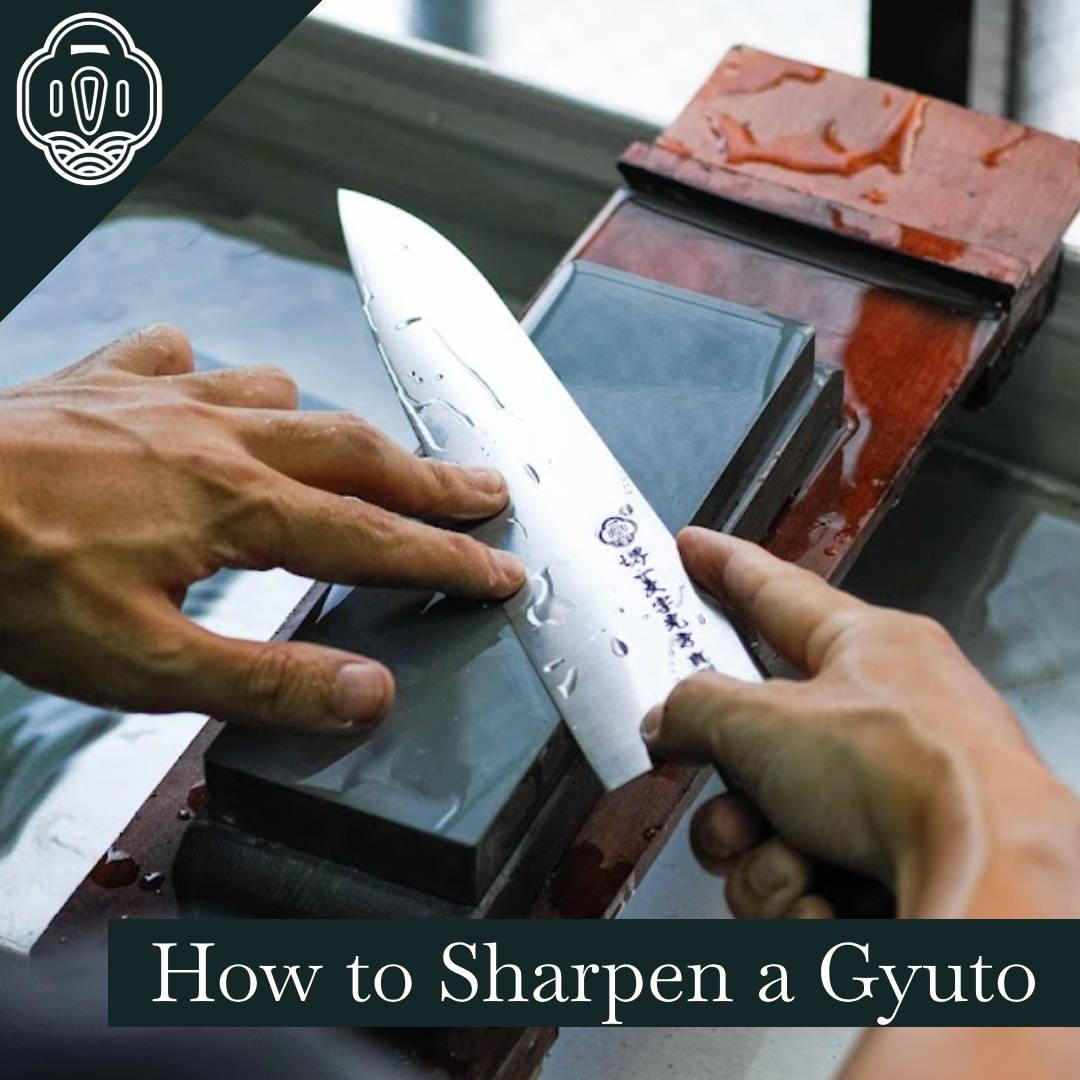
Step-by-step Sharpening Process
1. Setting Up The Whetstone
Place the soaked stone on your towel. Keep a bowl of water nearby to splash on the stone as you work. The stone should always be wet.
2. Sharpening The First Side
Hold the knife with the edge facing away from you. Set the edge on the stone at the correct angle. Using your dominant hand, hold the handle; with your other hand, press lightly on the blade near the edge.
Push the blade forward and across the stone, as if you’re trying to slice a thin layer off the top. Use the whole length of the stone. Lift the blade slightly as you reach the tip to follow its curve.
Repeat this motion 10–20 times, or until you feel a burr—a slight, rough edge—form along the opposite side. The burr means you have sharpened all the way to the edge.
3. Sharpening The Other Side
Flip the knife and repeat on the other side, using the same angle and motion. Work until you feel a burr on this side too.
4. Alternating Strokes
Once you have a burr on both sides, switch to alternating strokes—one stroke per side. This refines the edge and removes any remaining burrs.
5. Using Finer Stones
Repeat the process with finer stones (3000–8000 grit) to polish the edge. Each finer stone makes the edge smoother and sharper. With fine stones, use lighter pressure and fewer strokes.
6. Polishing And Deburring
After your final stone, lightly drag the edge of the knife across a piece of wood or a cork. This removes any tiny pieces of burr left behind.
7. Cleaning And Drying
Rinse your knife and stones. Dry the knife completely before storing it to prevent rust.
Special Tips For Single Bevel Knives
Single bevel knives require special care. Only sharpen the beveled side at the sharpening angle. The flat side should be kept flat against the stone. This prevents accidentally adding a second bevel, which would ruin the knife’s special cutting ability.
On the flat side, use just a few gentle strokes to remove the burr. Do not grind heavily. These knives are often used for making clean, straight cuts (like in sushi), so keeping the original geometry is critical.
Common Mistakes And How To Avoid Them
Even experienced cooks sometimes make errors when sharpening Japanese knives. Here are mistakes to watch out for:
- Wrong Angle: Using a Western angle (20°+) on a Japanese knife will make the edge too thick and not as sharp.
- Too Much Pressure: Pressing hard can chip the harder steel.
- Dry Stone: If the stone dries out, the knife won’t sharpen well and the stone wears unevenly.
- Uneven Strokes: Not using the entire length of the stone causes uneven wear and creates a wave in the blade.
- Skipping Grits: Jumping from a coarse to a very fine stone misses the polishing step and leaves a rough edge.
- Not Checking for Burrs: If you don’t feel a burr, you probably haven’t sharpened the edge fully.
- Not Flattening the Stone: A warped stone leads to uneven sharpening.
- Not Cleaning the Knife After Sharpening: Metal particles can rust or contaminate food.
- Using a Pull-Through Sharpener: These can ruin the edge geometry of Japanese knives.
- Storing Wet: Water left on the blade can cause rust, especially with carbon steel Japanese knives.
Maintenance Between Sharpenings
Japanese knives can keep their edge for a long time if cared for properly. Between full sharpenings, you can use a strop (a strip of leather) or a ceramic honing rod (not a steel rod) to realign the edge. This is not the same as sharpening, but it helps keep the blade feeling sharp.
Always wash and dry your knife immediately after use. Store it in a knife block or on a magnetic strip—never loose in a drawer.
How Often Should You Sharpen?
The answer depends on use and the type of food you cut. For a home cook, sharpening every 2–3 months is enough. For professionals, it might be every few weeks. If you notice the knife pushing or tearing instead of slicing cleanly, it’s time to sharpen.
Choosing And Caring For Whetstones
Not all whetstones are created equal. Japanese stones are made to work with Japanese steel. Some common brands are King, Shapton, and Naniwa. Synthetic stones are best for beginners, as natural stones can be expensive and require experience.
Keep your stones flat. After each sharpening session, check for dips and flatten if needed. Store stones in a dry place. Never leave them soaking in water for long periods, as this can damage them.
Practical Examples And Scenarios
Let’s look at two real-world examples:
Home Cook: Light Use
Maria owns a Santoku knife and cooks dinner for her family every night. She sharpens her knife every three months with a 1000/6000 grit combination stone. She uses a sharpening guide to keep the angle consistent. Each session takes her about 15 minutes. Her knife stays sharp enough to slice tomatoes cleanly with little pressure.
Sushi Chef: Professional Use
Kenji is a sushi chef using a Yanagiba (single bevel). He sharpens his knife every week, starting with a 1000 grit stone and finishing with an 8000 grit stone. Because he uses a single bevel knife, he only sharpens one side and polishes the flat side gently. He flattens his stones after every session. His knife glides through raw fish, making perfect slices every time.
Credit: global.ichimonji.co.jp
When To Seek A Professional
If your knife is chipped, bent, or extremely dull, it may need repair or reshaping. In these cases, a professional sharpener with experience in Japanese knives is best. They have the right tools and know the correct blade geometry.
For valuable or rare knives, professional sharpening can protect your investment. It’s also a good idea if you don’t have the time or confidence to learn the process yourself.
Additional Insights Most Beginners Miss
- Stone Maintenance is Key: Many people focus only on the knife, but a warped or clogged stone will ruin your results. Always flatten and clean your stones.
- Water Quality Matters: If your tap water is very hard (high in minerals), it can leave residue on your stones and knife. Use filtered water if possible.
- Edge Trailing vs. Edge Leading: Beginners often don’t realize the direction of sharpening strokes affects the finish. For final polish, use edge trailing strokes (moving the knife away from the edge), which are gentler and produce a smoother edge.
- Visual Inspection: Use a magnifying glass or bright light to check the edge. A sharp edge reflects almost no light. If you see shiny spots, those areas are dull.
- Don’t Over-Polish: Going too fine (over 8000 grit) can make the edge too smooth and actually reduce “bite,” making slicing tomatoes or soft foods harder.
Storing And Handling Your Japanese Knife
Proper storage and handling extend the life of your knife and your sharpening work. Always use a wooden or plastic cutting board; glass or stone boards will dull the edge quickly. Never use the knife to cut bones, frozen food, or hard materials.
After sharpening, apply a drop of camellia oil or mineral oil to carbon steel knives to prevent rust. Stainless steel Japanese knives are more resistant but still benefit from drying and oiling.
How To Test Sharpness
After sharpening, you want to know if your knife is truly sharp. Here are three simple tests:
- Tomato Test: Try slicing a ripe tomato. A sharp knife should cut cleanly with almost no pressure.
- Paper Test: Hold a sheet of printer paper and try slicing it with the knife. A sharp edge will slice smoothly without tearing.
- Hair Test: Very sharp knives can shave thin hair from your arm. This is not essential for kitchen use but shows a high level of sharpness.
Quick Reference: Step-by-step Summary
Sharpening a Japanese knife can feel complex, so here is a concise summary:
- Soak and flatten your whetstone.
- Set the angle (10–15 degrees).
- Sharpen one side until a burr forms.
- Repeat on the other side.
- Alternate strokes to refine the edge.
- Use finer stones to polish.
- Remove the burr with a gentle stroke on wood or cork.
- Rinse and dry the knife.
Use this summary as a mental checklist each time you sharpen.
Comparing Popular Sharpening Methods
While whetstones are best for Japanese knives, other methods are used for different knives. Here’s how they compare:
| Method | Suitable For Japanese Knives? | Edge Quality | Ease of Use |
|---|---|---|---|
| Whetstone | Yes | Excellent | Medium (needs practice) |
| Pull-Through Sharpener | No | Poor (damages edge) | Easy |
| Ceramic Honing Rod | Yes (for maintenance) | Good | Easy |
| Electric Sharpener | No | Poor | Very Easy |
| Professional Service | Yes | Excellent | Easy (outsourced) |

Credit: www.youtube.com
Learning Resources
For those who want to go deeper, consider watching videos from Japanese knife makers or attending a sharpening class. There are also books and online guides. One highly respected resource is the Whetstone Wikipedia page, which explains the science and history behind sharpening stones.
Frequently Asked Questions
How Do I Know When My Japanese Knife Needs Sharpening?
If your knife struggles to slice through tomatoes, herbs, or fish, or if it starts tearing instead of cutting, it’s time to sharpen. You can also use the paper test: try slicing a piece of printer paper—if it snags or tears, the knife is dull.
Can I Use An Electric Sharpener On A Japanese Knife?
No, electric sharpeners are too aggressive for the harder, thinner edges of Japanese knives. They can ruin the edge geometry and even chip the blade. Stick to whetstones or seek a professional.
What Grit Of Whetstone Should I Start With?
For regular maintenance, start with a 1000–2000 grit stone. If your knife is very dull or has chips, begin with a coarse stone (220–400 grit). Always finish with a finer stone (3000–8000 grit) for polishing.
How Long Does It Take To Sharpen A Japanese Knife?
A typical sharpening session takes 15–30 minutes, depending on how dull the knife is and your experience level. With practice, you’ll get faster and more efficient.
What’s The Best Way To Store A Japanese Knife After Sharpening?
Dry the knife completely, then store it in a knife block, sheath, or on a magnetic strip. For carbon steel knives, a drop of oil helps prevent rust. Never store a wet knife or toss it in a drawer unprotected.
Taking care of your Japanese knives through proper sharpening is an investment in your cooking and your tools. With patience and practice, anyone can master this essential skill and enjoy the unmatched performance of a truly sharp Japanese blade.