Sharpening a single bevel knife is both an art and a science. These unique blades, often found in Japanese kitchens and among skilled woodworkers, are prized for their precision and performance. But their one-sided edge means the sharpening process is quite different from what most people know.
If you want your single bevel knife to stay razor-sharp, you’ll need the right approach, tools, and understanding. This guide will walk you through everything, from the basics to advanced tips, so you can sharpen with confidence and keep your blade in top condition.
What Makes A Single Bevel Knife Unique?
Before you start sharpening, it’s important to understand what sets single bevel knives apart. Unlike double bevel knives, which have a V-shaped edge on both sides, a single bevel knife has an edge only on one side. The other side is flat or slightly concave (known as an urasuki in Japanese knives).
This design offers several benefits:
- Extreme sharpness: The thin edge allows for cleaner, more precise cuts.
- Specialized tasks: Ideal for tasks like filleting fish, making sushi, or fine woodworking.
- Unique cutting feel: The knife naturally steers food away from the flat side, reducing sticking.
But there are also challenges:
- Sharpening requires skill: The asymmetrical edge means you must pay close attention to angles and technique.
- Susceptible to damage: The thin edge can chip if misused.
Understanding these features helps you appreciate why sharpening must be done carefully and with the right method.
Types Of Single Bevel Knives
Single bevel knives come in different shapes and are used for various tasks. Here are some common types:
- Yanagiba: Long, slender blade for slicing fish.
- Deba: Thick, strong blade for cutting through fish bones.
- Usuba: Flat blade for precise vegetable cuts.
- Kiridashi: Small utility blade used in woodworking.
Each knife type has its own optimal sharpening angle and usage. For example, a yanagiba needs an especially smooth edge for sashimi, while a deba must be sturdy enough for butchery.
Single Bevel Vs. Double Bevel
It’s worth comparing single and double bevel knives side by side.
| Feature | Single Bevel | Double Bevel |
|---|---|---|
| Edge Side | One | Two |
| Sharpness | Very high | High |
| Usage | Specialized | General |
| Sharpening Complexity | High | Medium |
| Food Release | Better | Good |
As you can see, the single bevel knife offers unique performance, but demands a more careful sharpening process.
Credit: sharppebble.com
Essential Tools For Sharpening A Single Bevel Knife
To sharpen your single bevel knife properly, you need the correct tools. Using the wrong stones or techniques can actually damage the edge. Here’s what you’ll need:
- Sharpening stones (whetstones): At least three grits – coarse (around 400), medium (1000–2000), and fine (3000–8000).
- Nagura stone: Used to clean and refresh the surface of fine stones.
- Stone holder: Keeps the stone steady during sharpening.
- Water: For soaking and lubricating the stones.
- Towel: To wipe the blade and hands.
- Marking pen: For marking the bevel and checking your progress.
- Protective gloves: Optional but useful for safety.
Do not use pull-through sharpeners or electric devices; these are not suitable for single bevel knives and can ruin the edge geometry.
Comparison Of Sharpening Stones
Understanding the difference between stone types will help you choose the right ones for your needs.
| Stone Type | Grit Range | Purpose |
|---|---|---|
| Coarse | 200–600 | Repair chips, reset edge |
| Medium | 1000–2000 | General sharpening |
| Fine | 3000–8000 | Polishing, finishing |
Most users will work with medium and fine stones for maintenance, using coarse stones only when the knife is damaged.
Preparing For Sharpening
A good sharpening session starts with preparation. This step is often rushed, but skipping it can lead to mistakes.
Soak The Stones
Most Japanese water stones need to be soaked for at least 10–15 minutes before use. Place each stone in a basin or sink filled with water. When air bubbles stop rising, the stone is ready.
Some stones are “splash and go,” meaning they only need surface water. Check the manufacturer’s instructions to avoid cracks or damage.
Secure Your Workspace
Lay a towel on your work surface and set up a stone holder. This prevents slipping, which is both safer and more effective.
Inspect The Knife
Wipe your knife clean and check for chips, rust, or deep scratches. If you notice serious damage, start with a coarse stone. For regular sharpening, medium and fine stones are enough.
Mark The Bevel
Use a black or blue marking pen to color the bevel (the angled edge). As you sharpen, the ink will disappear where you’re making contact. This simple trick helps beginners maintain the correct angle.
Non-obvious Insight
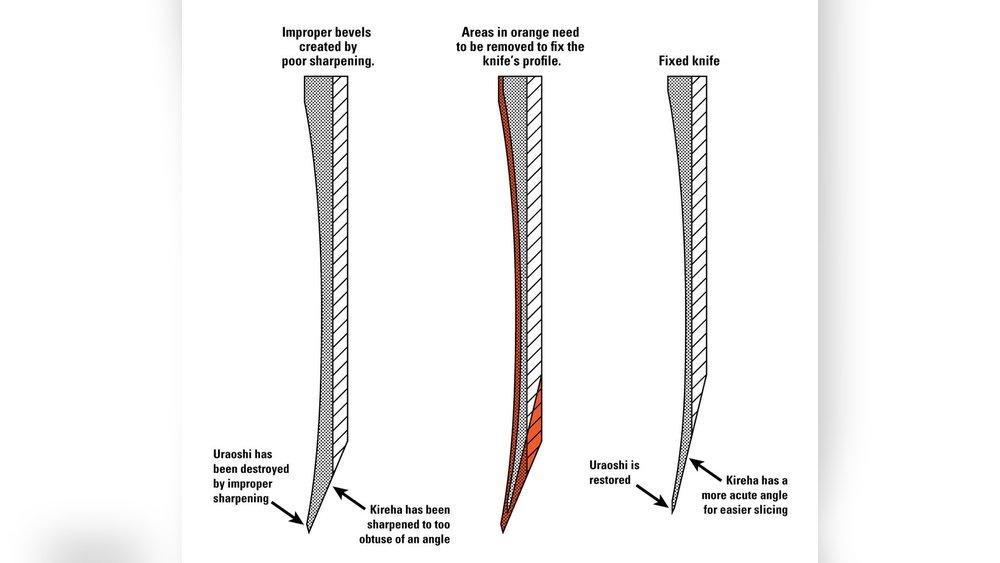
Always check the flat (urasuki) side for warping or unevenness. Many beginners ignore this, but it affects how the knife cuts and sharpens.

Credit: knifewear.com
Understanding The Sharpening Angles
Getting the angle right is the most important part of sharpening a single bevel knife. If you sharpen at the wrong angle, you risk damaging the edge or making the knife cut poorly.
Typical Angles For Common Knives
- Yanagiba: 10–15 degrees
- Deba: 15–20 degrees
- Usuba: 12–15 degrees
- Kiridashi: 15 degrees
These are guidelines. Some traditional knives come with a specific angle set by the maker. If possible, check with the manufacturer or a professional.
Why The Angle Matters
The single bevel creates a thin, sharp edge. Too steep an angle makes the edge weak and prone to chipping. Too wide an angle makes it dull and hard to use. Maintaining the correct angle preserves the knife’s unique performance.
How To Hold The Angle
- Place your fingers on the flat side of the blade.
- Set the bevel side against the stone so the entire edge touches.
- Keep the same angle as you slide the knife back and forth.
A common mistake is lifting the spine or pressing too hard. Both will change the angle and unevenly wear the blade.
Step-by-step Sharpening Process
Let’s go through the sharpening process in detail. Each phase is important for building a sharp, polished edge.
1. Coarse Grit: Repairing And Shaping
If your knife is chipped or very dull, start here.
- Wet the coarse stone.
- Place the bevel flat on the stone at the correct angle.
- Use gentle, even strokes, moving the blade away from you.
- Cover the full length of the edge.
- Check progress with the marking pen.
- Stop when the edge is straight and chips are gone.
2. Medium Grit: Establishing The Edge
For routine sharpening, start with a medium (1000–2000 grit) stone.
- Soak the stone and secure it.
- Place the bevel on the stone at the set angle.
- Push the blade forward and slightly sideways in smooth motions.
- Maintain even pressure across the edge.
- Repeat 10–20 times, depending on dullness.
- Wipe the blade and check the edge with your fingernail or by gently slicing paper.
You should feel a slight “burr” forming on the flat side. This means the edge is becoming sharp.
3. Flat Side (urasuki) Maintenance
The flat side is not truly flat—it’s slightly concave. This shape helps with food release and makes sharpening easier.
- Place the flat side of the blade nearly flush on the stone.
- Use very light pressure.
- Make a few passes to remove the burr and polish the urasuki.
- Do not overdo this step—excessive sharpening can ruin the urasuki.
4. Fine Grit: Polishing
To achieve a razor-sharp, mirror-like finish, use a fine stone (3000–8000 grit).
- Wet the stone and clean it with a nagura stone if needed.
- Repeat the same motions as with the medium grit, but use even less pressure.
- Focus on consistent angle and smoothness.
- Alternate between the bevel and flat side to remove any remaining burr.
A polished edge is not just about looks. It reduces food sticking and keeps the knife cutting smoothly for longer.
5. Final Touches
- Rinse and dry the knife completely.
- Use a leather strop or newspaper to gently remove the last trace of burr.
- Check the sharpness by slicing through paper or a tomato.
Common Mistakes To Avoid
- Using too much pressure: Leads to uneven edges and scratches.
- Changing angles: Inconsistent sharpening causes a wavy edge.
- Ignoring the urasuki: Leads to poor food release and edge instability.
- Skipping grits: Moving from coarse to fine too quickly leaves a rough edge.
Practical Tips For Consistent Results
Even with the right method, experience matters. Here are some practical tips to help you improve:
- Sharpen regularly: Don’t wait until your knife is very dull. Light touch-ups are easier and safer.
- Keep stones flat: Uneven stones can ruin your edge. Use a lapping plate or flattening stone to level the surface.
- Use water generously: It prevents clogging and keeps the stone cutting well.
- Check your work: Use the marking pen and test the edge after each grit.
- Develop a rhythm: Consistent, smooth strokes produce a better edge than fast, jerky movements.
Non-obvious Insight
Try using a magnifying glass to inspect the edge. Tiny chips or burrs are easier to see, helping you refine your sharpening technique.
Honing Vs. Sharpening
Many people confuse honing with sharpening. They are not the same, especially for single bevel knives.
- Sharpening: Removes steel to create a new edge. Done with stones.
- Honing: Realigns the edge without removing much metal. Usually done with a ceramic rod.
Single bevel knives rarely need honing rods, and using the wrong tool can even damage them. Stick to stones for best results.
Caring For Your Knife After Sharpening
A sharp knife deserves proper care. Here’s how to protect your investment:
- Hand wash only: Never put single bevel knives in the dishwasher.
- Dry immediately: Prevents rust, especially for high-carbon steel.
- Store properly: Use a wooden sheath or knife block to avoid chipping.
- Use the right cutting board: Softwood or plastic is best. Avoid glass or stone.
- Cut correctly: Avoid twisting the knife or cutting through hard materials like bones (unless using a deba, which is designed for that).
Rust Prevention
Many single bevel knives are made from carbon steel, which rusts easily. After sharpening, apply a thin coat of food-safe oil to protect the blade.
When To Seek Professional Help
Even experienced sharpeners sometimes need help. Here are signs it’s time to consult a pro:
- Large chips or cracks in the blade.
- Warped or uneven urasuki.
- Difficulty maintaining the correct angle.
- Specialty knives worth significant value.
Professional sharpeners have the tools and experience to restore your knife without risk.
Advanced Techniques: Micro-bevels And Mirror Polishing
Once you’re comfortable with basic sharpening, you can try advanced methods to further enhance performance.
Creating A Micro-bevel
Some chefs add a tiny micro-bevel to the edge. This strengthens the edge and reduces chipping.
- After sharpening at the main angle, raise the spine by 1–2 degrees.
- Make 2–3 light passes on a fine stone.
- Remove the burr on the flat side.
Micro-bevels are optional and may not be suitable for all knife types.
Mirror Polishing
A highly polished edge not only looks impressive but also glides through food with less resistance.
- Use a very fine stone (8000+ grit).
- Work slowly, focusing on smooth, even strokes.
- Finish with a strop for extra shine.
This level of finish is often reserved for yanagiba and usuba used in fine sushi preparation.
Troubleshooting: Fixing Common Issues
Sometimes, sharpening doesn’t go as planned. Here’s how to address common problems:
The Edge Feels Dull After Sharpening
- Check your stone grit sequence; you may have skipped a step.
- Make sure you removed the burr completely.
- Use lighter pressure and slower strokes on the fine stone.
The Edge Is Chipped
- Use a coarse stone to grind past the chips.
- Avoid using the knife on hard materials.
Food Sticks To The Blade
- Polish the urasuki side more thoroughly.
- Check if the urasuki is uneven and correct with careful flattening.
The Knife Cuts To One Side
- The edge is not centered. Sharpen more on the side that’s not cutting well.
- Use a marking pen to track where you’re removing steel.
Sharpening Frequency: How Often Is Enough?
How often you need to sharpen depends on use, steel type, and cutting surface.
- Home cooks: Every 2–4 weeks for regular use.
- Professional chefs: Weekly or even daily, depending on workload.
- Woodworkers: After every major project or when the edge feels less effective.
Remember, light maintenance is better than letting the knife become very dull.
Comparing Sharpening Single Vs. Double Bevel Knives
To understand why single bevel knives need special care, let’s compare the sharpening process.
| Step | Single Bevel | Double Bevel |
|---|---|---|
| Angle | One side only (10–20°) | Both sides (15–20° each) |
| Process | Sharpen bevel, then urasuki | Alternate both sides |
| Edge Shape | Asymmetrical | Symmetrical |
| Common Errors | Over-sharpening urasuki | Uneven bevels |
| Tools Needed | Whetstones only | Whetstones or rods |
This difference explains why the sharpening technique must match the blade type.

Credit: www.youtube.com
Myths About Sharpening Single Bevel Knives
There are several myths that can mislead beginners:
- Myth: “You must always finish with a leather strop.”
*Fact:* Stropping is optional and sometimes not needed if you finish with a high-grit stone.
- Myth: “All single bevel knives use the same angle.”
*Fact:* The optimal angle depends on the knife’s purpose and maker.
- Myth: “You can use a honing rod instead of stones.”
*Fact:* Most honing rods are too rough and can damage the delicate edge.
Understanding these myths helps you make better decisions and avoid common pitfalls.
Real-world Example: Sharpening A Yanagiba
To see the process in action, let’s walk through sharpening a yanagiba sushi knife.
- Soak a 1000 grit stone and mark the bevel.
- Hold the knife at 12 degrees and use gentle strokes along the stone.
- Check the marking pen to ensure even sharpening.
- Feel for a burr, then flip to the urasuki side for a few light passes.
- Move to a 6000 grit stone and repeat, using even lighter pressure.
- Finish by stropping on newspaper.
- The result: A mirror-polished edge that slices cleanly through fish with no tearing.
This process works for other single bevel knives, with adjustments for angle and pressure.
Why Practice Matters
Sharpening is a skill that improves with repetition. Each knife is a little different, and your hand will learn the right pressure and angle over time. Beginners often rush or worry about making mistakes, but practice builds confidence. Don’t be afraid to start with an inexpensive blade before moving on to your best knife.
Additional Resources
For those looking to learn more, there are many resources online and in print. One of the most respected is the Wikipedia page on Japanese cutlery, which offers detailed history and technique guides.
Frequently Asked Questions
How Do I Know If My Knife Is Single Or Double Bevel?
Look closely at the edge. If one side is flat (or slightly hollow) and the other is angled, it’s a single bevel knife. Double bevel knives have a V-shaped edge, angled on both sides. If unsure, shine a light along the edge—single bevel knives reflect light differently on each side.
Can I Sharpen A Single Bevel Knife With A Pull-through Sharpener?
No, you should not use pull-through sharpeners. They are designed for double bevel knives and can damage the unique shape of a single bevel edge. Always use whetstones for single bevel knives.
What Should I Do If I Over-sharpen The Urasuki?
If you’ve removed too much metal from the flat side, the urasuki may become uneven or disappear. Stop sharpening the flat side and focus only on the bevel for a while. In severe cases, a professional can regrind the urasuki.
How Do I Store A Single Bevel Knife To Keep It Sharp?
Use a wooden sheath (saya) or a soft-edge guard. Avoid storing loose in a drawer, as the edge can chip. Always dry the knife completely before storing, especially if it’s made from carbon steel.
Why Is My Knife Not Getting Sharp Even After Using Fine Stones?
If your knife remains dull, check these possible reasons:
- Skipped medium grit, so the edge wasn’t set properly.
- Did not remove the burr fully.
- Used inconsistent angles.
- Stones may be worn out or not flat.
Go back to a medium stone, check your technique, and try again.
A single bevel knife is a precision tool that rewards proper care. With the right methods, you’ll enjoy a sharp edge and the satisfaction of mastering a traditional skill.