Sharpening a knife is a skill that can make your kitchen tasks faster, safer, and much more enjoyable. But what if you don’t have a sharpening stone? Many people believe that a stone is the only way to sharpen a knife.
The truth is, there are several effective methods you can use with common household items. You don’t need to be a professional chef or invest in expensive tools to keep your knives in top shape. In fact, learning how to sharpen a knife without a stone can save you time, money, and frustration, especially in emergencies or while camping.
This guide explains step-by-step how to sharpen a knife without a stone, why these methods work, and how to choose the best approach for your needs. You’ll also learn common mistakes to avoid, safety tips, and maintenance advice. Whether you use a mug, sandpaper, or a car window, you’ll finish with a knife that cuts better and works safer.
Why Knife Sharpness Matters
A sharp knife is more than just a convenience. It’s a key part of safety and precision in the kitchen. Dull knives slip easily, which means you’re more likely to cut yourself by accident. They also squash or tear food instead of slicing it cleanly. This affects both the look and taste of your meals.
Research shows that using a sharp knife can reduce cutting force by up to 50%. This means less effort and more control. For example, a sharp chef’s knife can slice a tomato cleanly, while a dull one will crush it.
For professionals, knife sharpness is a sign of skill, but for home cooks, it’s about making daily tasks simpler and safer.
How Knife Edges Dull Over Time
Knives get dull through regular use. Every time you cut, the edge of the blade bends or develops tiny nicks. Even soft foods or plastic cutting boards wear down the edge slowly. Washing knives in the dishwasher, cutting on hard surfaces, or dropping them can make things worse.
A knife doesn’t go from razor-sharp to useless overnight. It loses its keen edge little by little, making cutting more difficult and dangerous. Understanding this helps you know when your knife needs sharpening and how different methods can restore the edge.
Essential Knife Safety Before You Begin
Before you start sharpening, remember these safety tips:
- Work on a stable surface. This prevents slips.
- Hold the knife carefully. Always point the blade away from your body.
- Keep fingers clear of the blade’s path.
- Go slow. Rushing can lead to accidents.
- Clean the knife before and after sharpening to remove metal dust.
Most injuries happen when people try to rush or get distracted. Take your time, and focus on the task.
Common Household Items For Sharpening
You might be surprised how many everyday objects can sharpen a knife. Here are some of the most effective:
- Ceramic mug
- Sandpaper
- Car window (side glass)
- Leather belt
- Nail file (emery board)
- Another knife
- Brick or unglazed tile
- Scissors
- Steel rod or screwdriver
- Cardboard
- Edge of a plate
- Concrete step
Each method works best for different types of knives and levels of dullness. In the next sections, you’ll learn how to use these objects correctly.
Method 1: Sharpening With A Ceramic Mug
A ceramic mug is one of the best stone-free options. Most mugs have an unglazed, rough ring on the bottom. This acts like a fine sharpening stone.
Step-by-step Instructions
- Flip the mug upside down on a stable surface.
- Clean the bottom ring to remove dust or dirt.
- Hold the knife at a 15–20 degree angle to the unglazed rim.
- Draw the blade across the rim from heel to tip, applying light pressure. Repeat 5–10 times.
- Flip the knife and sharpen the other side the same way.
- Wipe the blade clean to remove ceramic or metal dust.
This method is quick and works well for most kitchen knives. The ceramic is hard enough to remove metal and restore the edge.
Practical Tip
Don’t use too much pressure. The goal is to reshape the edge, not grind away lots of metal. If the mug is glazed all over, try a ceramic plate instead.
Method 2: Using Sandpaper
Sandpaper is versatile and cheap. It comes in many grits (levels of roughness), from coarse to very fine.
Choosing The Right Grit
- Coarse (200–400 grit): For very dull or damaged knives.
- Medium (800–1000 grit): For regular sharpening.
- Fine (1500–2000 grit): For finishing and polishing.
How To Use Sandpaper
- Tape the sandpaper to a flat surface like a cutting board or table.
- Hold the knife at a 15–20 degree angle to the sandpaper.
- Draw the blade across the sandpaper as if slicing a thin layer off the surface. Do 8–12 strokes per side.
- Switch to finer grit for a smoother edge.
- Clean the knife to remove any metal particles.
Sandpaper gives you control over how much metal is removed. Start with coarser grit only if the knife is very dull.
Non-obvious Insight
Many beginners use only one grit. For best results, use at least two: a medium to shape, then a fine to polish. This gives a sharper, smoother edge.
Method 3: Car Window (side Glass)
The top edge of a car window is made from tough, unfinished glass. This edge works like a sharpening rod.
How It Works
- Roll down the window halfway, exposing the top edge.
- Hold the knife at the correct angle (15–20 degrees).
- Slide the blade along the glass edge from heel to tip, 6–8 times per side.
- Wipe the blade after sharpening.
This trick is popular with outdoor enthusiasts and drivers who get stuck without tools.
Safety Caution
Don’t use too much force. Glass is strong but can chip if hit hard. Keep the knife moving smoothly.
Method 4: Leather Belt For Honing
A leather belt won’t sharpen a dull knife, but it can hone the edge. Honing realigns the blade’s tiny teeth, making it feel sharper.
Honing With A Belt
- Lay the belt flat on a table with the smooth side up.
- Draw the knife away from the edge (opposite of sharpening), holding it at a 15-degree angle.
- Repeat 10–15 times per side.
This method is great after sharpening with another item. It finishes and smooths the edge.
Common Mistake
Don’t use the belt’s rough side. The smooth side works best for honing and polishing.
Method 5: Nail File (emery Board)
A nail file is made for shaping hard material, so it can help sharpen small knives in a pinch.
Using A Nail File
- Hold the file steady on a table.
- Draw the knife blade along the file, matching the angle to your knife’s edge.
- Repeat 6–8 times per side.
Nail files are small, so this method works best for pocket knives or paring knives, not large kitchen blades.
Practical Example
If you’re camping and have no tools, a nail file from a first-aid kit can restore a usable edge.
Method 6: Sharpening With Another Knife
You can use the back of a second knife as a sharpening rod.
How It Works
- Hold both knives firmly by the handle.
- Run the dull blade along the spine (thick back) of the other knife at a low angle.
- Repeat evenly on both sides.
This is more for honing than true sharpening, but it can improve the edge in an emergency.
Non-obvious Insight
Don’t use the sharp edge of the second knife. Only the flat, unsharpened spine is safe and effective.
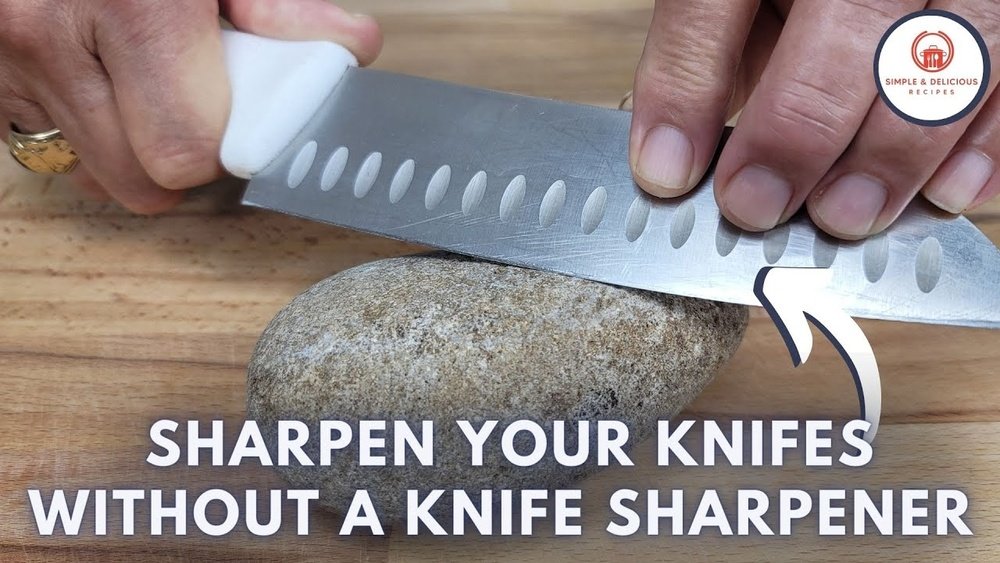
Method 7: Brick Or Unglazed Tile
A brick or unglazed ceramic tile has a rough, abrasive surface that acts like a coarse sharpening stone.
How To Sharpen With A Brick
- Choose a clean, flat area on the brick or tile.
- Wet the surface slightly to reduce dust.
- Hold the knife at the usual angle and draw it across the brick, heel to tip.
- Repeat on both sides until you feel a burr (raised edge).
This method removes a lot of material, so use it only if the knife is very dull.
Comparison Table: Common Sharpening Surfaces
Here’s how different surfaces compare in terms of effectiveness, speed, and edge quality:
| Sharpening Surface | Best For | Edge Quality | Speed | Risk of Damage |
|---|---|---|---|---|
| Ceramic Mug | Kitchen knives | Fine | Medium | Low |
| Sandpaper | All knives | Very fine | Fast | Low |
| Car Window | Pocket knives | Medium | Fast | Medium |
| Brick/Tile | Very dull knives | Coarse | Fast | High |
Method 8: Scissors
You can sharpen a knife by using the blade of scissors as a honing tool.
How To Use Scissors
- Open the scissors wide.
- Place the knife edge against the inside of one scissor blade.
- Slide the knife down the blade at a low angle, as if you’re trying to “cut” the scissor blade.
- Repeat on both sides.
This method works better for small repairs or honing, not major sharpening.
Method 9: Steel Rod Or Screwdriver
A steel rod or the uncoated shaft of a screwdriver can act as a honing rod.
How To Hone With A Rod
- Hold the rod vertically on a table.
- Draw the knife down the rod at a 15-degree angle, alternating sides.
- Repeat 6–10 times per side.
This method is best for quick touch-ups, not for repairing very dull edges.
Real-world Example
Many professional kitchens use steel rods daily to keep knives in shape between sharpenings.
Method 10: Cardboard
Surprisingly, thick cardboard has enough abrasion to polish and realign a knife edge.
How To Use Cardboard
- Lay the cardboard flat on a stable surface.
- Draw the blade across it at a 15-degree angle, 10–15 times per side.
This is more for finishing or maintaining an edge than for restoring a very dull knife.
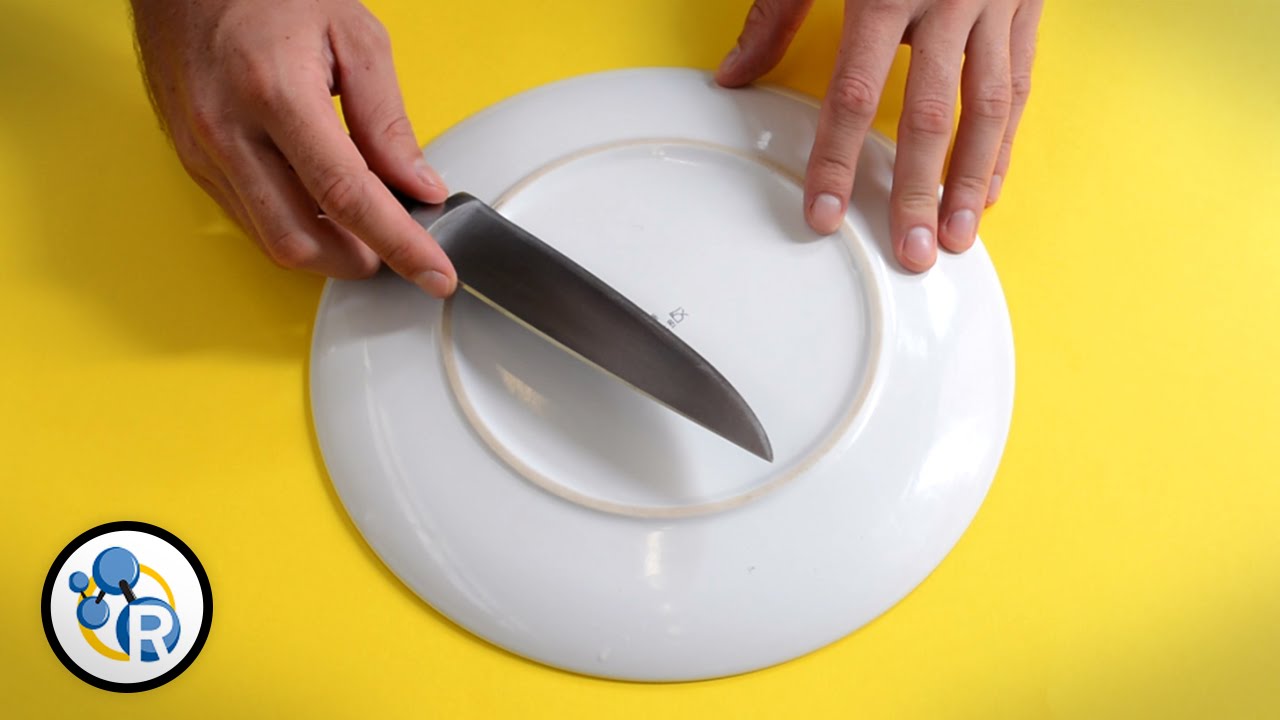
Method 11: Edge Of A Plate
The unglazed rim on the bottom of a plate works like a ceramic mug.
How To Use A Plate
- Flip the plate and find the rough edge.
- Hold the knife at the proper angle and draw it across the rim, alternating sides.
This method is common in restaurants when no stone is available.
Method 12: Concrete Step
A concrete step or curb can act as a coarse sharpening stone in emergencies.
How To Use Concrete
- Find a smooth area on the concrete.
- Wet the surface to reduce dust.
- Hold the knife at the correct angle.
- Draw the blade across 6–10 times per side.
Concrete is rough, so finish with cardboard or a belt to polish.
Which Method Is Best? Key Factors To Consider
Choosing the right sharpening method depends on your situation, knife type, and how dull the blade is. Here’s a comparison to help you decide:
| Situation | Best Method | Why It Works |
|---|---|---|
| Kitchen, no tools | Ceramic mug or plate | Readily available, gentle on knives |
| Camping or outdoors | Car window, sandpaper, nail file | Portable, accessible, effective |
| Very dull or damaged knife | Brick, tile, concrete | Removes more metal, repairs chips |
| Quick maintenance | Belt, steel rod, cardboard | Fast, polishes edge |
How To Hold The Knife For Best Results
Angle matters more than force. Most kitchen knives are sharpened at a 15–20 degree angle. This gives a balance between sharpness and durability. Too steep, and the edge is weak. Too shallow, and it’s not sharp enough.
- Visual trick: Picture a matchbook under the knife’s spine; that’s about 15–20 degrees.
- Consistency: Keep the angle the same with each stroke.
If you change the angle with every pass, the edge will be uneven and less effective.
Understanding Burrs And How To Remove Them
When you sharpen, a tiny piece of metal called a burr forms along the edge. You can feel it by gently running your fingernail across the blade. If you feel a tiny “catch,” that’s the burr.
- Remove the burr by lightly stropping (dragging) the blade across leather, cardboard, or even your jeans (carefully).
- Why it matters: If you don’t remove the burr, the knife will feel sharp at first but quickly become dull.
Many beginners skip this step and wonder why their knife loses sharpness so quickly.
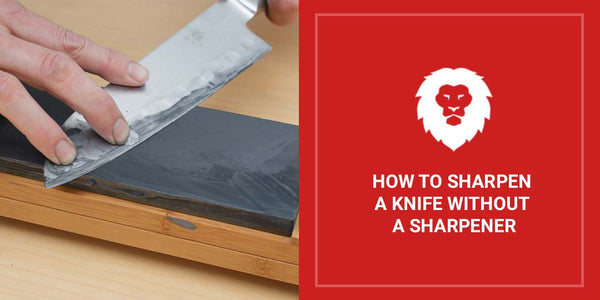
Polishing And Finishing The Edge
After sharpening, polish the edge with a finer surface. This can be a leather belt, cardboard, or the finest sandpaper you have. Polishing removes tiny scratches and gives a smoother, longer-lasting edge.
- Finish with 10–15 gentle strokes on the polishing surface.
- Avoid heavy pressure at this stage; let the surface do the work.

Credit: www.redlabelabrasives.com
How To Test Knife Sharpness
Don’t guess—test your work. Here are three simple ways:
- Paper test: Hold a sheet of paper by the edge and slice it. A sharp knife will cut cleanly.
- Tomato test: Try slicing a tomato. The skin should break easily.
- Shaving test: Very carefully, try to shave a few hairs from your arm. A sharp knife will do this without force.
If your knife fails these tests, repeat the sharpening or finishing steps.
Mistakes To Avoid When Sharpening Without A Stone
Even with the right method, some common mistakes can ruin your results:
- Wrong angle: Too high or low makes the edge weak or ineffective.
- Too much pressure: Removes too much metal or damages the edge.
- Skipping polishing: Leaves the knife rough and more likely to dull quickly.
- Sharpening dirty knives: Grit and food can scratch or pit the blade.
- Not removing the burr: Edge won’t last.
How Often Should You Sharpen Your Knife?
How often depends on use. For most home cooks:
- Hone with a belt or rod: Every 2–3 uses.
- Sharpen with a mug or sandpaper: Every 2–4 weeks.
If you notice food slipping or squashing instead of slicing, it’s time to sharpen.
Knife Maintenance Tips For A Lasting Edge
A sharp knife stays sharp longer with good care:
- Cut on wood or plastic boards. Avoid glass or stone surfaces.
- Hand wash knives and dry right away.
- Store in a knife block, sheath, or magnetic strip.
- Don’t use knives to open cans or pry lids.
Proper storage and cutting habits prevent dulling and chipping.
When To Use Professional Sharpening
Sometimes, home methods aren’t enough. If your knife is badly chipped, bent, or won’t hold an edge, it’s best to see a professional. They have tools to restore even damaged blades.
Professional sharpening is recommended once or twice a year for expensive or favorite knives.
Are Diy Methods Safe For All Knives?
Most household methods work well for standard kitchen knives. But avoid them for:
- Serrated knives: Use a special tool or professional service.
- Japanese knives: These are harder and sometimes more brittle. Use gentle methods like ceramic or sandpaper.
- Damaged blades: Don’t try to fix serious chips at home.
Environmental And Cost Benefits Of Diy Sharpening
Sharpening knives at home saves money and reduces waste. You don’t need to buy new knives as often. Using household items means fewer tools and less clutter. Plus, you avoid the chemicals and packaging of commercial sharpeners.
According to the Environmental Protection Agency, Americans throw away more than 2 billion pounds of kitchenware yearly. Extending knife life helps reduce this number.
Practical Scenarios Where These Methods Help
- Camping: No tools? Use a car window or nail file.
- Travel: Hotel room mug or plate.
- Emergency: Concrete step or brick if you’re locked out of your home or car.
- Busy kitchen: Quick touch-up with a belt or steel rod.
These skills mean you’re never stuck with a dull knife, no matter where you are.
Credit: www.youtube.com
When Not To Sharpen
If the knife is bent, broken, or missing large chunks, don’t try DIY fixes. Sharpening can make it worse or cause injury. In these cases, seek professional help or replace the knife.
Myths About Knife Sharpening Without A Stone
Let’s clear up some common myths:
- Myth: “You need fancy tools to sharpen a knife.”
Fact: Many household items work well.
- Myth: “Any rough surface will do.”
Fact: Some surfaces (like glass cutting boards) will damage your knife.
- Myth: “More pressure means a sharper edge.”
Fact: Too much force ruins the blade.
- Myth: “Once a month is enough for sharpening.”
Fact: Frequency depends on use and knife type.
Knowing the facts helps you get better results and avoid damaging your knives.
Advanced Tips For Even Better Results
- Use water on abrasive surfaces like sandpaper or brick. This reduces heat and improves the finish.
- Finish with a strop (leather or denim) for a razor-sharp edge.
- Alternate sides often. Don’t do all strokes on one side before switching.
- Check your progress often. Touch the edge (carefully) to feel for sharpness.
Summary Table: Sharpening Methods At A Glance
For quick reference, here’s a summary of the methods, best uses, and their pros and cons:
| Method | Best Use | Pros | Cons |
|---|---|---|---|
| Ceramic Mug/Plate | Kitchen knives | Easy, available, fine edge | Not for very dull blades |
| Sandpaper | All knives | Custom grit, precise | Needs flat surface |
| Car Window | Pocket knives/outdoors | Portable, effective | Can chip glass |
| Brick/Tile | Damaged knives | Repairs chips, fast | Very coarse, finish needed |
| Leather Belt | Finishing/honing | Polishes edge | Does not sharpen |
| Nail File | Small knives/emergency | Portable, precise | Slow for large knives |
| Steel Rod/Screwdriver | Maintenance | Quick touch-up | Not for dull blades |
| Cardboard | Polishing | Gentle, safe | Not for sharpening |
| Scissors | Small repairs | Accessible | Limited effect |
| Concrete | Emergency use | Works anywhere | Can scratch blade |
Where To Learn More
For more on knife sharpening, maintenance, and safety, check out the Wikipedia entry on Sharpening. It covers the science and history behind these methods and more.
Frequently Asked Questions
How Often Should I Sharpen My Knife Without A Stone?
If you cook daily, sharpen every 2–4 weeks. Hone more often, such as every 2–3 uses. The more you use your knife, the more often it needs attention.
Is It Safe To Use Sandpaper Or A Brick On All Types Of Knives?
Sandpaper is safe for most knives, but bricks are best for tough, stainless steel knives. Avoid these methods for delicate or expensive Japanese knives.
What’s The Difference Between Sharpening And Honing?
Sharpening reshapes the edge by removing metal. Honing realigns the edge without removing metal. Honing keeps a sharp knife working well; sharpening restores dull knives.
Can I Ruin My Knife By Using These Methods?
If you use the wrong angle, too much pressure, or a very rough surface, you can damage the edge. Go slow, use gentle pressure, and test often for best results.
How Do I Know When My Knife Is Sharp Enough?
A sharp knife should slice paper smoothly and cut tomatoes without crushing. If the blade drags or tears, it needs more sharpening or honing.
Keeping your knives sharp improves safety, speed, and enjoyment in the kitchen. With these simple methods, you don’t need a stone to get professional results. Practice and attention to detail will give you an edge every time you cook.
Credit: www.redlabelabrasives.com