
Running a stove pipe through a wall is not just about making a hole and fitting a pipe. It’s a project that involves safety, precision, and following building codes. When done right, it keeps your home warm and safe. Done wrong, it can lead to fires, leaks, or costly repairs.
Many people want to install a wood stove or replace an old stove pipe, but worry about making mistakes. This guide will help you understand every detail, from planning to finishing, so you can tackle the job with confidence.
Installing a stove pipe means creating a path for smoke and gases to leave your home. This is essential for both wood and pellet stoves. A well-installed pipe protects your walls from heat, prevents smoke leaks, and meets insurance and inspection standards.
Even if you’re handy, there are steps that are easy to miss—like choosing the right materials or sealing gaps properly. If you want to do the job yourself or just understand what a professional should do, keep reading. You’ll learn about tools, materials, safety, and expert tips, all explained in simple language.
Understanding The Basics Of Stove Pipe Installation
Before you pick up any tools, it’s important to know how a stove pipe works. A stove pipe is a metal tube that connects your stove to the outside. It carries away smoke, hot air, and gases. There are two main parts: the stove pipe inside the room and the chimney pipe that goes through the wall and outside.
Most house fires caused by wood stoves happen because the stove pipe is too close to walls or not installed correctly. That’s why you must use the right parts. Most codes require a double-wall pipe or a Class A chimney pipe for the part that goes through a wall. These are designed to stay cool on the outside, even when the smoke inside is very hot.
You should never use regular single-wall stove pipe through a wall. It gets too hot and can set the wall on fire. Always check your local building codes before starting. In some places, a permit and inspection are required. If you skip this step, insurance might not pay in case of a fire.
Planning Your Stove Pipe Route
A good plan is the key to a safe and clean installation. Start by deciding exactly where your stove will sit and where the pipe will exit the wall. The pipe path should be as straight as possible. Each bend or turn makes the stove less efficient and harder to clean.
Key Points For Planning
- Shortest Route: The shorter and straighter the pipe, the better the draft (the pull of air and smoke up the pipe). Use no more than two 90-degree turns.
- Proper Clearance: Most codes need at least 18 inches of space between a single-wall pipe and any wall or ceiling. Double-wall and insulated pipes can be closer, but always follow the manufacturer’s rules.
- Wall Type: Check if your wall is wood, brick, or another material. This changes how you cut the hole and what kind of wall thimble you need.
- Location: The exit point should be high enough on the wall so snow, rain, or debris can’t block it. It should also be away from windows, doors, and vents to prevent smoke from getting back inside.
Example Route
Suppose your wood stove is in the living room near an outside wall. You want the pipe to go straight out the back and through the wall. That’s usually the easiest and safest option. If you need to go up and then out (for example, in a basement), plan for extra elbows and supports.
Choosing The Right Materials
Not all stove pipes are the same. Using the wrong materials is one of the biggest mistakes homeowners make. Here’s how to pick what you need:
Types Of Stove Pipes
- Single-Wall Stove Pipe: Used only inside the room. Never through a wall.
- Double-Wall Stove Pipe: Two layers of metal, safer, can be closer to walls.
- Class A Chimney Pipe: Triple-wall or double-wall, made for passing through walls and outside. This is the safest choice.
- Wall Thimble: A metal box that fits in the wall hole. It protects the wall from heat.
- High-Temperature Sealant: For sealing gaps and joints.
Comparison Of Pipe Types
Here’s a quick look at the main differences:
| Type | Use | Clearance Needed | Cost (per foot) | Durability |
|---|---|---|---|---|
| Single-Wall Stove Pipe | Inside only | 18 inches | $7–$15 | Low |
| Double-Wall Stove Pipe | Inside only | 6–8 inches | $25–$40 | Medium |
| Class A Chimney Pipe | Through wall/outside | 2 inches | $60–$100 | High |
Non-obvious Insights
- Always buy a complete chimney kit from one brand if possible. Mixing brands can lead to poor fits and leaks.
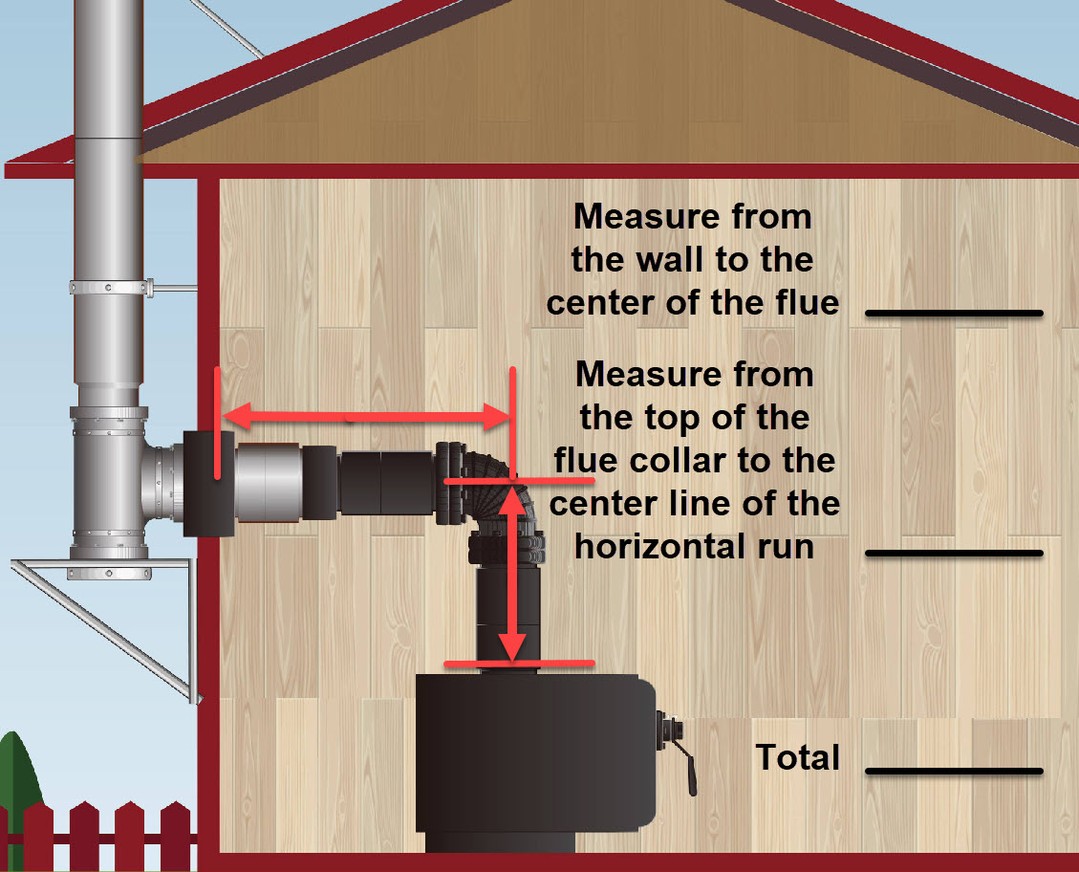
- Measure your stove collar (the opening on top of the stove) before buying pipes. Common sizes are 6 or 8 inches, but they must match exactly.
Tools And Supplies You Will Need
Having the right tools saves time and prevents mistakes. Here’s what you need for most installations:
- Drill with hole saw bit (size depends on your pipe and wall thimble)
- Reciprocating saw or hand saw (for wood or drywall)
- Masonry drill and chisel (for brick walls)
- Tape measure
- Level
- Screwdriver or impact driver
- High-temp silicone sealant
- Pipe screws
- Protective gloves and safety glasses
- Ladder (for outside work)
- Drop cloths (to catch dust and debris inside)
Many people forget to use a level. If your pipe is not perfectly straight, you’ll have problems with smoke backing up or poor draft. Take your time with measurements.
Steps To Run A Stove Pipe Through A Wall
Now it’s time to get hands-on. Follow these steps, and you’ll have a safe and professional-looking installation.
1. Mark The Exit Point On The Wall
Start by holding the first section of stove pipe up to the wall where you want it to exit. Use a pencil to mark the center of the pipe on the wall. Check both inside and outside the house to make sure nothing (wires, pipes, studs) will be in the way.
Use a level to make sure your marks are straight. This small step prevents headaches later.
2. Cut The Wall Opening
The size of the hole depends on your pipe and wall thimble. For example, if you have a 6-inch Class A chimney pipe, the thimble may need a 12-inch hole. Always check the instructions.
- For wood walls, use a drill to make a starter hole, then cut with a reciprocating saw.
- For brick or concrete, use a masonry bit to drill holes around the circle, then chip out the center with a hammer and chisel.
Wear safety glasses and gloves. Cutting walls creates lots of dust and sharp edges.
3. Install The Wall Thimble
The wall thimble is a metal box that lines the hole and keeps heat away from wall materials. Slide the inside half of the thimble into the hole from inside the house. Attach it with screws as directed.
From outside, fit the other half of the thimble into the hole. The two halves should overlap and form a tight seal. Some thimbles come with insulation; make sure it is evenly placed around the pipe.
Seal any gaps around the thimble with high-temp silicone sealant. This keeps out drafts, smoke, and pests.
4. Connect Stove Pipe To Thimble
Inside the house, attach the stove pipe to the thimble. Use three self-tapping screws at each joint for a strong and smoke-tight connection. The crimped (narrowed) end of the pipe always points toward the stove, so smoke and creosote flow smoothly.
If you need elbows to reach the thimble, use the smallest number possible. Too many bends make cleaning and draft worse.
5. Run The Chimney Pipe Outside
On the outside of the wall, connect the Class A chimney pipe to the wall thimble. The chimney pipe must be supported so it won’t pull loose over time.
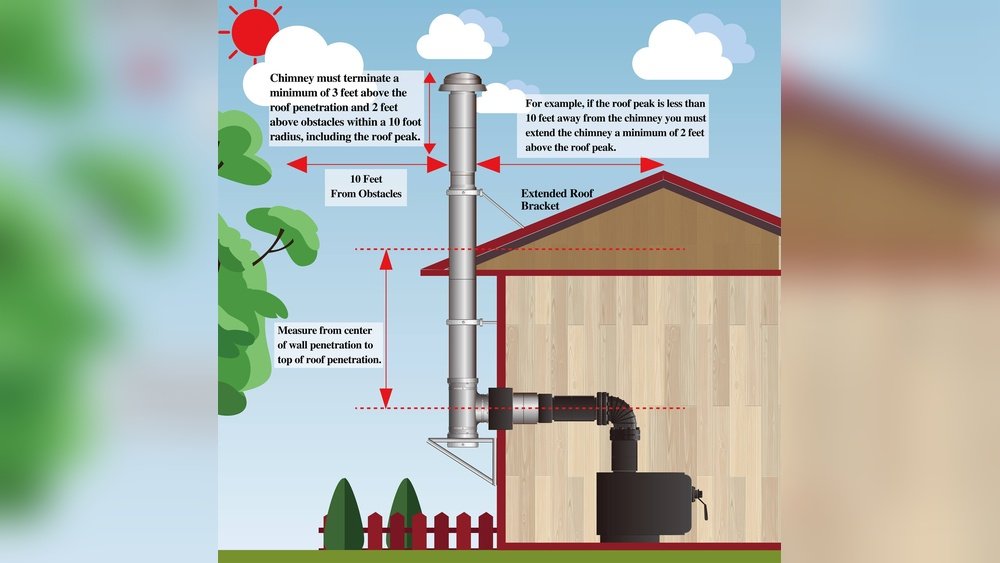
Most codes require the pipe to rise at least 3 feet above the roof and at least 2 feet higher than anything within 10 feet. This keeps smoke away from the house and creates good draft. Use a roof bracket or wall support if the pipe is tall.
6. Add The Chimney Cap
The chimney cap keeps out rain, snow, birds, and leaves. It also prevents sparks from escaping, which is important for fire safety.
Choose a cap that matches your chimney pipe brand and size. Attach it firmly according to instructions. If you live in a windy area, look for a wind-resistant cap to stop downdrafts.
7. Seal And Finish The Installation
Double-check every joint for gaps or loose connections. Use high-temp sealant where metal meets the wall thimble and chimney pipe. Clean up dust and debris inside and outside.
Test the installation with a small fire. Check for smoke leaks, strange smells, or unusual noises. If everything looks good, your new stove pipe is ready to use.
Safety Precautions And Building Codes
Safety is not optional with stove pipes. Even a small mistake can cause a house fire or carbon monoxide leak. Here’s what you need to know:
- Follow Manufacturer’s Instructions: Every chimney system is a bit different. Read and follow the guide that comes with your parts.
- Check Local Codes: Some places have extra rules about pipe clearance, height, or outside appearance. Call your local building department if you’re not sure.
- Get a Permit: Many areas require a permit and inspection for wood stove installations. This protects you and your insurance in case of problems.
- Use Only Approved Parts: Never use dryer vent or HVAC pipe for a stove. Only use UL-listed stove and chimney pipes.
- Install Carbon Monoxide Detectors: Place at least one CO detector near the stove and another near bedrooms.
Common Safety Mistakes
- Letting insulation or wall materials touch the pipe.
- Using single-wall pipe through the wall.
- Not supporting the outside chimney pipe.
- Not cleaning the pipe regularly (at least once per year).

Credit: www.tinywoodstove.com
Real-life Example: Installing A Stove Pipe In A Log Cabin
Imagine you have a log cabin with a wood-burning stove. The stove sits next to an exterior wood wall. Here’s how an experienced installer would approach the project:
They start by measuring the exact position for the wall thimble, double-checking for wall studs. After marking the spot, they cut a 12-inch hole through both the inside and outside log siding. A double-wall thimble is fitted, and the inside pipe is connected from the stove to the thimble using two elbows.
On the outside, a 6-inch Class A chimney pipe is attached, rising six feet above the roofline with a wall support bracket. All joints are sealed, and a wind-resistant cap is added. The installer checks clearances twice, then lights a test fire.
No smoke leaks are found, and the job passes inspection.
This example shows the importance of careful planning, correct materials, and not rushing. Many first-timers forget to check for wall studs or use the wrong thimble size, causing costly repairs later.
Maintenance And Cleaning Tips
A stove pipe that is not cleaned can fill with creosote, a sticky, flammable substance. This is the number one cause of chimney fires. To keep your system safe:
- Clean the pipe at least once a year. If you use the stove daily, check it twice a year.
- Use a chimney brush that matches your pipe size.
- Inspect for rust, loose joints, or blockages.
- Replace any damaged sections right away.
- After storms, check that the outside chimney pipe and cap are still secure.
Never burn trash, plastics, or wet wood. These produce more creosote and can damage your pipe.
Cost Breakdown Of Stove Pipe Installation
How much will it cost to run a stove pipe through a wall? Here’s a typical breakdown for a standard 6-inch system:
| Item | Estimated Cost |
|---|---|
| Stove Pipe (inside) | $40–$100 |
| Wall Thimble | $50–$120 |
| Class A Chimney Pipe (outside, 4–8 ft.) | $250–$800 |
| Chimney Cap | $30–$80 |
| Sealant, Screws, Misc. | $30–$60 |
| Labor (if hired) | $400–$1,200 |
| Total (DIY) | $400–$1,200 |
| Total (Pro Install) | $800–$2,300 |
Prices vary by brand, pipe length, and your location. Doing the work yourself saves money but takes more time and effort.
Troubleshooting Common Problems
Even with careful planning, problems can happen. Here’s how to handle the most common issues:
Smoke Leaks Inside
- Check that all pipe joints are tight and sealed.
- Make sure the crimped ends point toward the stove.
- Clean the pipe; blockages cause smoke to back up.
Poor Draft
- The pipe may be too short or have too many bends.
- Make sure the chimney cap is clear of debris.
- Wind-resistant caps can help in windy areas.
Water Leaks
- Check the seal around the wall thimble and outside pipe.
- Reapply high-temp sealant as needed.
- Look for cracks in the chimney pipe.
Rust Or Corrosion
- Use only stainless steel pipes outdoors.
- Inspect pipes each year, replace rusty sections.
- Paint exterior pipes with high-temp paint if needed.
Credit: allfuelhst.com
When To Call A Professional
Some jobs are best left to the pros. Call a certified chimney installer if:
- You are not sure about building codes or permits.
- Your wall is made of brick, stone, or other hard materials.
- The pipe needs to go through more than one wall or story.
- You see signs of old fire damage or water leaks in your wall.
- Your insurance requires a professional installation.
Professional installers have special tools and experience. They can also help with inspections and paperwork.
Stove Pipe Brands And Where To Buy
Not all brands are equal. Here are some top choices in the US:
- DuraVent: Known for high-quality, easy-to-assemble pipes.
- Selkirk: Offers both double-wall and Class A systems.
- SuperVent: Good for DIYers, clear instructions.
- Metal-Fab: Used by many professionals.
Buy from hardware stores, stove shops, or online retailers. Never buy used or damaged pipe sections.

Credit: www.youtube.com
Regulations And Insurance
Always check with your insurance company before starting. Many policies have rules about wood stoves and pipes. They may require:
- An inspection after installation.
- Use of UL-listed parts.
- Proof of a building permit.
Failing to follow these rules can void your coverage in case of a fire.
For more details on codes and standards, you can visit the National Fire Protection Association (NFPA) website.
Practical Tips For A Professional Finish
- Paint the inside stove pipe with high-temp black paint to prevent rust and match your stove.
- Use wall trim plates to cover the edges of the wall thimble for a clean look.
- If you ever move the stove, patch the old hole with fire-resistant material.
- Take clear photos of each step for your records or inspections.
Frequently Asked Questions
How Close Can A Stove Pipe Be To A Wall?
For a single-wall pipe, you need at least 18 inches of clearance. With double-wall or Class A chimney pipe, you can usually go as close as 2 to 6 inches, but always follow the manufacturer’s instructions and local codes for safety.
Can I Use Regular Metal Pipe Or Dryer Vent As A Stove Pipe?
No, never use regular sheet metal or dryer vent pipe. Only use UL-listed stove pipe and chimney pipe designed for high temperatures. Other pipes can melt or catch fire.
Do I Need A Permit To Install A Stove Pipe Through A Wall?
In most places, yes. Building permits and inspections are required for any wood stove or chimney installation. This keeps you safe and ensures your insurance will cover you.
How Often Should I Clean My Stove Pipe?
Clean it at least once per year, or more often if you use your stove daily. Regular cleaning prevents creosote buildup and reduces the risk of chimney fires.
What Is A Wall Thimble And Why Is It Necessary?
A wall thimble is a metal box that lines the hole where the pipe passes through the wall. It keeps heat away from wood, insulation, or other wall materials, preventing fires and making the installation safe and legal.
Running a stove pipe through a wall may seem complex, but with careful planning and the right materials, you can do it safely and efficiently. Always respect local codes, never cut corners, and remember that a little extra care today can prevent big problems tomorrow.
With these steps, your wood stove will keep your home warm and safe for years to come.