Every kitchen has its little secrets. For many people, foil and plastic wrap are part of those secrets—hidden away in crowded drawers, lost in a cupboard, or falling out of torn boxes. When you need to wrap leftovers quickly or cover a baking sheet, you don’t want to waste time searching for the right roll. But with the right organization, these kitchen helpers can always be in the right spot, ready to use. Organizing foil and plastic wrap may seem simple, but doing it well can save you time, make your kitchen safer, and help reduce clutter. Let’s take a deep look into how to organize foil and plastic wrap, with clear steps, smart products, and tips that most people overlook.
Why Organizing Foil And Plastic Wrap Matters
Many people don’t realize how much time and effort they waste because of poorly organized kitchen supplies. If you’ve ever knocked over a roll of wrap or struggled with a broken box, you know how frustrating it can be. Proper organization helps you:
- Save time: Everything is easy to find and use.
- Reduce waste: Wraps stay neat, so you use the right amount every time.
- Avoid accidents: Sharp cutter edges stay out of the way.
- Keep your kitchen tidy: Less mess means less stress.
In fact, a study by the National Soap and Detergent Association found that getting rid of clutter can eliminate up to 40% of housework in the average home. That’s a powerful reason to get organized.
Understanding Your Storage Space
Before buying any organizers or starting to sort, look at your kitchen storage. Every kitchen is different. Some have deep drawers, others have tall cabinets or open shelves. Measure the space where you want to keep foil and plastic wrap.
Think about these questions:
- Do you want them close to your prep area?
- Do you need them near your microwave or oven?
- Are you limited on drawer or cabinet space?
Choosing the right spot is the first step to success. For many people, the best location is near where they use wraps the most, such as next to the refrigerator or on a kitchen island.
Popular Organization Methods
There are many ways to organize foil and plastic wrap. Each method has pros and cons. Let’s look at the most common options.
1. Drawer Storage
Using a kitchen drawer is one of the most popular ways to keep wraps organized. It keeps them out of sight, but always within reach.
How to set it up:
- Choose a drawer close to your prep area.
- Use drawer dividers or bins to separate foil, plastic wrap, parchment paper, and wax paper.
- Lay the rolls flat or stand them upright if the drawer is deep.
Drawer storage works well if you have enough space, but rolls can slide around if not held in place. Adding a non-slip liner can help.
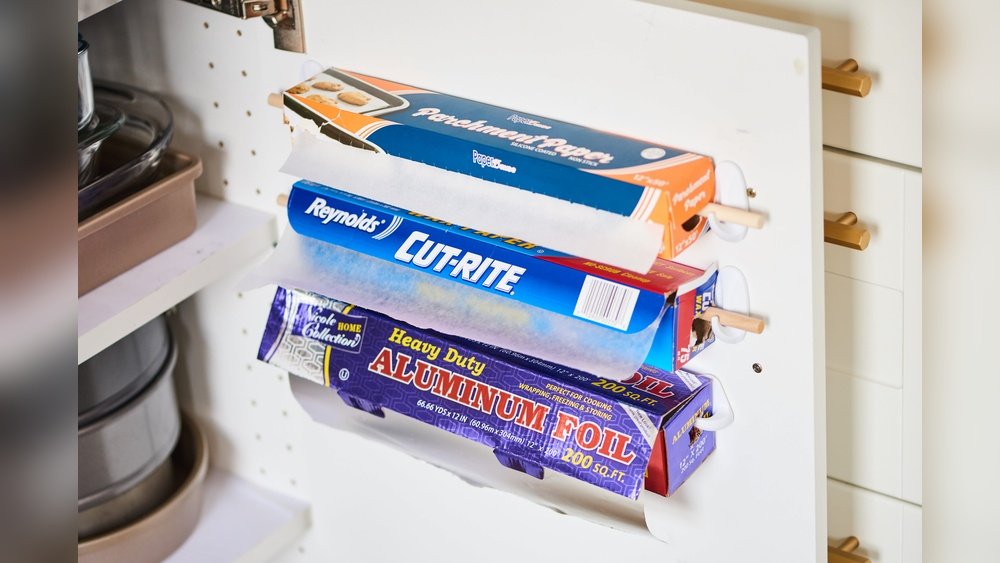
2. Mounted Dispensers
A mounted dispenser attaches to your wall, inside a cabinet door, or under a shelf. These holders have built-in cutters and space for two or three rolls.
Pros:
- Saves counter and drawer space.
- Easy to pull out and cut the wrap.
- Keeps sharp edges away from children.
Cons:
- Needs installation.
- May not fit very large or odd-sized rolls.
Some high-end dispensers look stylish and even match stainless steel appliances.
3. Vertical Organizers
If your kitchen is short on horizontal space, a vertical organizer can help. These stand upright on counters or inside cabinets.
Tips:
- Choose a model that grips the rolls, so they don’t tip over.
- Place it near your food prep area for convenience.
4. Over-the-door Racks
These racks hang over your pantry or cabinet door. They use space that often goes to waste.
What to look for:
- Make sure the rack is strong enough for heavy foil rolls.
- Check that the door still closes fully.
Many people use over-the-door racks for cleaning supplies, but they work just as well for wraps.
5. Pull-out Cabinet Organizers
A pull-out organizer is a special rack that slides out of your cabinet, making it easy to see and grab each roll.
Benefits:
- Maximizes deep cabinet space.
- No need to reach into the back of the cabinet.
These organizers are often part of custom kitchens, but you can also buy add-on models.
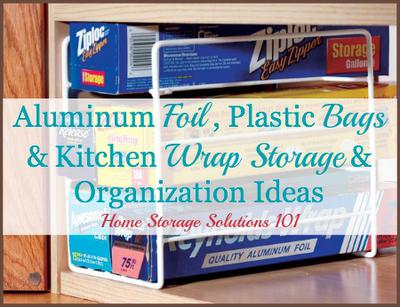
6. Bins And Baskets
Simple bins or baskets can hold multiple rolls together. Clear bins let you see what you have at a glance.
Best practices:
- Label each bin (foil, plastic wrap, parchment).
- Use bins with handles to pull out easily.
This method works well for people who want a low-cost and flexible solution.
7. Lazy Susans
A Lazy Susan is a round tray that spins. Place several wrap rolls on it and turn to find the one you need.
Useful for:
- Deep cabinets or pantry shelves.
- Organizing extra rolls and backup boxes.
Make sure the rolls don’t fall off when spinning. Choose a model with a raised edge for safety.
Comparison Of Popular Organization Tools
Let’s compare some of the most common tools for organizing foil and plastic wrap:
| Method | Space Needed | Cost | Best For | Limitations |
|---|---|---|---|---|
| Drawer Dividers | Medium | Low | Standard drawers | Rolls can slide |
| Mounted Dispenser | Low/Wall | Medium | Quick access | Needs installation |
| Vertical Organizer | Small/Vertical | Low | Limited counter space | Stability issues |
| Over-the-Door Rack | None (door) | Low | Extra storage | May block door closure |
| Pull-Out Organizer | Cabinet | High | Deep cabinets | Installation required |
| Bins/Baskets | Any | Low | Flexible placement | Less tidy |
| Lazy Susan | Round shelf | Low | Deep shelves | Can tip over |
Steps To Organize Foil And Plastic Wrap
Getting organized is not just about buying a product. The process works best when you follow a few clear steps.
Step 1: Gather All Wraps
Start by pulling out every roll of foil, plastic wrap, parchment paper, and wax paper you own. You might be surprised by how many you find, especially if you have extras stored in different places.
Tip: Group similar items together. For example, put all foil rolls in one pile and all plastic wrap in another.
Step 2: Check For Damage Or Expiry
Wraps can get torn, dirty, or lose their cutter edge. Some even have expiration dates.
- Throw away any rolls with broken boxes or missing cutters.
- Get rid of wraps that look old, yellowed, or dusty.
- Keep only what you can use in the next year.
This keeps your supplies safe and easy to use.
Step 3: Choose Your Storage Method
Based on your kitchen space and how often you use each type of wrap, choose the best method from the options above. Don’t be afraid to mix methods. For example, you might use a drawer for everyday wraps and a bin for backups.
Non-obvious insight: Many people forget to measure the size of their largest roll. Always check the width and length, especially for commercial-size foil or specialty wraps.
Step 4: Clean The Area
Wipe out your drawer, cabinet, or shelf before putting anything back. Dust and crumbs can collect in kitchen storage areas, so a quick clean helps keep things fresh.
Step 5: Install Organizers
If you’re using a mounted dispenser, over-the-door rack, or pull-out organizer, install it according to the instructions. Use a level to keep it straight, and check that the location is easy to reach.
Extra tip: Put heavier rolls on the bottom or at the back to avoid tipping or bending.
Step 6: Load And Label
Put each roll in its new spot. If you’re using bins or baskets, label them clearly. Some people even use color-coded labels for faster access (blue for foil, green for plastic wrap, etc. ).
Example: “FOIL – 12 INCH,” “PLASTIC WRAP – MICROWAVE SAFE.”
Step 7: Test For Ease Of Use
Try pulling out a piece of foil or plastic wrap. Make sure the roll turns smoothly, the cutter works, and nothing gets stuck. If anything feels awkward, adjust the setup.
Common mistake: Placing wraps too high or too far back. You should be able to reach them with one hand, without moving other items.
Step 8: Store Extras Elsewhere
If you buy in bulk, keep extra rolls in a separate, less-used spot, like a pantry or utility closet. This keeps your main area uncluttered.
Maximizing Small Kitchen Spaces
Not everyone has a big kitchen with extra drawers and cabinets. If your space is tight, get creative.
- Use magnetic strips on the side of the fridge for foil or wrap boxes with metal edges.
- Attach a hanging organizer under a shelf.
- Keep only one roll of each type in the main area; store backups elsewhere.
- Use the inside of cabinet doors for slim racks.
Data point: The average American kitchen is about 161 square feet, but apartments and condos are often much smaller. Smart storage can make even a tiny space work better.
Advanced Organization: Custom Solutions
If you want a high-end look or have special needs, consider custom options.
- Built-in drawer inserts: Many new kitchens have fitted organizers designed for wraps.
- Pull-down racks: These can be hidden under upper cabinets and pulled down when needed.
- DIY options: Use file holders, magazine racks, or even PVC pipes to create custom storage.
Non-obvious insight: Custom solutions let you combine wrap storage with other kitchen tools, like baggies or baking sheets, for a truly streamlined space.
Common Mistakes And How To Avoid Them
Even with good intentions, it’s easy to make mistakes when organizing foil and plastic wrap.
- Ignoring roll size: Some organizers can’t fit wide or jumbo rolls.
- Placing wraps too far from the prep area: This adds extra steps every time you cook.
- Not securing rolls: Loose rolls can unspool and make a mess.
- Forgetting backup storage: Extra rolls can pile up if not separated from daily use.
- Overfilling organizers: Crowded spaces make it hard to grab the right wrap.
Learn from these mistakes to keep your system working well.
Eco-friendly Organization Tips
With more people thinking about the environment, it’s smart to organize with less waste in mind.
- Store reusable wraps (like beeswax wraps or silicone covers) alongside foil and plastic wrap.
- Keep wraps in their original boxes to reduce plastic waste.
- Use up old rolls before buying new ones.
- Recycle boxes when empty.
If you want to learn more about eco-friendly food storage, check resources like the EPA’s recycling page.
Organizing Wraps For Special Needs
Some kitchens have unique needs, such as for people with arthritis or vision problems. Here are some ideas:
- Choose a dispenser with a large, easy-to-pull handle.
- Use organizers with raised, tactile labels.
- Avoid sharp metal cutters; look for plastic safety cutters.
For families with children, keep sharp wraps up high or in a locked cabinet.
Organizing For Bulk Buyers
If you shop at warehouse stores and buy jumbo rolls, you’ll need a different approach.
- Use heavy-duty racks that can hold big, heavy boxes.
- Store backup rolls in a pantry or basement.
- Only keep one active roll in your main kitchen area.
Insider tip: Cut jumbo rolls into smaller sizes with a sharp saw if you don’t need the full length in your main kitchen.
How Often Should You Reorganize?
Organization is not a one-time task. Check your wrap storage every few months:
- Toss out empty boxes.
- Rotate in backup rolls.
- Wipe down bins and racks.
Most people find that a five-minute tidy-up every season keeps things under control.

Credit: youcopia.com
Smart Storage For Different Types Of Wraps
Not all wraps are the same. You may need to store:
- Aluminum foil
- Plastic wrap
- Parchment paper
- Wax paper
- Freezer paper
- Reusable silicone wraps
Some wraps are bulkier or come in odd shapes. Keep the most-used types in the easiest-to-reach spot, and store specialty wraps elsewhere.
Example:
If you bake often, keep parchment paper near your baking sheets. If you rarely use wax paper, store it higher up or in the back.
How To Store Wraps Safely
Safety matters, especially with metal cutters on foil and plastic wrap boxes.
- Store boxes with cutters facing the back or bottom of a drawer.
- Choose organizers with covered blades.
- Teach children not to play with wrap boxes.
Fact: Each year, thousands of people visit the emergency room for kitchen-related cuts. Safe storage reduces the risk.
How To Organize Wraps For Meal Prep Success
If you do a lot of meal prep, your wraps get heavy use. Here’s how to set up for speed:
- Keep foil, plastic wrap, and baggies in the same area.
- Use a mounted dispenser for one-handed use.
- Label each wrap for its main use (“BAKING,” “FREEZING,” etc. ).
- Set up a prep zone with wraps, scissors, and markers together.
This saves time when portioning meals or packing lunches.
Maintenance And Cleaning Tips
Organizers work best when kept clean and in good shape.
- Wipe down dispensers and bins monthly.
- Check for spilled food, crumbs, or sticky spots.
- Tighten screws or mounts if anything gets loose.
Clean organizers help keep wraps free from dust and pests.
Credit: www.home-storage-solutions-101.com
Cost Comparison: Budget Vs. Premium Solutions
Let’s look at the difference between basic and advanced organization options:
| Solution | Average Cost | Durability | Ease of Installation |
|---|---|---|---|
| Basic bins/baskets | $5–$15 | Medium | Very easy |
| Drawer dividers | $10–$20 | Medium | Easy |
| Mounted dispenser | $20–$40 | High | Medium |
| Custom pull-out organizer | $50–$150 | Very high | Professional install |
Real-life Examples And Success Stories
Sarah, a mother of three in Chicago, used to keep foil and plastic wrap in a cluttered drawer. She switched to a mounted dispenser next to her sink and cut her lunch-packing time in half. John, a bachelor in a small apartment, uses a simple vertical organizer inside his cabinet and always knows when he’s running low.
Both say that clear organization has made daily life easier and less stressful.
When To Upgrade Your Organization System
If you notice any of these signs, it may be time to upgrade:
- Rolls get jammed or lost often.
- Boxes fall apart or the cutter is dull.
- You buy extras because you can’t find what you have.
- The area looks messy, even when tidy.
A small investment in a new organizer can save hours of frustration.
Final Review Checklist
Before you finish, ask:
- Can you grab foil or plastic wrap in under 10 seconds?
- Are all wraps in good condition, with cutters that work?
- Is the area clean, and free from extra clutter?
- Are backups stored separately?
If you can answer “yes” to these questions, you have a system that works.

Credit: youcopia.com
Frequently Asked Questions
How Do I Keep Foil And Plastic Wrap From Unrolling In Storage?
Store rolls in a snug organizer or use a rubber band around the roll. Avoid tossing rolls loosely in drawers, which can cause unrolling.
What Is The Best Way To Cut Plastic Wrap Cleanly?
Use a dispenser with a built-in cutter for the cleanest cut. If you must use the box edge, pull the wrap tight before cutting. Keep the cutter blade free from sticky residue.
Can I Store Foil And Plastic Wrap In The Refrigerator?
It’s not recommended, as moisture can damage the box and cutter. Store wraps in a cool, dry kitchen area for best results.
Are There Organizers For Commercial-size Rolls?
Yes, look for heavy-duty racks or dispensers designed for restaurant or catering use. Measure your rolls before buying to ensure a good fit.
How Can I Organize Wraps In A Rental Kitchen Without Making Holes?
Choose organizers that don’t need screws, such as over-the-door racks, bins, or non-slip drawer dividers. Magnetic holders can also work on metal surfaces.
When you organize foil and plastic wrap well, you make your kitchen more efficient, safe, and enjoyable to use. With the right plan and a few smart products, you’ll never struggle to find the right wrap again. Organization is a small change that brings big results—start today and see the difference every time you cook.