A well-organized pantry makes cooking easier, saves money, and helps reduce stress. But when your shelves are made of wire, keeping things neat and tidy can feel like a puzzle. Items tip, small packets fall through the gaps, and it’s hard to find what you need.
The good news? With the right strategies, you can transform your wire-shelved pantry into a space that works for you, not against you.
This guide will walk you through how to organize a pantry with wire shelves from start to finish. You’ll learn practical solutions, clever tips, and expert techniques—whether your pantry is a tiny closet or a spacious walk-in. We’ll cover everything: planning, storage products, food safety, and even how to keep it organized long term. If you’ve struggled with wire shelves before, you’ll find answers here that really work.
Why Wire Shelves Are Tricky (but Useful)
Wire shelves are popular because they’re strong, affordable, and let air flow around your food. This air flow helps prevent mold and keeps food fresh longer. But wire shelves have big gaps that make it hard to store bottles, jars, and small items.
Things wobble, tip, or fall right through. Plus, crumbs and spills drop down to lower shelves, making a mess.
Despite these challenges, wire shelves can be made just as efficient as solid shelves—if you use the right tools and methods. The following sections show you how to turn those wire shelves into your pantry’s best feature.
Step 1: Prepare For Pantry Organization
Before you buy bins or move food, set yourself up for success. Preparation is where most people skip ahead and regret it later.
1. Empty Your Pantry Completely
Take every single item out. This might feel like a big job, but it’s key. You need to see what you have, clean properly, and start fresh.
2. Sort and Check Expiration Dates
As you empty shelves, group similar items and check dates. Toss out anything expired or stale. If you find duplicates, consider combining boxes or bags if possible.
3. Deep Clean the Wire Shelves
Vacuum crumbs and debris. Wipe each shelf with a damp cloth and mild cleaner. Pay attention to sticky spots. Wire shelves can be dusty, so this step makes your pantry safer for food.
4. Measure Your Space
Use a tape measure to note the height, width, and depth of your shelves. Write it down. These numbers will help you buy the right bins, liners, or organizers—no guessing in the store.
Extra Tip: Take a photo of your empty pantry. You can use this later to plan your layout.
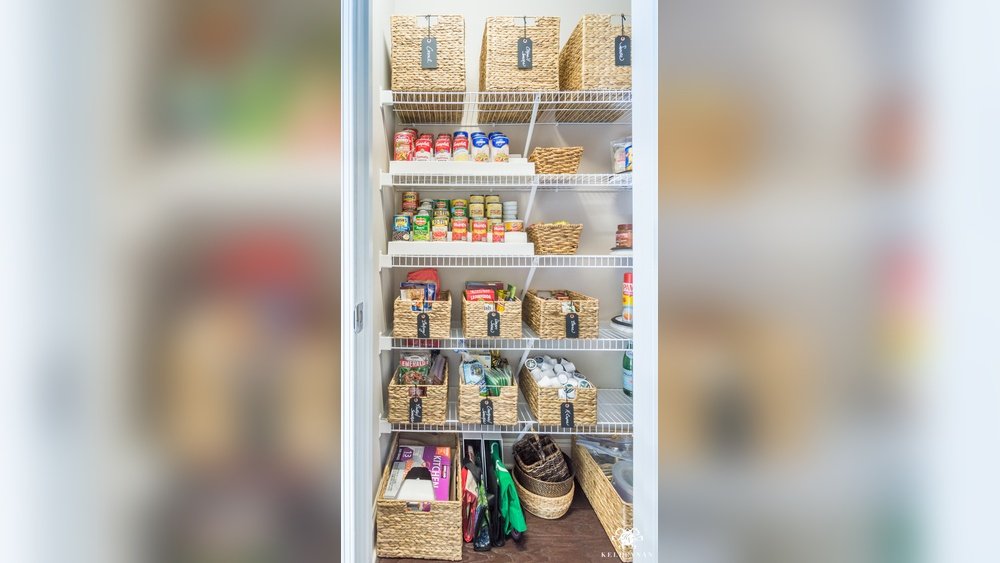
Credit: kelleynan.com
Step 2: Fix Common Wire Shelf Problems
To get the most out of your wire shelves, deal with their main problems head-on. The solutions below will make your pantry safer and easier to use.
Add Shelf Liners
Wire shelves have gaps that cause problems. The simplest fix: shelf liners. These flat covers keep small items from tipping or falling. There are several types:
- Plastic shelf liners: Easy to cut and wipe clean.
- Acrylic panels: Stronger and more rigid.
- DIY options: Use thin cutting boards, placemats, or even cardboard for a temporary fix.
Liners also stop crumbs from dropping down. Measure each shelf before buying or cutting. Secure liners with double-sided tape or zip ties if they move.
Use Storage Bins And Baskets
Bins turn tricky wire shelves into easy-to-use drawers. They hold things together and make it easy to pull out what you need. Look for:
- Clear plastic bins for visibility
- Handled baskets for easy access
- Stackable bins to maximize vertical space
Bins are especially good for snacks, baking supplies, or packets that fall over easily.
Add Riser Shelves And Turntables
Small items like spices or cans can disappear behind taller items. Riser shelves (also called can organizers or step shelves) let you see everything at once. For bottles or jars, turntables (lazy Susans) are perfect—especially in corners.
Secure Shelves To Prevent Movement
Sometimes, wire shelves wiggle or sag under weight. If you notice this, check the brackets and wall mounts. Tighten any loose screws. For extra support, add shelf clips or braces.
Step 3: Plan Your Pantry Zones
Once your shelves are ready, it’s time to plan where everything will go. Smart organization isn’t about perfection—it’s about making things easy to find and use.
1. Create Zones for Food Types
Group similar items together. Examples of common zones:
- Breakfast foods (cereal, oatmeal)
- Baking supplies (flour, sugar, baking soda)
- Snacks (chips, granola bars)
- Canned goods
- Grains and pasta
- Spices and condiments
2. Place Most-Used Items at Eye Level
Store what you use daily—like rice or snacks—where you can reach without effort. Reserve top shelves for extras or rarely used items.
3. Use Lower Shelves for Heavy Items
Keep heavy things like canned goods or large bottles low. This prevents accidents and makes them easier to grab.
4. Kids’ Zone
If you have children, create a low shelf with healthy snacks they can reach. This saves time and keeps them from climbing.
5. Special Diet or Allergy Zone
Separate foods for allergies or special diets in a clear, labeled bin. This keeps everyone safe.
Non-Obvious Insight:
Most people forget to leave some “open space. ” Always leave a little room on each shelf for new groceries. This prevents clutter from building up.
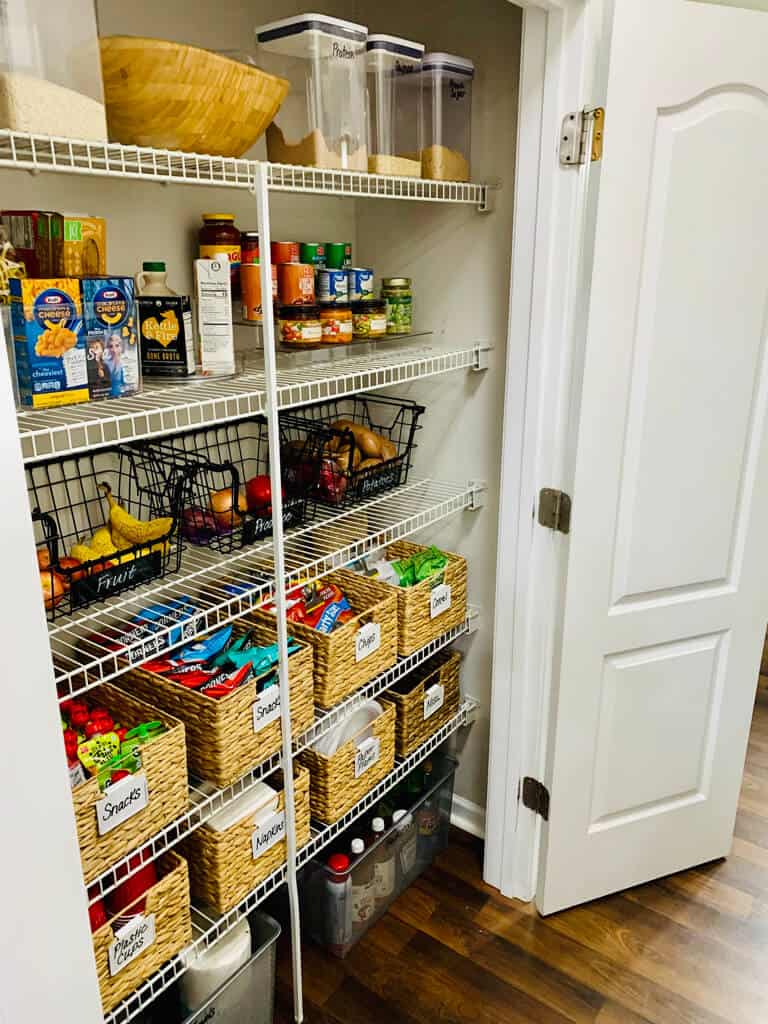
Credit: organizedmarie.com
Step 4: Choose The Right Storage Products
Not all bins and containers work well with wire shelves. Here’s how to pick the best ones.
Best Types Of Bins For Wire Shelves
Look for bins that are sturdy, smooth on the bottom, and fit your shelf depth. Popular options:
- Acrylic bins: Great visibility, easy to clean.
- Wire baskets: Good for produce, allow airflow.
- Stackable plastic bins: Double your space vertically.
- Soft-sided bins: For lightweight or odd-shaped items.
Avoid bins with legs or wheels—they can tip or catch on the wires.
Airtight Food Containers
For dry goods like flour, rice, or pasta, use airtight containers. These stop bugs, keep food fresh, and look neat. Choose containers with wide mouths for easy scooping.
Label Everything
Labels help everyone know where things go—no more guessing! Use a label maker, stickers, or even masking tape. Write clearly and include expiration dates if possible.
Size And Quantity Guide
How many bins do you need? It depends on your pantry size and shopping habits. Here’s a quick comparison:
| Pantry Size | Suggested Number of Bins | Best Bin Size (L x W x H) |
|---|---|---|
| Small (2-3 shelves) | 4-6 | 12″ x 8″ x 6″ |
| Medium (4-6 shelves) | 8-12 | 14″ x 10″ x 8″ |
| Large (walk-in) | 15-20 | Varied (mix sizes) |
Non-Obvious Insight:
Most people buy bins that are too big. It’s better to have more small bins than a few large ones—small bins fit wire shelves better and are easier to move.
Step 5: Store Food Safely
Wire shelves have good airflow, but food safety is more than that. Here’s how to keep your food fresh and safe:
1. Don’t Store Food Directly on the Wires
Packages can get ripped or punctured. Always use liners, bins, or baskets.
2. Keep Dry Food in Airtight Containers
This stops pantry pests like moths and weevils, which can squeeze through tiny gaps in boxes or bags.
3. Store Opened Packages in Bins
Packets of nuts, chips, or dried fruit can spill or go stale. Store them in sealed bins or clip bags tightly.
4. Watch Temperature and Humidity
Pantries should be cool (50–70°F) and dry. Avoid storing food near heaters or in damp basements.
5. First In, First Out (FIFO)
Always move older items to the front when you buy new groceries. This way, nothing gets forgotten and wasted.
6. Avoid Glass Jars on Top Shelves
Wire shelves aren’t always stable. Keep glass containers on lower, solid sections to prevent breakage.
Step 6: Organize Special Pantry Items
Every pantry has some tricky items. Here’s how to handle the toughest ones:
Spices
Spices get lost easily on wire shelves. Use a dedicated spice rack (tiered or pull-out) that fits your shelf depth. Or use a turntable for jars.
Canned Goods
Cans are heavy and roll easily. Use can risers or stackable organizers to keep labels visible. Never stack cans too high—they can fall and cause injury.
Packets And Pouches
Taco seasoning, soup mixes, or gravy packets get lost or slip through wires. Store them upright in a bin, or use a magazine holder as a DIY solution.
Bottles And Jars
Bottles tip easily on wire shelves. Store oil, vinegar, or sauces in a bin or on a turntable. This keeps spills contained.
Bread And Produce
Some wire shelves come with attached baskets underneath. If not, use a shallow basket for bread or produce. Avoid plastic bags—they trap moisture and cause mold.
Baking Sheets And Trays
Tall, thin items slide through wires. Use a vertical file organizer to keep them upright and easy to grab.
Practical Example:
If you buy snacks in bulk, open the big box and store individual packs in a bin at kid level. This keeps the shelf clear and saves time when packing lunches.
Step 7: Make The Most Of Vertical Space
Wire shelves are often spaced far apart. Don’t waste that “air space”—use it smartly.
1. Stackable Bins
Choose bins that nest or stack safely. Place lighter items on top to avoid tipping.
2. Hanging Organizers
Attach hooks or baskets to the underside of shelves for small items (like spice packets or kitchen tools).
3. Door Racks
If your pantry has a door, add an over-the-door rack for spices, foil, or wraps.
4. Under-Shelf Baskets
Slide-on baskets make use of space below each shelf. Great for snacks or bread.
5. Shelf Dividers
Wire shelf dividers keep bins or stacks from sliding sideways.
Here’s a quick visual on how these products compare:
| Product | Best For | Wire Shelf Compatibility |
|---|---|---|
| Stackable bins | Snacks, dry goods | Excellent |
| Under-shelf baskets | Bread, packets | Good |
| Door racks | Spices, wraps | Varies |
| Shelf dividers | Keep bins in place | Excellent |
Extra Tip:
If you rent and can’t add permanent fixtures, focus on removable products like clip-on baskets or freestanding bins.
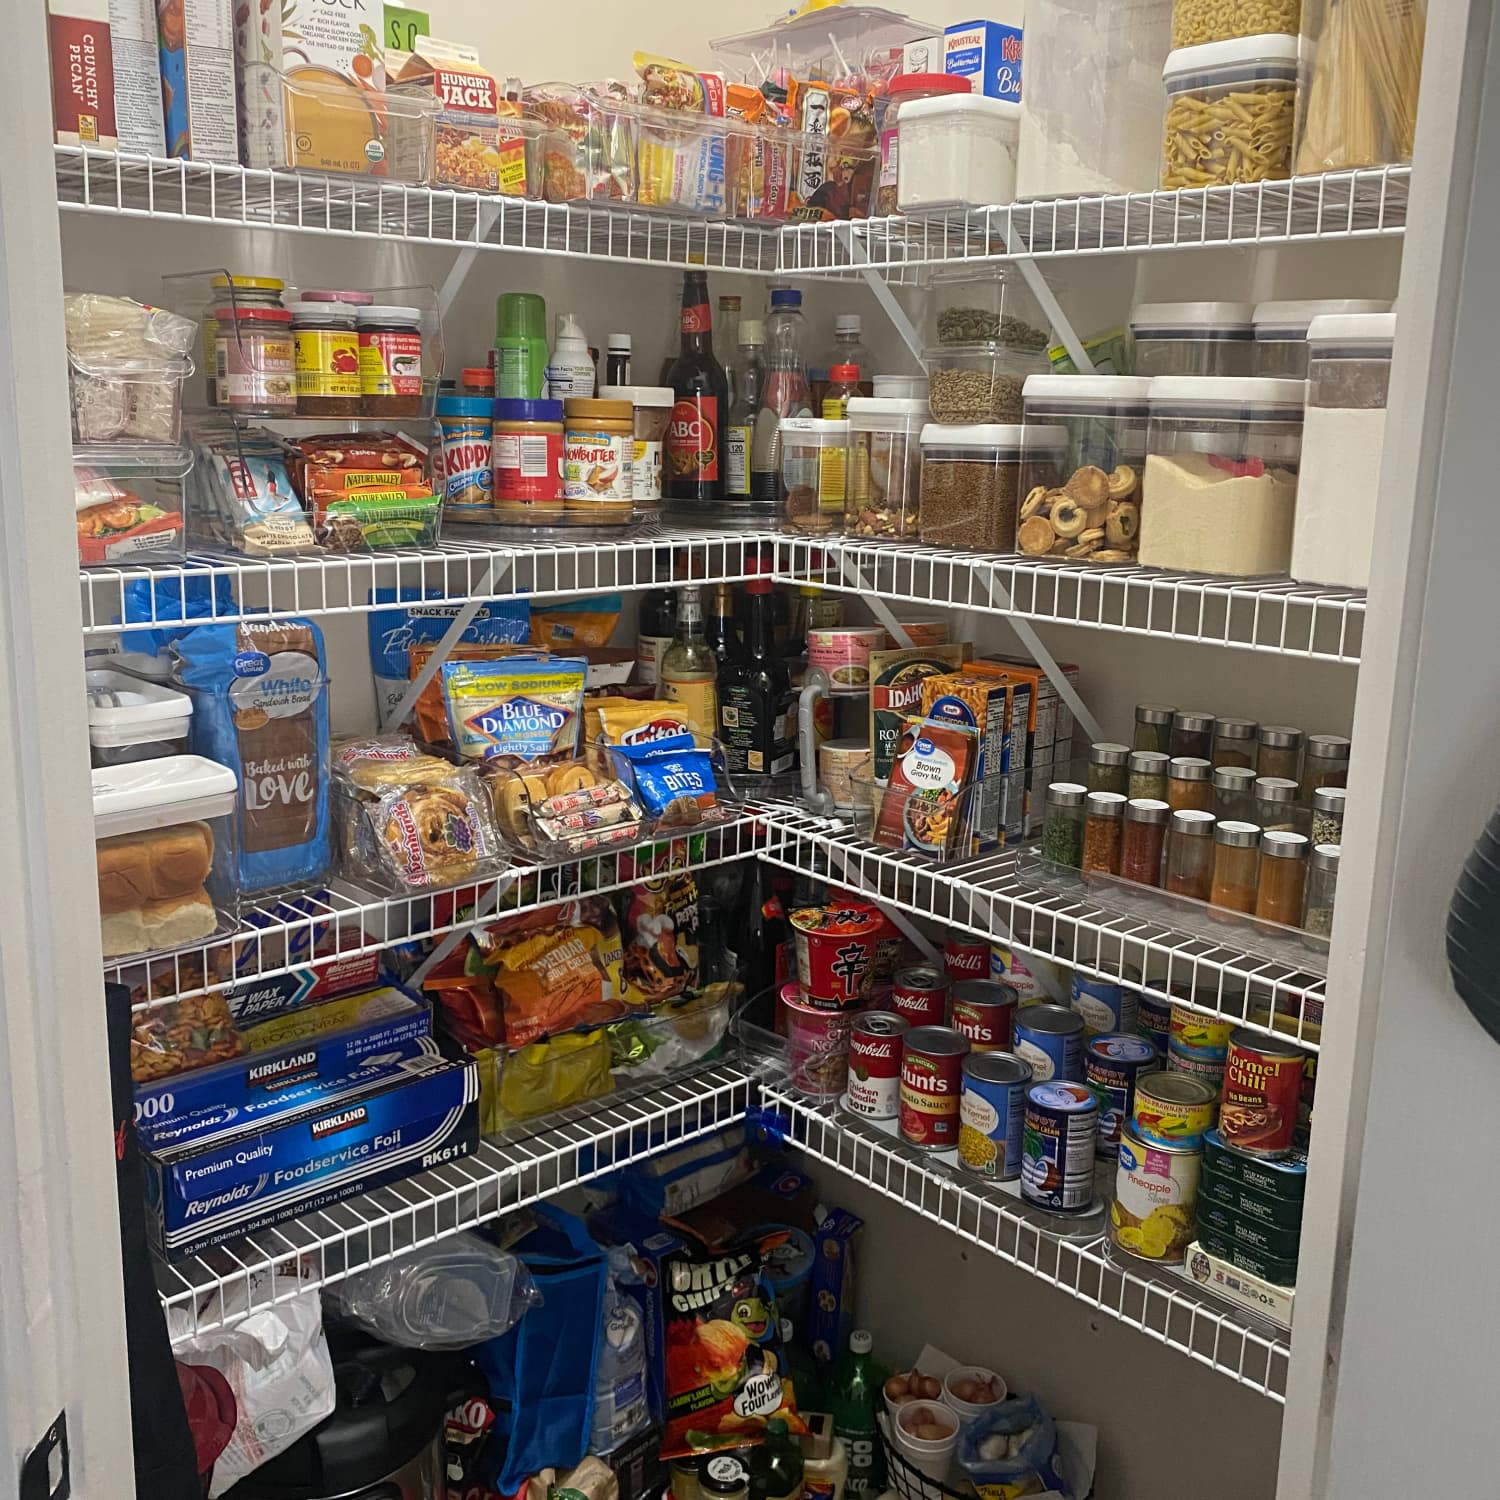
Credit: www.apartmenttherapy.com
Step 8: Keep Your Pantry Organized Long-term
Setting up your pantry is just the beginning. The real challenge is keeping it neat as weeks go by.
1. Set a Re-Stock Day
Choose one day a week to tidy up. Move old food to the front, wipe crumbs, and re-label bins as needed.
2. Teach Everyone the System
Show family or roommates where things go. Labels help, but habits matter more. If kids or partners don’t put things back, remind them gently.
3. Adjust as You Go
If you notice bins getting messy or zones not working, change it up. Organization is not “one and done”—it’s an ongoing process.
4. Track What You Use
If you keep buying and not using something, stop. A good pantry makes it easy to see what you actually eat.
5. Clean Up Spills Fast
Wire shelves let spills drip down, making a bigger mess. Keep wipes nearby for quick cleanup.
6. Seasonal Deep Cleans
Every 3–4 months, empty one shelf at a time. Check dates, clean, and reorganize. This keeps pests away and prevents waste.
Experience-Based Advice:
Most people overfill their pantry, which leads to chaos. It’s better to have a little empty space than shelves packed to the edge. This makes it easier to see what you have and prevents food from getting lost.
Step 9: Budget-friendly Tips
You don’t need to spend a fortune to organize your pantry with wire shelves. Here are some ideas for every budget:
1. Repurpose Containers
Old shoeboxes, baskets, or jars make great pantry organizers. Clean them well and label clearly.
2. Dollar Store Finds
Many dollar stores sell bins, baskets, and shelf liners for a fraction of big-box prices.
3. DIY Liners
Cut cardboard, poster board, or placemats to size. Not fancy, but very effective.
4. Wait for Sales
Many organizing products go on sale in January (after New Year’s resolutions) and August (back to school).
5. One Shelf at a Time
If money is tight, organize one shelf each month. You’ll see progress without stress.
Practical Example:
Use a magazine holder to store pasta or snack bars vertically. It’s cheap, easy, and stops items from falling through the wires.
Step 10: Common Mistakes To Avoid
Even with the best intentions, it’s easy to make mistakes. Here’s what to watch for:
1. Skipping Shelf Liners
Without liners, small items will fall and make a mess.
2. Using Large Bins
Big bins get heavy and hard to move. They also block airflow, which can cause food to spoil faster.
3. Ignoring Labels
Without labels, items drift out of place and you forget what’s in each bin.
4. Overfilling Shelves
Too much food means you can’t see what you have. This leads to waste and clutter.
5. Neglecting Deep Shelves
Items get lost at the back. Use risers or bins to pull things forward.
6. Storing Food Directly on Wires
Packages can rip, and spills are harder to clean up.
7. Forgetting to Adjust
Your needs change. Don’t be afraid to swap bins, move zones, or try new products.
Straight-to-the-Point Insight:
Wire shelves work best when every item has a “home. ” If you can’t find a place for something, consider if you really need it.
Step 11: Special Considerations For Wire Shelf Pantries
Every pantry is a little different. Here are extra tips for some common situations:
Small Pantries
- Use every inch, including door racks and vertical stacking.
- Choose narrow bins and avoid overbuying.
- Store backup supplies elsewhere (like a closet).
Large Or Walk-in Pantries
- Divide shelves into clear zones by food type or meal (breakfast, dinner, baking).
- Use rolling carts for the middle of the room.
- Hang a whiteboard for shopping lists or meal planning.
High-humidity Areas
- Use wire for airflow, but check for rust.
- Place silica gel packs or baking soda to absorb moisture.
- Avoid storing flour or sugar in paper packages—move to airtight containers.
Rental Homes
- Use removable liners and organizers.
- Avoid permanent fixtures or drilling into shelves.
- Take a photo before making changes in case you need to return things to original condition.
External Resource:
For more ideas on pantry storage, check out The Container Store.
Frequently Asked Questions
How Do I Stop Small Items From Falling Through Wire Shelves?
The best fix is to use shelf liners—plastic, acrylic, or even thick paperboard. Liners cover the gaps and make a flat surface. For tiny packets, use bins or baskets to keep them together.
Can I Store Cans And Heavy Jars On Wire Shelves?
Yes, but make sure your shelves are properly installed and not overloaded. Place heavy items on lower shelves and use can risers or sturdy bins. Don’t stack cans too high or near the shelf edge.
What’s The Best Way To Organize Snacks In A Pantry With Wire Shelves?
Use clear plastic bins or handled baskets. Store snacks by type (chips, bars, dried fruit) and put the most-used items at eye level or within kids’ reach. Label each bin for easy access.
How Often Should I Clean And Reorganize My Pantry?
Do a quick tidy-up every week and a deeper clean every 3–4 months. Check expiration dates, wipe shelves, and adjust your system as needed to keep things efficient and safe.
Are There Any Products I Should Avoid With Wire Shelves?
Avoid organizers with thin legs or wheels, which can tip on wires. Also, skip very large bins that block airflow. Choose sturdy, flat-bottomed bins, baskets, and containers made for wire shelving.
A well-organized pantry doesn’t need to be perfect—it needs to work for you and your family. With these steps, your wire shelves can help you build a kitchen that’s tidy, efficient, and a pleasure to use every day.