Measuring for a new kitchen faucet may seem simple, but it’s a step many homeowners overlook until installation day. Choosing the wrong size can lead to leaks, awkward usage, or even a faucet that doesn’t fit at all. The right measurement brings not just peace of mind, but also better water flow, smoother cleaning, and a stylish kitchen look.
This guide takes you through the entire process—from understanding your current setup to avoiding common mistakes that first-time DIYers often make.
Many people think “all faucets are the same size,” but kitchen faucet sizes and styles vary widely. Knowing exactly what to measure, and how, makes shopping easier and ensures you pick a faucet that works perfectly with your sink, countertop, and kitchen habits.
By following the steps below, you’ll save time, avoid returns, and enjoy a kitchen upgrade that truly fits.
Why Accurate Measurement Matters
A kitchen faucet is used dozens of times every day, so even small measurement errors can cause big headaches. For example, a spout that’s too short won’t reach all corners of your sink, while one that’s too long may splash water everywhere.
Choosing the wrong faucet can also mean drilling new holes in expensive countertops, or worse, not being able to install the faucet at all.
Accurate measurement helps you:
- Ensure a proper fit for your sink and countertop.
- Avoid costly modifications.
- Choose a faucet style that matches your kitchen’s needs.
- Prevent leaks and water damage from poor connections.
Many first-time buyers overlook the mounting hole spacing or the height clearance under cabinets. These details are just as crucial as the look and finish of the faucet.
Tools Needed For Measuring
Before starting, gather the tools you’ll need. Most measurements are straightforward, but having the right tools helps you work faster and get accurate results.
- Measuring tape (flexible, at least 6 feet)
- Ruler (for small or tight spaces)
- Flashlight (to see under the sink)
- Notepad and pen (to record numbers)
- Smartphone or camera (optional, for taking photos)
- Level (optional, to check alignment)
A soft measuring tape works best for curved or hard-to-reach areas. For deep cabinets or awkward corners, a flashlight helps you spot pipes and obstructions.
Understanding Your Sink And Faucet Types
Before measuring, it’s important to know what kind of sink and faucet you have. Different sinks and faucets need different measurements.
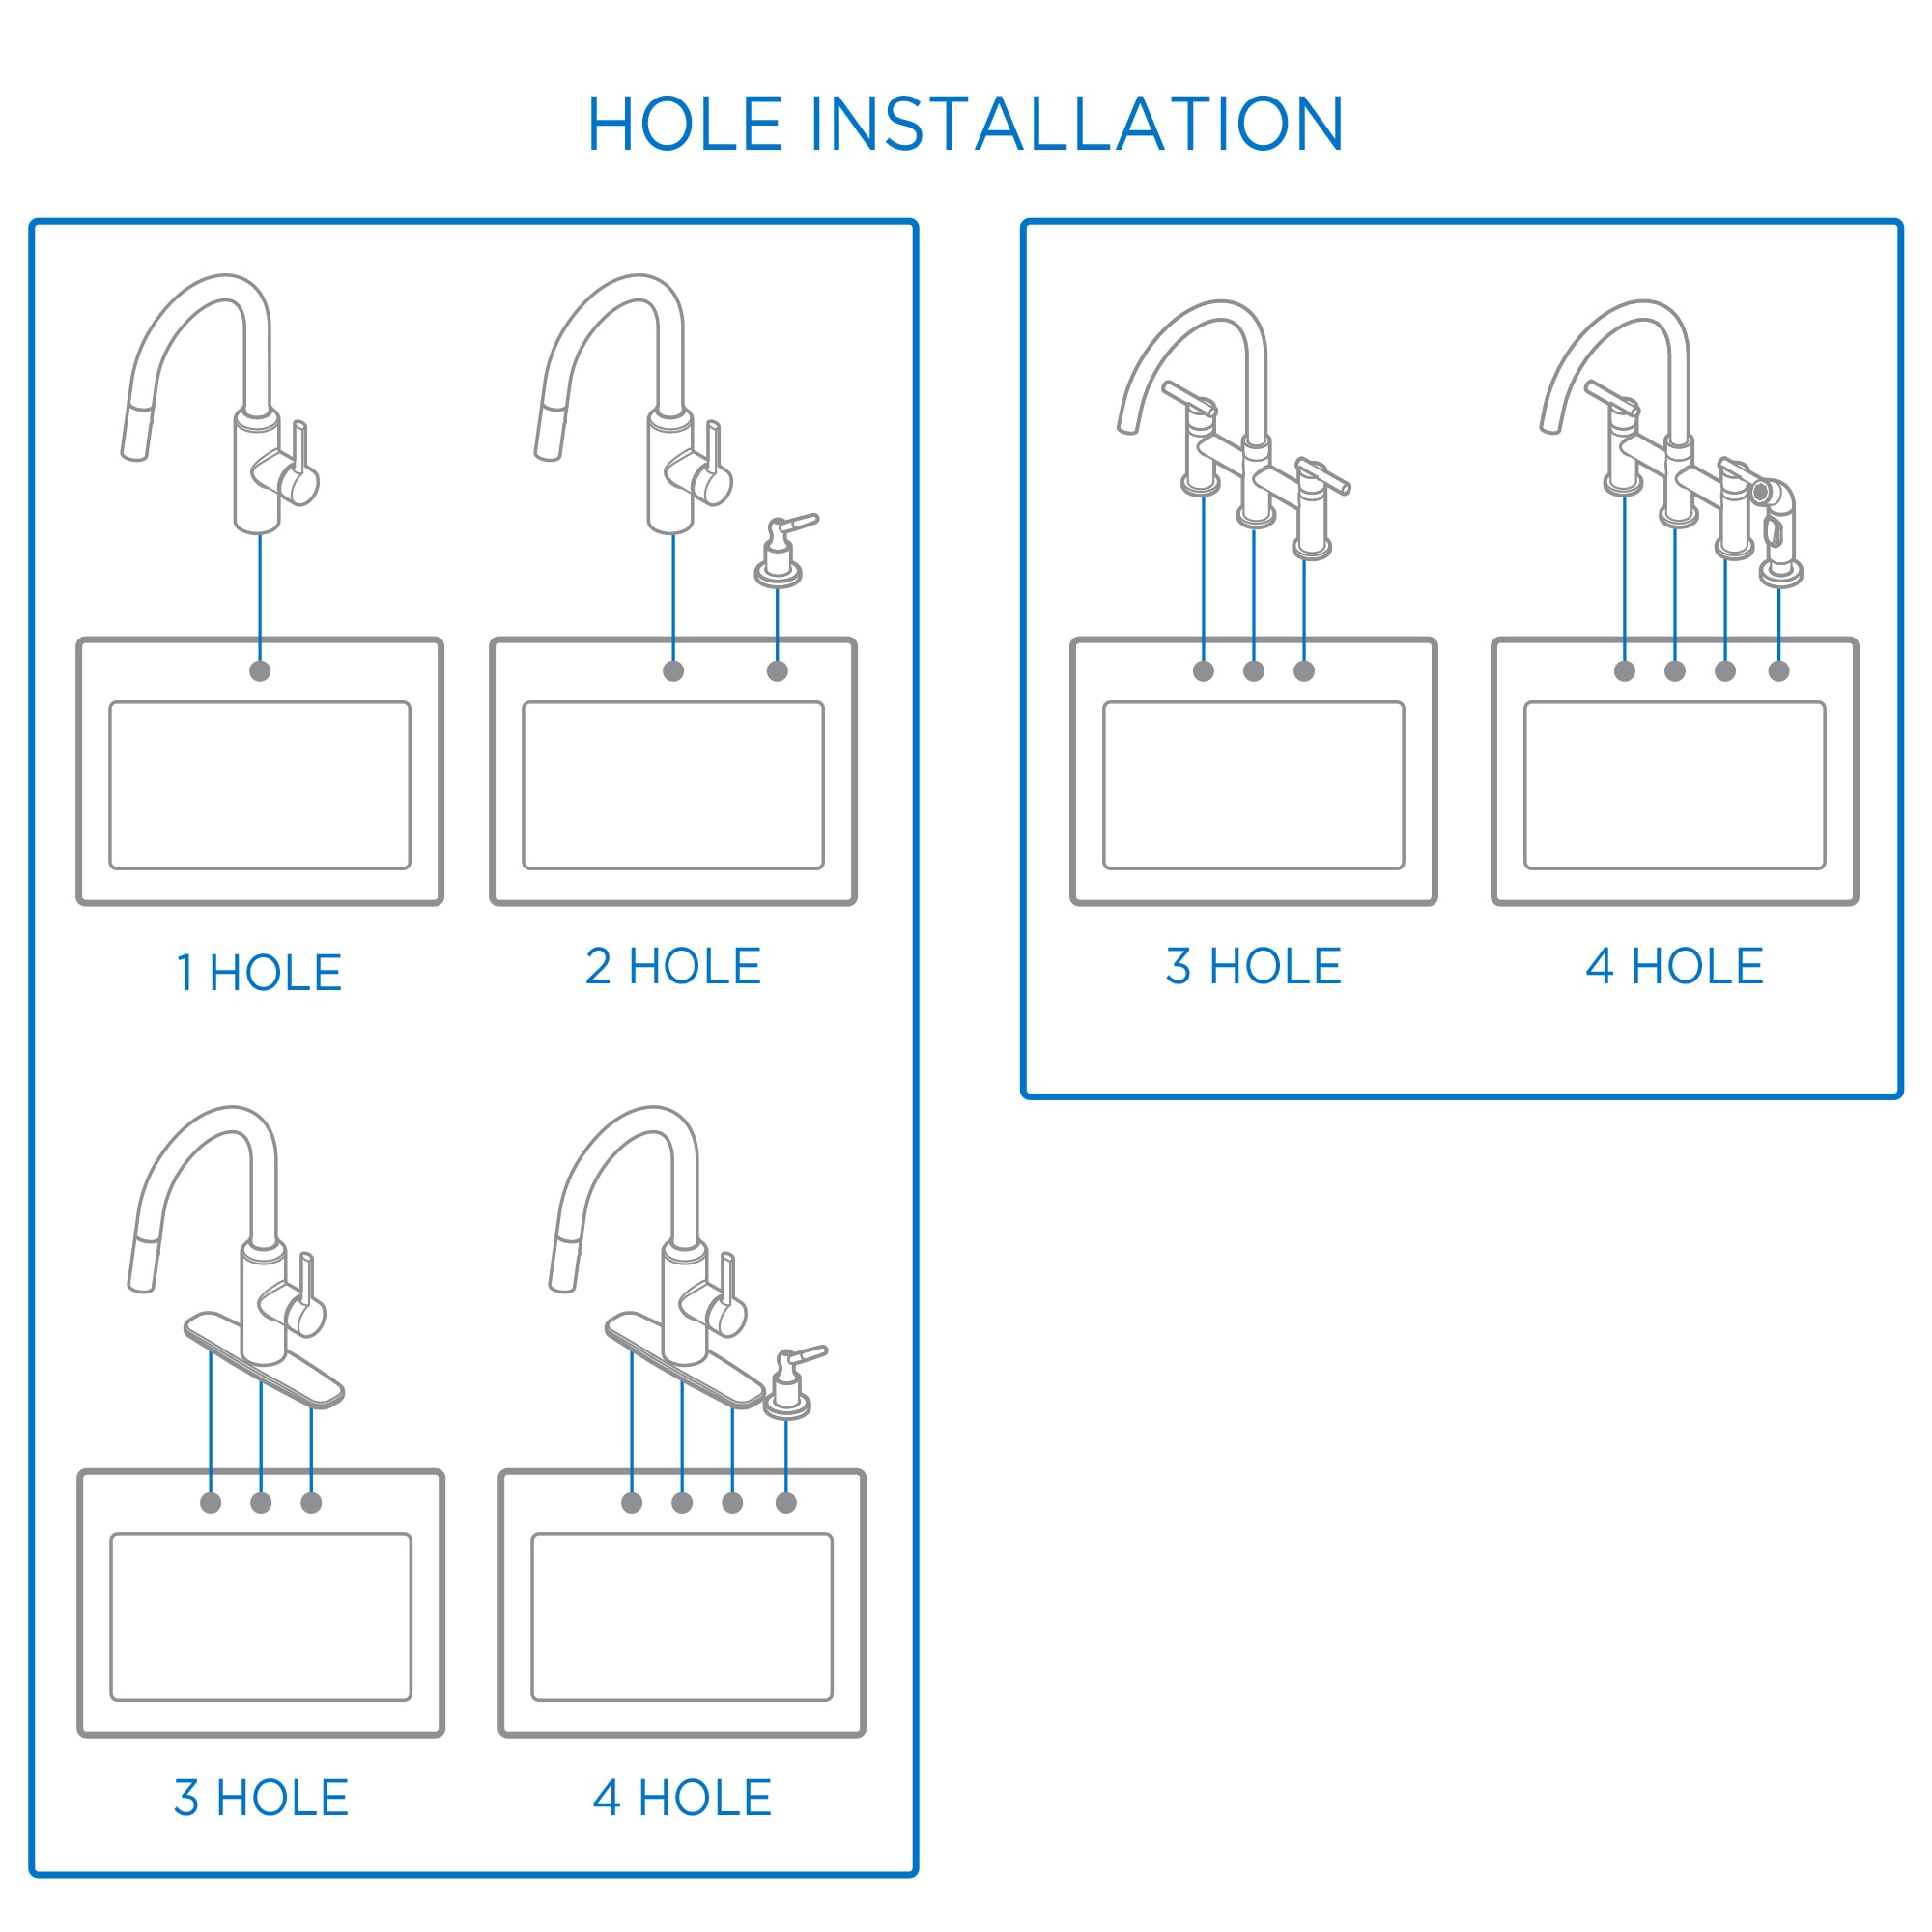
- Single-hole faucets: Need just one mounting hole.
- Centerset faucets: Typically use three holes (spout and two handles) close together.
- Widespread faucets: Use three holes spaced farther apart, usually 8 inches or more.
- Pull-down/pull-out faucets: Have a built-in spray head.
Sinks can be top-mount (drop-in), undermount, or farmhouse style. The sink type affects where the faucet sits and how much space you have for handles and sprayers.
If you’re replacing an old faucet, try to match the new faucet to your existing sink holes. Changing the hole pattern often means replacing the sink or countertop.
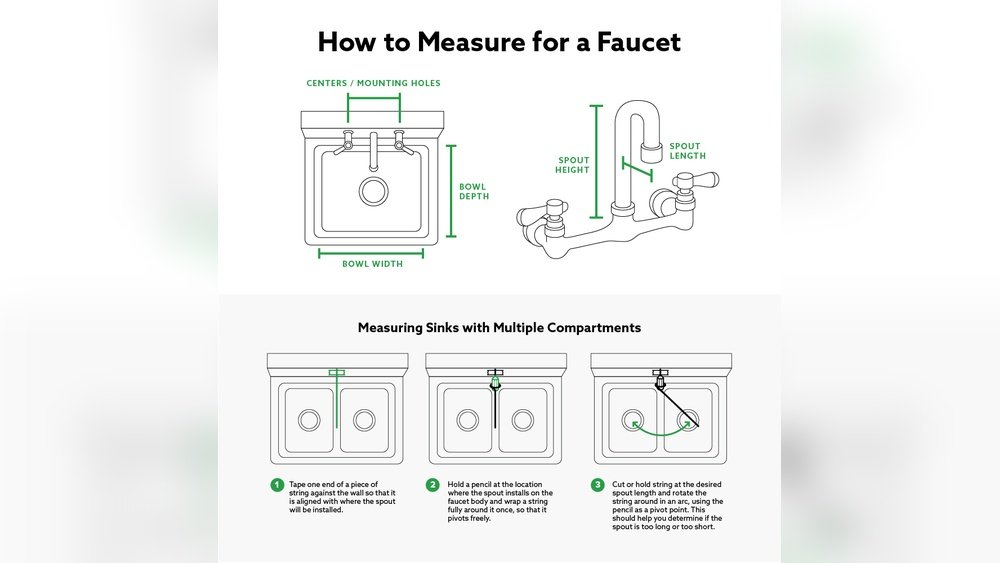
Key Measurements For A New Kitchen Faucet
Measuring for a new kitchen faucet involves several important dimensions. Each one affects how your faucet fits and functions.
1. Number Of Mounting Holes
Most kitchen sinks have 1 to 4 pre-drilled holes. These hold the faucet, handle(s), sprayer, or soap dispenser.
- Check under the sink for unused holes covered by a plate.
- Remove any old faucet or deck plate to count holes accurately.
- Note the hole pattern (in a straight line, or with one hole offset).
If you want to switch from a three-hole to a single-hole faucet, you’ll need a deck plate to cover the extra holes.
2. Center-to-center Measurement (hole Spacing)
For faucets with multiple handles, measure the distance between the centers of the outermost holes.
- Most centerset faucets have 4-inch spacing.
- Most widespread faucets have 8-inch spacing or more.
Use a measuring tape to measure from the center of the leftmost hole to the center of the rightmost hole.
| Faucet Type | Typical Hole Spacing | Common Use |
|---|---|---|
| Single-hole | 1 hole | Modern designs |
| Centerset | 4 inches | Standard sinks |
| Widespread | 8 inches or more | Large sinks, premium kitchens |
3. Faucet Height And Clearance
Measure from the countertop or mounting surface to the bottom of your cabinets or shelves above the sink.
- Most kitchen faucets are 12-18 inches tall.
- Low cabinets or windowsills can limit your options.
- Allow at least 2-3 inches above the faucet for comfortable use and removal if needed.
Measure both at the front and back of the sink, as cabinets or window ledges may slope.
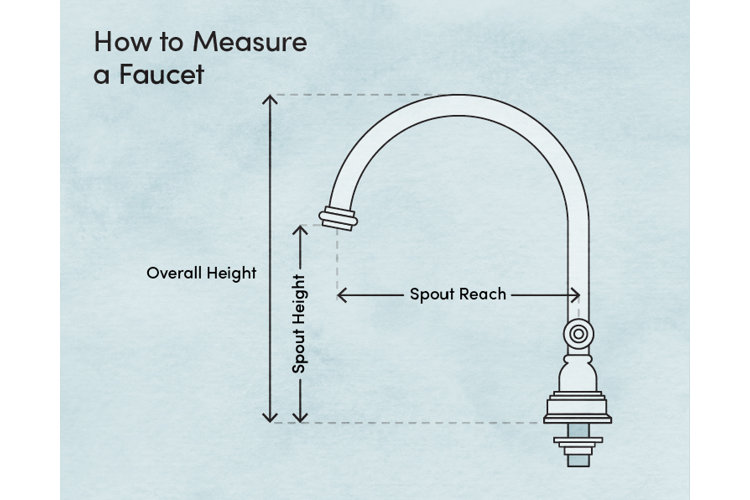
4. Spout Reach
Spout reach is the distance from the center of the faucet base to where the water comes out.
- Standard spout reach is 8-10 inches.
- For double sinks, longer spouts (10-12 inches) help reach both bowls.
- Make sure the spout reaches near the center of your sink.
Hold the measuring tape at the mounting hole and extend it to your preferred spot in the sink.
5. Spout Height
Spout height means the distance from the mounting surface to the highest point of the spout.
- Taller spouts (8-10 inches) are good for filling tall pots.
- Lower spouts (5-8 inches) fit under cabinets better.
Note: Spout height is different from faucet height. Some faucets arch higher than others.
6. Under-sink Space
Look under your sink to check for pipes, garbage disposals, or water filter systems.
- Measure the space from the wall to the back of the sink.
- Check the vertical clearance for faucet shanks and supply lines.
This area often surprises DIYers—tight spaces can make installation much harder.
7. Supply Line Connections
Check the diameter and type of your existing water supply lines.
- Standard sizes are 3/8-inch or 1/2-inch compression fittings.
- Measure the length of the supply line to the shutoff valve.
Some faucets come with pre-attached lines, but not all. Adapters are available, but it’s easier to match sizes.
8. Handle Clearance
For faucets with side handles or levers, measure the space behind and beside the faucet.
- Allow at least 2-3 inches so handles can move freely.
- Watch for walls, windowsills, or backsplash tiles.
Some handles pull back, while others rotate forward or sideways. If space is tight, consider a faucet with front-mounted handles.
Credit: www.gerber-us.com
Step-by-step Guide To Measuring For A New Kitchen Faucet
Getting the right measurements means following a clear process. Here’s a step-by-step guide for both beginners and experienced DIYers.
Step 1: Turn Off Water Supply And Clear The Area
Before touching anything, turn off both hot and cold water supply valves under your sink. This prevents leaks and keeps you safe. Remove any cleaning products, trash cans, or stored items for easy access.
Step 2: Remove The Old Faucet (if Needed)
If you’re replacing an old faucet, remove it carefully. This helps you see the mounting holes and check for rust or damage.
- Loosen supply line connections with a wrench.
- Unscrew mounting nuts under the sink.
- Lift out the old faucet.
- Clean the area to remove old putty or debris.
Taking photos before removal can help you remember how pipes are arranged.
Step 3: Count And Measure Mounting Holes
Look at the top and bottom of the sink. Count the number of holes and measure the distance between them as described earlier.
- Record if any holes are covered by a plate.
- Note if you have a separate sprayer or soap dispenser (these need extra holes).
Step 4: Measure Faucet Height And Spout Reach
Hold the measuring tape at the mounting hole. Measure up to the bottom of the cabinet or window above. Then, measure from the hole outward to where you want the water to land in your sink.
- Make sure the spout will reach the center of your main sink bowl.
Step 5: Check Under-sink Space
Use your flashlight to look under the sink. Measure the distance from the sink bottom to the cabinet floor, and from the back wall to the sink. Note any pipes, filters, or obstructions.
- Check if you have enough room to tighten mounting nuts and connect supply lines.
Step 6: Measure Supply Line Size
Use a ruler to measure the diameter of your supply line fittings. Most are 3/8-inch, but older homes may have 1/2-inch.
- Measure the length from the sink to the shutoff valve.
- Take a photo of the connections if you plan to buy parts at a store.
Step 7: Test Handle Clearance
Move the old faucet handle(s) or imagine where the new ones will go. Measure behind and to each side to make sure they won’t hit walls or windows.
- For single-handle faucets, check if the handle rotates back or forward.
Step 8: Write Down All Measurements
Keep your notes organized. Use a chart like this to record your findings:
| Measurement | Your Value | Notes |
|---|---|---|
| Number of holes | Extra holes for sprayer? | |
| Hole spacing | Centerset or widespread? | |
| Faucet height | Fits under cabinets? | |
| Spout reach | Reaches sink center? | |
| Supply line size | Adapter needed? | |
| Handle clearance | Enough space? |
This chart makes shopping easier and helps hardware store staff give you accurate advice.
Special Considerations For Different Kitchen Layouts
Not all kitchens are the same. Some have unique layouts that require extra care when measuring.
Small Kitchens
In smaller kitchens, space above and behind the sink is often limited.
- Choose a faucet with a shorter spout reach and lower height.
- Consider single-handle designs to save space.
Deep Or Double-bowl Sinks
Large sinks need longer spouts to reach both bowls.
- Measure the total sink width and bowl separation.
- Look for a pull-down or high-arc faucet for better reach.
Farmhouse Or Apron-front Sinks
These sinks have a thick, exposed front.
- Measure from the back of the sink to the wall, as farmhouse sinks often sit forward.
- Some faucets need extra-long supply lines due to thicker sink material.
Windows Behind The Sink
If your sink sits below a window, faucet height can block the view or window operation.
- Choose a low-profile faucet.
- Check if the window opens inward or outward.
Granite Or Stone Countertops
Stone counters can be harder to drill for new holes.
- Try to match your faucet to existing holes.
- If new holes are needed, consider hiring a professional to avoid cracks.
Common Mistakes And How To Avoid Them
Even careful DIYers make mistakes. Here are some common errors and how to avoid them.
- Not measuring handle clearance: Handles can hit walls or windowsills, making the faucet hard to use.
- Ignoring cabinet height: Tall faucets can get blocked by low cabinets or shelves.
- Forgetting supply line size: Old homes may have non-standard fittings.
- Overlooking spout reach: A short spout may not reach the center of the sink, causing splashing.
- Assuming all mounting holes are the same: Some sinks have offset holes or extra holes for accessories.
- Not checking under-sink space: Pipes or garbage disposals can block installation.
- Choosing style over function: The coolest-looking faucet may not suit your kitchen’s needs.
A simple tip: Take your measurements, photos, and even old faucet parts to the hardware store. Staff can help you match everything correctly.
Advanced Tips For A Perfect Fit
Once you know the basics, a few advanced tips can help you get a perfect fit and long-lasting performance.
- Consider water pressure: High-arc or pull-down faucets may need good water pressure to function well.
- Think about future upgrades: If you plan to add a water filter or instant hot water, measure for extra space and holes now.
- Check for ADA compliance: If you want a faucet that’s easy for everyone to use, look for ADA-compliant models.
- Plan for accessories: Soap dispensers and side sprayers need extra holes. Measure and plan accordingly.
- Look at finish compatibility: Some faucet finishes (like brushed nickel or matte black) may look different under your kitchen lighting. Take a sample home if possible.
Credit: www.wayfair.com
What To Do If Measurements Don’t Match Standard Sizes
Sometimes, your sink doesn’t fit standard faucet sizes. Don’t worry—there are solutions.
- Use a deck plate: Covers extra holes if your new faucet uses fewer than your sink.
- Buy a faucet with adjustable bases: Some models can fit a range of hole spacings.
- Install adapters: For supply lines, adapters can connect different sizes.
- Hire a pro: For stone countertops or complex plumbing, a plumber can drill new holes or make modifications safely.
How To Choose The Right Faucet Style For Your Measurements
With your measurements in hand, it’s time to pick a faucet that fits both physically and stylistically.
Match Faucet Type To Sink Holes
- Single-hole faucet for sinks with one hole.
- Centerset or mini-widespread for 4-inch spacing.
- Widespread faucet for 8-inch or larger spacing.
Match Height And Reach To Kitchen Tasks
- High-arc spouts for filling pots and cleaning large pans.
- Low-profile spouts for small sinks or under-cabinet areas.
Consider Handle Options
- Single-handle faucets save space and are easy to use.
- Two-handle faucets offer precise temperature control.
Look For Special Features
- Pull-down or pull-out sprayers add flexibility for cleaning.
- Touchless or motion-activated faucets add convenience (but may need extra space for batteries or electronics).
Compare Popular Styles
Here’s a comparison of some common kitchen faucet styles:
| Faucet Style | Best For | Typical Features |
|---|---|---|
| Single-handle | Small sinks, modern kitchens | Easy control, compact design |
| Double-handle | Traditional kitchens | Separate hot/cold control |
| Pull-down | Deep sinks, heavy cleaning | Flexible spray, high arc |
| Touchless | Busy kitchens, hygiene-focused | Motion sensors, battery required |
Non-obvious Insights Most People Miss
- Deck Plate Use: If you have more holes than your new faucet needs, a matching deck plate is essential. Not all faucets come with one—check the box or buy separately.
- Handle Movement Direction: Some faucets have handles that move backward, needing extra space behind. Others rotate forward, which is better for tight spaces.
- Water Line Length: If your supply lines are too short, you can buy longer lines or extension kits. Measure before you buy, as “standard” lengths may not fit all setups.
- Aesthetics vs. Function: Tall, dramatic faucets look great but may cause splashing in shallow sinks. Always balance looks with practical use.
Checking Your Measurements Before Buying
Before making your final purchase, review all your notes and double-check measurements. If possible, bring your notes, old faucet, or photos to the store. Compare your numbers to the faucet box or online specifications.
- Check return policies in case the faucet doesn’t fit.
- Ask store staff for advice if you’re unsure about any measurement.
- If shopping online, check user reviews for fit issues.
For more guidance on kitchen faucet installation and standards, you can review resources from Family Handyman.
Credit: www.homedepot.com
When To Call A Professional
While measuring and replacing a kitchen faucet is a good DIY project, some situations require a plumber:
- Supply lines are corroded or stuck.
- You need to drill new holes in stone or metal.
- Plumbing under the sink is complex or non-standard.
- You’re not comfortable working with water lines.
A plumber can complete the job quickly, safely, and guarantee a leak-free installation.
Frequently Asked Questions
How Do I Know If My New Faucet Will Fit My Existing Sink?
Check the number and spacing of mounting holes in your sink. Compare these to the new faucet’s requirements. Most standard sinks and faucets use 1, 3, or 4 holes. Use a deck plate if your new faucet needs fewer holes.
What Should I Do If My Supply Lines Don’t Match The New Faucet?
Measure the diameter and thread type of your current supply lines. If they don’t match, buy adapter fittings or replacement lines. Most hardware stores can help you find the right parts.
Can I Install A Single-handle Faucet On A Three-hole Sink?
Yes, as long as your faucet comes with a deck plate to cover the extra holes. Most single-handle faucets include one, but check before buying.
How Much Space Do I Need Behind The Faucet For The Handle To Move?
Leave at least 2-3 inches behind the faucet for the handle to move freely. For tight spaces, choose a faucet with a handle that moves forward, not backward.
Is It Better To Measure Before Or After Removing The Old Faucet?
It’s best to measure after removing the old faucet for the most accurate results. However, you can measure most dimensions with the old faucet in place if you’re careful.
Measuring for a new kitchen faucet may take a little time, but it pays off in a smooth installation and years of trouble-free use. With the right tools, accurate measurements, and these tips, you’ll find a faucet that fits your kitchen perfectly and matches your daily needs.
Enjoy your kitchen upgrade with confidence!