Making chicken drumsticks on the stove can turn a simple meal into something special. You do not need an oven or grill to enjoy juicy, flavorful chicken. With the right method, seasoning, and a few tips, you can create drumsticks that are crispy on the outside and tender inside—all using just your stovetop.
Whether you are new to cooking or want to improve your skills, this guide will help you get delicious results every time.
Chicken drumsticks are popular because they are affordable, easy to cook, and loved by all ages. They also have more flavor than some other parts of the chicken because of their dark meat. Cooking them on the stove is fast, and you can control the process, adjusting seasoning and doneness easily.
Many people believe that great chicken must come from an oven or grill, but stovetop drumsticks can be just as tasty—if you follow the right steps.
This guide will walk you through everything: choosing drumsticks, preparing them, seasoning, cooking steps, troubleshooting, serving ideas, and even how to store leftovers. You will also learn some insights that many beginners miss, such as how to get crispy skin without burning or how to check doneness without cutting the meat open. By the end, you’ll feel confident making stovetop chicken drumsticks that your family and friends will ask for again and again.
Choosing The Best Chicken Drumsticks
Good results start with good ingredients. When you buy chicken drumsticks, look for these qualities:
- Freshness: The meat should be pink, not gray. The skin should look moist, not dry or slimy.
- Size matters: Try to get drumsticks that are about the same size, so they cook evenly. Small ones cook faster but may dry out. Large ones take longer but stay juicy.
- With or without skin: Drumsticks with skin will get crispier and have more flavor. If you want less fat, skinless drumsticks are an option, but you will not get that crunchy texture.
- Organic or conventional: Organic chicken is usually more expensive, but some people prefer it for flavor or ethical reasons. Both types can taste great if cooked properly.
If you buy frozen drumsticks, make sure they are fully thawed before cooking. Cooking from frozen will lead to uneven results.
How To Thaw Chicken Drumsticks Safely
Never leave chicken out on the counter to thaw. The safest ways are:
- Refrigerator thawing: Place drumsticks in a dish, cover, and leave in the fridge overnight. This method is slow but safe.
- Cold water thawing: Put drumsticks in a sealed bag and submerge in cold water, changing the water every 30 minutes. They should thaw in 1-2 hours.
Microwave thawing is possible, but it can start cooking the meat, leading to uneven texture.
Essential Tools And Equipment
You do not need fancy equipment to make chicken drumsticks on the stove, but having the right tools helps:
- Large skillet or frying pan: Non-stick or stainless steel works best. A pan with a lid is helpful.
- Tongs: For turning the drumsticks without piercing the meat.
- Meat thermometer: Ensures chicken is cooked through (165°F or 74°C).
- Paper towels: For drying the skin—key for crispiness.
- Spatula: For scraping up browned bits.
If you do not have a lid, you can use foil to cover the pan during part of the cooking.
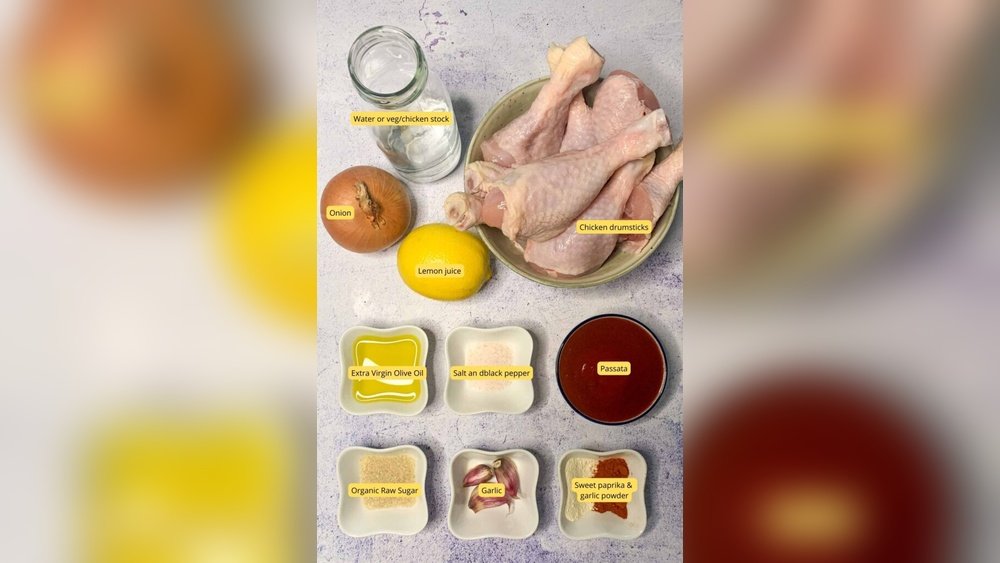
Ingredients For Basic Stovetop Chicken Drumsticks
Here’s a simple recipe to serve 4 people (2 drumsticks each):
- 8 chicken drumsticks
- 2 tablespoons cooking oil (canola, vegetable, or olive oil)
- 1 teaspoon salt
- ½ teaspoon black pepper
- 1 teaspoon paprika
- 1 teaspoon garlic powder
- ½ teaspoon onion powder
- Optional: 1 teaspoon dried herbs (thyme, oregano, or Italian seasoning)
- Optional: 2 tablespoons butter for extra richness
You can adjust spices or add chili powder if you like heat.
Ingredient Comparison: Skin-on Vs Skinless Drumsticks
Here’s how skin-on and skinless drumsticks compare for stovetop cooking:
| Type | Crispiness | Flavor | Fat Content | Best Use |
|---|---|---|---|---|
| Skin-On | High | Rich, juicy | More | Classic crispy drumsticks |
| Skinless | Low | Lean, lighter taste | Less | Healthier options, stews |
Preparing The Drumsticks
Preparation is key for great texture and flavor. Here’s what to do:
1. Dry The Drumsticks
Pat each drumstick dry with paper towels. Removing moisture helps the skin crisp up and keeps hot oil from splattering.
2. Season Generously
Mix your spices (salt, pepper, paprika, garlic powder, onion powder, herbs) in a small bowl. Rub the mixture all over the drumsticks. Make sure every part is covered, including under the skin if possible.
Some people marinate the drumsticks for extra flavor. You can do this by adding your spices to a bit of oil and lemon juice, then leaving the drumsticks in the fridge for 1-4 hours. Marinating is optional but can boost taste.
3. Bring To Room Temperature
Let the seasoned drumsticks sit on the counter for 10-15 minutes before cooking. This helps them cook more evenly.
Beginner Tip: Do not skip drying the skin. Even a little water left on the drumsticks can stop them from getting crispy.
Cooking Chicken Drumsticks On The Stove: Step-by-step
Now it’s time for the main event. This method gives you a crispy outside and juicy inside, without deep-frying.
Step 1: Heat The Pan
Place your skillet on the stove over medium-high heat. Add 2 tablespoons of oil and swirl to coat the bottom. Wait until the oil shimmers but is not smoking.
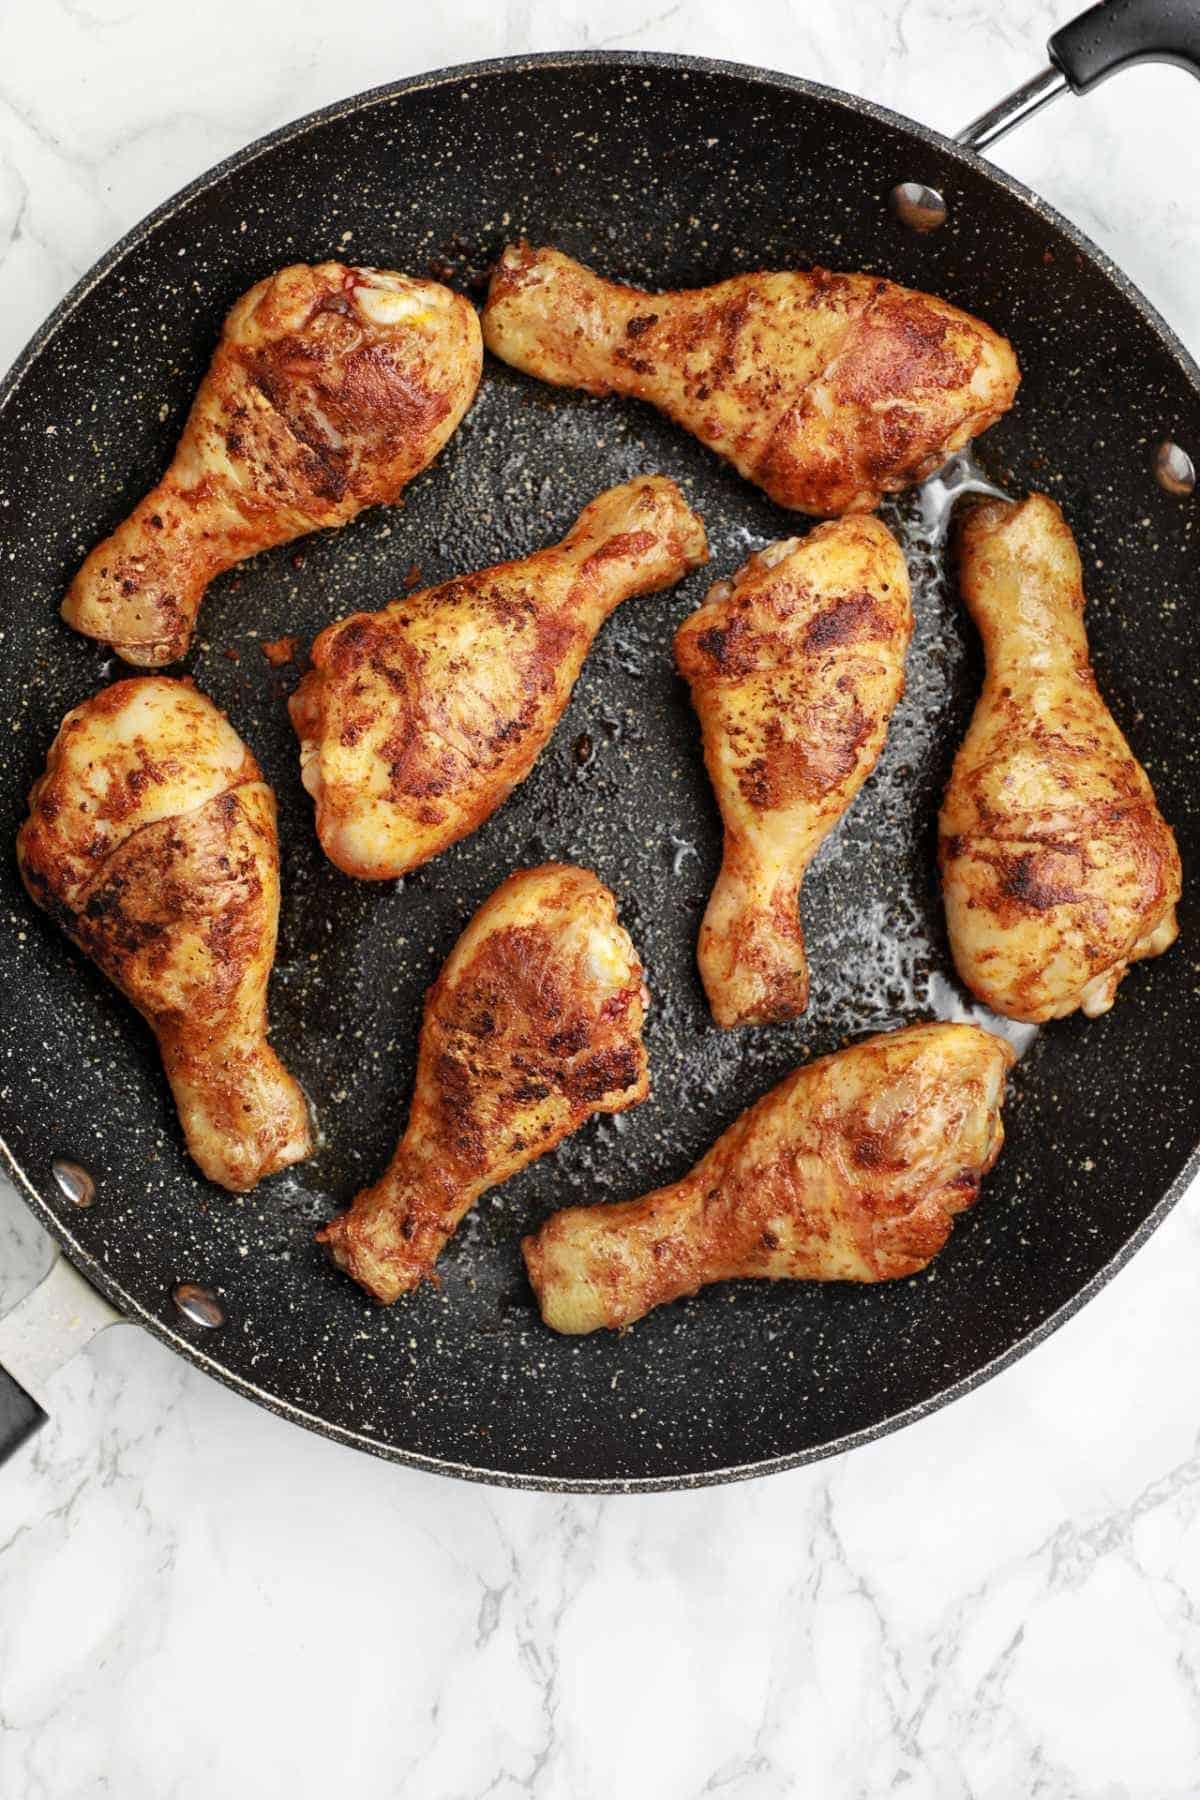
Step 2: Sear The Drumsticks
Add the drumsticks to the pan, skin side down if they have skin. Do not crowd the pan—work in batches if needed. Cook without moving them for 4-5 minutes, until the skin is golden brown.
Step 3: Flip And Brown The Other Side
Turn the drumsticks with tongs. Cook the other side for another 3-4 minutes, until both sides are browned.
Step 4: Lower Heat And Cover
Reduce the heat to medium-low. Cover the pan with a lid. This traps steam and helps cook the drumsticks through without burning the outside. Cook for 15-20 minutes, turning every 5-6 minutes.
Step 5: Check Doneness
After 15 minutes, use a meat thermometer to check the thickest part of a drumstick. It should read 165°F (74°C). If not, cover and cook for 5 more minutes, then check again.
Step 6: Uncover And Crisp
Once cooked through, remove the lid. Raise the heat to medium-high for 2-3 minutes, turning the drumsticks so all sides get crispy. You can add 2 tablespoons of butter now for extra richness.
Step 7: Rest The Drumsticks
Remove the drumsticks to a plate and let them rest for 5 minutes before serving. This keeps the juices inside.
Common Mistake: Turning the drumsticks too often or using high heat can burn the outside before the inside cooks. Keep the heat moderate after the first sear.
Flavor Variations And Marinades
Chicken drumsticks are very flexible. Here are some ways to change up the flavor:
- Lemon Herb: Use lemon zest and juice with parsley, thyme, and oregano.
- Spicy BBQ: Mix smoked paprika, chili powder, cumin, and brush with BBQ sauce at the end.
- Asian Style: Marinate with soy sauce, ginger, garlic, and a little honey.
- Buffalo: Toss cooked drumsticks in melted butter and hot sauce.
- Garlic Parmesan: Add garlic powder and grated Parmesan in the last 2 minutes of cooking.
Marinade Timing Comparison
Marinating can add flavor, but how long is best? Here’s a simple guide:
| Marinade Time | Flavor Depth | Texture Impact |
|---|---|---|
| 15 minutes | Mild | Little change |
| 1 hour | Medium | Slightly tender |
| 4+ hours | Strong | Tender, more flavor |
Do not marinate chicken in acidic mixtures (with lemon or vinegar) for more than 8 hours or the texture can get mushy.
Credit: www.recipevibes.com
Tips For Extra Crispy Drumsticks
Getting crispy skin on the stove is possible, but requires attention:
- Dry thoroughly: Moisture is the enemy of crispiness.
- Do not overcrowd: Too many drumsticks in the pan will steam, not crisp.
- Use enough oil: Oil helps brown the skin.
- Finish uncovered: The last minutes without a lid are essential.
- Let rest: Resting before serving keeps skin from getting soggy.
Pro Insight: Some cooks sprinkle a little cornstarch or flour on the skin before cooking. This can make the crust even crispier.
Troubleshooting Common Problems
Even experienced cooks run into issues. Here’s how to fix or prevent them:
Drumsticks Sticking To The Pan
- Make sure the pan and oil are hot before adding chicken.
- Do not try to flip too soon; the skin will release easily when browned.
- Use a non-stick or well-seasoned pan if possible.
Burnt Outside, Raw Inside
- Heat too high is the main cause. After searing, lower the heat and cover.
- Use a thermometer to check doneness, not just color.
Soggy Skin
- Too much moisture or covering for too long can make skin soggy.
- Remove lid for the last few minutes and let drumsticks rest on a rack or plate, not in the pan.
Uneven Cooking
- Drumsticks of different sizes will cook at different rates. Try to use similar-sized pieces.
- Rotate positions in the pan for even heat.
Nutrition Facts For Stovetop Chicken Drumsticks
Cooking method affects nutrition. Here are typical values for one medium (skin-on) drumstick, cooked with basic seasoning and 1 teaspoon of oil:
- Calories: 150
- Protein: 18g
- Fat: 8g
- Carbohydrates: 0g
- Cholesterol: 70mg
- Sodium: 300mg (varies with seasoning)
Removing the skin will lower fat and calories but also some flavor.
Serving Suggestions And Side Dishes
Chicken drumsticks go well with many sides. Here are some classic and creative options:
- Mashed potatoes: Creamy and mild, a classic pairing.
- Rice pilaf: Lightly seasoned rice soaks up juices.
- Grilled vegetables: Zucchini, bell peppers, and carrots add color and nutrition.
- Coleslaw: Crunchy and cool, balances the rich chicken.
- Salad: Mixed greens with a light dressing refresh the palate.
- Corn on the cob: Sweet and buttery, especially in summer.
- Bread rolls: Great for dipping in pan juices.
Expert Tip: Serve drumsticks with a wedge of lemon or a sprinkle of fresh herbs for a fresh finish.
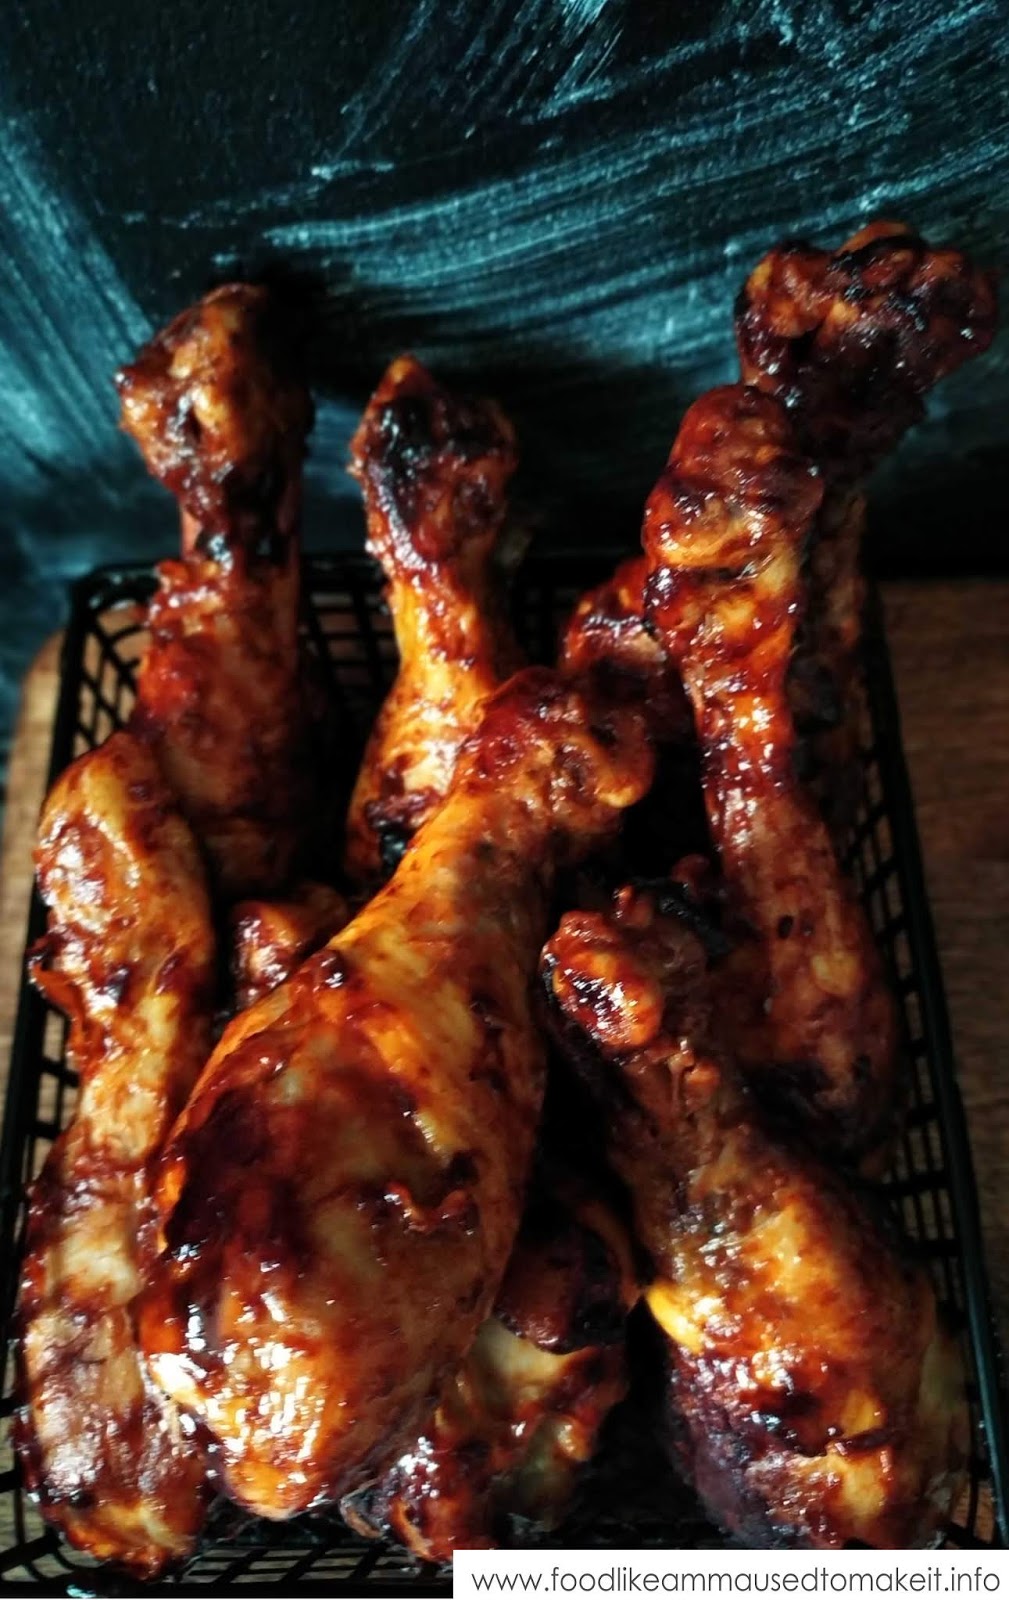
Credit: foodlikeammausedtomakeit.info
Storing And Reheating Leftovers
If you have leftovers, here’s how to keep them safe and tasty:
- Cool quickly: Let drumsticks cool to room temperature for 30 minutes, then refrigerate.
- Store in airtight container: Keeps moisture and other fridge odors out.
- Use within 3-4 days: Chicken can spoil if kept longer.
Reheating Methods
- Oven: Preheat to 350°F (175°C), place drumsticks on a baking sheet, cover with foil, and heat for 15-20 minutes. Remove foil for last 5 minutes to crisp skin.
- Stovetop: Add a little oil to a pan, cover, and heat on medium-low for 10 minutes, turning occasionally.
- Microwave: Use only for quick reheating; skin will not stay crispy.
Do not reheat more than once, as this can dry out the meat and lower food safety.
Advanced Tips For Perfect Drumsticks
Want to take your stovetop chicken to the next level? Try these:
- Deglaze the pan: After cooking, add a splash of broth or wine to the pan. Scrape up browned bits for a quick sauce.
- Baste with butter: During the last few minutes, spoon melted butter and pan juices over the drumsticks for extra flavor.
- Use aromatics: Add a few garlic cloves, rosemary, or lemon slices to the pan for more depth.
- Finish under the broiler: If you have an oven, broil drumsticks for 2-3 minutes for maximum crisp.
Little-Known Fact: Drumsticks cooked on the bone taste better. The bone helps the meat stay juicy and adds more flavor.
Comparing Stovetop Drumsticks To Other Cooking Methods
Some people wonder how stovetop drumsticks compare to other methods like baking or grilling. Here’s a quick look:
| Method | Cooking Time | Texture | Flavor | Skill Level |
|---|---|---|---|---|
| Stovetop | 25-30 min | Crispy skin, juicy inside | Rich, pan-seared | Easy-Moderate |
| Baked | 35-45 min | Evenly cooked, less crispy | Subtle, roasted | Easy |
| Grilled | 20-25 min | Charred, smoky | Smoky, grilled | Moderate |
| Deep Fried | 10-15 min | Very crispy, rich | Fried, bold | Moderate-Hard |
Safe Handling And Food Safety
Raw chicken can carry harmful bacteria. Follow these tips for safety:
- Wash hands: Always wash hands before and after handling raw chicken.
- Clean surfaces: Sanitize cutting boards, knives, and counters after use.
- Cook to temperature: Only eat chicken that reaches 165°F (74°C) inside.
- Do not wash chicken: Washing spreads germs around your kitchen. Dry with paper towels instead.
More details on food safety can be found at the USDA Food Safety site.
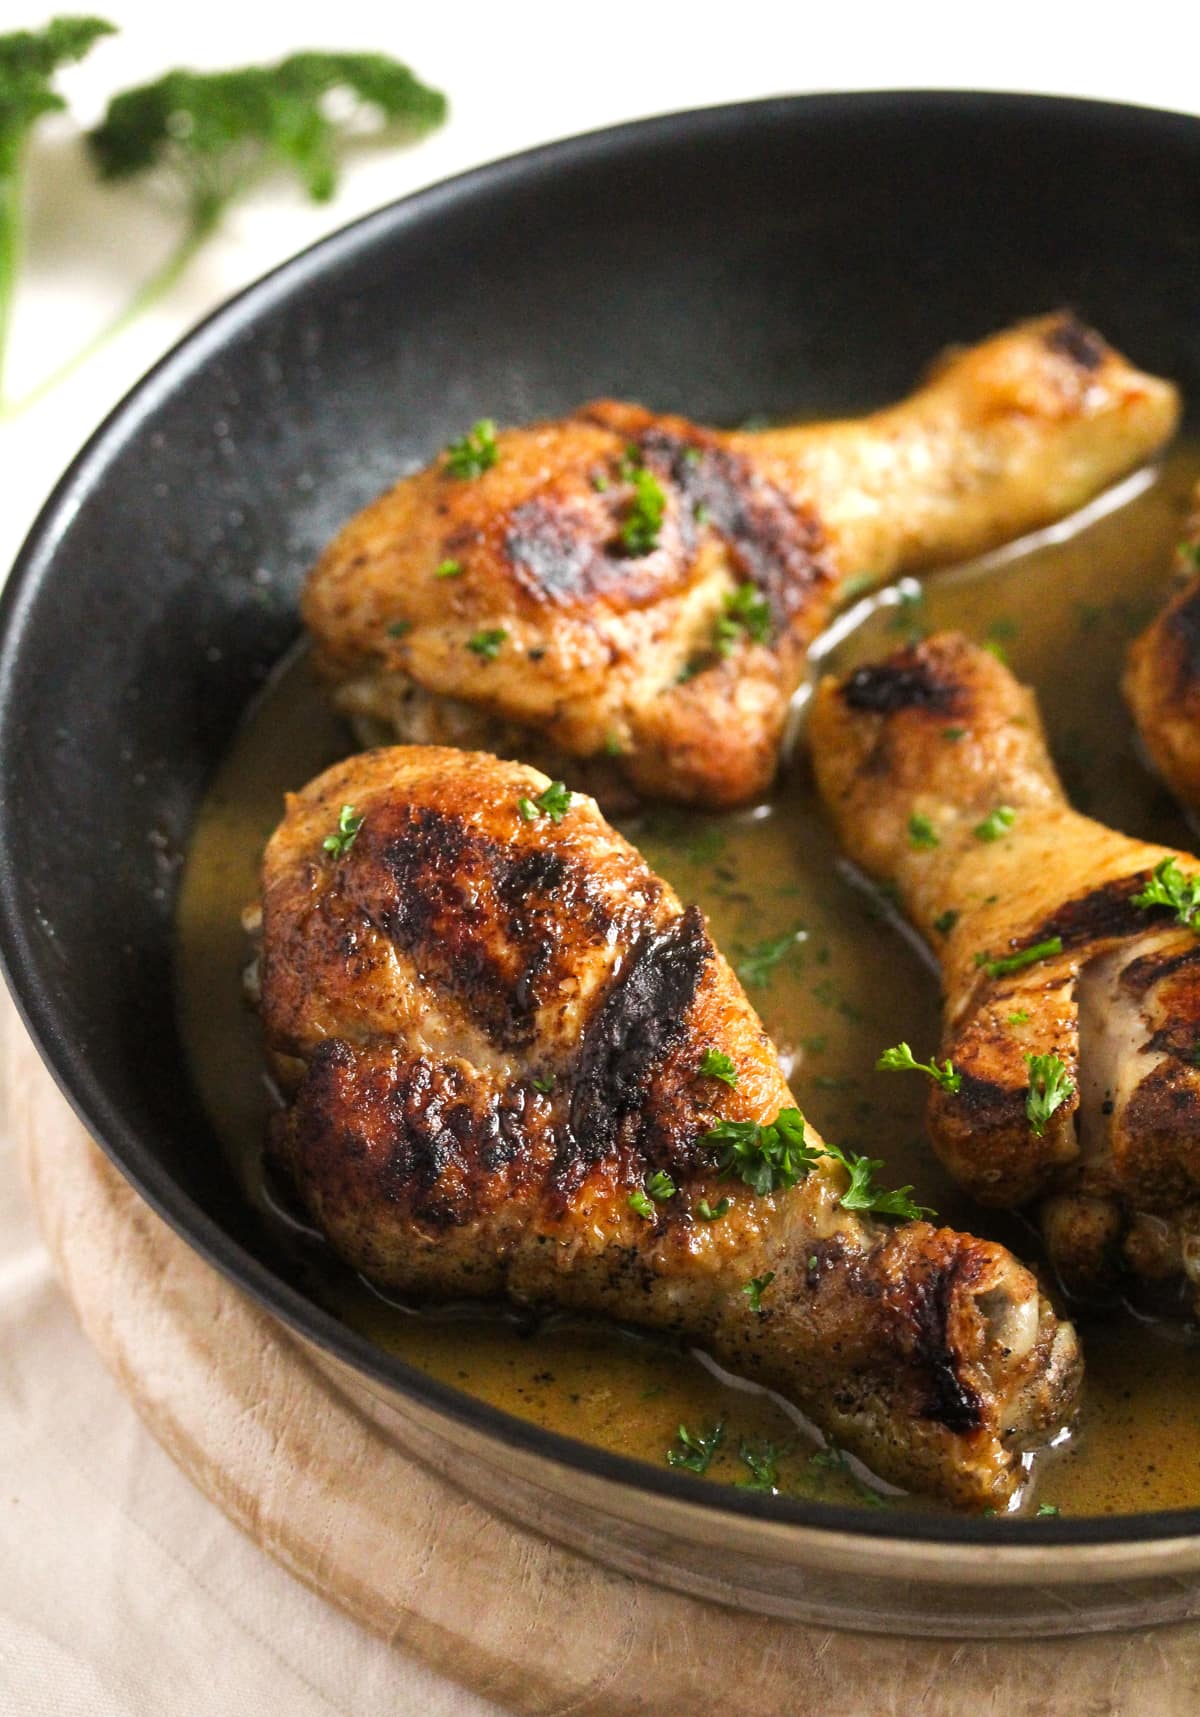
Credit: whereismyspoon.co
Frequently Asked Questions
How Do I Know When My Drumsticks Are Fully Cooked?
Use a meat thermometer in the thickest part of the drumstick, but not touching the bone. It should read 165°F (74°C). The juices should run clear, not pink.
Can I Make Chicken Drumsticks On The Stove Without Oil?
You need a small amount of oil to prevent sticking and to help the skin crisp up. For less oil, use a non-stick pan and wipe with just 1 teaspoon, but totally dry cooking will not work well.
Is It Possible To Use Frozen Drumsticks Directly?
It is not recommended. Frozen drumsticks will cook unevenly and can stay raw inside while burning outside. Always thaw drumsticks fully before cooking on the stove.
What Spices Go Best With Chicken Drumsticks?
Salt, black pepper, paprika, garlic powder, and onion powder are classic. You can also use curry powder, Cajun seasoning, or Italian herbs. Try different blends to find your favorite.
How Can I Keep Leftover Drumsticks Crispy?
Let them cool uncovered before storing, then reheat in the oven or air fryer to restore crispiness. Avoid microwaving if you want the skin to stay crunchy.
Cooking chicken drumsticks on the stove is simple but rewarding. With these steps, you can enjoy crispy, juicy chicken any night of the week—no oven or grill needed. Experiment with flavors, sides, and sauces to make the meal your own. And remember, the real secret is attention to detail: dry the skin, season well, and control the heat. Soon, you’ll be making drumsticks that everyone will ask for again and again.