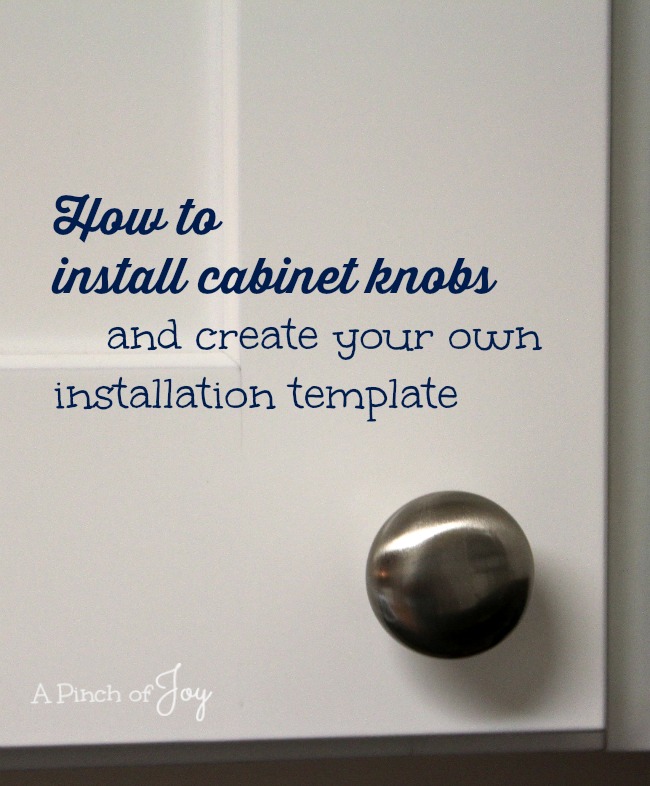
Making your own template for cabinet pulls can turn a tricky project into a simple, repeatable task. If you’re updating kitchen cabinets, building new furniture, or just replacing old hardware, the right template helps you drill holes in exactly the right place every time.
Without a good template, you risk crooked pulls or uneven handles—small mistakes that stand out on finished cabinets. But with some planning and careful steps, you can create a reusable template that saves time, improves accuracy, and gives your cabinets a professional look.
This guide explains everything you need to know about making a template for cabinet pulls, even if you have never done woodworking before. You’ll learn what tools and materials are best, how to measure for different cabinet styles, and how to avoid common mistakes.
Along the way, you’ll discover pro tips and small details that make a big difference. By the end, you’ll feel confident enough to create a template and use it for your whole project, whether for a single drawer or an entire kitchen.
Why Use A Template For Cabinet Pulls?
Installing cabinet pulls might look simple, but getting all the holes lined up perfectly is harder than it seems. Cabinet pulls must be level, spaced evenly, and centered on the door or drawer. Even a small error can make the hardware look crooked or unprofessional.
A template acts as a guide, showing you exactly where to drill holes for each pull. Once you make a good template, you can use it over and over, which saves time and reduces mistakes. This is especially helpful if you have many cabinets to update.
Templates also help when you want all your pulls at the same height or distance from the edge. Instead of measuring every single door and drawer, you use your template and get the same results every time.
Common Problems Without A Template
Many beginners try to measure and mark each cabinet by hand. This often leads to:
- Misaligned pulls: Holes are not level or not centered.
- Uneven spacing: Hardware looks different on each door or drawer.
- Damaged cabinets: Drilling in the wrong place means patching holes or replacing doors.
A template prevents these problems and gives you more confidence with each hole you drill.
Types Of Cabinet Pull Templates
Not all cabinets are the same, and neither are templates. The right template depends on your project. Some templates are simple, while others are more advanced.
1. Single-hole Templates
For knobs or pulls with only one screw, a single-hole template is enough. It has one hole to mark or drill through, and you line it up with the center of the door or drawer.
2. Multi-hole Templates
Multi-hole templates are for pulls with two screws (handles or bar pulls). These templates have two holes spaced to match your hardware. You must know the center-to-center measurement—the distance between the two screws.
3. Adjustable Templates
Some templates have sliding guides or slots. An adjustable template is useful if your cabinet pulls are different sizes or you want to reuse the same template for future projects.
4. Commercial Templates
You can buy templates made from metal or plastic. These are fast but may not fit every cabinet style. Making your own allows for more flexibility and customization.
5. Digital Templates
Advanced woodworkers sometimes use digital templates or jigs with laser guides. These are accurate but expensive and usually not needed for home projects.
Credit: www.thehappyhousie.com
Tools And Materials Needed
To make a good template, you’ll need a few basic tools and supplies. Most people already have these in their toolbox or kitchen drawer.
Essential Tools
- Ruler or tape measure: To measure cabinet size and hardware spacing.
- Pencil or fine-tip marker: For marking holes.
- Drill: For making holes in the template (and later in the cabinets).
- Drill bits: Choose the right size for your cabinet pull screws.
- Clamps (optional): To hold the template in place on the cabinet.
- Awl or nail (optional): For making small starter marks.
Materials For The Template
- Sturdy paper or cardboard: Good for a simple, disposable template.
- Thin plywood or MDF: Best for a reusable, durable template.
- Clear plastic sheet: Lets you see the cabinet edge through the template.
Choosing The Right Material
Cardboard is easy to cut but bends easily and may not last long. Plywood or MDF (about 1/8 inch thick) gives you a strong, flat template that stays accurate after many uses. Clear plastic works well if you want to see the cabinet edge, but it’s harder to drill and cut.
For most DIYers, thin plywood or MDF is the best balance of price, strength, and ease of use.
Measuring For Your Cabinet Pulls
Accurate measuring is the key to making a template that works. If you measure wrong, every hole will be off. Take your time with this step.
Step 1: Measure The Hardware
First, measure your cabinet pull:
- Find the center-to-center distance (the distance between the screw holes).
- Use a ruler or caliper for best accuracy.
- Double-check the manufacturer’s instructions, as some pulls have non-standard sizes.
Common sizes are 3 inches (76 mm), 4 inches (102 mm), or 128 mm (about 5 inches), but always measure your own hardware.
Step 2: Measure The Cabinet Front
Next, measure the cabinet door or drawer front:
- Measure the height and width.
- Decide where you want the pull placed. For doors, pulls are usually vertical near the opening edge. For drawers, pulls are centered horizontally.
Step 3: Decide On Placement
There is no single rule for pull placement, but here are some common guidelines:
- Doors: Place the pull 2 to 3 inches from the bottom (for upper cabinets) or top (for lower cabinets) and about 1 inch from the edge.
- Drawers: Center the pull both vertically and horizontally, or place it in the top third for tall drawers.
For modern kitchens, you might prefer a consistent distance from the edge on every cabinet. For traditional styles, placement can vary.
Step 4: Mark The Template
On your template material, mark the center line. Then mark the holes for your pull based on your measurements. Use a square or straightedge to make sure everything is lined up.
Credit: www.apinchofjoy.com
Creating The Template: Step-by-step
With your measurements ready, you can make your template. The steps below explain how to make a strong, reusable template.
Step 1: Cut Your Template Material
Cut a piece of plywood or MDF slightly larger than your cabinet face—about 4 inches tall by 8 inches wide is a good size. If you’re using cardboard, you can cut it with scissors. For wood or plastic, use a saw.
Smooth any rough edges with sandpaper to avoid scratching your cabinets.
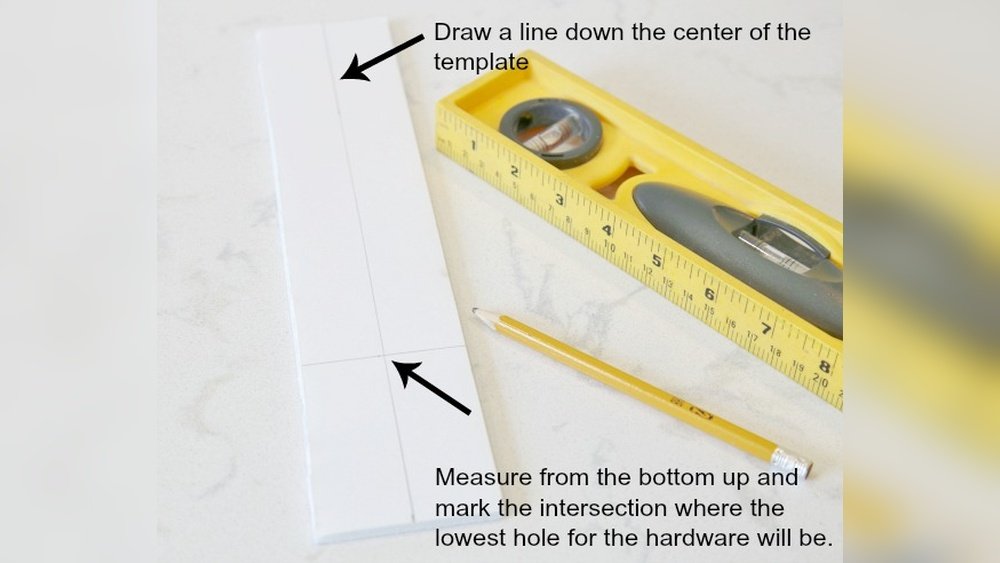
Step 2: Draw Center Lines
With a ruler, draw a vertical and horizontal line on your template. The intersection is your center point. Label the lines if it helps: “Vertical Center,” “Horizontal Center.”
These lines help you align the template with the cabinet edge or center.
Step 3: Mark Hole Locations
Using your hardware measurements, mark where the holes should go.
- For single-hole pulls, mark one spot on the center line.
- For two-hole pulls, use your center-to-center measurement and mark two spots, equally spaced from the center.
Check your marks with the ruler to make sure they are level and spaced correctly.
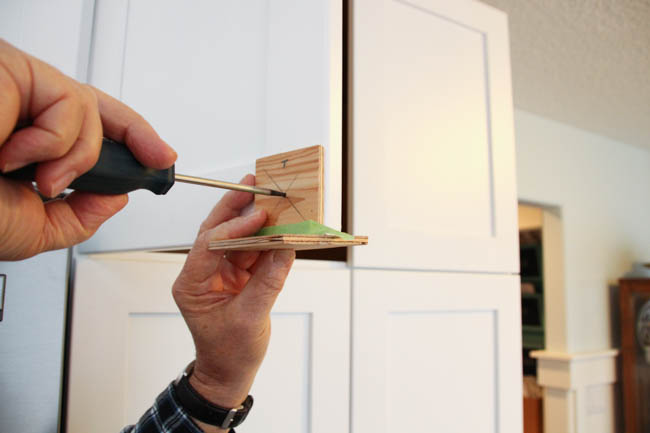
Step 4: Drill Holes In The Template
Clamp your template to a scrap piece of wood. Using a drill bit that matches your pull screws, carefully drill holes through your template where you made your marks.
Drill straight through for clean holes. If the template moves, the holes may be off—so clamp it down or have someone hold it.
Step 5: Test With Your Hardware
Insert the pull into the holes you drilled. Make sure the screws fit perfectly and the spacing matches your hardware.
If the fit is too tight, widen the holes slightly with sandpaper or a larger bit.
Step 6: Label And Store The Template
Write on the template what it’s for (e. g. , “Kitchen Drawers—128 mm pulls”). Store it where you can find it for future use.
Using Your Template On Cabinets
Now that your template is ready, it’s time to use it on your cabinets. This part is just as important as making the template.
Step 1: Position The Template
Line up the template with the cabinet door or drawer. Use the center lines to align with the edge or the center of the cabinet.
For doors, you may want the template to fit against the top or bottom edge. For drawers, center it vertically.
Step 2: Clamp Or Hold The Template
If possible, use a small clamp to hold the template in place. This keeps your hands free for marking or drilling. If you don’t have clamps, ask someone to help.
Step 3: Mark The Hole Locations
With a pencil, mark through the template holes onto the cabinet. Press firmly so you can see the marks later.
If you want, use an awl or a small nail to make a starter dent. This helps keep the drill from slipping.
Step 4: Drill The Holes
Use a drill bit slightly larger than the screw (but smaller than the pull head) to drill straight through the cabinet at your marks.
Drill slowly and hold the drill level. If you drill too fast, you might chip the cabinet surface.
Step 5: Install The Pulls
Insert the screws from the back of the door or drawer and attach the pull. Tighten gently—don’t over-tighten or you might strip the screw hole.
Check that the pull is straight. If it’s not, check your template and measurements before continuing with the rest.
Example: Making A Template For A 3-inch Pull
Let’s walk through a quick example for a typical cabinet pull with a 3-inch center-to-center measurement.
- Cut a piece of thin plywood to 4 x 8 inches.
- Draw vertical and horizontal center lines.
- From the horizontal center, measure 1.5 inches to the left and right (total of 3 inches between holes).
- Mark the two screw holes.
- Drill holes with a 3/16 inch bit.
- Test fit with your pull.
- Use the template on your cabinets as described above.
Practical Tips For Perfect Templates
Small details can make a big difference. Here are some expert tips:
- Use clear plastic if you want to see the cabinet edge through the template.
- Mark the template with a permanent marker so you remember what it’s for.
- Test on scrap wood before using the template on your real cabinets.
- Keep the drill level to avoid slanted holes.
- Label the template with the hardware size and room (e.g., “Bath—3 inch”).
- If you have different-sized pulls in one room, make a separate template for each.
Comparison: Homemade Template Vs Store-bought Template
Here’s a quick look at the pros and cons of making your own template versus buying one:
| Feature | Homemade Template | Store-Bought Template |
|---|---|---|
| Cost | Very low | Medium to high |
| Customization | Fully customizable | Limited (fixed sizes) |
| Durability | Depends on material | Usually high |
| Ease of Use | Simple, but takes time to make | Ready to use |
| Accuracy | High (if made carefully) | High, but only fits standard pulls |
Table: Common Pull Sizes And Their Center-to-center Measurements
Understanding the most popular pull sizes can help you decide what template to make:
| Pull Size (inches) | Center-to-Center (mm) | Common Use |
|---|---|---|
| 3 | 76 | Kitchen drawers, small doors |
| 4 | 102 | Medium cabinet doors |
| 5 | 128 | Wide drawers, modern kitchens |
| 6 | 152 | Large doors, appliances |
Table: Template Materials Compared
Choosing the right material makes your template easier to use and more accurate.
| Material | Strength | Clarity | Ease of Use | Best For |
|---|---|---|---|---|
| Plywood/MDF | High | Opaque | Easy to drill | Reusable, accurate templates |
| Cardboard | Low | Opaque | Very easy to cut | One-time use, testing |
| Clear plastic | Medium | Transparent | Harder to drill | Visual alignment, special cabinets |
Non-obvious Insights For Perfect Cabinet Pull Templates
Many beginners miss small details that save time and avoid frustration. Here are two advanced tips:
1. Compensate for Door Overlays: Some cabinet doors overlap the frame. If you measure from the wrong spot (the edge of the door instead of the frame), your pulls may not line up. Always measure from the same reference point on every door.
2. Use Blue Painter’s Tape: Before drilling, place blue painter’s tape on the cabinet where you’ll drill. Mark on the tape. This prevents the wood from chipping and makes pencil marks easier to see and erase.
Troubleshooting Common Problems
Even with a template, mistakes can happen. Here’s how to fix or avoid them:
- Holes too close or far apart: Double-check your center-to-center measurement. Test on scrap before the real cabinet.
- Drill bit slips: Use an awl or a small nail to make a starter dent.
- Template moves during marking: Clamp it or ask for help.
- Pulls not level: Use a small level to check the template before drilling.
- Wrong template for different doors: Label each template clearly.
If you drill in the wrong spot, fill the hole with wood filler, let it dry, sand smooth, and try again.
When To Make A New Template
If you switch hardware styles or sizes, make a new template. Even a small change in center-to-center measurement means the old template won’t work. For the best results, make and label a separate template for each type of pull or knob.
If your old template is worn or the holes are too big, replace it to keep your work accurate.
Safety Tips For Making And Using Templates
Drilling holes in cabinets is safe if you follow basic rules:
- Always wear safety glasses when drilling.
- Clamp your work whenever possible.
- Keep fingers away from the drill bit.
- Work slowly and don’t rush.
If you’re drilling into a finished cabinet, use a sharp bit to prevent splintering. If you’re not sure, practice on a scrap piece first.
Advanced: Making An Adjustable Template
If you plan to update many cabinets with different pulls, an adjustable template can save you time.
- Use a piece of plywood or clear plastic.
- Drill several pairs of holes at common center-to-center distances (e.g., 3”, 4”, 5”).
- Mark each hole with its size.
- Use masking tape to cover holes you’re not using, to avoid confusion.
This way, you can quickly switch sizes without making a new template for each pull.
How Professionals Speed Up Installation
Pro installers use special jigs, but you can borrow some of their tricks:
- Make a template that fits over the top and side of the cabinet—this lines up the template every time.
- For large kitchens, make one template for left doors and one for right doors.
- Use a cordless drill with a depth stop to avoid drilling too deep.
- Have a helper install pulls while you drill the next holes.
These small details can cut your installation time in half and ensure consistent results.
Resources For More Information
If you want to see how cabinet professionals make and use templates, check out detailed guides and instructional videos from woodworking experts. For more on cabinet hardware standards, visit the Wikipedia Cabinetry page for further reading.

Credit: ourhomefromscratch.com
Frequently Asked Questions
How Do I Find The Center-to-center Measurement For My Cabinet Pulls?
Measure from the center of one screw hole to the center of the other. This is usually listed on the packaging, but always double-check with your own ruler. Common sizes are 3, 4, or 5 inches, but some pulls are metric.
Can I Use The Same Template For Both Doors And Drawers?
Yes, if the pulls are the same size and you want them placed the same way. However, doors and drawers often need different placement for best appearance. Many people make one template for doors and another for drawers.
What If I Make A Mistake And Drill The Hole In The Wrong Place?
Fill the hole with wood filler, let it dry, and sand smooth. You can repaint or touch up the area if needed. Then re-drill in the correct spot using your template.
Do I Need A Special Drill Bit For Cabinets?
A standard wood drill bit works well. For clean holes, use a sharp bit and drill slowly. If your cabinets are laminated or painted, use painter’s tape to prevent chipping.
Is There An Easy Way To Keep The Pulls Level On Every Cabinet?
Yes. Use your template’s center lines and a small bubble level to check alignment before drilling. If you have many cabinets, consider making a template that fits over the edge for consistent placement.
Making your own template for cabinet pulls is a simple project that pays off every time you install hardware. With careful measuring, the right materials, and a little patience, you’ll get professional results and avoid common mistakes. Whether you’re updating a single cabinet or a whole kitchen, the template you make today will help for years to come.