Lifting a stove top might sound simple, but it can quickly become confusing or even risky if you don’t know what you’re doing. Whether you need to clean under your stove, check for a gas leak, or fix a burner, knowing how to lift stove top safely is important. Most people only try it when something spills, but there are many situations where you need to access the space below. This guide will walk you through everything you need to know, step by step, with clear instructions, safety tips, and answers to common problems.
You’ll also find out what kind of stove top you have, which tools make the job easier, and what mistakes people often make. Even if you’ve never tried this before, you’ll feel confident by the end. Let’s get started and make lifting your stove top a stress-free task.
Understanding Stove Top Types
Before you begin, it’s important to know which kind of stove top you have. Not all stoves are made the same. Some lift up easily, while others need special tools or steps. Understanding your stove’s design is the first step for a safe, efficient job.
Common Stove Top Designs
- Hinged stove tops: These are usually found on older gas stoves. The whole top lifts up, similar to a car hood. Hinged designs are straightforward, but you may find small variations. Some models have a support rod, while others use tension hinges that hold the top up automatically.
- Removable burner stove tops: Many modern electric ranges have burners you can remove, and the top may lift off completely. This design is popular for easy cleaning, but the connections for the coils can sometimes be stiff or greasy, making removal tricky if you haven’t done it before.
- Sealed burner stove tops: These are common in newer gas ranges. The burners are attached directly to the top, making lifting a bit more complex. You’ll often need to remove screws from each burner, and sometimes the igniter wires are short, so you must be careful not to stretch or break them.
- Glass-ceramic stove tops: Found on smooth-top electric or induction stoves. These do not usually lift up, and trying to do so can break the glass. This type is the most delicate and expensive to repair, so it’s important to confirm if your model is truly designed to be lifted before you try anything.
Why Identifying Matters
Knowing your stove type helps you avoid damage. For example, trying to force a glass stove top can lead to expensive repairs. It also tells you what tools you’ll need and what steps to follow. Some models have electronic touch controls connected to the top, so lifting it incorrectly could break a wire or sensor.
A surprising fact: some high-end stoves use a mix of designs. For example, a gas range might have sealed burners and a glass top, blending the challenges of both. Always check your manual if you’re not sure.
Where To Check
Look for your stove’s model and serial number, usually found under the top, on the frame, or in the manual. If you don’t have the manual, you can often look up the model number online to get detailed instructions. If you’re renting, ask your landlord or property manager—they often have appliance records.
Some manufacturers put a sticker or plate inside the bottom drawer or on the stove’s side panel. Taking a photo of this label can help when searching online or asking for advice at an appliance parts store.
Safety First: Preparing To Lift Your Stove Top
Lifting a stove top is not dangerous if you follow basic safety steps. Here’s what you should always do before starting:
- Turn off power or gas: For electric stoves, unplug from the wall. For gas stoves, turn the control knob to “off” and, if possible, close the gas valve. Even with the knob off, some gas can remain in the lines, so closing the valve is best if you’re doing anything beyond a quick clean.
- Let the stove cool: Wait at least 30 minutes after cooking. Surfaces and internal parts stay hot and can burn you. This is especially true for glass-ceramic tops, which hold heat much longer than metal.
- Clear the area: Remove pots, pans, and anything on or near the stove. You want space to move. It’s easy to accidentally knock something over when lifting the top, so a clear workspace helps prevent broken dishes or spills.
- Gather tools: Depending on your stove, you may need a screwdriver, a flashlight, gloves, or a putty knife. If you’re unsure, lay out all the common tools before you start so you’re not searching with a half-open stove top.
- Read the manual: If you have it, check for any special instructions. Some stoves have specific warnings, like “do not lift without removing certain screws,” or they may require a particular order for removing parts.
Why These Steps Matter
Skipping any of these steps can lead to injury, fire, or damage. For example, even a warm burner can burn your hand. Gas leaks can be dangerous if you accidentally open a line. Always double-check before you start.
People often forget that stoves are heavy and can shift slightly when the top is lifted, especially if the feet aren’t level. If possible, make sure the stove isn’t loose or wobbly before you start. If you need to move the stove for better access, ask someone to help rather than trying to slide it alone.
Tools You Might Need
Having the right tools makes the job easier and safer. Here’s a quick list of what might help:
- Screwdriver: Most stove tops have screws holding them down. Usually Phillips or flat-head. Sometimes, security screws are used, which need a special tip.
- Work gloves: Protect your hands from sharp edges or hot surfaces. Thin, flexible gloves are best—you still need to feel what you’re doing.
- Flashlight: Some areas are dark, especially under the top. A small headlamp is even better, as it leaves your hands free.
- Putty knife: Helpful for prying up stuck tops. Metal putty knives work, but a plastic one is less likely to scratch painted surfaces.
- Nut driver: Sometimes needed for special fasteners. Appliance screws can be tiny, so the right size matters.
- Soft cloth: To protect the surface when lifting. Place it between the top and your tool if you have to pry, to avoid chips or scratches.
- Small container or magnetic tray: For holding screws and small parts, so nothing rolls away or gets lost.
Not all jobs need every tool, but having them ready saves time. If your stove is older or greasy, gloves are especially helpful.
One small but useful tip: keep your phone nearby to take photos during the process. This helps if you forget how something fits back together.
Step-by-step Guide: How To Lift Stove Top
Let’s break down the process for different stove types. Always follow the steps for your specific design.
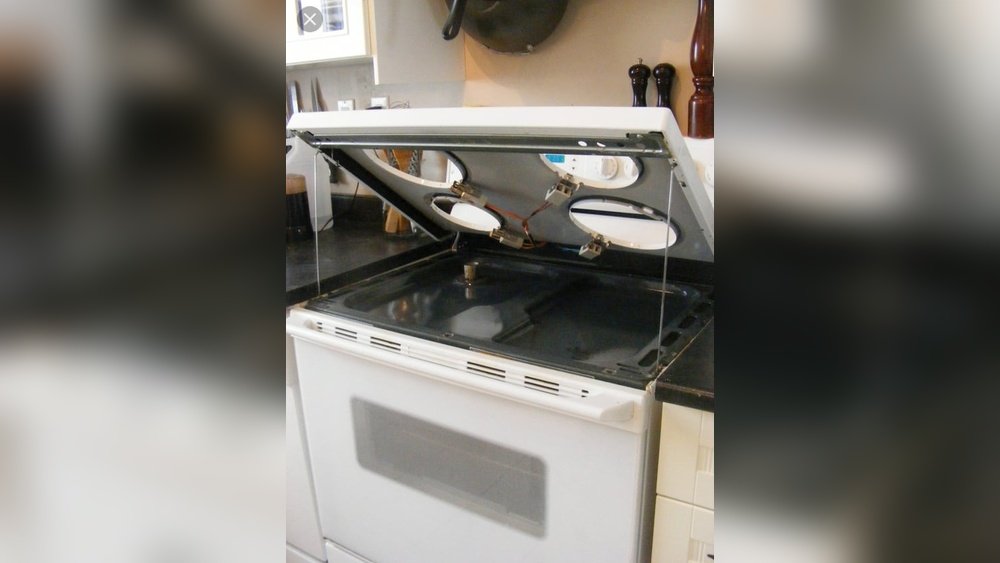
1. Hinged Gas Stove Tops
These are the most common in older homes. They’re usually easy to lift.
Steps:
- Remove the burner grates and caps.
- Check for screws near the front edge. Remove them if present.
- Gently lift the front edge of the top. It should pivot up on back hinges.
- Use the built-in support rod (if present) to hold it open, like a car hood.
Tip: If the top won’t lift, double-check for hidden screws under the burners.
Some models use spring clips instead of screws. If you feel resistance, try gently sliding a putty knife under the front edge to release these clips.
2. Removable Burner Electric Stove Tops
Modern electric stoves often let you remove burners and lift the top.
Steps:
- Unplug the stove.
- Remove all coil burners by gently pulling them out.
- Take off drip pans.
- Look for hold-down clips near the front edge. Release them with a putty knife.
- Lift the top straight up.
Tip: Be gentle with the burner connections. Don’t force anything.
Burner sockets can sometimes be stiff if they’ve never been removed. Wiggle them gently side to side while pulling. If you see any corrosion or burn marks on the connectors, clean them with a dry cloth before reassembly.
3. Sealed Burner Gas Stove Tops
Newer gas stoves often have burners attached to the top.
Steps:
- Remove grates and burner caps.
- Use a screwdriver to remove screws holding the burner bases.
- Carefully lift the top. It may have wires connected, so don’t pull hard.
- Prop up the top with a rod or have someone hold it.
Tip: Take a photo before removing parts, so you know how to reassemble.
On some models, the igniter wire is very short. If you feel resistance, check underneath before lifting further. If you see wires connected, gently disconnect them if possible, or only lift as far as the wires allow.
4. Glass-ceramic Or Induction Stove Tops
These do not usually lift in the same way. Lifting a glass top is only for advanced repairs.
Steps:
- Unplug the stove.
- Remove control knobs.
- Check for screws under the front lip and at the back.
- With help, carefully lift the glass panel.
Warning: Glass tops are heavy and fragile. Only lift if you really need to, and have a friend help.
Some glass tops have adhesive or sealant at the edges. If it won’t lift easily, double-check the manual. Never use a metal tool to pry, as this can crack the glass.
What If It Feels Stuck?
If the top doesn’t move, stop and check for hidden screws, clips, or stuck-on grease. Never force it—this can break parts or the top itself.
It’s common for older stoves to have a layer of grease or even rust holding the top in place. If you see buildup, spray a little degreaser around the edges and wait a few minutes before trying again.
Practical Examples: Real Stove Brands
Let’s look at a few real-world examples, so you know what to expect.
Ge Gas Stove
Most GE gas stoves from the 1980s and 1990s have a hinged top. You remove the grates, take off the burner caps, and lift. There’s usually a support rod.
Some newer GE models have sealed burners, so you need to remove screws from each burner before lifting. Always check your specific model.
Whirlpool Electric Range
Whirlpool electric stoves often have coil burners. You pull out the elements, remove the drip pans, and then lift the top using clips.
If you feel resistance, make sure all burner prongs are fully disconnected. For glass-top Whirlpool ranges, the top doesn’t lift for cleaning—only for repairs.
Samsung Glass Top
A Samsung glass top requires removing screws at the back and sides. Two people are needed to lift it safely.
The glass is often heavier than people expect, and there may be a foam or rubber seal around the edges. Don’t cut or peel this seal unless you are replacing the entire top.
Frigidaire Sealed Burner
With a Frigidaire sealed burner range, you must unscrew each burner base before the top will lift.
Some Frigidaire models use Torx screws (star-shaped). Check your tool kit before starting.
Data Table: Stove Top Lifting Methods By Brand
Here’s a quick reference for some popular brands and their typical lifting methods.
| Brand | Stove Top Type | Lifting Method | Tools Needed |
|---|---|---|---|
| GE (Gas) | Hinged | Lift from front, use support rod | Screwdriver (if screws present) |
| Whirlpool (Electric) | Removable Burner | Remove coils and drip pans, lift | None or putty knife |
| Samsung (Glass) | Glass-Ceramic | Remove screws, lift with help | Screwdriver |
| Frigidaire (Sealed Gas) | Sealed Burner | Remove burner screws, lift | Screwdriver |
| LG (Electric) | Removable Burner | Remove coils, release clips, lift | Putty knife |
If your stove brand isn’t listed, check the manual or look for online videos specific to your model.

Credit: www.youtube.com
Cleaning And Maintenance Tips After Lifting
Once your stove top is open, it’s a great time to clean and check for problems.
Cleaning Under The Stove Top
- Vacuum crumbs and debris: Use a small vacuum or hand brush to remove food and dust.
- Wipe with a damp cloth: Clean all surfaces with warm, soapy water.
- Remove grease: For stubborn spots, use a degreaser or baking soda paste.
- Dry completely: Make sure everything is dry before closing the top.
Don’t forget to clean the burner bases and around the igniters. Even a little grease here can cause ignition problems or strange smells during cooking.
If you find melted plastic or burned food, let the area cool, then gently scrape it off with a plastic tool. Never use metal tools—they can scratch or damage the metal.
Checking For Problems
- Look for gas leaks: If you smell gas, stop and call a professional.
- Inspect wires: Look for burned or loose wires, especially in electric stoves.
- Check igniters: For gas stoves, make sure igniters are clean and in place.
If you see any wires with cracked or melted insulation, do not use the stove until they are repaired. Electrical tape is only a temporary fix—replace damaged wires as soon as possible.
Some people use a small mirror to check the back corners, where crumbs and grease often collect. This helps you spot issues that are hard to see from above.
Reassembling The Stove
- Reverse the steps: Put back all screws, burner caps, and drip pans.
- Test each burner: Make sure everything works before cooking again.
If a burner won’t light or heat up after reassembly, double-check that all connections are secure. Sometimes drip pans or burner caps are not seated correctly, which can cause uneven flames or poor heating.
Common Mistakes And How To Avoid Them
Lifting a stove top isn’t hard, but there are a few mistakes that can cause trouble.
1. Forcing The Top
Some people try to pry up the top with too much force. This can bend metal or break glass. Always check for hidden screws or clips first.
If you’re unsure, stop and consult your manual or look up a video for your specific stove. Forcing things usually leads to more costly repairs.
2. Forgetting To Unplug
Working on an electric stove while it’s plugged in is dangerous. You risk electric shock. Unplug every time.
Don’t just turn off the control knobs—unplug at the wall or flip the circuit breaker if you can’t reach the plug.
3. Losing Screws
Small screws are easy to lose. Use a cup or tray to keep them safe.
A magnetic tray is great if you have one. If a screw falls behind the stove, use a telescoping magnet to retrieve it.
4. Damaging Wires
Pulling up the top too quickly can pull out wires. Go slowly and support the top as you lift.
Double-check for wires before lifting the top more than a few inches. If you see any, disconnect them gently.
5. Not Taking Photos
If you remove parts, take photos so you know how to put them back. This prevents confusion later.
Labeling parts with tape can also help, especially if you’re working on more than one burner at a time.
Credit: www.reddit.com
Advanced Tips: When To Call A Professional
Not every problem should be fixed at home. Here’s when to call an expert:
- Gas smell that doesn’t go away
- Broken glass stove tops
- Burned wires or melted parts
- Electronic control problems
Trying to fix these yourself can be risky. A technician has the right tools and training.
If you have a warranty, doing major repairs yourself might void it. Always check before starting. Most technicians can also spot other problems before they get worse, saving you money in the long run.
Comparison Table: Lifting Difficulty By Stove Type
If you’re wondering how hard it is to lift your stove top, here’s a comparison.
| Stove Top Type | Difficulty Level | Time Needed | Risk of Damage |
|---|---|---|---|
| Hinged (Old Gas) | Easy | 5 minutes | Low |
| Removable Burner (Electric) | Easy-Moderate | 7 minutes | Low |
| Sealed Burner (Gas) | Moderate | 10-15 minutes | Medium |
| Glass-Ceramic | Hard | 20 minutes with help | High |
If you’re new to DIY repairs, start with the easier types and work up to more complex models as you gain confidence.

Credit: www.reddit.com
Non-obvious Insights Most Beginners Miss
1. The Hidden Clip Problem
Many stove tops have spring clips near the front edge. Beginners often miss these and wonder why the top won’t budge. Use a putty knife, slide it under the front, and gently pry to release the clips.
If you hear a “pop” or feel the top release, you’ve found the clip. Repeat on the other side. If the top still won’t lift, look for screws at the back or sides.
2. Grease As A “glue”
Old stoves often have grease buildup acting like glue. Even if all screws and clips are removed, the top may stick. Warm soapy water around the edges can help loosen it before you try to lift.
Another trick: gently tap the side of the top with the heel of your hand (not a tool) to loosen the seal. Just be careful not to hit glass or controls.
3. Burner Alignment On Reassembly
If burners aren’t sitting perfectly after reassembly, they may not heat correctly or the gas flow could be uneven. Make sure each burner is centered and the caps are fully seated. If you’re unsure, compare with another burner or check the manual.
4. Checking For Rust
If you see rust under the stove top, clean it thoroughly and dry the area well before closing. Rust can spread quickly and damage metal parts, leading to more expensive repairs later.
Frequently Asked Questions
How Do I Know If My Stove Top Can Be Lifted?
Check your stove’s manual or look for visible hinges, screws, or clips at the front or sides. If you see none and have a glass top, it likely does not lift easily. You can also search the model number online for instructions.
What Should I Do If The Stove Top Won’t Lift?
First, double-check for screws, clips, or stuck-on grease. Use a putty knife to gently probe the edges. Never force the top—if it does not move, consult your manual or call a technician.
Can I Clean Under My Stove Top With Water?
You can use a damp cloth or mild cleaner, but avoid soaking any electrical parts. Make sure everything is dry before closing the top and turning the stove back on.
Is It Safe To Lift A Glass Stove Top By Myself?
No, glass stove tops are heavy and fragile. Always have at least two people to lift. If you are unsure, call a professional to avoid breaking the glass.
Where Can I Find More Information About My Stove’s Model?
Check the manufacturer’s website or look up the model number online. For general stove safety, the Wikipedia page on kitchen stoves has helpful background.
Lifting your stove top doesn’t have to be difficult or risky. With the right steps, tools, and a bit of patience, you can access the area below safely for cleaning or small repairs. Always put safety first, and don’t hesitate to call a professional if something seems out of your comfort zone.
Following this guide, you’ll be able to handle your next stove top project with confidence.