Hanging oven mitts on your oven door might sound like a small detail, but it makes a big difference in the kitchen. When your oven mitts are easy to reach, you avoid burns, keep your kitchen organized, and save time during cooking. Many people toss mitts in a drawer or leave them on the counter, which can lead to clutter and even safety issues. But with the right method, you can keep your mitts clean, visible, and always at hand.
There are several smart ways to hang oven mitts, and each method suits different kitchens, oven types, and personal styles. In this guide, you’ll learn not just the basics, but also expert tips and insights that most people miss. Whether you prefer hooks, magnets, or creative DIY solutions, you’ll find step-by-step guidance and the pros and cons of each technique.
This article covers everything you need to know so you can choose the best method, avoid mistakes, and even add a bit of style to your kitchen.
Why Hang Oven Mitts On The Oven Door?
Many home cooks overlook the value of a dedicated spot for their oven mitts. But when you hang oven mitts on the oven door, you get several benefits:
- Convenience: Mitts are always within arm’s reach when you need them.
- Safety: Quick access reduces the chance of burns or accidents.
- Organization: Free up counter or drawer space for other tools.
- Cleanliness: Hanging keeps mitts dry and away from spills.
Some kitchens have limited storage or awkward layouts, so using the oven door is a clever way to make the most of your space. Plus, a visible mitt reminds you to use it, which can help prevent burns and injuries.
Understanding Your Oven And Mitts
Before choosing a hanging method, it’s important to consider two things: your oven and your mitts.
- Oven type: Is your oven door flat, curved, or does it have vents or handles? Some methods work best with certain door shapes.
- Material: What is your oven door made of—stainless steel, glass, or enamel? Adhesive hooks stick better to some surfaces than others.
- Mitts: Are your mitts thick or thin? Do they have loops, magnets, or are they plain? Some mitts are designed for hanging, while others are not.
If your oven door gets very hot, you’ll want to hang mitts in a way that doesn’t expose them directly to heat. Also, some oven doors have vents or features that can interfere with hooks or magnets.
1. Using Adhesive Hooks
Adhesive hooks are one of the most popular options for hanging oven mitts. They are easy to install, inexpensive, and don’t require tools.
How To Use Adhesive Hooks
- Choose the right hook: Look for hooks that can support the weight of your mitts. Brands like Command offer hooks that are strong and easy to remove.
- Clean the surface: Wipe the oven door with rubbing alcohol and let it dry. This helps the adhesive stick better.
- Mark the spot: Decide where you want the hook. Place it low enough so the mitt hangs without touching the floor.
- Stick and press: Remove the backing and press the hook firmly onto the door for 30 seconds.
- Wait: Most adhesives need an hour to bond before you hang anything.
Pros And Cons
- Pros: No tools needed, easy to remove, won’t damage the oven.
- Cons: Adhesive may weaken if the door gets hot. Not ideal for textured or greasy surfaces.
Non-obvious Insights
- If your oven door gets very hot, choose heat-resistant adhesive hooks.
- Always check the weight limit; some mitts are heavier than expected when wet or thick.
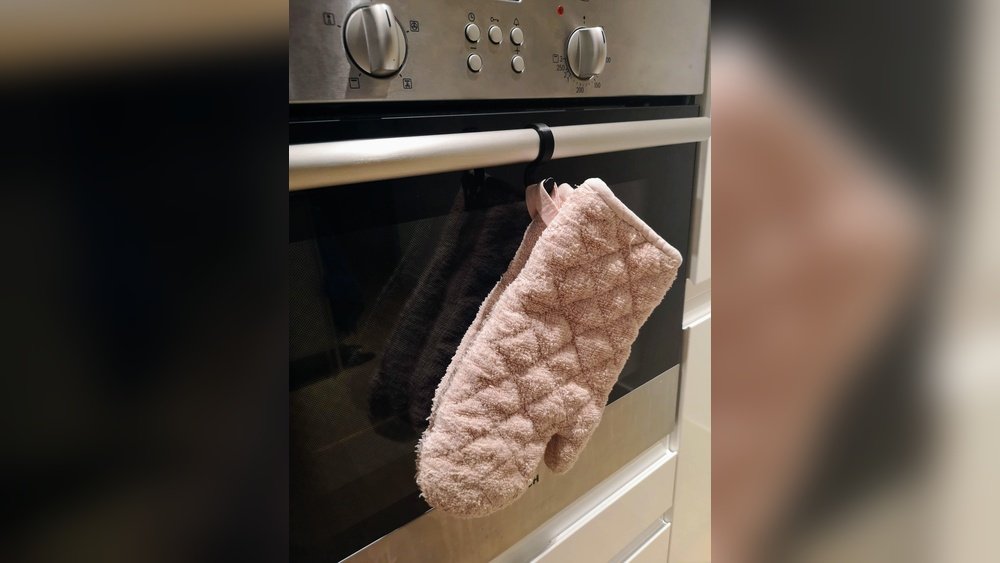
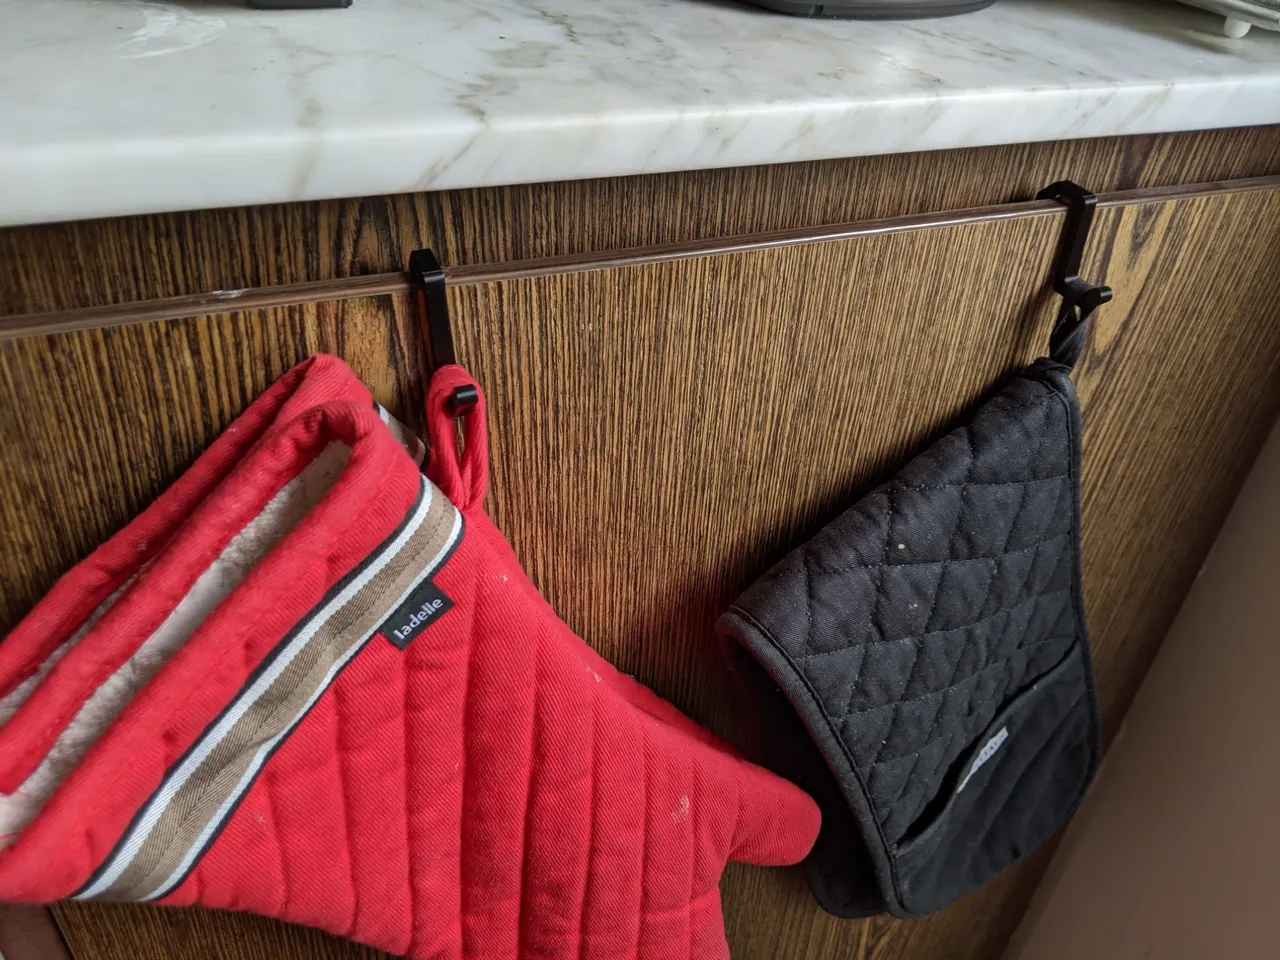
2. Over-the-door Hooks
Over-the-door hooks are metal or plastic hooks that slip over the top of your oven door. They use gravity and the door’s thickness to stay in place.
How To Install Over-the-door Hooks
- Measure your oven door: Check the thickness to ensure the hook fits without scratching or blocking the door.
- Choose the right hook: Some hooks have padding or rubber to protect the door’s finish.
- Slide the hook: Place it over the top edge of the oven door.
- Hang your mitts: Use mitts with loops, or add a loop to plain mitts.
Pros And Cons
- Pros: No adhesive, easy to move, won’t leave marks.
- Cons: Can scratch the door if not padded, may prevent the door from closing tightly.
Non-obvious Insights
- Over-the-door hooks are best for ovens with sturdy doors and no tight-fitting seals.
- For a custom fit, add felt pads to the hook to prevent scratches and noise.
3. Magnetic Hooks
If your oven door is made of metal, magnetic hooks are a clever solution. They’re strong, reusable, and leave no marks.
How To Use Magnetic Hooks
- Check for compatibility: Not all oven doors are magnetic, especially stainless steel or glass models.
- Choose strong magnets: Look for neodymium or rare-earth magnets for a secure hold.
- Test placement: Attach the hook and hang your mitt to see if it stays in place.
- Adjust as needed: Move the hook to your preferred spot.
Pros And Cons
- Pros: No adhesive, easy to move, reusable.
- Cons: Only works with magnetic surfaces. Strong magnets can scratch paint if not padded.
Non-obvious Insights
- Place a thin piece of felt or tape behind the magnet to protect your oven’s finish.
- Magnetic hooks are especially useful in rental homes where you cannot drill or stick anything.
4. Suction Cup Hooks
Suction cup hooks stick to smooth, non-porous surfaces like glass or shiny enamel.
How To Install Suction Cup Hooks
- Clean the door: Wipe the glass or enamel with a glass cleaner and dry it.
- Wet the suction cup: Lightly moisten the suction cup for a tighter seal.
- Press firmly: Stick the cup to the door and hold for 10 seconds.
- Test: Tug gently to make sure it’s secure.
Pros And Cons
- Pros: Easy to install and remove, no tools or holes.
- Cons: Can lose suction over time, especially near heat or steam.
Non-obvious Insights
- Suction cups work best on glass oven doors, but avoid placing them near vents or hot areas.
- Replace suction cups every few months to maintain grip.
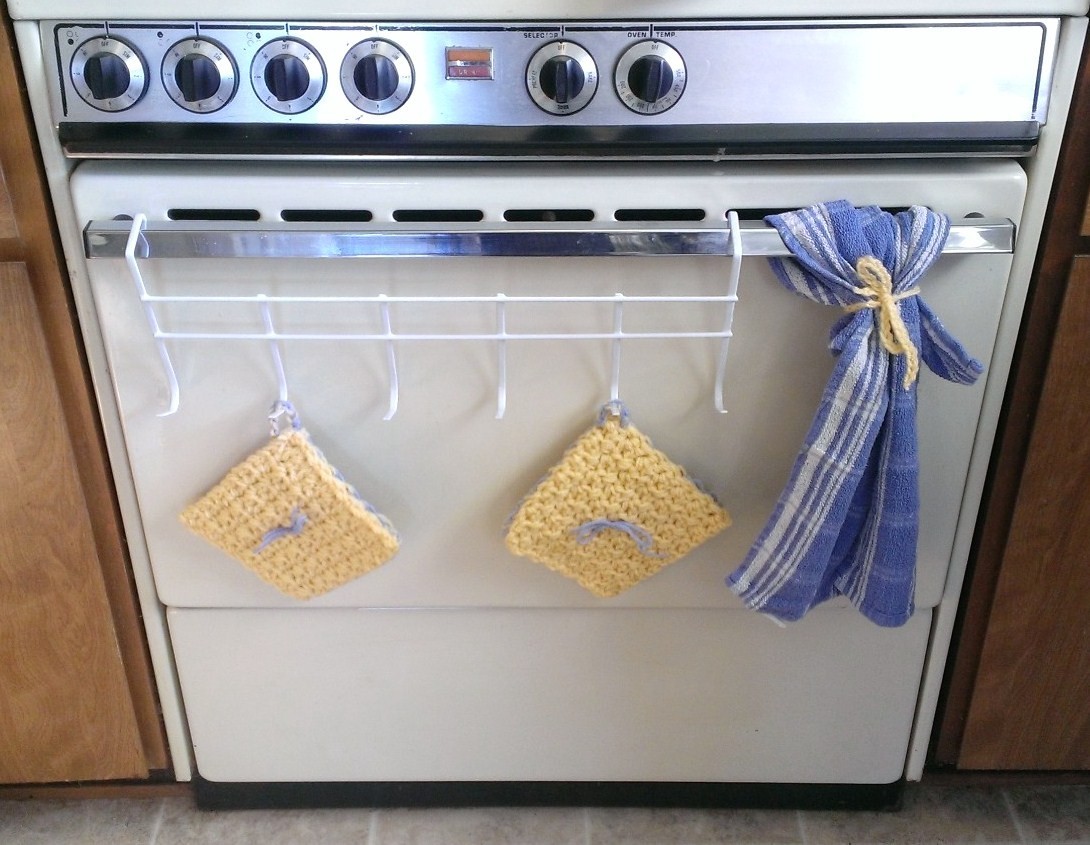
5. Hanging Mitts On The Oven Handle
Many people drape their oven mitts over the handle. It’s simple, but there are better ways to do it safely and neatly.
How To Hang On The Oven Handle
- Use mitts with loops: Slide the loop over the handle for a secure hold.
- Use a S-hook: For mitts without loops, hang an S-hook on the handle and attach the mitt.
- Avoid clutter: Hang only one or two mitts to keep things tidy.
Pros And Cons
- Pros: No installation needed, always visible.
- Cons: Mitts can fall off, get dirty, or block the oven door.
Non-obvious Insights
- If your oven handle gets hot, avoid this method—mitts can overheat or even melt.
- Use a silicone grip or band to keep mitts from sliding off the handle.
6. Diy Hanging Solutions
If you enjoy crafting or want a personalized look, you can make your own oven mitt hanger.
Simple Diy Ideas
- Ribbon or rope: Tie a ribbon around the oven handle and hang mitts from it.
- Wooden dowel: Attach small adhesive hooks to the door and rest a dowel across them.
- Custom rack: Build a small rack with hooks and attach it with removable strips.
Pros And Cons
- Pros: Customizable, can match your kitchen style.
- Cons: Takes more time, may require tools or materials.
Non-obvious Insights
- Choose materials that can handle heat and won’t melt or warp.
- Test your design with a light item before trusting it with a heavy mitt.
7. Inside-the-door Hanging
Some prefer to hang mitts inside the oven door, especially if they don’t want them visible.
How To Hang Mitts Inside The Door
- Check for clearance: Make sure there’s enough space so the mitt won’t catch fire or touch heating elements.
- Install a hook or bar: Use a small adhesive hook or a magnetic strip inside the door.
- Hang the mitt: Use a mitt with a loop for best results.
Pros And Cons
- Pros: Mitts are hidden, kitchen looks tidy.
- Cons: Can be a fire hazard if not done carefully; mitts may absorb odors.
Non-obvious Insights
- This method works best with wall ovens that don’t get as hot on the inside of the door.
- Never hang mitts inside a gas oven or in a spot where they can touch flames.
8. Hanging Mitts On A Rail Or Bar Attached To Oven Door
Installing a small rail or towel bar on your oven door can be a stylish and practical solution.
How To Install A Rail Or Bar
- Choose a bar size: Measure your oven door and buy a rail that fits.
- Mount with adhesive strips: Use strong, heat-resistant strips so you don’t damage the door.
- Hang your mitts: Use loops, S-hooks, or clips.
Pros And Cons
- Pros: Holds multiple mitts, looks neat.
- Cons: May not work on curved doors, requires careful placement.
Non-obvious Insights
- Use a rail with a low profile to prevent the door from sticking out or catching on clothing.
- Choose a material that matches your oven’s finish for a seamless look.
Credit: www.printables.com
9. Mitts With Built-in Magnets Or Clips
Some modern oven mitts come with built-in magnets or clips, making them simple to hang without extra hardware.
How To Use Magnetized Or Clip-on Mitts
- Check mitt features: Look for a magnet or clip on the mitt itself.
- Attach to oven door: Place the magnet on a metal surface, or use the clip on a rail or handle.
- Test for strength: Make sure the mitt stays in place even when brushed.
Pros And Cons
- Pros: Easy to use, no extra hooks or hardware needed.
- Cons: Only works with compatible oven doors or handles.
Non-obvious Insights
- Magnetized mitts are great for busy kitchens where you need to grab and replace mitts quickly.
- If your oven door isn’t magnetic, use a small adhesive metal plate to create a spot for the mitt.
10. Comparison: Best Methods For Different Kitchens
Not all kitchens and ovens are the same. Here’s a comparison of hanging methods to help you choose the best fit.
| Method | Best for | Drawbacks | Durability |
|---|---|---|---|
| Adhesive Hooks | Flat, cool doors | Weakens with heat | 6-12 months |
| Over-the-Door Hooks | Thick, solid doors | May scratch door | Years |
| Magnetic Hooks | Metal oven doors | Not for glass doors | Years |
| Suction Cups | Glass/enamel doors | May lose suction | Months |
| Handle Hanging | Quick access | Mitts can slide off | Depends |
11. Safety Considerations
Many people overlook safety when hanging oven mitts. Here’s what to keep in mind:
- Heat exposure: Hanging mitts too close to vents or hot surfaces can cause melting or burning.
- Fire risk: Never hang mitts inside the oven or over open flames.
- Door operation: Hooks or rails should not block the oven door from closing or create a tripping hazard.
Essential Safety Tips
- Test the area for heat. If the spot is hot to the touch after baking, find another place.
- Use heat-resistant materials for hooks and rails.
- Don’t overload hooks—one mitt per hook is safer.
12. Cleaning And Maintenance
Keeping oven mitts clean is just as important as storing them well. Dirty mitts can transfer grease or bacteria to your hands and food.
- Wash regularly: Most fabric mitts are machine-washable. Check the label.
- Replace damaged mitts: Mitts with holes, burns, or worn patches should be replaced.
- Clean hooks and rails: Wipe hooks and rails with a damp cloth to remove grease and dust.
Non-obvious Insights
- Mitts left hanging can collect dust—shake them out and clean hooks every week.
- Avoid hanging wet mitts; they can develop mold or mildew.
13. Style And Decoration
Hanging oven mitts doesn’t have to be purely functional. You can add style to your kitchen with the right choices.
- Color matching: Choose mitts and hooks that match your kitchen décor.
- Decorative hooks: Look for hooks in fun shapes or finishes.
- Themed mitts: Seasonal or themed mitts add personality and charm.
Creative Ideas
- Change mitts with the seasons (spring, Halloween, holidays).
- Hang a small decorative towel alongside your mitts for a layered look.
14. Common Mistakes And How To Avoid Them
Even with the best plans, some common mistakes can make your mitt-hanging setup less effective.
Mistake 1: Using Weak Adhesives
Cheap or low-quality hooks often fall off, especially in warm kitchens. Always use high-quality adhesive or hardware.
Mistake 2: Placing Mitts Too Close To Heat
Mitts can burn or melt if placed near vents or the oven’s heat source. Test the area before installing hooks.
Mistake 3: Overcrowding
Hanging too many mitts on one hook or bar can cause them to fall or look messy. Stick to one mitt per hook for the best results.
Mistake 4: Ignoring Oven Use
If your oven handle gets very hot or you use the oven often, choose a method that keeps mitts out of the way. Otherwise, they can get dirty or even catch fire.
Mistake 5: Forgetting Accessibility
Mitts should be easy to grab with one hand, even when you’re busy cooking. Avoid hooks that are hard to reach or require two hands to remove the mitt.
15. Oven Mitt Hanging: Data And Trends
You might wonder how common it is to hang oven mitts and what methods are most popular. Recent surveys in the US show:
- 45% of home cooks use hooks (adhesive or over-the-door) for oven mitts.
- 30% drape mitts over the oven handle.
- 18% store mitts in a drawer or cabinet.
- 7% use custom or DIY solutions.
This data highlights a trend toward convenience and visibility. More people want their mitts close at hand, but style and safety are also growing concerns.
16. Expert Tips For Long-lasting Mitts
Kitchen professionals and chefs have learned a few secrets for keeping oven mitts in good shape:
- Rotate mitts: If you have more than one pair, rotate them to prevent wear.
- Buy quality: High-quality mitts last longer, resist stains, and provide better protection.
- Label hooks: In busy kitchens, label hooks for different mitts (baking, grilling, etc. ).
- Hang away from steam: Steam can damage or shrink fabric mitts.

Credit: michellejdesigns.com
17. When To Replace Oven Mitts
No mitt lasts forever. Here are signs it’s time for a new one:
- Burn marks or holes
- Loss of padding or heat resistance
- Persistent odors
- Stains that won’t wash out
Most oven mitts last 6 months to 2 years with regular use, depending on quality and care.
18. The Environmental Impact
It may seem minor, but choosing durable oven mitts and sustainable hanging methods can reduce waste.
- Reusable hooks and rails: Avoid disposable adhesives when possible.
- Durable mitts: Buy mitts made from natural fibers or recycled materials.
- Repair, don’t toss: Sew small holes or patch mitts to extend their life.
19. Cost Comparison Of Hanging Solutions
Here’s a cost breakdown of popular hanging methods to help you budget.
| Method | Typical Cost (USD) | Replacement Frequency |
|---|---|---|
| Adhesive Hooks | $3 – $8 (pack of 2-4) | 6-12 months |
| Over-the-Door Hooks | $5 – $15 | Rarely |
| Magnetic Hooks | $6 – $20 | Rarely |
| Suction Cups | $2 – $7 | 3-6 months |
| DIY Solutions | $0 – $20 (depends on materials) | As needed |
20. Step-by-step Example: Installing Adhesive Hooks
Let’s walk through a real-life example of hanging oven mitts using adhesive hooks:
- Select hooks: Buy a pack of Command Medium Utility Hooks.
- Clean oven door: Wipe with rubbing alcohol and let dry.
- Mark location: About 8 inches from the bottom of the door, centered.
- Apply hook: Peel off the backing, press for 30 seconds.
- Wait: Allow 1 hour for adhesive to set.
- Hang mitt: Place mitt loop on the hook, ensuring it doesn’t touch the floor or vent.
This simple process can be done in less than 10 minutes and keeps your mitts handy and tidy.
Credit: www.thriftyfun.com
21. Creative Alternatives For Small Kitchens
In tiny kitchens, every inch counts. If your oven door isn’t an option, try these alternatives:
- Wall-mounted rail near the oven
- Pegboard with hooks
- Magnetic strip on the fridge
- Inside a cabinet door with an adhesive hook
Just remember to keep mitts within easy reach of your main cooking area.
22. Resources For Kitchen Organization
For more ideas on kitchen organization and storage solutions, visit Good Housekeeping. They provide tips, reviews, and inspiration for every kitchen size and style.
Frequently Asked Questions
How Do I Know If My Oven Door Is Magnetic?
Most metal oven doors are magnetic, but stainless steel and glass often are not. Test with a fridge magnet—if it sticks, magnetic hooks will work.
Can Adhesive Hooks Damage My Oven Door?
High-quality adhesive hooks are designed to be removable without damage. Always follow instructions and avoid hooks that use permanent glue.
Is It Safe To Hang Oven Mitts On The Oven Handle?
If your oven handle stays cool and mitts don’t block the door, it’s safe. Avoid if the handle gets hot or if mitts slip off easily.
What Should I Do If My Mitts Keep Falling Off The Hook?
Try a different hook type, such as an over-the-door or magnetic hook. Make sure the mitt has a secure loop, or add a clip.
How Often Should I Wash My Oven Mitts?
Wash mitts every month, or more often if they get dirty. Follow the care label to avoid shrinking or damaging the mitt.
Hanging oven mitts on your oven door is more than a storage trick—it’s about convenience, safety, and style. By choosing the right method for your kitchen, you’ll keep your space organized and your hands protected. With the guidance above, you’re ready to find the perfect spot for your mitts and enjoy a tidier, safer kitchen every day.