
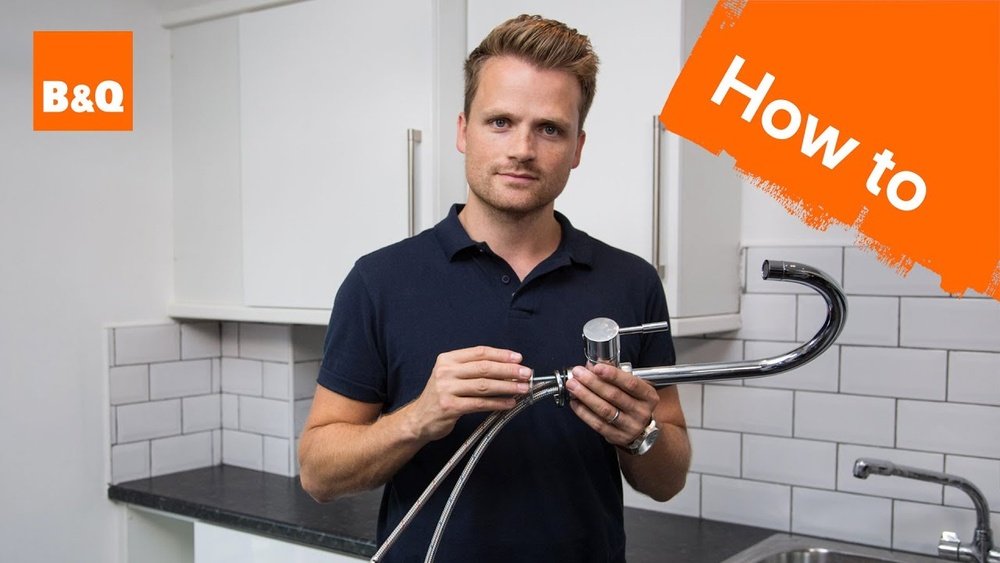
Changing a kitchen tap mixer might seem like a job for a professional plumber, but with the right guidance, many homeowners can handle it themselves. This task is not only about saving money; it’s also about understanding your home better and having the satisfaction of doing it yourself. If your kitchen mixer tap is leaking, old, or just doesn’t suit your style anymore, replacing it can give your kitchen a fresh look and improve your daily life. This article will take you through every step, from preparation to final checks, with practical advice and real-life tips. By the end, you’ll know exactly how to change a kitchen tap mixer safely and confidently—even if you’re new to DIY work.
Understanding Kitchen Tap Mixers
Before starting, it helps to know what a kitchen tap mixer is and how it works. A mixer tap combines hot and cold water inside the faucet, letting you control both temperature and flow with one handle or two separate handles. They’re now more common than traditional separate hot and cold taps, as they’re practical and look modern.
There are several types:
- Monobloc mixers: One single hole in the sink, with one or two handles.
- Deck-mounted mixers: Fitted to the sink or countertop, usually with two handles.
- Wall-mounted mixers: Fixed to the wall, not the sink.
Each type may need a slightly different installation method. Most homes use monobloc or deck-mounted taps, so this guide will focus on those.
Why Change A Kitchen Tap Mixer?
People change their mixer taps for different reasons:
- Leaking or dripping
- Corroded or stained finish
- Loose handles
- Outdated style
- Upgrading to a water filter or pull-out spray
Sometimes, fixing an old tap costs nearly as much as a new one. Also, newer taps often use less water, which can help lower bills.
Tools And Materials You’ll Need
Having the right tools makes the job easier and safer. Here’s what you’ll need:
- Adjustable wrench (often called a shifter)
- Basin wrench (reaches tight spots under the sink)
- Screwdrivers (Phillips and flathead)
- Bucket or bowl (to catch water)
- Towels or old rags
- Plumber’s tape (also called PTFE tape)
- Penetrating oil (for rusty nuts)
- New kitchen mixer tap (with all fittings)
- Flexible connector hoses (if not included with the tap)
- Torch or headlamp
- Safety gloves
A basin wrench is especially important because most taps are held in place by nuts that are hard to reach. If you don’t have one, you can often borrow or rent one from a hardware store.
Pro tip: Take a picture of your current tap’s connections before removing anything. This will help you remember how to fit the new one.
Preparation: Getting Ready To Change The Tap
Preparation is key for a smooth job. Start by clearing out the cabinet under your sink. Remove cleaning supplies or anything that could get in the way. Wipe the area dry.
Next, locate your water shut-off valves. Usually, there are two small valves under the sink: one for hot and one for cold. Turn both clockwise to shut off the water. If your home doesn’t have these, you’ll need to turn off the main water supply for the whole house.
After shutting off the water, open the kitchen tap to let any remaining water drain out. This prevents spills when you disconnect the pipes.
Place a bucket and some towels under the sink. Even after draining, some water may still leak out.
Non-obvious insight: If your shut-off valves are stiff or stuck, avoid forcing them. Applying too much pressure can break old valves, leading to a bigger plumbing issue. Instead, use a small amount of penetrating oil and wait a few minutes before trying again.
Removing The Old Kitchen Tap Mixer
Here’s where the real work begins. Removing the old tap can sometimes take longer than installing the new one, especially if the nuts are rusty.
Step 1: Disconnect The Water Supply Hoses
Under the sink, you’ll see two flexible hoses running from the tap to the shut-off valves (one hot, one cold). Use the adjustable wrench to loosen the nuts connecting the hoses to the valves. Turn them counterclockwise. Have your bucket ready for any water that drips out.
If the hoses are stuck, spray a little penetrating oil and wait a few minutes. Sometimes, older hoses may be brittle—handle them gently.
Step 2: Free The Tap From The Sink
The tap is usually held in place by a large nut (sometimes called a backnut) underneath the sink. Use the basin wrench to reach this nut and turn it counterclockwise. This can be tricky in tight spaces, so be patient.
If there’s a metal or plastic horseshoe-shaped bracket, remove this too. Keep all parts in case you need to compare them with your new tap’s fittings.
Step 3: Remove The Old Tap
Once the nuts and brackets are off, carefully lift the old tap out from above the sink. Some taps might stick due to old sealant. If so, gently wiggle the tap back and forth while pulling up.
Take a moment to clean around the hole in the sink. Remove any old sealant or dirt—this helps the new tap sit flat and prevents leaks.
Non-obvious insight: If your old tap won’t budge, check underneath for a hidden retaining screw. Some models have an extra screw that holds the tap tight to the sink.

Credit: www.youtube.com
Choosing A New Kitchen Tap Mixer
Not all mixer taps are the same. Choosing the right one will save you headaches during installation and everyday use.
Key Factors To Consider
- Mounting holes: Check if your sink has one or two mounting holes. Most monobloc taps fit a single hole. Make sure your new tap matches.
- Water pressure: Some taps need high water pressure. If your home uses gravity-fed systems (like a tank in the attic), choose a tap that works with low pressure.
- Spout reach and height: The tap’s spout should reach over your sink bowl without splashing.
- Hose connections: Most modern taps use standard-sized hoses (usually 1/2 inch in the US), but double-check yours.
- Material: Brass with chrome plating is common. Avoid lightweight, all-plastic taps.
- Features: Do you want a pull-out spray, a water filter, or a touchless sensor?
Comparing Popular Tap Types
Here’s a comparison of common tap types:
| Type | Pros | Cons |
|---|---|---|
| Monobloc Single Lever | Easy to use, modern look, one hole | Not always suitable for low water pressure |
| Monobloc Dual Lever | Separate hot and cold, more control | Takes up more space |
| Deck-Mounted | Classic look, often suits traditional kitchens | Needs two holes, can be harder to install |
| Pull-Out Spray | Great for rinsing, flexible use | More parts to maintain |
Practical tip: Take your old tap or a photo to the store. Staff can help you find a perfect match for size and connections.
Installing The New Kitchen Tap Mixer
With your old tap out and a new tap chosen, it’s time to fit the replacement. Read the instructions that come with your tap—details may vary between brands.
Step 1: Fit The Flexible Hoses
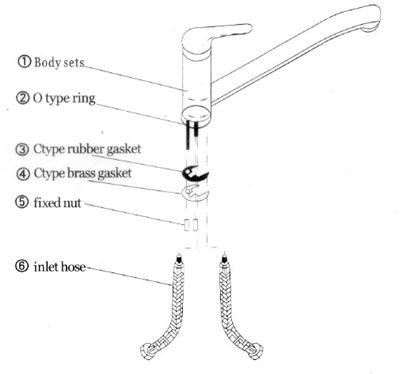
Before placing the new tap in the sink, attach the flexible hoses to the base of the tap. These usually screw in by hand, but finish tightening with a wrench. Don’t overtighten—finger tight plus a quarter turn is enough.
Wrap a little plumber’s tape around the threaded ends of the hoses. This helps prevent leaks.
Step 2: Position The Tap
Slide the hoses through the sink hole from above. Make sure any rubber or plastic gasket (included with your tap) sits between the tap base and the sink. This stops water from leaking under the tap.
Ask someone to hold the tap steady above the sink while you work underneath.
Step 3: Secure The Tap
From under the sink, slide the metal or plastic horseshoe bracket and the mounting nut onto the hoses and up to the base of the tap. Tighten the nut with the basin wrench. The tap should feel solid—if it wobbles, tighten a bit more.
Double-check the tap is straight and aligned before fully tightening.
Step 4: Connect The Hoses To Water Supply
Attach the flexible hoses to the hot and cold shut-off valves. Hot is usually on the left, cold on the right. Tighten the nuts by hand, then finish with the wrench.
Warning: Don’t mix up hot and cold connections. If you do, the tap will work but in reverse—hot water on the right, cold on the left.
Step 5: Test For Leaks
Before cleaning up, slowly turn on the shut-off valves. Watch for drips at all connections. If you see leaks, gently tighten the fittings a bit more. If the leak continues, turn off the water and check the washer or add more plumber’s tape.
Turn the tap on and off several times. Check for leaks under the sink and around the tap base.
Step 6: Clean Up And Finish
Once you’re sure there are no leaks, tidy up under the sink and put items back. Wipe down the tap and sink to remove fingerprints or water spots.
Experience-based tip: Run both hot and cold water for a minute to flush out any debris from the new tap. This prevents blockages and helps the tap last longer.

Credit: www.airtasker.com
Troubleshooting Common Problems
Even with careful work, sometimes things don’t go perfectly. Here’s how to solve common issues.
Leaky Connections
If water drips from the hose connections, turn off the water and unscrew the fitting. Check for a missing or twisted washer. Wrap more plumber’s tape and try again.
Tap Feels Loose
If the tap moves when you use it, the mounting nut under the sink may not be tight enough. Use the basin wrench to tighten further. If your sink is thin, add a plastic or metal reinforcing plate (sold in hardware stores).
No Water Or Low Pressure
Double-check that both shut-off valves are fully open. If only one side works, you might have mixed up the hoses. If pressure is low, clean out the tap’s aerator (the small filter at the spout).
Hose Too Short
If the new hoses don’t reach the shut-off valves, you can buy extension hoses. Always match the diameter and type (braided stainless steel is best).
Practical tip: Keep all old parts until you’re sure the new tap works perfectly.
When To Call A Professional
Most people can change a kitchen tap mixer with patience and the right tools. But some situations call for a plumber:
- Rusty or seized fittings that won’t budge
- No local shut-off valves
- Complex under-sink access (tight spaces, garbage disposal in the way)
- Unusual leaks that don’t stop after re-tightening
If you feel unsure or uncomfortable, don’t force anything. A professional can often do the job quickly and safely.
Safety Tips For Diy Tap Replacement
Working under the sink isn’t dangerous, but these safety tips will help:
- Wear gloves to protect your hands from sharp edges
- Use a headlamp for good lighting
- Never force a stuck valve—use penetrating oil first
- Keep towels and a bucket ready for water spills
Always check your tap’s instructions. Some brands have special steps or washers.
How Much Does It Cost To Change A Kitchen Tap Mixer?
Changing a tap mixer yourself can be very affordable. Here’s a breakdown:
| Item | Typical Cost (USD) |
|---|---|
| Kitchen mixer tap | $50 – $200 |
| Flexible hoses | $10 – $20 |
| Basin wrench | $15 – $30 (can rent for less) |
| Plumber’s tape | $2 – $5 |
| Total (DIY) | $75 – $255 |
| Professional plumber (labor only) | $100 – $250 |
Doing it yourself can save you $100 or more. However, don’t risk damaging pipes or causing leaks. If in doubt, hire a pro.
Credit: artofdiy.wordpress.com
Tips For A Smooth Tap Replacement
Here are some final tips to make your tap change go smoothly:
- Check all parts before starting. Open the tap box and lay out all washers, nuts, and instructions.
- Have a helper if possible. Holding the tap straight while tightening from below is easier with two people.
- Take your time. Rushing leads to mistakes or leaks.
- Clean as you go. Wipe up any water right away to avoid slipping or damaging cabinets.
- Keep the old tap. If the new tap fails quickly, you can reinstall the old one temporarily.
- Label hoses. Mark hot and cold hoses with tape before removal for easy reconnecting.
Pro tip: If your old tap was noisy, the new one may be quieter—newer models are designed to reduce water hammer and splashing.
Environmental Benefits Of A New Tap
A new kitchen tap mixer can help the environment. Modern taps use flow restrictors or aerators to reduce water use by up to 30%. That means less wasted water and lower bills.
Some taps are made from recycled materials or are designed to last longer, reducing the need for replacements. If you want to learn more about water-saving fixtures, check out the EPA’s WaterSense Program.
Frequently Asked Questions
What If My Kitchen Tap Mixer Is Stuck And Won’t Come Off?
If your tap is stuck, first check for hidden screws or extra brackets. Use penetrating oil on all nuts and let it sit for 10-15 minutes. If it still won’t move, use a basin wrench for better grip. In rare cases, a plumber may need to cut the nut off, especially if there’s severe corrosion.
Do I Need To Turn Off The Water Supply To The Whole House?
Usually, you only need to turn off the shut-off valves under the sink. If your kitchen doesn’t have these, you must turn off the main water supply for your home. Always test the tap after turning off the water to make sure it’s off before starting work.
Can I Reuse The Old Flexible Hoses With A New Tap?
It’s best to use the new hoses that come with your tap. Old hoses can be worn inside and might leak soon after reinstalling. Also, new taps may have different thread sizes or fittings. If you must reuse the old hoses, check for cracks or stiffness first.
How Long Does It Take To Change A Kitchen Tap Mixer?
If all goes smoothly, most people can change a tap in 1 to 2 hours. Removing a stuck or corroded tap can add extra time. Preparation and clean-up are also part of the process, so give yourself enough time, especially if it’s your first time.
Why Does My New Mixer Tap Splash More Than The Old One?
New taps often have stronger flow or a different spout shape. Try adjusting the water pressure at the shut-off valves or install an aerator if your tap didn’t come with one. Aerators mix air with water to reduce splashing and save water.
Swapping out a kitchen tap mixer is a practical and rewarding home improvement project. With the right tools, a bit of patience, and this clear guide, you can handle it yourself and enjoy a leak-free, stylish kitchen tap for years to come.