Building an outdoor kitchen is more than just adding value to your home—it can change how you enjoy your space, cook meals, and entertain friends. Among the many ways to finish an outdoor kitchen, stone veneer stands out. It gives your space a timeless, elegant look without the high cost or weight of natural stone. But building an outdoor kitchen with stone veneer takes careful planning and some hard work. Whether you want a simple grill station or a fully equipped kitchen, this guide will walk you through every step. You’ll learn how to design, plan, and build a beautiful, durable kitchen that will be the heart of your backyard for years.
Why Choose Stone Veneer For Your Outdoor Kitchen?
Stone veneer offers the charm of natural stone with less weight and lower cost. Modern stone veneers are made from concrete or lightweight stone, shaped and colored to look like granite, limestone, or fieldstone. They’re easier to install than full-thickness stone, so you don’t need to be a mason to get great results.
Key benefits:
- Aesthetic appeal: Stone veneer creates a classic look that matches almost any outdoor style.
- Durability: Properly installed, it stands up to weather, heat, and daily use.
- Affordability: Costs less than natural stone, both in materials and installation.
- Easy to customize: Available in many shapes, colors, and patterns.
Many homeowners worry that stone veneer won’t last as long as real stone. In reality, with good installation and care, it can last decades—often as long as the kitchen itself.
Planning Your Outdoor Kitchen
Building an outdoor kitchen starts long before the first stone is laid. Planning is where most mistakes happen, so take your time here.
Setting Your Budget
Costs can range from $3,000 to $20,000 or more depending on size, appliances, and material quality. Stone veneer itself usually costs $6 to $15 per square foot for materials, plus labor if you hire someone. Plan for:
- Structure frame (wood, metal, or concrete)
- Stone veneer materials
- Appliances (grill, fridge, sink)
- Countertops (granite, concrete, tile)
- Utilities (gas, electric, water)
- Permits and inspections
Always add 10–20% extra for surprises—outdoor projects often cost more than you think.
Choosing The Right Location
Location affects everything: comfort, safety, and how much you use your kitchen. Look for:
- Proximity to the house: Close enough for easy food transfer, but not blocking doors or windows.
- Level ground: Avoid slopes to reduce construction work.
- Wind direction: Position grills downwind from seating areas.
- Sun and shade: Consider sun exposure during peak hours.
If you live in a windy or rainy area, consider adding a roof or pergola for shelter.
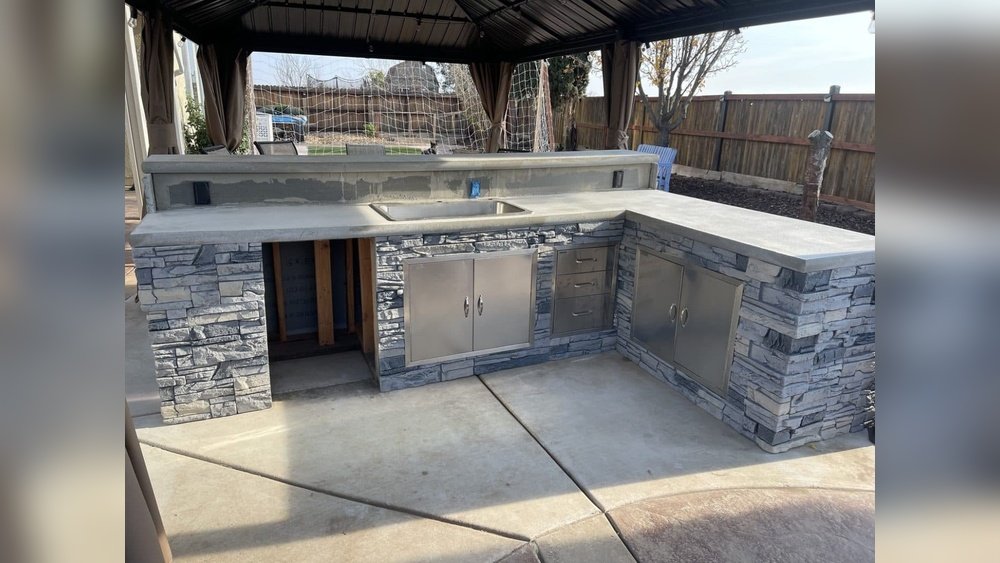
Designing Your Layout
Think about how you cook and entertain. Do you want a basic grill station or a full kitchen with a fridge, sink, and bar? Popular layouts include:
- Straight island: Simple and space-saving.
- L-shaped: More counter space and seating.
- U-shaped: Great for large gatherings.
Draw a simple sketch. Mark where each appliance and counter will go. Measure everything twice. Don’t forget space for opening fridge doors or walking around the grill.
Credit: www.reddit.com
Understanding Stone Veneer Types
Not all stone veneer is the same. There are two main types:
| Type | Description | Best For |
|---|---|---|
| Manufactured Stone Veneer (MSV) | Made from concrete, colored and molded to look like real stone. Lightweight and easy to cut. | DIY projects, most outdoor kitchens |
| Natural Stone Veneer | Thin slices of actual stone. More expensive and heavier but very authentic. | High-end kitchens, historic homes |
MSV is most popular for outdoor kitchens due to its lower cost and easy handling. For most homeowners, it’s the ideal choice.
Tools And Materials Needed
Before you start, gather all the right tools and materials. Running to the store mid-project causes delays and mistakes.
Essential materials:
- Stone veneer panels or pieces
- Metal lath (if using wood frame)
- Mortar mix
- Cement backer board (for wood frames)
- Weather barrier (house wrap)
- Galvanized screws or nails
- Grout or pointing mortar
- Countertop material (granite, tile, etc.)
- Appliances (grill, fridge, sink)
Tools required:
- Masonry trowel and float
- Angle grinder (for cutting stone)
- Drill/driver
- Level
- Measuring tape
- Chalk line
- Wheelbarrow and mixing hoe
- Brush and sponge
- Safety gear (gloves, goggles, dust mask)
Many hardware stores rent out tools if you don’t want to buy them.
Building The Frame
A strong frame is the backbone of your kitchen. It supports the stone veneer and all appliances.
Frame Materials
You can use pressure-treated wood, steel studs, or concrete block. Each has pros and cons.
| Frame Material | Pros | Cons |
|---|---|---|
| Pressure-treated wood | Easy to build and cut, affordable | Needs protection from moisture, can warp over time |
| Steel studs | Won’t rot, lightweight, fire-resistant | Requires special tools, harder to cut |
| Concrete block | Very strong, fireproof, lasts decades | Heavy, labor-intensive, expensive |
For most DIYers, wood or steel framing with cement board is easiest.
Framing Steps
- Mark your layout: Use chalk lines to outline the kitchen on your patio or slab.
- Build the base: Assemble the frame using screws or bolts. Anchor it to the ground.
- Add supports: Install cross-bracing where appliances will sit.
- Sheath with cement board: Attach cement board to all sides. Leave gaps for appliances, doors, and utilities.
Pro tip: Always check local building codes. Some areas require a concrete base or fireproof materials around grills.
Preparing For Stone Veneer
Stone veneer won’t stick to wood or metal directly. You need the right layers for long-lasting results.
Weather Barrier And Metal Lath
- Wrap the frame: Cover all wood with a weather-resistant barrier (like Tyvek). This stops moisture from getting in.
- Install metal lath: Staple or screw galvanized metal lath over the barrier. It gives the mortar something to grip.
- Use cement board: If using steel studs, cement board alone may be enough—check manufacturer instructions.
Applying Scratch Coat
A scratch coat is a thin layer of mortar that goes over the lath. It holds the stone veneer.
- Mix mortar: Use a wheelbarrow and hoe.
- Apply 1/2 inch thick layer: Cover all lath with mortar.
- Score with a notched trowel: Make grooves so the stone sticks better.
- Let dry: Wait 24 hours before adding stone.
Don’t skip the scratch coat. Skipping this step is a leading cause of stone veneer failure.
Selecting And Laying Out Stone Veneer
Stone veneer comes in many shapes and sizes—ledgestone, fieldstone, river rock, and panel systems. Choose a style that fits your home and personal taste.
Dry-lay Before Installing
Lay out your stones on the ground first. This helps you:
- Mix colors for a natural look
- Avoid similar shapes side-by-side
- Plan for corners and edges
Beginner mistake: Not dry-laying leads to awkward color patches or repeated patterns.
Cutting Stone Veneer
You’ll need to cut pieces to fit corners and edges. Use an angle grinder with a diamond blade. Always wear safety gear—stone dust is harmful.
Tip: Hide cut edges at corners or under counters for a clean look.
Installing Stone Veneer
Now comes the rewarding part—putting stone on your kitchen.
Applying Mortar
- Mix mortar: It should be peanut butter thick.
- Apply to stone back: Cover the back of each stone with 1/2 inch of mortar.
- Press onto wall: Wiggle slightly to set. Mortar should squeeze out around edges.
- Start at corners: Use special corner pieces for a seamless look.
- Work in small areas: Mortar dries quickly.
Filling Joints
Some stone veneers are “dry-stack” (no visible mortar joints), others need joints filled.
- Use a grout bag: Squeeze mortar into gaps.
- Smooth with a pointing tool
- Brush off excess after 30–60 minutes
Don’t try to fill all joints at once—work in sections for best results.
Installing Around Appliances
Leave 1/4 inch gap between stone and appliances. Fill with high-temperature caulk to allow movement and prevent cracking.
Common oversight: Forgetting these gaps can lead to cracking when appliances heat up.
Building Countertops
Countertops must be durable and weatherproof. Popular choices for outdoor kitchens:
- Granite: Very strong, weather-resistant, many color choices.
- Concrete: Custom shapes and colors, but needs sealing.
- Tile: Affordable, but grout may crack over time.
- Stainless steel: Modern look, easy to clean, but can get hot in sun.
Pro tip: Overhang counters by 1–2 inches for drip protection and comfort.
Installing Countertops
- Frame support: Add extra bracing under heavy counters.
- Level surface: Check with a long level before installing.
- Seal edges: Use outdoor-grade caulk or flashing.
If you’re not confident, hire a pro for granite or concrete installation.
Installing Appliances And Utilities
Most outdoor kitchens have at least a grill. Many also include a fridge, sink, or pizza oven.
Grill
- Drop-in grills: Sit in a cutout with vents for airflow.
- Freestanding grills: Roll into place, easier to replace later.
Fridge
- Outdoor-rated fridges are a must (indoor fridges often fail outside).
- Needs a dedicated electrical outlet.
Sink
- Cold water only is easiest; hot water requires extra plumbing.
- Plan drainage—local codes may require a dry well or hookup to sewer.
Gas And Electric
- Hire a licensed pro for gas or electric work.
- Use weatherproof outlets and shutoff valves.
Warning: DIY gas or electric mistakes are dangerous. Always follow codes and get inspections.
Sealing And Protecting Stone Veneer
Stone veneer is tough, but sealing adds years to its life—especially in harsh climates.
- Use a breathable sealer: Keeps out water but lets vapor escape.
- Apply with a sprayer or roller every 2–3 years.
- Clean with mild soap and a brush—never a pressure washer.
Insight: Over-sealing (too often) can trap moisture and cause damage. Follow manufacturer’s instructions.
Creating A Comfortable Cooking And Dining Space
The best outdoor kitchens are comfortable year-round. Think beyond just cooking.
Shade And Shelter
- Pergolas or awnings block harsh sun and light rain.
- Umbrellas are a quick, affordable option.
Lighting
- LED strip lights under counters for nighttime cooking.
- String lights or lanterns for atmosphere.
Seating
- Bar stools at the counter for guests.
- Dining table nearby for larger meals.
Tip: Plan power outlets for blenders, phone chargers, or speakers.
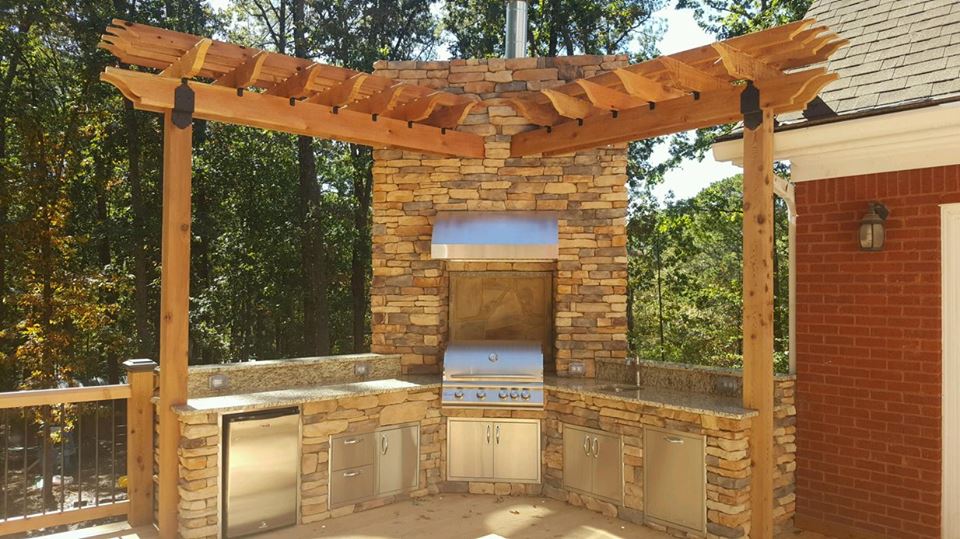
Credit: www.nativecustomstone.com
Maintenance And Troubleshooting
Your stone veneer kitchen will last longer with simple care.
Routine maintenance:
- Sweep off leaves and debris monthly.
- Check for loose stones once a year—re-mortar as needed.
- Reseal countertops and veneer every 2–3 years.
- Clean grill and appliances after each use.
Common problems:
- Stone loosening: Usually due to poor mortar or water damage.
- Cracked grout: Caused by freeze-thaw cycles or movement.
- Mildew: Clean with vinegar and water, improve drainage.
If you live in a freeze-thaw climate, check after every winter for new cracks.
Cost And Value Of A Stone Veneer Outdoor Kitchen
An outdoor kitchen is a major investment, but it can add 60–80% of its cost to your home’s value, according to the National Association of Realtors. Stone veneer makes it possible to get a high-end look without breaking the bank.
Typical costs:
| Kitchen Size | Cost Range | Description |
|---|---|---|
| Small (grill station) | $3,000–$7,000 | Basic frame, grill, counter, stone veneer |
| Medium (with fridge and sink) | $7,000–$15,000 | Larger frame, two or more appliances, stone veneer |
| Large (full kitchen/bar) | $15,000–$25,000+ | All appliances, bar seating, high-end finishes |
Insider tip: Doing the stone veneer yourself can save thousands in labor. But don’t cut corners on utilities or waterproofing—fixing mistakes is expensive.
Avoiding Common Mistakes
Even experienced DIYers make errors. Here are two less obvious pitfalls:
- Skipping expansion joints: Stone and concrete expand in heat. Without joints, cracks will form.
- Not sloping counters: Outdoor counters must slope 1/8 inch per foot away from appliances to drain water.
Other mistakes include using indoor-rated appliances, not checking codes, and poor planning for storage or shade.
Real-life Example: A Backyard Transformation
Consider the story of a family in Austin, Texas. They built a U-shaped outdoor kitchen with stone veneer, granite counters, grill, fridge, and sink. Their total cost was $13,500—half what a contractor quoted. The project took two weekends and added a cozy spot for family dinners and parties. Years later, the stone veneer still looks brand new, and the kitchen is the most used area of their backyard.
When To Hire A Professional
While many parts of building a stone veneer kitchen are DIY-friendly, some jobs are best left to pros:
- Gas and electrical hookups
- Granite or concrete countertop installation
- Complex plumbing
Hiring experts for these steps protects your investment and your safety.
If you want more inspiration, see the latest outdoor kitchen trends at Houzz.
Frequently Asked Questions
How Long Does Stone Veneer Last Outside?
With proper installation and care, stone veneer can last 20–50 years outdoors. It’s designed to handle weather and temperature changes. Sealing and regular maintenance are key to longevity.
Can I Install Stone Veneer Over An Old Brick Or Concrete Wall?
Yes, you can install stone veneer over brick, concrete, or block walls. Clean the surface well. Apply a scratch coat if needed. Make sure the old wall is stable and free of moisture problems before starting.
Do I Need A Permit To Build An Outdoor Kitchen?
Most areas require a permit for outdoor kitchens—especially if you’re adding gas, electric, or water lines. Always check with your local building department before starting. Building without permits can lead to fines and problems when selling your home.
Is Stone Veneer Fireproof?
Stone veneer itself is not combustible and can handle high temperatures. But the frame and materials underneath matter—wood frames must be protected with cement board and metal lath near grills or ovens. Always follow safety codes.
How Do I Clean And Maintain Stone Veneer?
Clean stone veneer with a mild soap, water, and a soft brush. Avoid pressure washers and harsh chemicals. Re-seal every few years to protect from stains and moisture. Check for loose stones or cracked grout yearly.
Building an outdoor kitchen with stone veneer is a project that pays off for years. With careful planning, the right materials, and attention to detail, you can create a backyard space that’s beautiful, practical, and built to last.

Credit: rtaoutdoorliving.com