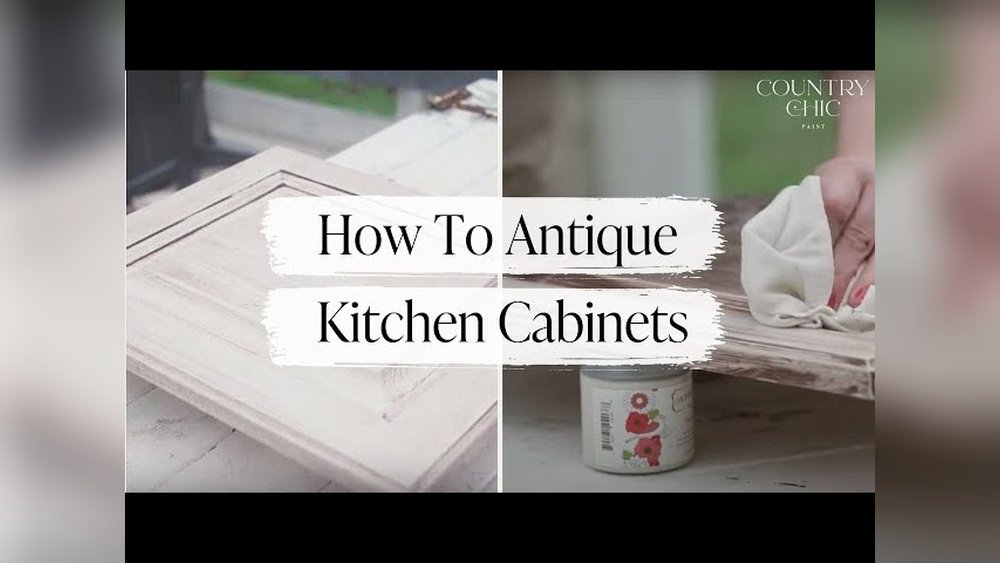
Transforming your kitchen doesn’t always mean a full remodel or buying new cabinets. Sometimes, the magic lies in the details. Antiquing kitchen cabinets is a creative, budget-friendly way to add character and warmth to your space. This decorative technique gives your cabinets an aged, vintage look—like they have a story to tell. Whether you dream of a cozy farmhouse feel or a rustic European charm, learning how to antique kitchen cabinets can make a dramatic difference in your home.
If you’ve never tried a DIY project before, don’t worry. Antiquing cabinets is approachable for beginners and rewarding for experienced decorators. The process involves more than just paint—it’s about using the right materials, mastering simple techniques, and knowing a few tricks that most people miss.
In this guide, you’ll discover every step, from planning to finishing touches, and learn how to avoid common mistakes. By the end, you’ll have the confidence to turn plain cabinets into stunning focal points.
Understanding The Antiqued Look
Before you pick up a brush, it helps to know what antiquing really means. When you antique kitchen cabinets, you create the illusion of age and use. This style shows subtle wear, gentle color variations, and sometimes exposed wood or details. It’s not just one “look”—antiquing can be soft and romantic, or bold and dramatic, depending on your technique and colors.
There are several popular antiquing effects:
- Distressed: Paint is worn away on edges and corners, exposing wood or a base color.
- Glazed: A tinted glaze is brushed over the paint, adding depth and shadow.
- Crackled: Special crackle medium creates tiny cracks, mimicking aged paint.
- Stained: Dark stains highlight wood grain and crevices, making details pop.
Choosing the best style depends on your kitchen’s design, how much “age” you want to show, and your comfort with DIY methods.
Planning Your Antiquing Project
Jumping in without a plan is risky. Take time to prepare—this step saves hours of frustration later.
Assess Your Cabinets
Not all cabinets are ideal for antiquing. Check if yours are real wood, wood veneer, or laminate. Real wood and wood veneers take paint and glaze well. Laminate can be tricky, but it’s still possible with the right primer.
Look for damage. If cabinets have deep scratches, peeling finish, or broken parts, fix these before starting. Antiquing highlights, not hides, imperfections.
Pick Your Style And Colors
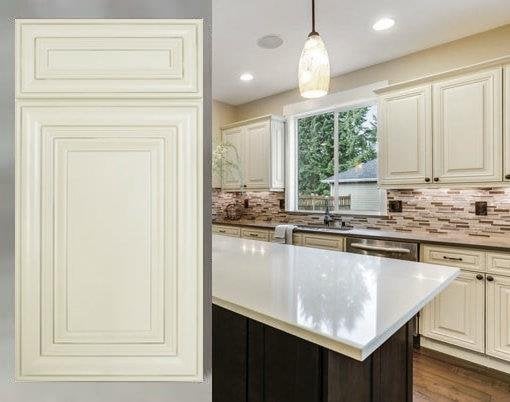
Think about your kitchen’s overall mood. Soft whites and creams work well for a classic look. Deep grays and blues feel modern but still vintage. If your walls are colorful, a neutral antiqued cabinet balances the space.
Here are some classic color combinations:
| Base Color | Glaze Color | Final Effect |
|---|---|---|
| Antique White | Mocha Brown | Warm, farmhouse look |
| Light Gray | Charcoal Glaze | Soft, aged urban style |
| Cream | Dark Umber | Traditional, rustic charm |
| Pale Blue | Walnut | Vintage cottage feel |
Gather Materials And Tools
You don’t need expensive equipment. Here’s what to have on hand:
- Sandpaper (120 and 220 grit)
- Degreaser or cabinet cleaner
- Painter’s tape
- Drop cloths
- Screwdriver (for hardware removal)
- Quality paintbrushes and foam brushes
- Lint-free cloths
- Primer (if needed)
- Cabinet paint (latex or chalk paint)
- Antiquing glaze or gel stain
- Clear protective finish (polycrylic or polyurethane)
- Optional: Crackle medium, wax, or distressing tools
Buying quality brushes and paint saves time and gives better results. Don’t use leftover wall paint—it’s not durable enough for cabinets.

Credit: rtawoodcabinets.com
Preparing Your Cabinets
Preparation is more than half the battle. Skipping this step can ruin your finish, so be patient.
Remove Doors And Hardware
Take off all cabinet doors, drawers, and hardware (knobs, handles, hinges). Label each piece and its screws with painter’s tape so you remember where everything goes. Lay doors flat on drop cloths. This makes painting easier and prevents drips.
Clean Thoroughly
Kitchen cabinets collect grease, dust, and food residue. Even invisible oils will stop paint from sticking. Use a strong degreaser or a mix of warm water and dish soap. Scrub every surface, rinse with clean water, and let dry completely.
Sand The Surfaces
Sanding creates a surface the paint can grip. Start with 120-grit sandpaper for shiny or glossy finishes. Lightly scuff all areas, paying attention to edges and corners. Wipe away dust with a damp cloth. For a smoother base, follow with 220-grit sandpaper.
If your cabinets are laminate, sand lightly and always use a bonding primer.
Repair And Prime
Fill any small dents or holes with wood filler. Let dry, then sand smooth. Apply a quality primer if your cabinets are dark, have stains, or are a tricky material like laminate. Primer helps paint stick and keeps colors true.
Allow the primer to dry completely before moving on.
Painting The Base Color
The base color is the heart of your antiqued finish. It sets the tone for the entire kitchen.
Choosing Paint
Most DIYers use either latex paint (water-based, durable, easy to clean) or chalk paint (matte, easy to distress, forgiving for beginners). Chalk paint doesn’t always need primer, but it’s less durable unless sealed well.
Don’t skimp on quality. Cabinet paint is specially formulated to resist chips and stains.
Application Tips
- Stir paint well before using.
- Use a high-quality brush for corners and a foam roller for flat panels.
- Paint in thin, even coats. Too much paint causes drips and uneven texture.
- Let each coat dry completely. Most cabinets need two coats for full coverage.
Paint the backs of doors first, let dry, then flip and do the fronts. This avoids smudges.
Non-obvious Insight
Many people ignore the edges of doors and drawers. Always paint these areas, or your finished cabinets will look “unfinished” when doors are open.
Antiquing Techniques Step By Step
Now for the fun part—creating your antiqued finish. There are several methods, and you can combine them for a custom look.
Distressing
Distressing is about making cabinets look worn from years of use.
- After the base paint dries, use 220-grit sandpaper to lightly rub edges, corners, and raised details.
- Sand areas that would naturally get worn (around handles, bottom edges).
- Go slowly. It’s easy to take off too much paint. Less is often more.
- Wipe away dust with a soft cloth.
A beginner tip: Distress in small sections, step back often, and check your work. If you over-sand, touch up with a bit of base color.
Glazing
Glaze adds depth by settling in grooves and creating shadows.
- Choose a glaze color darker than your base (brown, gray, or black are common).
- Mix glaze with a bit of water to slow drying—this gives more working time.
- Use a brush to apply glaze over a small area (like one door).
- Quickly wipe off the excess with a clean, lint-free cloth, leaving glaze in corners, edges, and details.
- Repeat on all surfaces, working one section at a time.
The more glaze you leave, the darker the effect. Practice on a scrap board first.
Common Beginner Mistake
Don’t try to glaze the whole kitchen at once. Glaze dries fast. Work on one door or drawer at a time for best results.
Crackle Finish
A crackle finish adds tiny cracks, mimicking old, brittle paint.
- Paint your base color and let dry.
- Apply a crackle medium (available at paint stores) according to instructions.
- When tacky, brush on a contrasting top color. Don’t overwork the brush—one pass is best.
- As the paint dries, cracks will form, showing the base color underneath.
Crackle is unpredictable—each door will look a little different, which adds to the charm.
Staining And Waxing
You can use a gel stain or dark wax to deepen color and highlight texture.
- After painting, use a brush or rag to rub gel stain or wax into corners and grooves.
- Wipe off the excess, leaving more in low spots.
- Let dry and buff with a soft cloth.
This method gives cabinets a soft, “lived-in” glow.
Protecting Your Finish
Antiqued cabinets need protection from moisture, grease, and daily use. The right topcoat keeps them beautiful for years.
Choosing A Topcoat
- Polycrylic: Water-based, clear, non-yellowing, easy to clean up. Best for light colors.
- Polyurethane: Oil-based, very durable, can yellow over time. Use on dark colors or wood tones.
- Wax: Soft, matte look, less durable. Good for chalk paint, but needs reapplying every few years.
Apply 2–3 thin coats with a clean brush. Let each coat dry completely. Lightly sand with 320-grit paper between coats for a smooth finish.
Table: Topcoat Comparison
Here’s how the main topcoats compare:
| Topcoat Type | Best For | Durability | Finish | Notes |
|---|---|---|---|---|
| Polycrylic | Light colors | High | Clear/Satin | Does not yellow |
| Polyurethane | Dark colors, wood | Very high | Gloss/Satin/Matte | Can yellow with age |
| Wax | Chalk paint | Low to Medium | Matte | Needs reapplication |
Non-obvious Insight
Let cabinets cure for at least a week before heavy use. Paint and topcoat feel dry in hours, but full strength takes longer. Waiting helps avoid scratches and fingerprints.
Reinstalling Doors And Hardware
Once your finish is fully dry and cured, it’s time to put your kitchen back together.
- Reattach doors and drawers using your labeled tape as a guide.
- Clean or update hardware. Aged bronze or brushed nickel fits the antique look.
- If your budget allows, change out knobs and pulls for a fresh style.
- Adjust door alignment if needed. Sometimes paint adds thickness and hinges need a tweak.
Take your time with this step. Rushing can chip paint or scratch your new finish.
Maintenance And Care Tips
Antiqued cabinets are sturdy, but a little care keeps them looking their best.
- Clean gently: Use a soft, damp cloth. Avoid harsh chemicals, which can dull the finish.
- Touch up chips: Keep a small jar of your base color for quick fixes.
- Avoid water: Wipe spills quickly. Standing water can damage paint and wood.
- Wax maintenance: If you used wax, reapply once a year for protection.
- Check hinges: Painted hinges can stick. If they do, loosen screws slightly or replace with new hardware.
Credit: www.kitchencabinetdepot.com
Advanced Techniques For Unique Effects
If you want a truly custom look, consider these advanced antiquing ideas. They take more time but add serious character.
Layering Multiple Colors
Instead of one base color, try two or three. Paint a dark color first, a lighter shade over it, then distress to reveal each layer. This creates a rich, complex look.
Dry Brushing
Use a nearly dry brush with a small amount of paint. Lightly drag across the surface, leaving streaks that mimic years of wear. This works well on raised panels and detailed trim.
Color Washing
Thin paint with water to create a wash. Brush over painted cabinets for a hint of color and subtle texture. Wipe off excess with a cloth.
Highlighting Details
Use glaze or stain to darken crevices and carvings. This brings out molding and adds depth.
Common Mistakes And How To Avoid Them
Even pros make mistakes, but you can dodge the most common ones.
- Skipping prep: Not cleaning or sanding leads to peeling paint.
- Rushing coats: Thick paint or glaze will drip and look uneven.
- Forgetting to label parts: Mixing up doors and hardware causes headaches.
- Over-distressing: It’s easy to go too far. Start small.
- Ignoring cure time: Using cabinets too soon ruins the finish.
If something goes wrong, don’t panic. Most mistakes are fixable with a little sanding and touch-up paint.
Professional Vs. Diy Antiquing
Is DIY always the best choice? Here’s a quick comparison to help you decide:
| Factor | DIY | Professional |
|---|---|---|
| Cost | Low (supplies only) | High (labor + supplies) |
| Time | Several days to a week | 1–2 days |
| Customization | Full control | Limited by pro’s style |
| Skill Needed | Beginner to Intermediate | Expert |
| Durability | Good if done right | Excellent |
DIY is ideal for those who enjoy hands-on projects and want a personal touch. Professionals are best for flawless results, especially with intricate finishes.
Cost Breakdown And Budget Tips
You don’t need a huge budget to antique kitchen cabinets.
- Paint and primer: $40–$80 (depending on kitchen size)
- Glaze or stain: $15–$30
- Topcoat: $20–$40
- Brushes and tools: $20–$40
- Miscellaneous (sandpaper, tape, drop cloths): $20
Total for a medium kitchen: $100–$200 (DIY). Hiring a pro can cost $1,000–$3,000.
Money-saving Tips
- Reuse hardware or spray paint old knobs for an updated look.
- Buy paint samples instead of full gallons for small kitchens.
- Borrow tools from friends or a local tool library.
Inspiring Examples And Styles
Wondering what style to choose? Here are some real-world inspirations:
- French Country: Creamy white cabinets with dark glaze, gentle distressing, and antique brass hardware.
- Modern Farmhouse: Soft gray base, sanded edges, and black cup pulls.
- Old World European: Deep blue-green cabinets, heavy glaze, crackle finish on panels.
- Coastal Cottage: Light blue with white glaze, minimal distressing, glass knobs.
Browse home design websites, magazines, or Pinterest for visual ideas. Don’t be afraid to blend styles to fit your taste.
Safety And Ventilation
Painting and antiquing can release fumes. Work in a well-ventilated area—open windows and use fans. Wear gloves and a mask when sanding or using strong cleaners. Keep pets and kids away from wet paint and chemicals.
If you’re sensitive to smells, use low-VOC paints and finishes. These are safer for indoor air quality and easier on allergies.

Credit: www.youtube.com
When To Avoid Antiquing
Antiquing isn’t always the best choice. If your cabinets are badly damaged, falling apart, or made of cheap laminate, painting may not last. In these cases, consider refacing or replacing doors.
Also, if you plan to sell your home soon, know your local market. Some buyers prefer modern, sleek kitchens. Others love the charm of antiqued cabinets.
Final Touches For A Complete Look
Small details make your project look professional.
- Add decorative molding or trim for extra character.
- Install under-cabinet lighting to highlight the finish.
- Use open shelves with antique-style brackets for a vintage touch.
- Display old cookbooks, pottery, or baskets to enhance the effect.
Your kitchen should reflect your style and feel inviting. Enjoy the process—each brushstroke adds to the story.
If you want to see more examples and expert advice on decorative finishes, visit Better Homes & Gardens.
Frequently Asked Questions
How Long Does It Take To Antique Kitchen Cabinets?
For a medium-sized kitchen, plan for 4–7 days. This includes time for cleaning, sanding, painting, distressing, glazing, and letting everything dry and cure. Rushing any step can lead to a poor finish.
Can I Antique Laminate Cabinets?
Yes, but you must use a bonding primer made for laminate. Sand lightly, prime well, and choose a high-quality paint and glaze. The results can be beautiful, but durability depends on preparation.
What Is The Best Paint For Antiquing Cabinets?
Chalk paint is popular for its matte finish and easy distressing. Latex cabinet paint is more durable for kitchens. Always use a paint designed for furniture or cabinets, not standard wall paint.
How Do I Fix Mistakes During Antiquing?
If you over-distress or glaze too heavily, let the area dry, then repaint with your base color. For glaze, you can wipe off mistakes with a damp cloth while it’s still wet. Most errors are fixable with patience.
How Do I Keep Antiqued Cabinets Looking Good?
Clean with a soft, damp cloth—avoid strong chemicals. Touch up chips with leftover paint. Reapply wax or topcoat every few years for ongoing protection.
Transforming your kitchen with antiqued cabinets is a rewarding project. With careful planning and the right techniques, you’ll create a space full of warmth and character—one that feels truly your own.