A dripping sink, a sudden leak, or just a kitchen upgrade—installing a kitchen faucet supply line can seem tricky if you’ve never done it before. But don’t worry. With the right steps, a bit of patience, and some practical advice, you can handle this project yourself. You don’t need to be a plumber to ensure your kitchen faucet gets reliable water flow, saves you from leaks, and functions smoothly for years.
Whether you’re replacing an old supply line, installing a new faucet, or just fixing a persistent drip, knowing how to install a kitchen faucet supply line is a valuable skill. This guide will walk you through every detail, from understanding the parts to avoiding common mistakes.
You’ll also learn how to pick the right supply line, what tools you’ll need, and how to troubleshoot problems. Let’s get started and make sure your next kitchen upgrade is a success.
What Is A Kitchen Faucet Supply Line?
The kitchen faucet supply line is a flexible hose or pipe that connects the water shut-off valve (usually under your sink) to the faucet itself. Most faucets have two supply lines—one for hot water and one for cold. These lines make sure your faucet gets water from your home’s plumbing system.
Supply lines can be made from different materials, like braided stainless steel, plastic, or copper. Each has its pros and cons. Braided stainless steel is the most popular because it’s flexible, strong, and resists leaks.
Why Does This Small Part Matter?
A supply line may look simple, but it’s crucial. A leak here can cause water damage, mold, or even ruin cabinets and floors. Choosing the right line and installing it correctly keeps your kitchen safe and dry.
Tools And Materials You’ll Need
Before you start, gather these items. This will save you time and stress later.
- Adjustable wrench: For tightening and loosening nuts.
- Basin wrench: Helpful if space is tight under the sink.
- Bucket or towel: To catch any leftover water.
- Plumber’s tape (Teflon tape): Seals threaded connections.
- New faucet supply lines: Make sure they are the right length and connection size.
- Flashlight: Under-sink areas can be dark.
- Safety glasses: Protect your eyes from debris or spraying water.
Choosing The Right Faucet Supply Line
Not all supply lines are the same. Here’s what to look for:
- Length: Measure the distance from the shut-off valve to the faucet connection. Add a few extra inches for flexibility.
- Diameter: Most kitchen faucets use 3/8-inch diameter connectors, but check your faucet and valve.
- Material: Braided stainless steel is best for most homes, but plastic or copper lines are sometimes used.
- Connector Type: Common types are compression fittings or threaded nuts.
Here’s a comparison of common supply line materials:
| Material | Pros | Cons | Typical Lifespan |
|---|---|---|---|
| Braided Stainless Steel | Flexible, durable, resists leaks | Costs more than plastic | 5-10 years or more |
| Plastic | Inexpensive, easy to cut | Less durable, can kink or crack | 3-5 years |
| Copper | Strong, lasts long | Hard to bend, can corrode | 10+ years |
Non-obvious insight: The most common leak in kitchen supply lines comes from using the wrong length. If your line is too short, it pulls on the connections and can loosen over time.
Credit: www.deltafaucet.com
Step-by-step: How To Install A Kitchen Faucet Supply Line
With your tools and the right line ready, it’s time to begin. These steps work for replacing old lines or installing new ones.
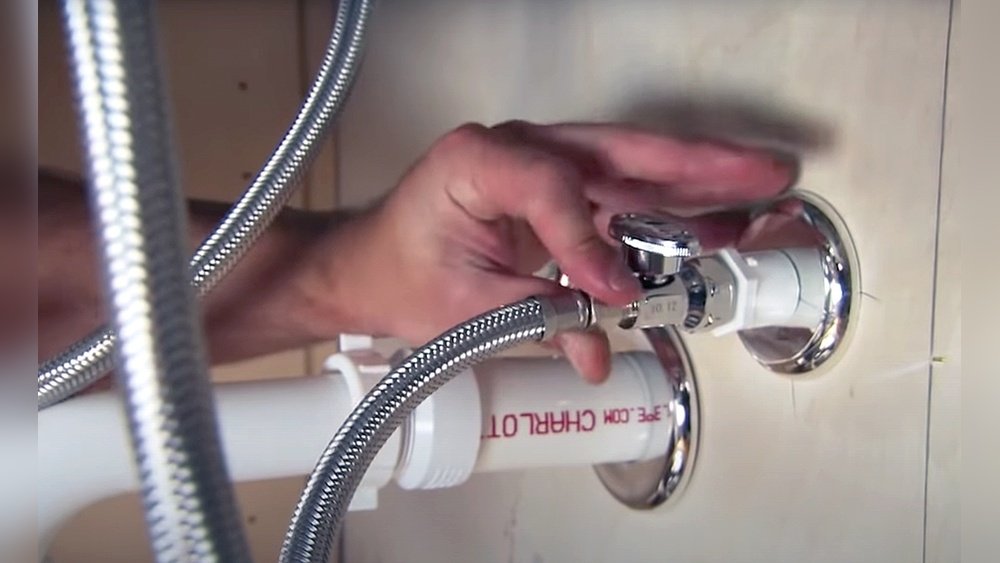
Step 1: Turn Off The Water Supply
Find the shut-off valves under your sink. There should be two—one for hot and one for cold. Turn them clockwise until tight. If your valves are stuck, use a rag and pliers for grip, but don’t force them too hard.
Open the faucet to make sure the water is off. Any water left in the lines will come out now. Place a bucket or towel under the valves to catch drips.
Tip: If your shut-off valves don’t work, you may need to turn off the main water supply for your home.
Step 2: Remove The Old Supply Line
Use your adjustable wrench or basin wrench to loosen the nuts connecting the old supply line to the shut-off valve and to the faucet tailpiece. Turn counterclockwise. If the nut is stuck, gently tap the wrench with your hand.
Once loose, pull the old line away. Some water may drip out—this is normal.
Non-obvious insight: Take a photo of the old supply line before removal. This helps you remember how everything fits together.
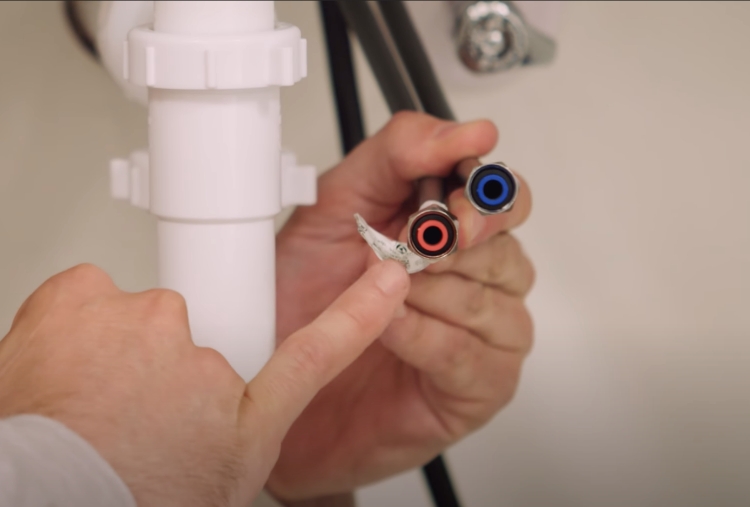
Step 3: Prepare The New Supply Line
Unpack your new supply line and check for damage. Make sure the connectors match your faucet and shut-off valve. If the ends are threaded, wrap the threads with plumber’s tape. This creates a better seal and helps prevent leaks.
Tip: Don’t use too much tape—2-3 wraps are enough.
Step 4: Connect The Supply Line To The Faucet
Attach one end of the new supply line to the faucet tailpiece (the pipe sticking down from the faucet). Hand-tighten the nut, then use your wrench to give it an extra quarter turn. Do not overtighten—this can strip the threads.
Step 5: Connect The Other End To The Shut-off Valve
Attach the other end of the supply line to the shut-off valve. Again, hand-tighten, then use the wrench for a snug fit (but not too tight).
Common mistake: Overtightening can crush washers and cause leaks.
Step 6: Check Your Connections
Before you turn the water back on, double-check that both ends of the supply line are secure. Wipe away any old water so you can spot leaks later.
Step 7: Turn On The Water Slowly
Open the shut-off valves slowly. Watch and listen for leaks. If you see water dripping, turn off the valve and tighten the connection slightly. If everything stays dry, open the valve fully.
Turn on your faucet and let water run for a minute. This removes any air or debris from the line.
Step 8: Inspect For Leaks
Feel around the connections with a dry hand or paper towel. Even a small drip means you need to tighten the connection a bit more. If you can’t stop a leak, disconnect the line and check the washer or tape.
Pro tip: Leave the cabinet door open for a few hours to check for slow leaks. Sometimes water takes time to appear.
How To Choose The Right Replacement Supply Line
If you’re replacing an old line, use these tips to choose the best replacement.
Measure Before You Buy
Measure from the faucet tailpiece to the shut-off valve. Most supply lines are sold in lengths like 12, 16, or 20 inches. Too long is better than too short, but don’t buy a line that’s so long it tangles.
Match The Connector Types
Common connectors include:
- 3/8-inch compression (to faucet)
- 1/2-inch FIP (female iron pipe) or 7/16-inch to valve
Check your old supply line or the manual for your faucet.
Material Matters
For most kitchens, braided stainless steel is best. It resists kinks and can handle higher water pressure. Avoid clear plastic lines in hot climates—they can fail quickly.
Cost Versus Quality
Don’t pick the cheapest line. A few extra dollars for a quality supply line can prevent water damage that costs thousands.
Troubleshooting Common Problems
Even with careful work, problems can happen. Here’s how to solve the most common issues.
Leak At The Connection
- Check the washer. A missing or damaged washer causes leaks.
- Retighten. Sometimes a small turn is enough.
- Replace tape. Remove the supply line, add fresh plumber’s tape, and reconnect.
Supply Line Too Short
If your new line doesn’t reach, don’t pull or stretch it. Buy a longer line. Never connect two short supply lines together—this increases leak risk.
Water Flow Is Weak
- Debris in the line. Remove the supply line and flush it with water.
- Valve not fully open. Check your shut-off valves.
- Supply line too narrow. Use a line with the correct diameter.
Supply Line Won’t Fit
If the connector doesn’t match, you may need an adapter. Bring your old supply line to the store to compare.
Safety And Maintenance Tips
Check Your Lines Yearly
Inspect under your sink for drips, rust, or bulges. Replace supply lines every 5-10 years, even if they look fine.
Use Only Hand Tools
Power tools can overtighten and crack connectors. Use an adjustable or basin wrench for control.
Clean Up Spills
Even a small leak can damage wood or cause mold. Wipe up water immediately.
Don’t Ignore Small Drips
A minor drip can turn into a flood. Fix leaks as soon as you notice them.
When To Call A Professional
Some problems are bigger than a DIY fix. Call a plumber if:
- The shut-off valves won’t close or leak.
- The faucet or supply line connection is corroded.
- There is water damage under the sink.
- You can’t stop a leak after several tries.
Advanced Tips For A Better Installation
Use Flexible Lines
Flexible braided supply lines are easier to install, especially in tight spaces.
Add A Water Hammer Arrestor
If you hear banging when you turn off the faucet, install a water hammer arrestor. This device absorbs shocks in the pipes and protects your faucet.
Label Hot And Cold Lines
Before you install, label each supply line. This makes future repairs easier.
Consider Upgrading Valves
If your shut-off valves are old or hard to turn, replace them while you have the sink open.

Credit: havensmetal.com
Cost Comparison: Diy Vs Professional Installation
If you’re thinking about hiring a plumber, here’s a cost comparison:
| Installation Method | Average Cost | Time Required | Reliability |
|---|---|---|---|
| DIY (Yourself) | $10 – $30 (materials only) | 30-60 minutes | Good, if done carefully |
| Professional Plumber | $80 – $200 (labor + materials) | 20-30 minutes | Excellent |
DIY saves money and is a good skill to learn. But if you’re unsure, a pro can guarantee a leak-free job.
Eco-friendly And Safe Supply Line Choices
Today, many homeowners look for eco-friendly materials and lead-free fittings. Check that your supply line is certified for drinking water and free from harmful chemicals.
Look for supply lines marked NSF 61 or NSF 372. These are safe for use with potable water.
Example: Installing A Supply Line On A New Faucet
Let’s walk through a real-world scenario:
Maria just bought a new kitchen faucet and wants to install it herself. She checks that the old supply lines are 12 inches long and have 3/8-inch connectors. At the hardware store, she buys two braided stainless steel lines, each 16 inches, to give herself more flexibility.
Back home, she:
- Turns off the shut-off valves.
- Removes the old supply lines with her adjustable wrench.
- Checks the faucet tailpieces for dirt.
- Wraps plumber’s tape on the threaded connectors.
- Attaches the new lines, hand-tightens, and then gives each a quarter turn with her wrench.
- Turns on the water slowly and checks for leaks.
- Leaves the cabinet open overnight to be sure there are no drips.
Maria’s faucet now works perfectly, with no leaks and a smooth, steady flow.
Mistakes Beginners Often Make
Many first-time DIYers run into problems. Here are mistakes to avoid:
- Not measuring properly: Guessing the length leads to leaks or tangled lines.
- Overtightening: Too much force can break washers or strip threads.
- Forgetting plumber’s tape: This leads to leaks at threaded connections.
- Mixing hot and cold: Always check which valve is which.
- Ignoring old valves: Old, corroded valves can leak after you touch them.
Pro tip: Take your old supply line to the hardware store. Staff can help you find the exact match.

Credit: www.homedepot.com
Upgrading Your Kitchen Faucet Supply Line
If you want to improve your kitchen, consider these upgrades:
- Quick-connect fittings: These snap in place and don’t need tools.
- Stainless steel mesh lines: Extra durable for high-pressure systems.
- Color-coded lines: Easy to identify hot and cold in the future.
Upgrading now can prevent leaks and make future repairs easier.
How To Replace A Leaky Supply Line: Step-by-step Summary
If you notice water under your sink, act quickly:
- Turn off the water at the shut-off valves.
- Place a bucket under the lines.
- Loosen and remove the old supply line with a wrench.
- Check for rust or corrosion on the faucet tailpiece and valve.
- Install the new supply line—hand-tighten first, then use a wrench.
- Turn on the water slowly and check for leaks.
- Wipe dry and check again in a few hours.
Supply Line Lifespan And Replacement Frequency
On average, supply lines last:
- Braided stainless steel: 5–10 years
- Plastic: 3–5 years
- Copper: 10–20 years
Replace supply lines during any kitchen remodel or faucet upgrade, even if they look fine.
How To Spot A Failing Supply Line
Watch for these signs:
- Bulging or blistering on the line
- Rust or green corrosion on connectors
- Dampness or water stains under the sink
- Musty smells (indicates mold or mildew)
If you notice any of these, replace the supply line right away.
Kitchen Faucet Supply Line Sizing Chart
Use this chart to choose the right size for your faucet:
| Faucet Side Connector | Valve Side Connector | Common Lengths |
|---|---|---|
| 3/8-inch compression | 1/2-inch FIP or 3/8-inch compression | 12″, 16″, 20″ |
| 1/2-inch compression | 1/2-inch FIP | 16″, 20″, 24″ |
| 7/16-inch compression | 3/8-inch compression | 12″, 16″ |
Always measure before you buy. If you’re not sure, take your old supply line to the store.
Where To Learn More
For more on plumbing basics, check the comprehensive guides at Family Handyman. Their tutorials are clear and beginner-friendly.
Frequently Asked Questions
How Do I Know What Size Supply Line I Need For My Kitchen Faucet?
Check your faucet and shut-off valve for size markings. Most kitchen faucets use 3/8-inch compression connectors. Measure the distance between the valve and faucet, then buy a supply line that’s slightly longer.
Can I Reuse An Old Supply Line When Replacing A Faucet?
It’s not recommended. Old supply lines can develop hidden cracks or weak spots. Always install a new supply line for best results and safety.
Why Is My New Supply Line Leaking After Installation?
Leaks happen if the connection isn’t tight, the washer is missing, or plumber’s tape wasn’t used. Turn off the water, disconnect, check the washer, add tape, and reconnect securely.
How Often Should I Replace My Kitchen Faucet Supply Lines?
Replace supply lines every 5-10 years or during any major kitchen upgrade. Check them yearly for signs of wear like rust, bulges, or leaks.
Is It Safe To Use Plastic Supply Lines For Hot Water?
Plastic lines can handle hot water but are less durable than braided stainless steel. In kitchens, stainless steel is safer and lasts longer, especially for hot water lines.
Installing a kitchen faucet supply line is a smart DIY project that can save you money and prevent water damage. With careful steps and the right materials, you’ll have a leak-free kitchen faucet for years to come.