Running a diagnostic on your KitchenAid dishwasher can feel intimidating, especially if you’re not familiar with appliance troubleshooting. But knowing how to use this powerful feature can save you time, money, and frustration. Diagnostics help you pinpoint issues—like why your dishwasher isn’t cleaning well, won’t start, or is making strange noises.
With the right approach, you can identify the problem, decide if you can fix it yourself, or know exactly what to tell a technician. In this guide, you’ll learn step-by-step how to run a diagnostic on your KitchenAid dishwasher, what the results mean, and how to use this information to keep your appliance running smoothly.
Whether you’re a first-time owner or an experienced DIYer, you’ll find practical tips, clear instructions, and advice that goes beyond the basics.
Understanding Kitchenaid Dishwasher Diagnostics
Modern KitchenAid dishwashers come with a built-in diagnostic mode. This special function is designed to help you and service technicians quickly identify errors or malfunctions. When you activate diagnostic mode, your dishwasher runs a series of tests and displays error codes using blinking lights or the digital display.
Diagnostic mode can check:
- Sensors (like water level and temperature)
- Motors (such as the wash pump and drain pump)
- Valves and switches
- Heating element
- Door latch and lock
- Electronic control board
Knowing how to run and interpret diagnostics is important because it gives you more control over your appliance. You’re not just guessing what’s wrong—you’re using the same tools professionals use.
Why Diagnostics Matter
Many common dishwasher problems—like dishes not getting clean, cycles not finishing, or unusual noises—can be caused by a wide range of issues. Sometimes, the fix is simple (like cleaning a filter or tightening a connection). Other times, you may need to replace a part.
Running diagnostics helps you zero in on the cause, saving you time and possibly avoiding an unnecessary service call.
Before You Start: Safety And Preparation
Before running a diagnostic on your KitchenAid dishwasher, it’s essential to prepare properly. This keeps you safe and helps ensure accurate results.
Safety First
- Unplug the dishwasher or turn off the circuit breaker before handling internal components.
- Never touch electrical parts with wet hands.
- Keep children and pets away from the area.
Gather Necessary Tools
You don’t need special tools to run diagnostics, but having these nearby can help:
- Flashlight (to read small labels or see under the dishwasher)
- Notepad and pen (to write down error codes)
- Kitchen timer or phone (to time test cycles)
Know Your Model
KitchenAid has many dishwasher models. While most use similar diagnostic procedures, there can be small differences. Find your model number—usually located on the inside edge of the door. Having your user manual or access to the official KitchenAid support site can be helpful.
Step-by-step: How To Run A Diagnostic On Your Kitchenaid Dishwasher
The exact steps to enter diagnostic mode can vary by model, but most follow a similar pattern. Here’s a general guide used by many KitchenAid dishwashers made after 2010.
Step 1: Ensure The Dishwasher Is In Standby
Your dishwasher must be in standby mode—not running a cycle and with the door closed. If it’s running, press “Cancel” or “Start/Reset” and wait for the cycle to end.
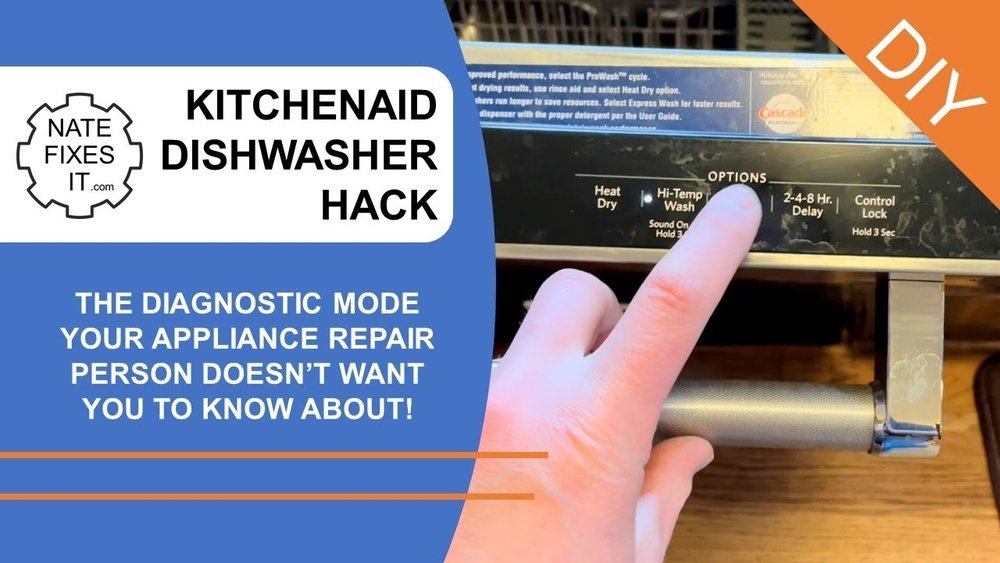
Step 2: Activate Diagnostic Mode
The most common method is the “button sequence” approach.
- Press three buttons in sequence: Find any three buttons (except “Start” or “Cancel”). For example: “Heated Dry,” “Normal,” “Heated Dry.”
- Press the buttons in this order, three times each, in a row (e.g., 1-2-3, 1-2-3, 1-2-3) within 8 seconds.
- The control panel lights should all turn on, or a specific pattern will flash. This signals you’re in diagnostic mode.
Note: On some models, the sequence may be different (such as “High Temp,” “Heated Dry,” “High Temp,” “Heated Dry”). If your dishwasher doesn’t respond, check your model’s manual or look for a tech sheet behind the lower kickplate.
Step 3: Let The Diagnostic Cycle Run
Once activated, the dishwasher will automatically test its major components. It may:
- Turn on the drain pump for several seconds
- Fill with water
- Run the wash motor
- Activate the heating element
- Display error codes or light patterns
The full diagnostic cycle usually takes 10–20 minutes.
Step 4: Watch For Error Codes
Error codes will appear as flashing lights or on the digital display (e.g., F6E4, which means “Float Switch Open”). Make a note of any codes that show up. You may see several codes flash in sequence.
Step 5: Interpret The Results
Consult your user manual or the tech sheet for your model to interpret the error codes. Some common examples:
- F6E1: No water entering
- F8E2: Drain motor problem
- F9E1: Slow drain
If no error codes display, your dishwasher did not find major faults.
Step 6: Exit Diagnostic Mode
Most KitchenAid dishwashers exit diagnostic mode automatically when the cycle finishes. If not, unplug the dishwasher or turn off power at the circuit breaker for 1–2 minutes to reset the control board.
Common Error Codes And Their Meaning
Understanding error codes is critical for effective troubleshooting. Here’s a summary of what you might see:
| Error Code | What It Means | Possible Causes |
|---|---|---|
| F6E1 | No water entering | Water supply shut off, kinked hose, faulty inlet valve |
| F8E2 | Drain pump error | Clogged filter, blocked drain hose, failed pump |
| F9E1 | Slow drain | Obstructed drain, air gap issue |
| F7E1 | Heater not working | Broken heating element, wiring issue |
| F6E4 | Float switch open | Stuck float, water in base pan |
If you see an unfamiliar code, check your manual or visit the official KitchenAid Service & Support page.
What To Do After Running Diagnostics
Once you’ve completed the diagnostic cycle and recorded any error codes, you’re ready to take action. Your next steps depend on what you’ve found.
If No Errors Are Found
If the dishwasher reports no errors but you’re still experiencing problems, consider these possibilities:
- Mechanical Blockages: Spray arms, filters, or drain areas may be blocked even if no error appears.
- Water Supply Issues: Ensure the water valve is fully open and supply pressure is normal.
- Loading Problems: Poor dish placement can block spray arms or sensors.
If Error Codes Are Found
Each error code points to a specific issue. Here’s how to proceed:
- Research the Code: Use your manual or a trusted online source to understand the code fully.
- Inspect the Suspected Area: For example, if you get a “drain pump error,” check the drain hose for kinks or blockages.
- Try Basic Fixes First: Clean filters, reset connections, and ensure parts are moving freely.
- Replace Faulty Parts: If a component like a float switch or inlet valve is faulty, consider replacing it.
- Call a Professional: If you’re not comfortable making repairs or the error persists, contact a certified technician.
Troubleshooting Common Kitchenaid Dishwasher Problems
Sometimes, diagnostics won’t catch every issue. Here are some frequent problems and how to approach them:
Dishwasher Won’t Start
- Check that the door is fully latched.
- Make sure the control lock is off (look for a lock symbol).
- Verify power at the outlet or circuit breaker.
Dishwasher Not Draining
- Inspect the drain hose for blockages.
- Clean the drain filter under the lower spray arm.
- Listen for the drain pump—if silent, it could be faulty.
Poor Cleaning Performance
- Remove and rinse the spray arms—look for clogged holes.
- Use the correct amount of detergent (too much can leave residue).
- Avoid overloading; leave space for water to reach all dishes.
Unusual Noises
- Rattling can mean a loose utensil or spray arm hitting a dish.
- Grinding sounds often indicate debris caught in the pump or filter.
Leaking Water
- Check the door seal for cracks or buildup.
- Inspect the float switch—if stuck, it may cause overfilling.
- Ensure the dishwasher is level so water drains properly.
When To Call A Professional
DIY fixes can solve many issues, but some situations require expert help:
- Electrical faults: If you suspect a wiring or control board problem.
- Persistent error codes: If codes return after resets or basic repairs.
- Water leaks: Large leaks or water pooling under the unit.
- Warranty concerns: If your dishwasher is still under warranty, always check with KitchenAid before making repairs.
Advanced Diagnostics: Using The Tech Sheet
Every KitchenAid dishwasher includes a tech sheet hidden behind the lower kickplate or inside the control panel. This document is designed for technicians, but you can use it too. It provides:
- Wiring diagrams
- Test points for voltage checks
- Detailed explanation of error codes
- Component test procedures
If you’re comfortable, you can use a multimeter to check voltage at specific test points as listed on the tech sheet. Always unplug the appliance before removing panels.
Credit: www.homedepot.com
Preventing Future Problems
Running diagnostics is helpful, but regular maintenance can prevent many issues before they start.
Monthly Maintenance Checklist
- Clean the filter: Remove and rinse under running water.
- Inspect spray arms: Remove and clear any blockages.
- Wipe the door gasket: Prevents leaks and odor buildup.
- Run a cleaning cycle: Use a dishwasher cleaner or a cup of white vinegar.
Tips For Long-term Care
- Always scrape food (but don’t fully rinse) before loading dishes.
- Use the right detergent for your water type (hard or soft).
- Leave the door slightly open after cycles to prevent mold and smells.
- Replace worn seals or gaskets promptly.
Comparing Kitchenaid Dishwasher Models: Diagnostic Features
Different KitchenAid models may have variations in their diagnostic procedures and features. Here’s a comparison of typical model types:
| Model Series | Diagnostic Entry Method | Display Type | Tech Sheet Location |
|---|---|---|---|
| Classic (Pre-2010) | Button sequence (usually “Heated Dry” + other) | Flashing lights | Kickplate |
| Modern (2010–2020) | Three-button sequence, repeated 3x | LED display or lights | Kickplate or control panel |
| Top-Control (2020+) | Touchpad sequence, may require door open | Full digital display | Inside door |
Tip: If your model has a full digital display, error codes will often appear as text (like “F6E1”). On older models, codes may show as a pattern of blinking lights.
Real-world Example: Diagnosing A Drain Problem
Let’s walk through a practical example using diagnostics:
Scenario: Your KitchenAid dishwasher finishes its cycle but leaves water at the bottom.
- Run Diagnostic Mode: You follow the button sequence and the dishwasher enters diagnostics.
- Error Code Displayed: After a few minutes, the display flashes “F8E2.”
- Check the Meaning: You look up F8E2 and find it means “Drain pump error.”
- Inspect the Area: You remove the lower rack and find a piece of broken glass blocking the drain filter.
- Fix and Retest: After clearing the debris, you run diagnostics again—no error code appears, and the dishwasher drains fully.
Non-obvious insight: Sometimes, error codes can be triggered by temporary blockages or items stuck during one cycle. Running diagnostics after a quick fix can help confirm the issue is resolved.
Key Things Beginners Often Overlook
When learning how to run a diagnostic on your KitchenAid dishwasher, many first-timers miss these important points:
- Reading the Tech Sheet: Many owners don’t realize their dishwasher comes with a hidden tech sheet. This document is a goldmine for troubleshooting.
- Button Sequence Timing: The sequence to enter diagnostic mode must be done quickly—usually within 8 seconds. If you go too slow, the dishwasher won’t respond.
- Recording Error Codes: It’s easy to miss error codes if you’re not watching carefully. Always have a pen and paper ready.
- Resetting After Diagnostics: Some owners forget to reset the dishwasher after diagnostics, causing old error codes to persist.
Credit: nashfix.us
Tips For Getting The Most From Diagnostics
- Double-check your model’s instructions: Procedures can change slightly between years.
- Don’t ignore minor error codes: Even “intermittent” codes can point to developing problems.
- Keep your manual handy: Or download a PDF from the KitchenAid website for quick reference.
- Document your process: If you need to call for service, having a record of what you’ve tried and the error codes will save time and money.
How Kitchenaid Diagnostics Compare To Other Brands
KitchenAid’s diagnostic process is similar to other major brands like Whirlpool and Maytag, but there are differences in interface and error code systems. Here’s a side-by-side comparison:
| Brand | Diagnostic Mode Entry | Error Code Format | Ease of Use |
|---|---|---|---|
| KitchenAid | Button sequence, usually 3 buttons | F#E# (e.g., F6E1) | Easy (if instructions followed) |
| Whirlpool | Similar button sequence | F#E# or flashing lights | Easy |
| Bosch | Dedicated “Reset” button | E# (e.g., E15) | Moderate |
| GE | Press and hold “Cycle Select” | Numbers or blinking lights | Varies by model |
Insight: Learning the diagnostic process for KitchenAid also helps if you own other Whirlpool-family appliances, as procedures and error codes are often similar.
Frequently Asked Questions
What If My Dishwasher Doesn’t Respond To The Diagnostic Button Sequence?
First, make sure you’re pressing the correct buttons quickly enough—usually within 8 seconds. If it still doesn’t work, check your model’s manual for the exact sequence. On some models, the sequence may involve different buttons. If you can’t find the tech sheet or manual, look online using your model number.
Can I Damage My Dishwasher By Running Diagnostics?
No, running diagnostics is safe and won’t harm your dishwasher. It’s a built-in feature designed for troubleshooting. However, avoid interrupting the cycle or unplugging the unit while diagnostics are running, as this can sometimes cause the control board to freeze.
How Do I Reset My Kitchenaid Dishwasher After Running Diagnostics?
Most KitchenAid dishwashers reset automatically after diagnostics finish. If not, unplug the dishwasher or turn off the circuit breaker for 1–2 minutes. This will clear any old codes and restart the control board.
What Should I Do If I See Multiple Error Codes?
Write down all codes you see, as they may point to related problems. Start by fixing the issue linked to the first code, then rerun diagnostics. Often, resolving the main error will clear the others.
Where Can I Find Official Information On Kitchenaid Dishwasher Error Codes?
The best source is your user manual or the tech sheet inside your dishwasher. You can also visit the official KitchenAid Service & Support website for up-to-date code lists and troubleshooting tips.
Running diagnostics on your KitchenAid dishwasher puts powerful information at your fingertips. By following the steps above, you can quickly identify problems, save on repair costs, and keep your appliance working at its best. Regular maintenance and a little confidence with the diagnostic process will help you enjoy clean, trouble-free dishes for years to come.

Credit: www.youtube.com