Transforming your kitchen does not always require a full remodel. Sometimes, a fresh coat of paint on your kitchen island can make the entire space look new. Painting a kitchen island is a rewarding project that adds personality and style without a huge investment.
Many homeowners feel nervous about the process—worried about mistakes, paint chipping, or simply not getting that professional look. The truth is, with the right steps, tools, and a little patience, you can achieve a flawless finish even as a beginner.
This guide will walk you through every stage of painting a kitchen island, from choosing the right paint to final touch-ups. You will learn how to prepare surfaces, select the best materials, and avoid common pitfalls. Along the way, you will discover practical tips and insights that most DIY guides miss—like how to handle tricky corners, or why drying times are more important than you think.
Whether your island is wood, laminate, or previously painted, this article will help you get lasting results and a kitchen feature you’ll love.
Why Paint Your Kitchen Island?
A kitchen island is often the centerpiece of your space. Over time, daily use, spills, and foot traffic can leave it looking worn or dated. Painting is the fastest way to revive your island without replacing it. Here are a few reasons to consider painting your kitchen island:
- Cost-effective update: Painting is much cheaper than buying a new island.
- Personalization: You can choose a color that matches your personality or current trends.
- Increase home value: A modern-looking kitchen often adds value if you plan to sell.
- Easy to maintain: Painted surfaces can be cleaned and touched up easily.
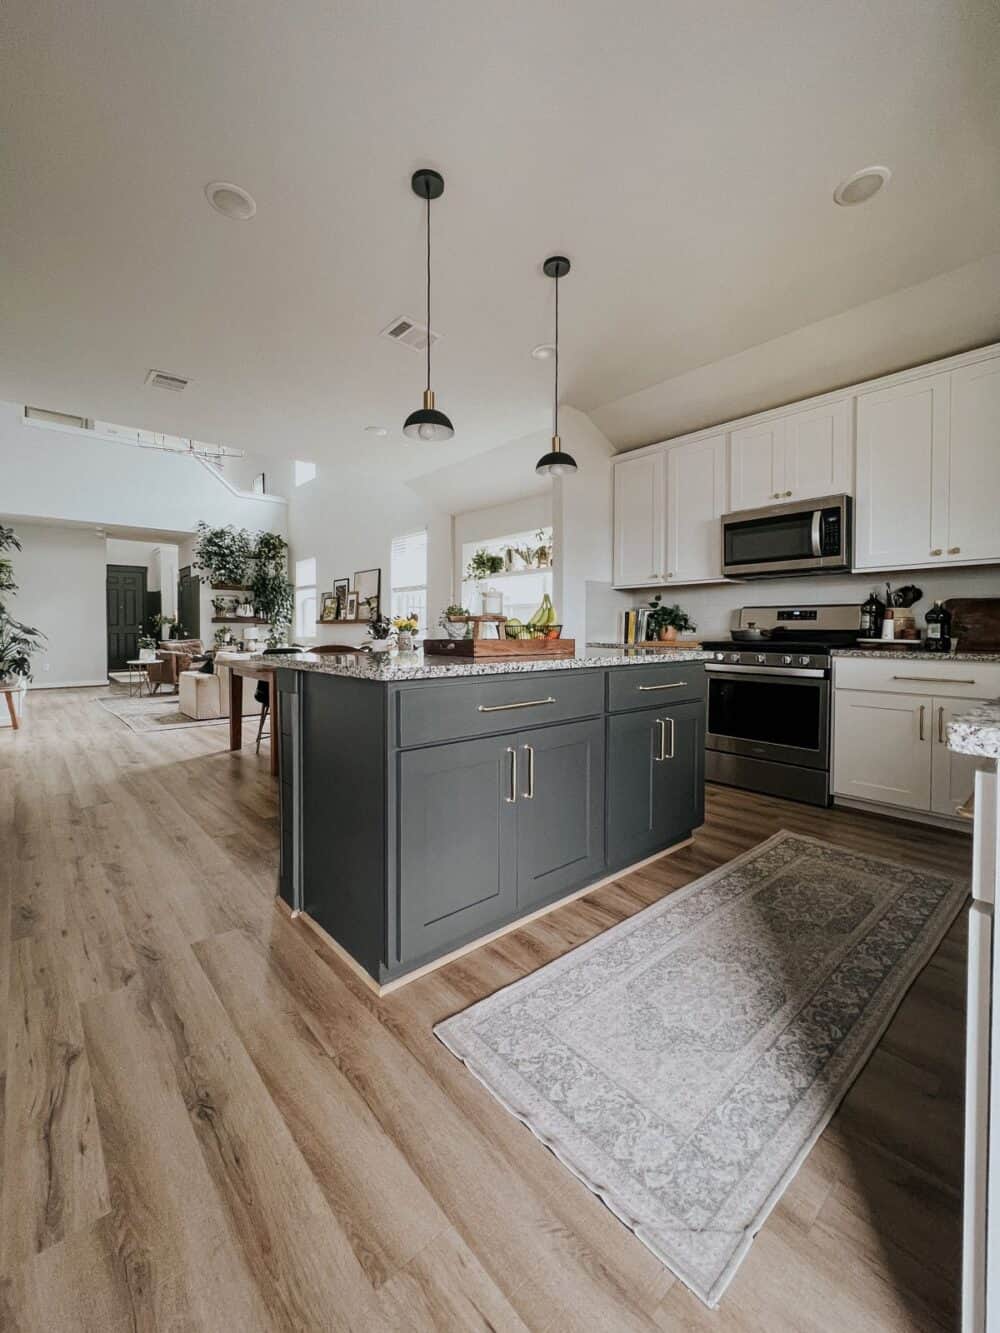
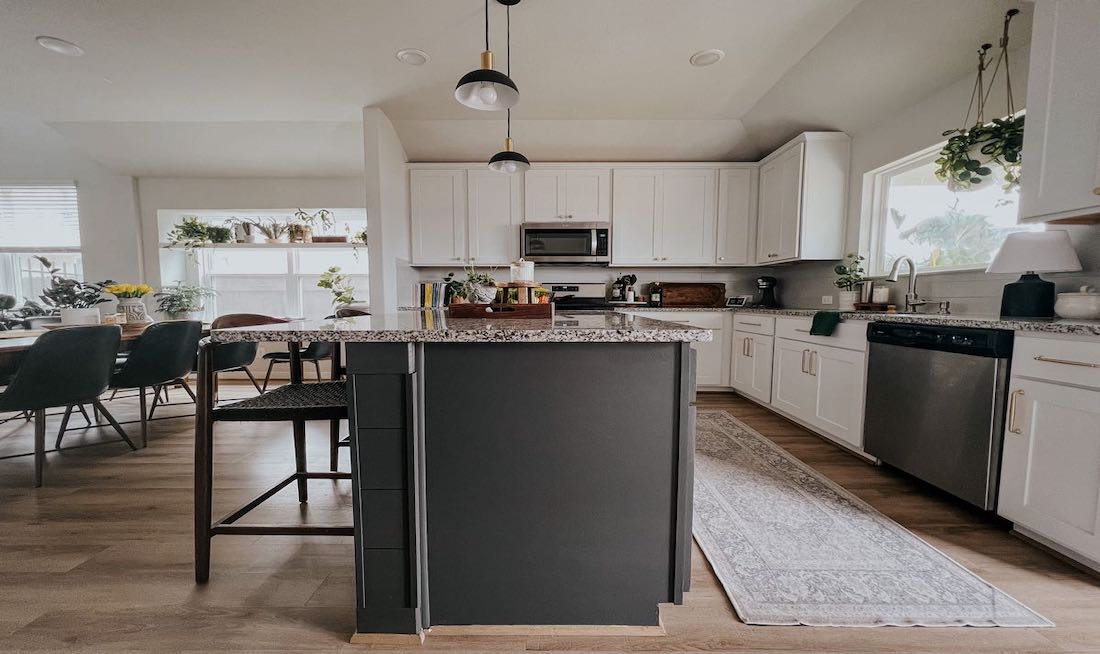
Many homeowners notice that a bold or calming color on their island changes the feel of the whole kitchen. For example, a navy or forest green island can create a modern, high-end look, while soft grays or classic white keep the space airy and bright.
Tools And Materials You’ll Need
Before you start, gather all necessary materials. Having everything ready will help you avoid interruptions and mistakes.
Essential tools:
- Screwdriver (for removing hardware)
- Drop cloths or plastic sheeting
- Painter’s tape
- Sandpaper (medium and fine grit)
- Tack cloth or lint-free rags
- Putty knife
- Paintbrushes (angled and straight)
- Foam roller (for smooth finish)
- Paint tray
- Small containers for hardware
Materials:
- Wood filler (for cracks or holes)
- Degreaser or mild cleaner
- Primer (stain-blocking recommended)
- High-quality paint (acrylic, alkyd, or cabinet-specific)
- Topcoat or sealer (if needed)
Optional but helpful:
- Power sander (for large or rough surfaces)
- Liquid deglosser (for glossy finishes)
- Respirator mask (if sanding or using strong chemicals)
Pro tip: Do not skip quality brushes and rollers. Cheap tools can leave brush marks or fuzz in your paint.
Choosing The Right Paint And Primer
Selecting the correct paint and primer is crucial for a long-lasting, beautiful finish. Kitchen islands need durable, washable surfaces because they face spills, heat, and daily wear.
Paint types:
- Acrylic latex: Water-based, easy to clean, low odor. Good for most islands.
- Alkyd or oil-based: More durable, smoother finish, but longer drying time and stronger odor.
- Cabinet or furniture paint: Specially formulated for toughness and easy cleaning.
Finishes:
- Satin or semi-gloss: Best for kitchen islands. They resist stains and are easy to wipe clean.
- High-gloss: Very durable and shiny, but can show imperfections.
Primer:
- Use a stain-blocking primer especially if painting over wood, dark colors, or glossy finishes. Primers help paint stick and prevent stains from bleeding through.
Non-obvious insight: Using a bonding primer can make a big difference on laminate or slick surfaces. It helps paint grip to non-porous materials.
Preparation: Setting Up For Success
Preparation is the foundation of a perfect paint job. Many people rush this step and regret it later when paint peels or chips. Take your time with prep—the results will be worth it.
Clear And Clean The Area
- Remove all items from your island, including stools or chairs.
- Lay drop cloths or plastic around the island to protect floors and nearby cabinets.
- Tape off edges where the island meets the floor, walls, or appliances with painter’s tape.
Remove Hardware And Doors
- Use a screwdriver to remove handles, knobs, hinges, and any removable panels or doors.
- Place hardware in small containers or bags and label them. This saves confusion during reassembly.
Deep Cleaning
Kitchens get greasy. Even invisible oil can ruin your paint job.
- Wipe down the entire surface with a degreaser or mild soap and water. Don’t forget hidden corners, under overhangs, and inside cabinet doors.
- Rinse with a damp cloth to remove soap residue.
- Let everything dry completely before moving on.
Repair And Fill
Check for dents, holes, or scratches.
- Fill holes or deep scratches with wood filler. Use a putty knife to smooth it flush with the surface.
- Allow filler to dry fully, then sand smooth.
Sanding: The Key To Adhesion
Sanding creates a surface that paint can grip. Skipping this is a top reason for peeling paint later.
- For wood or previously painted surfaces, use medium-grit sandpaper (120–150 grit) to scuff up all surfaces.
- For glossy or laminate, you may need a liquid deglosser or extra sanding with fine-grit paper (180–220 grit).
- Always sand with the grain, not against it.
- Wipe away dust with a tack cloth or damp rag.
Non-obvious insight: Pay special attention to corners and detailed trim. Paint won’t stick well if dust or oils remain in these spots.
Priming: Building A Solid Base
Priming is not optional for kitchen islands. It seals the surface, blocks stains, and ensures paint bonds well.
- Stir primer thoroughly. Do not shake, as this can cause bubbles.
- Use a brush for corners, trim, and detailed areas. Follow with a roller for flat panels.
- Apply a thin, even coat. It’s better to do two thin coats than one thick coat.
- Let primer dry completely—usually 2–4 hours (check your product’s label).
If you see stains or wood grain showing after the first coat, add a second coat of primer.
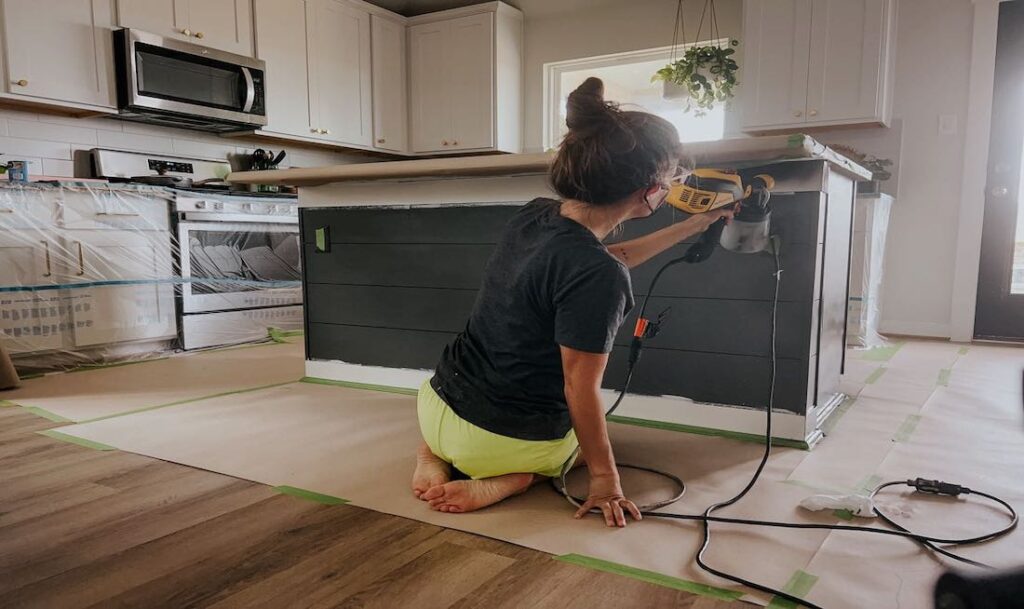
Painting: Techniques For A Smooth Finish
Now comes the fun part—adding color. Good technique makes the difference between a smooth, professional look and a streaky, uneven finish.
First Coat
- Stir paint well before and during use.
- Use an angled brush to cut in around edges, corners, and raised panels.
- Use a foam roller for flat, large surfaces. Roll in long, gentle strokes.
- Work in small sections to keep a wet edge. This prevents lap marks.
Drying And Sanding Between Coats
- Let the first coat dry fully. Most paints need 4–6 hours, but drying times vary—check your can.
- Lightly sand the surface with fine-grit sandpaper (220 grit). This removes dust and helps the next coat stick.
- Wipe away all sanding dust with a tack cloth.
Second And Third Coats
- Apply the second coat using the same method: Brush for edges, roller for large areas.
- Two coats are usually enough, but dark colors or dramatic color changes may need a third coat.
- Always sand lightly and remove dust between coats.
Practical tip: If painting doors or panels separately, keep them flat while drying to avoid drips.
Credit: www.wagnerspraytech.com
Finishing Touches: Protection And Assembly
A painted kitchen island needs to stand up to heavy use. The final steps protect your hard work and bring everything together.
Applying A Topcoat
While some paints are “self-sealing,” a clear topcoat adds extra durability—especially important for families or high-traffic kitchens.
- Use a water-based polyurethane for most paints. Oil-based topcoats can yellow over time.
- Apply with a clean, high-quality brush or foam roller.
- Follow the grain for the smoothest finish.
- Allow to dry fully before handling.
Data point: Water-based topcoats typically dry in 2 hours and cure in 7 days; oil-based can take 24 hours to dry and up to 30 days to fully cure.
Reattaching Hardware And Cleaning Up
- Remove all painter’s tape slowly to avoid peeling fresh paint.
- Reinstall hardware, doors, and panels carefully. If you want a new look, consider updating hardware at this stage.
- Touch up any small chips or missed spots with a small brush.
Wait at least 24–48 hours before heavy use. Full curing can take 7–30 days; avoid harsh cleaning or dragging items across the surface during this period.
Common Mistakes To Avoid
Even experienced DIYers make mistakes when painting kitchen islands. Knowing the most frequent problems can help you avoid them.
- Skipping sanding and cleaning: Paint will not stick to greasy, glossy, or dirty surfaces.
- Rushing drying times: Painting over tacky paint leads to bubbles, peeling, or smudges.
- Using the wrong paint: Interior wall paint is not durable enough for kitchen islands.
- Thick coats: Thick paint dries slowly and may drip or sag.
- Not labeling hardware: Losing track of where hinges or handles go can turn reassembly into a puzzle.
Remember, patience at every step means fewer touch-ups and repairs later.
Credit: www.loveandrenovations.com
Color Selection: Tips And Trends
Choosing the right color for your kitchen island is both fun and important. The island can match your cabinets, contrast for a bold look, or reflect current trends.
Popular colors:
- Classic white: Clean, bright, and timeless.
- Navy blue: Modern, works with many cabinet colors.
- Charcoal gray: Sleek and sophisticated.
- Forest green: Trendy and natural.
- Warm taupe: Neutral and calming.
Guidelines for choosing:
- Consider your kitchen’s lighting. Dark colors absorb light, light colors reflect it.
- Think about how the island color will look with your countertops and flooring.
- Use samples. Paint a small section to see how it looks at different times of day.
Expert tip: Bold colors can be stunning, but neutral shades are safer if you plan to sell your home soon.
Special Cases: Painting Over Laminate Or Previously Painted Surfaces
Not all kitchen islands are solid wood. Many are laminate or have been painted before. Here’s how to handle these:
Laminate Surfaces
Laminate is slippery and paint can peel if you do not prepare it well.
- Clean thoroughly with degreaser.
- Sand with fine-grit paper to rough up the surface.
- Use a bonding primer designed for glossy or laminate surfaces.
- Paint as usual.
Previously Painted Surfaces
If the paint is in good condition:
- Clean, sand lightly, and prime.
If the paint is chipping or peeling:
- Scrape or sand off loose paint.
- Fill any dents.
- Prime exposed areas before painting.
Data Table: Paint Types Compared
Here’s a comparison of the most common paint types for kitchen islands:
| Paint Type | Durability | Dry Time | Ease of Cleaning | Finish Options | Odor |
|---|---|---|---|---|---|
| Acrylic Latex | Good | 1-2 hours | Easy | Satin, Semi-gloss | Low |
| Alkyd/Oil-Based | Very High | 6-8 hours | Easy | Satin, Gloss, High-gloss | Strong |
| Cabinet/Furniture Paint | Excellent | 2-4 hours | Very Easy | Satin, Semi-gloss | Low |
Data Table: Primer Types And Uses
Choosing the right primer makes a big difference. Here’s a quick guide:
| Primer Type | Best For | Blocks Stains | Bonds to Laminate | Odor |
|---|---|---|---|---|
| Stain-blocking | Wood, Old Paint | Yes | No | Medium |
| Bonding | Laminate, Glossy Surfaces | No | Yes | Low |
| Shellac-based | Heavy Stains, Odor Control | Yes | Yes | Strong |
Step-by-step Timeline: How Long Will It Take?
Many people underestimate the time required. Here’s a realistic timeline for painting a kitchen island (excluding cure time):
| Step | Time Needed | Notes |
|---|---|---|
| Preparation (cleaning, sanding, taping) | 2-4 hours | Includes drying time after cleaning |
| Priming | 1-2 hours | Plus 2-4 hours drying |
| First coat of paint | 1-2 hours | Plus 4-6 hours drying |
| Second coat of paint | 1-2 hours | Plus 4-6 hours drying |
| Topcoat (optional) | 1 hour | Plus 2-4 hours drying |
| Reassembly & cleanup | 1-2 hours | Can be done after final coat is dry to touch |
A simple project may be done in a weekend, but complex islands or humid weather can add time.
Practical Advice For A Professional Look
- Work in good lighting. Shadows make it easy to miss streaks or drips.
- Keep a wet edge. Always paint into wet paint, not dried, for the smoothest finish.
- Use light, even strokes. Heavy pressure causes drips and roller marks.
- Check for drips as you go. Wipe away immediately.
- Ventilate your space. Open windows and use fans, especially with oil-based paints or primers.
Maintenance Tips After Painting
A well-painted island is easy to keep looking fresh with a few good habits:
- Wipe spills quickly with a damp cloth.
- Avoid harsh cleaners; use gentle soap and water.
- Place mats or trivets under hot pans or appliances.
- Touch up chips or scratches right away with leftover paint.
If you notice sticky residue or early wear, allow more time for curing before heavy use.
Real-world Example
One homeowner painted their old oak kitchen island navy blue using acrylic latex paint. They spent a full day prepping—cleaning, sanding, and priming. After two coats of paint and a clear topcoat, their island looked brand new. Two years later, the paint still looked perfect.
Their secret? Careful prep and patience with drying times.
Credit: www.wagnerspraytech.com
When To Hire A Professional
While most people can paint a kitchen island themselves, some situations are best left to pros:
- You want a high-gloss, sprayed finish.
- The island has a lot of damage or ornate trim.
- You have allergies or cannot ventilate the area well.
Professionals have access to better tools and can finish complex jobs faster.
Sustainability: Eco-friendly Options
If you are concerned about air quality or the environment, look for:
- Low-VOC or zero-VOC paints.
- Water-based primers and topcoats.
- Reusable drop cloths and brushes.
These options are safer for children and pets and reduce strong odors.
Further Learning
For more tips on choosing paints and primers, see this guide from This Old House.
Frequently Asked Questions
How Long Should I Wait Before Using My Kitchen Island After Painting?
Wait at least 24–48 hours before light use. Full curing for most paints and topcoats takes 7–30 days, so avoid heavy cleaning or dragging heavy items across the surface during this time.
Can I Paint Over A Dark Color Without Sanding It All Off?
Yes. Clean and lightly sand the surface, then use a stain-blocking primer. This will prevent the old color from showing through and help the new paint stick.
What Is The Best Way To Avoid Brush Marks Or Roller Lines?
Use a high-quality foam roller for flat areas and an angled brush for corners. Apply thin coats and sand lightly between coats for a smooth finish.
Is A Topcoat Really Necessary?
A topcoat is not required for every paint, but it adds extra durability and makes cleaning easier. It is especially useful for islands that get heavy use.
Can I Change The Hardware After Painting?
Absolutely. Painting is a great time to update knobs, handles, or hinges for a fresh look. Just make sure to attach new hardware after the paint and topcoat are fully dry.
Bringing new life to your kitchen island with paint is one of the most satisfying DIY projects. With careful preparation, the right materials, and a bit of patience, you can achieve a professional finish that transforms your kitchen. Remember to allow for proper drying and curing, and enjoy your refreshed space for years to come.