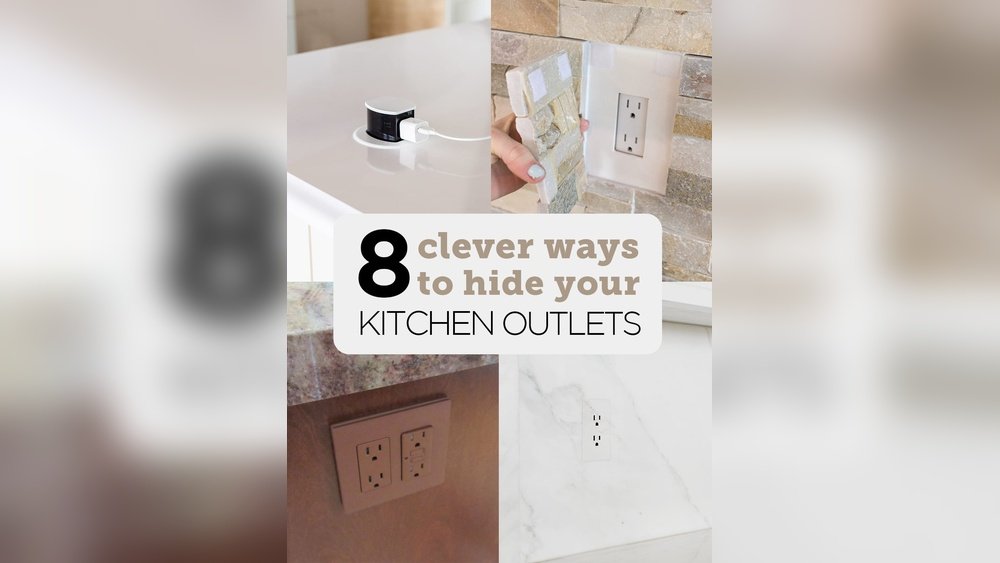
Hiding Outlets in Kitchen Island: Complete Guide for a Sleek and Safe Space
The modern kitchen island is much more than a place to prepare food. It’s a hub for cooking, socializing, charging devices, and sometimes even working or studying. But as these islands become more central to our lives, outlets—those essential but often unattractive power sources—can disrupt the clean, elegant look of your kitchen. Exposed outlets can also collect food debris or present safety risks, especially with children around. So, how can you hide outlets in your kitchen island without sacrificing convenience or safety?
This guide explores practical, creative, and code-compliant solutions for hiding outlets in kitchen islands. You’ll discover installation methods, design tricks, and insider tips that even experienced homeowners often overlook. We’ll also cover building codes, costs, and common mistakes—so you can make smart, stylish choices for your own kitchen.
Why Hide Outlets In Kitchen Island?
Outlets are a necessity, but visible ones can clash with your kitchen’s design. When you hide outlets, you create a seamless, clutter-free look. Here’s why homeowners and designers often choose to conceal outlets:
- Visual appeal: No more plastic covers breaking up beautiful stone or woodwork.
- Safety: Hidden outlets are less likely to attract spills or curious fingers.
- Easier cleaning: No more crumbs and grime trapped around outlet edges.
- Resale value: A polished kitchen often impresses buyers and appraisers.
But hiding outlets isn’t just about looks. Many cities require outlets in kitchen islands for safety and practicality. Knowing your options helps you meet these codes while keeping your kitchen beautiful.
Understanding Kitchen Island Outlet Requirements
Before you start, it’s important to understand electrical codes in the US. The National Electrical Code (NEC) requires at least one outlet for a fixed island (Section 210.52(C)(2)). Outlets must be readily accessible but not necessarily visible.
Key points:
- At least one GFCI (Ground Fault Circuit Interrupter) outlet is required.
- Outlets must be no more than 12 inches below the countertop.
- Extension cords or plug strips are not code-compliant substitutes.
Check your local building codes, as some regions may have stricter requirements. Hiring a licensed electrician is always the safest choice.
Credit: flushtek.com
Popular Ways To Hide Outlets In Kitchen Island
Let’s explore the most effective and creative ways to hide outlets. Each method balances accessibility, safety, and style.
1. Pop-up Outlets
Pop-up outlets are one of the most popular solutions. These units stay hidden within the island’s surface and only appear when needed.
How They Work:
- Installed flush with the countertop or island top.
- Push or pull to reveal the outlets.
- Close to hide them when not in use.
Pros:
- Keeps outlets completely out of sight.
- Many models offer USB charging ports.
- Some come with waterproof covers.
Cons:
- More expensive than standard outlets.
- Requires cutting into the countertop, which may not suit all materials.
Pop-up outlets are ideal for high-end kitchens or islands used for multiple activities.
2. Under-counter Flip-up Outlets
Unlike pop-up versions, flip-up outlets are installed just under the counter’s edge. They swing down or up when you need them.
How They Work:
- Mounted on the underside of the countertop overhang.
- Pull or flip the outlet down for access.
- Push back up to conceal.
Pros:
- Minimal impact on counter surface.
- Keeps outlets hidden from direct view.
Cons:
- May not be suitable for countertops with little overhang.
- Some models can be less durable.
Flip-up outlets work well for islands with at least a 1. 5-inch overhang.
3. Outlets Hidden In Drawers
This method places outlets inside a kitchen drawer, often in a dedicated charging station.
How They Work:
- Outlet is installed at the back or side wall of a deep drawer.
- Plug in small appliances or devices while keeping them out of sight.
Pros:
- Completely hidden when the drawer is closed.
- Great for charging phones, tablets, or small appliances.
Cons:
- Not suitable for heavy-duty appliances (stand mixers, slow cookers).
- Drawer must remain open while devices are plugged in (potential safety issue).
Drawer outlets are best for tech charging, not for powering large kitchen tools.
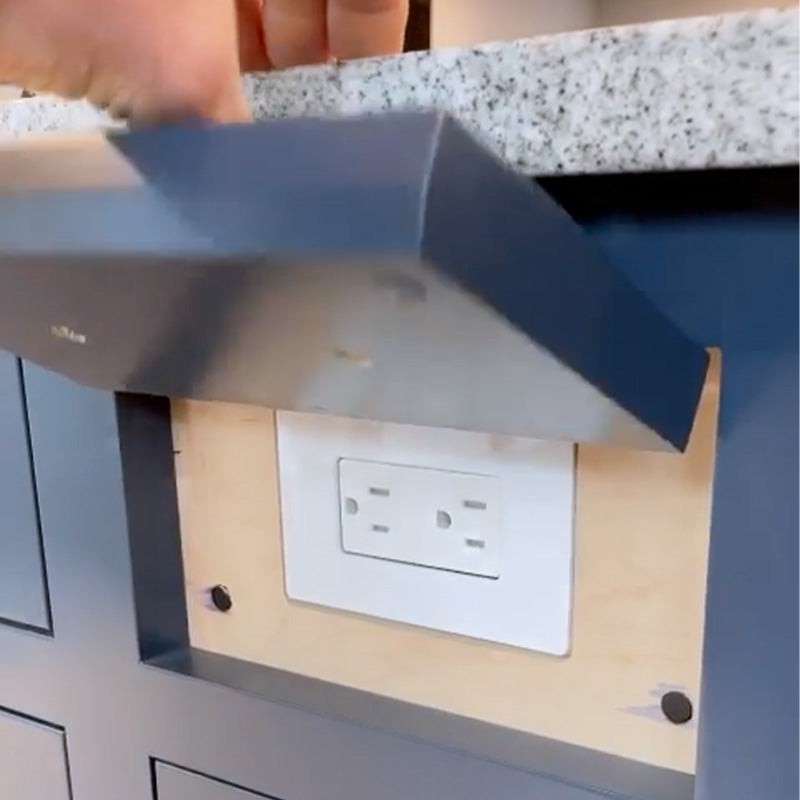
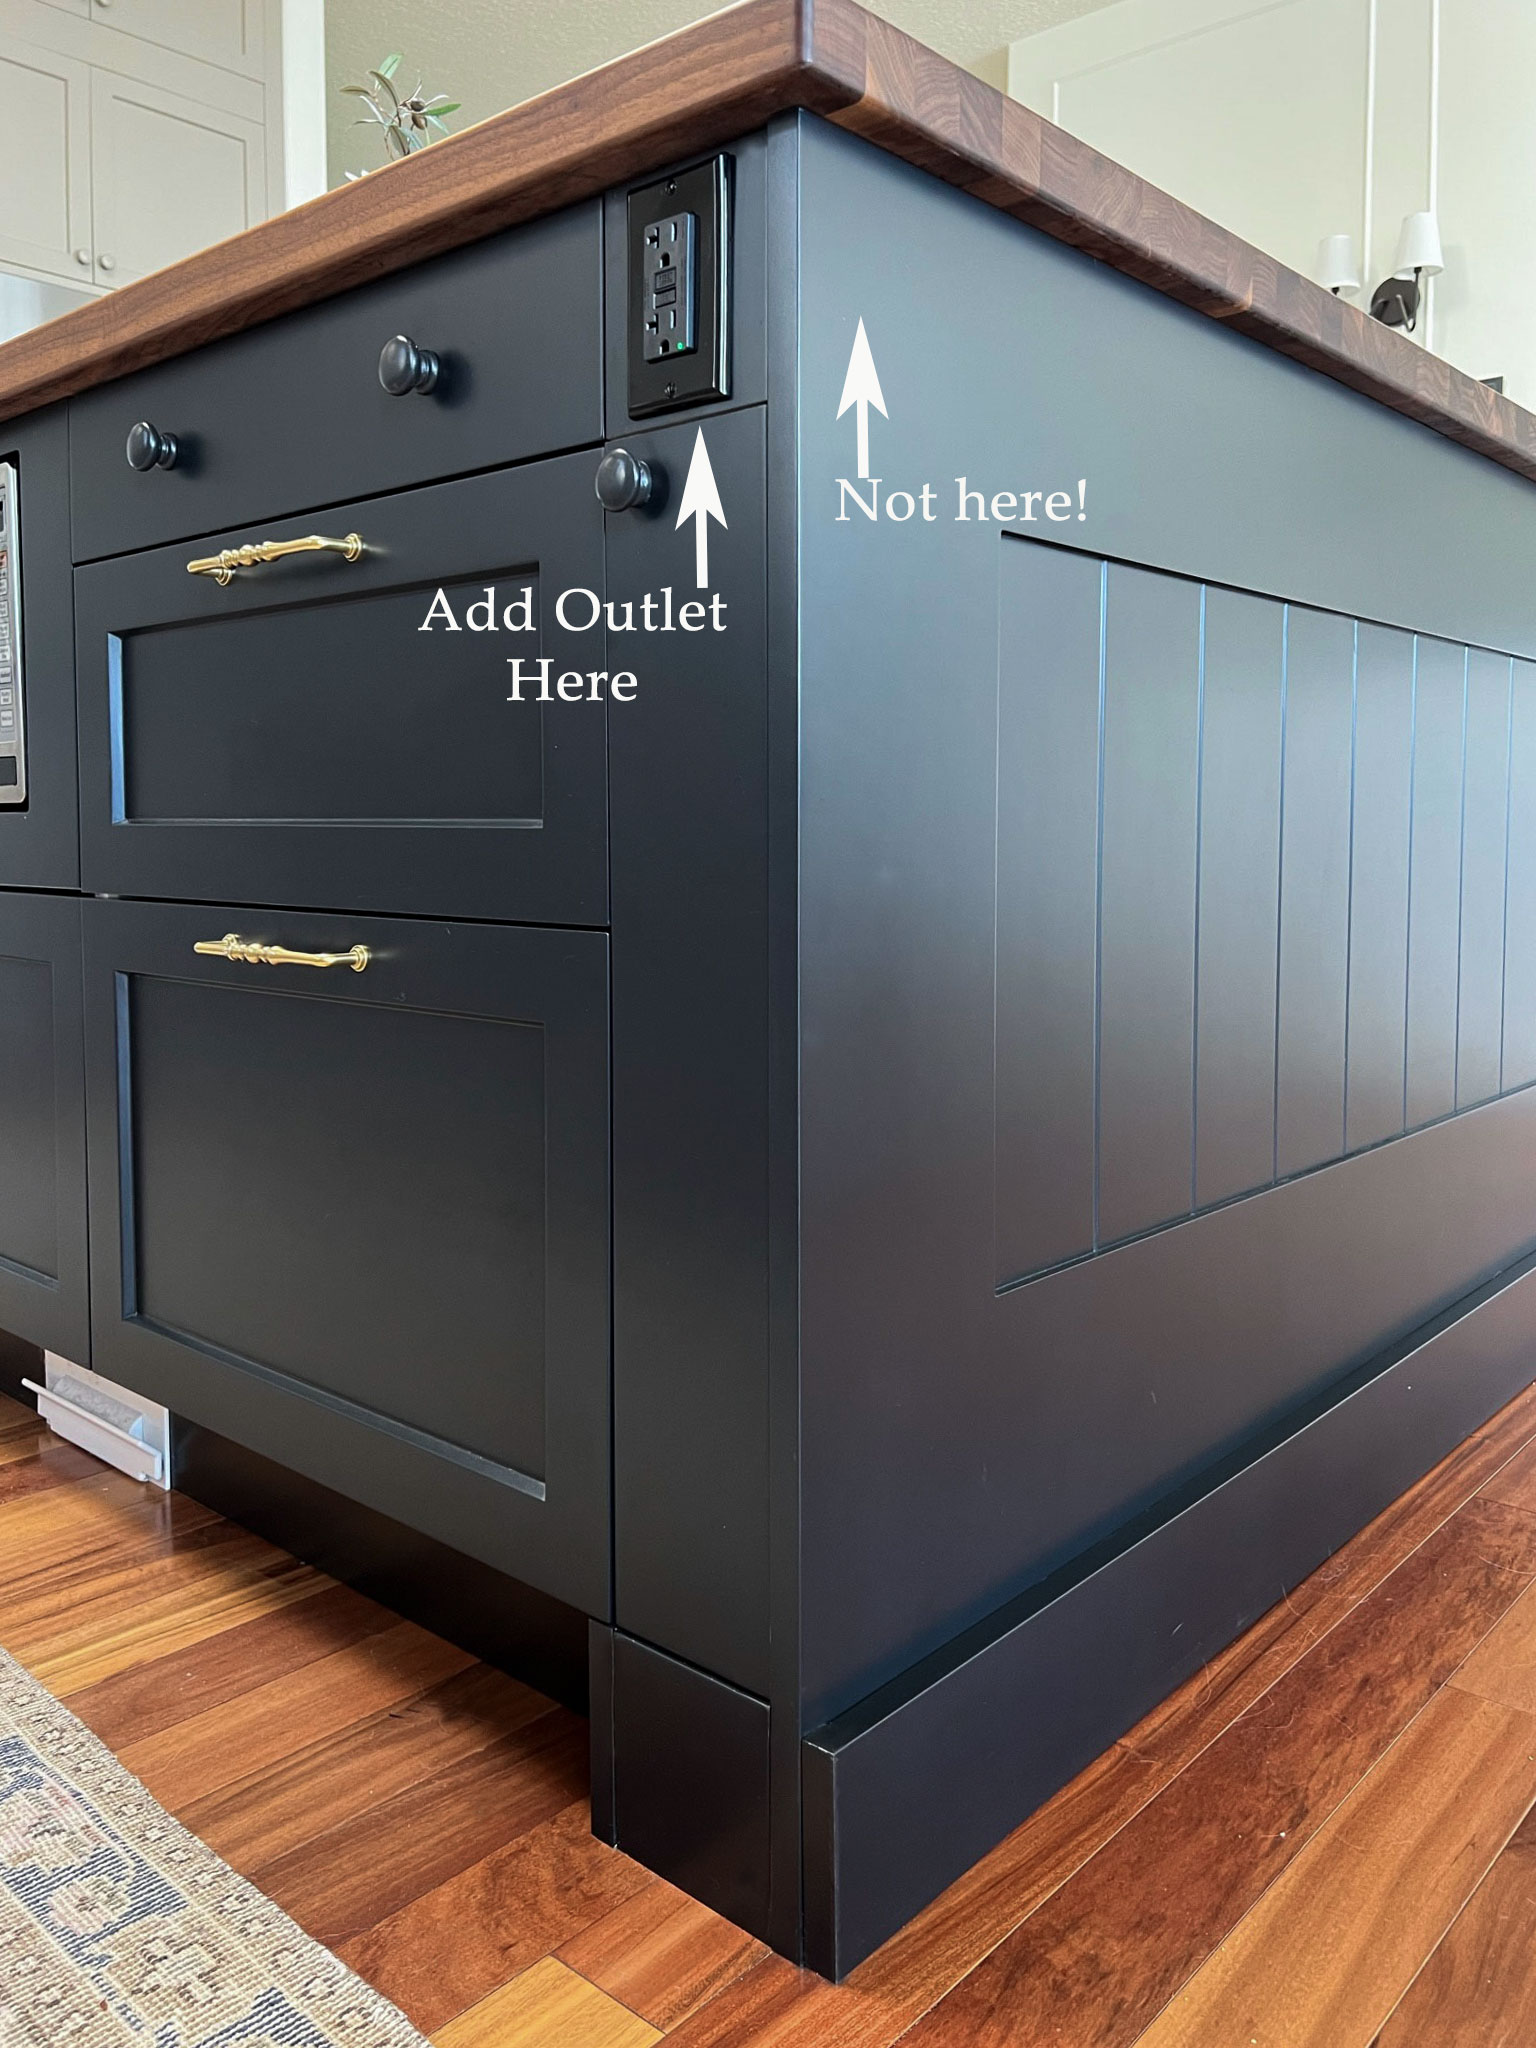
4. Outlets Mounted Vertically On Island Sides
Instead of placing outlets directly on the face of the island, install them vertically under the counter’s edge or on the cabinet side.
How They Work:
- Outlet is mounted on the short side panel or just beneath the countertop lip.
- Sometimes painted or finished to match the cabinetry.
Pros:
- Easy to reach but less visible from most angles.
- No changes needed to the countertop.
Cons:
- Still visible from some directions.
- May not work for islands with decorative panels or special finishes.
This is one of the simplest, most code-friendly solutions.
5. Outlets Behind Sliding Or Hinged Panels
Custom panels can cover outlets and blend seamlessly with your island’s design.
How They Work:
- Outlet is installed as usual, but a small door, sliding panel, or magnetic cover hides it.
- Open the panel when you need power.
Pros:
- Completely camouflages outlets.
- Allows you to use decorative materials.
Cons:
- More expensive (custom carpentry required).
- Not always code-compliant if the panel is hard to open.
If you want a truly seamless look, this approach works well for premium kitchens.
6. Toe-kick Outlets
Install outlets in the toe-kick—the recessed area at the base of your island.
How They Work:
- Outlet is mounted on the vertical toe-kick panel, near floor level.
Pros:
- Nearly invisible unless you’re looking down.
- Perfect for islands with minimal wall space.
Cons:
- Not ideal for frequent use (requires bending down).
- May not meet “readily accessible” code in some areas.
Toe-kick outlets suit islands where countertop or side access is limited.
7. Appliance Garage Outlets
An appliance garage is a hidden compartment for storing small appliances. Placing outlets inside these garages keeps cords and plugs out of sight.
How They Work:
- A small cabinet or compartment sits on the island.
- Outlet is installed inside for blenders, toasters, or coffee makers.
Pros:
- Keeps appliances and cords hidden.
- Reduces countertop clutter.
Cons:
- Takes up island space.
- More expensive to build.
This method is best for large islands or homes with many small appliances.
8. Outlets Behind Lift-up Or Pull-out Countertops
Some modern islands feature lift-up or pull-out countertop extensions. Outlets can be hidden beneath these movable surfaces.
How They Work:
- Outlet is installed under the section that lifts up or slides out.
- Access the outlet when you open or extend the countertop.
Pros:
- Completely hidden when the top is down.
- Good for casual or multi-use kitchen islands.
Cons:
- More complex installation.
- Extension hardware adds cost.
This approach is popular in kitchens that double as workspaces.
9. Outlets With Matching Covers Or Camouflage Plates
If you can’t completely hide the outlet, disguise it. Use covers or faceplates that match your island’s material.
How They Work:
- Outlet covers are custom-painted, stained, or finished to match the island.
- Some covers mimic stone, wood, or tile.
Pros:
- Outlets visually disappear into the background.
- Inexpensive and quick to install.
Cons:
- Does not hide the outlet physically, only visually.
- May still be noticeable up close.
This is a smart option if you want to minimize, not eliminate, outlet visibility.
10. Wireless Charging Stations
Built-in wireless charging pads can reduce the need for visible outlets, especially for phones and tablets.
How They Work:
- Charging pad is embedded under the countertop.
- Place device on the marked spot to charge.
Pros:
- No visible outlets or cords.
- Easy for guests and family to use.
Cons:
- Limited to devices with wireless charging capability.
- Still need traditional outlets for other appliances.
Pair wireless charging pads with one hidden outlet for the best results.
Comparing Outlet Hiding Solutions
Different methods suit different budgets, needs, and island designs. The table below compares the most popular options by visibility, cost, and code compliance.
| Method | Visibility When Not in Use | Typical Cost (Installed) | Code Compliance |
|---|---|---|---|
| Pop-Up Outlet | Completely hidden | $200–$600 | Usually compliant |
| Flip-Up/Under-Counter Outlet | Mostly hidden | $150–$400 | Usually compliant |
| Drawer Outlet | Fully hidden | $250–$600 | May not comply (accessibility) |
| Toe-Kick Outlet | Nearly invisible | $100–$250 | Varies by region |
| Camouflage Cover | Blended in | $30–$80 | Compliant |
Choosing The Right Solution For Your Kitchen
How do you decide which method is best for your kitchen island? Here are a few factors to consider:
Size And Shape Of Your Island
A large island allows for more hidden options, such as appliance garages or in-drawer outlets. Small islands may only have space for flip-up or side-mounted outlets.
How You Use Your Island
- If your island is mostly for prepping food, pop-up outlets or side-mounted outlets are usually enough.
- If you charge devices or use small appliances, consider drawer outlets or wireless charging pads.
- For family zones or homework spaces, safety and accessibility are most important.
Countertop Material
Some countertop materials, like natural stone or quartz, are more difficult (and costly) to cut for pop-up outlets. In those cases, under-counter or side options may be better.
Budget
Hidden solutions range from $30 for a simple camouflage cover to $1,000+ for custom cabinetry. Set your budget before choosing a method.
Local Building Codes
Always check local code before making a final decision. Some solutions (like in-drawer outlets) may not be allowed in all regions.
Step-by-step: Installing A Pop-up Outlet In A Kitchen Island
Let’s walk through the process of installing a pop-up outlet, one of the most popular and effective ways to hide outlets.
Tools And Materials Needed
- Pop-up outlet kit (UL-listed)
- Power drill and bits
- Jigsaw or hole saw (size per manufacturer instructions)
- Screwdriver set
- Wire nuts and electrical tape
- GFCI breaker or GFCI pop-up unit
- Measuring tape and pencil
Installation Steps
1. Turn Off Power
Shut off the kitchen circuit at the breaker box.
2. Mark The Location
Choose a spot that’s convenient but away from sink or stove. Mark the outline using the pop-up outlet template.
3. Cut The Hole
Use a jigsaw or hole saw to cut out the marked area. Take care not to crack stone or quartz surfaces.
4. Install The Pop-up Outlet
Fit the outlet box into the cutout. Secure it according to the manufacturer’s instructions.
5. Connect The Wires
Match the wires (black to black, white to white, ground to ground). Use wire nuts and electrical tape.
6. Secure And Test
Screw the unit into place. Restore power and test the outlet using a small appliance.
7. Seal (if Needed)
Apply a waterproof sealant if using near a sink or wet area.
Safety Tip: If you’re not comfortable with electrical work, hire a licensed electrician.
Credit: erinzubotdesign.com
Insider Tips For Hiding Kitchen Island Outlets
Even with the right outlet, small details make a big difference. Here are expert tips:
- Choose the smallest code-compliant outlet box to minimize cutting and maintain structural strength.
- Match outlet color to your cabinetry or countertop. Even small color differences can stand out.
- Don’t forget GFCI protection—it’s required for all kitchen outlets.
- Plan for future needs. Add USB ports or extra outlets if you often host or charge devices.
- Label hidden outlets (inside drawers or garages) to help guests or family find them.
Common Mistakes To Avoid
Many homeowners and even some contractors make these errors:
1. Ignoring Code Requirements:
Hidden outlets are great—unless they break code. Always check NEC and local rules.
2. Cutting Countertops Incorrectly:
Stone, quartz, and concrete require special tools. Cracks or chips can ruin a countertop.
3. Placing Outlets Near Sinks:
Spills and splashes can cause shocks or damage. Keep outlets at least 12 inches from sinks.
4. Overloading Circuits:
Each outlet should be on its own circuit or protected by GFCI. Avoid daisy-chaining multiple high-wattage appliances.
5. Using Non-listed Products:
Only use UL-listed (or ETL, CSA) outlets. Cheap imports may not be safe or code-compliant.
6. Hiding Outlets Too Well:
If you can’t easily find or access your outlet, neither can a home inspector—or a guest in need.
Real-world Examples: Hidden Outlets Done Right
Here are a few examples of how hidden outlets look and function in real kitchens:
- A family in Austin, TX, chose under-counter flip-up outlets in their walnut kitchen island. The outlets blend with the shadow line and are invisible from above.
- A California homeowner installed pop-up outlets with USB and standard plugs in a marble-topped island. When closed, the units are flush and water-resistant.
- In a small urban condo, outlets were placed in the toe-kick, making them invisible but still code-compliant and easy to reach with a foot tap.
These solutions not only improved looks but also made cleaning and entertaining easier.
Cost Comparison: Hidden Vs. Standard Outlets
Hidden outlets usually cost more than standard face-mounted ones. Here’s a cost breakdown for a typical US kitchen island:
| Solution | Materials | Labor | Total Cost (Installed) |
|---|---|---|---|
| Standard Side-Mounted | $10–$25 | $75–$150 | $85–$175 |
| Pop-Up Outlet | $80–$300 | $120–$300 | $200–$600 |
| Drawer Outlet | $120–$400 | $130–$200 | $250–$600 |
| Toe-Kick Outlet | $30–$60 | $70–$200 | $100–$260 |
| Custom Panel | $50–$300 | $200–$700 | $250–$1,000+ |
Hidden outlets are an investment, but they can make your kitchen more functional and attractive for years to come.
Diy Or Hire A Pro?
Some outlet solutions, like camouflage covers or simple side-mounts, are DIY-friendly if you have basic electrical skills. Others, like pop-up units or drawer installations, require advanced tools and knowledge. For safety and code compliance, many homeowners hire a licensed electrician.
When to DIY:
- Replacing an existing outlet with a matching cover
- Installing a low-voltage wireless charging pad
When to Hire a Pro:
- Cutting stone or quartz countertops
- Adding new circuits or GFCI protection
- Installing pop-up, flip-up, or in-drawer outlets
A professional can also ensure permits and inspections are handled properly.
Future Trends: Smart And Modular Outlets
Designers are now creating modular outlet systems that blend with cabinetry or move as your needs change. Some smart outlets work with voice assistants, letting you control kitchen appliances with a word. Wireless charging is becoming more common, and new outlets can include nightlights or LED indicators.
For more on electrical standards and smart home trends, check out the National Fire Protection Association.

Credit: www.decorpad.com
Frequently Asked Questions
How Many Outlets Are Required In A Kitchen Island?
The National Electrical Code requires at least one GFCI-protected outlet for a fixed kitchen island. Local codes may require more, especially for large islands or open kitchens. Always confirm with your local building department.
Are Hidden Outlets Safe For Children?
Most hidden outlets are safer than exposed ones because they’re harder for children to reach. For extra safety, use tamper-resistant outlets and covers. Avoid placing outlets where spills or water can collect.
Can I Install Hidden Outlets Myself?
Many basic solutions (like camouflage covers) are DIY-friendly if you have electrical experience. For pop-up, drawer, or toe-kick outlets, it’s best to hire a licensed electrician to ensure code compliance and safety.
Do Pop-up Outlets Work With All Countertop Materials?
Pop-up outlets can be installed in most materials, including wood, laminate, and solid surface. However, stone and quartz require special tools and may cost more to cut. Always check manufacturer guidelines and hire a pro for stone surfaces.
Will Hiding Outlets Increase My Home’s Value?
A clean, modern kitchen—especially with well-hidden, code-compliant outlets—can boost resale value and impress buyers. It shows attention to detail and safety, which many homeowners appreciate.
Hiding kitchen island outlets is a smart way to create a beautiful, functional, and safe kitchen. By understanding your options and following code, you can enjoy a seamless design without losing the power you need. If you’re planning a remodel or building a new kitchen, use these tips to make the best choice for your home.