
Baking has changed a lot in recent years. One tool that many home bakers and chefs now love is the silicone muffin pan. These colorful, flexible pans are everywhere—from big box stores to online shops. But if you’ve just bought one or you’re thinking about making the switch from metal pans, you might wonder, “How do I use a silicone muffin pan the right way?” The answer is simple, but there are clever tricks and important steps many people miss. Using silicone pans can make baking muffins, cupcakes, and more faster and easier, with less mess and fewer ruined treats. But only if you do it right.
This guide explains everything you need to know about using silicone muffin pans, from choosing your first one to cleaning up after your last batch. Along the way, you’ll learn tips that even experienced bakers sometimes forget, see real comparisons with metal pans, and discover how to get perfect muffins every time—even if you’re new to baking.
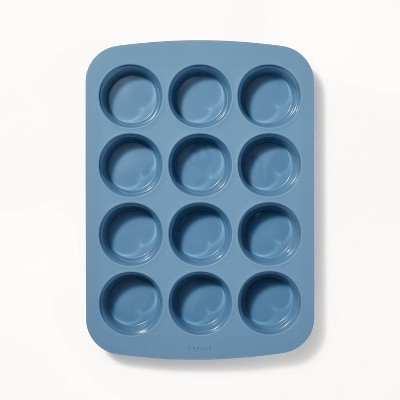
Why Choose A Silicone Muffin Pan?
Silicone pans are popular for good reasons. First, they’re nonstick, which means muffins usually pop out easily with no need for heavy greasing or liners. Second, they’re flexible and lightweight. You can bend them to get baked goods out without breaking or damaging your muffins. Third, they’re easy to clean—most can go right in the dishwasher. And unlike metal pans, silicone doesn’t rust or dent.
But there’s more. Silicone pans can handle a wide range of temperatures, usually from about -40°F to 450°F (-40°C to 232°C). That means you can use them in the oven, freezer, and even microwave. They also cool down fast, so you don’t have to wait long to remove your treats.
However, not all silicone pans are the same. Some are made from better, food-grade silicone, while cheap versions might include fillers that affect performance and safety. Choosing a good quality pan matters for both your baking and your health.
Choosing The Right Silicone Muffin Pan
What To Look For
When shopping for a silicone muffin pan, keep these factors in mind:
- Material Quality: Look for 100% food-grade silicone. This type is safe, has no chemical smell, and lasts longer. Avoid pans that feel thin, have a strong odor, or bend too easily.
- Cup Size and Count: Standard pans have 6 or 12 cups, but mini or jumbo sizes are available. Make sure the cup size matches your recipes.
- Color: While color doesn’t affect baking, darker colors may brown muffins faster than light ones.
- Brand Reputation: Check reviews and choose trusted brands. Some brands even print “LFGB” or “FDA approved” on the packaging, showing they meet safety standards.
- Price: Expect to pay a little more for better silicone. It’s worth it for safety and results.
Comparing Silicone Vs. Metal Muffin Pans
Here’s a quick look at how silicone and metal muffin pans compare:
| Feature | Silicone Muffin Pan | Metal Muffin Pan |
|---|---|---|
| Nonstick | Yes, naturally nonstick | Often needs greasing or liners |
| Flexibility | Very flexible | Rigid |
| Dishwasher Safe | Yes, most are | Usually, but may rust |
| Browning | Less browning | More browning/crisp edges |
| Durability | Can tear if mishandled | Long-lasting but can dent |
| Price | Medium to high | Low to medium |
As you can see, each type has its own strengths. For easy release and cleaning, silicone wins. For crispy edges and fast browning, metal pans are best.

Credit: www.amazon.com
How To Prepare A Silicone Muffin Pan
Some people think you don’t need to do anything special with silicone, but that’s not true. To get the best results:
- Wash Before First Use: Even if your pan looks clean, wash it in warm, soapy water and dry it well.
- Check for Residue: Some new pans have a slight oily film. Wipe it off with a paper towel.
- Light Grease for First Use: While silicone is nonstick, a light coating of oil or spray for the first few uses can help. After a few bakes, you might not need it.
- Place on a Baking Sheet: Because silicone is flexible, it can bend and spill. Always set your pan on a metal baking sheet before filling and moving it.
Step-by-step: Baking Muffins In A Silicone Pan
Let’s walk through the full process, using a standard recipe for 12 muffins.
1. Preheat Your Oven
Always preheat your oven fully before adding the pan. Silicone pans heat up slower than metal, so a hot oven is important.
2. Prepare The Pan
- Place your clean, dry silicone muffin pan on a sturdy baking sheet.
- Optionally, lightly spray or brush each cup with vegetable oil, especially if your recipe is low-fat or sticky.
3. Mix Your Batter
Follow your muffin recipe as usual. Silicone pans work with any standard muffin or cupcake recipe.
4. Fill The Cups
- Fill each cup about 2/3 to 3/4 full.
- Silicone cups are flexible, so hold the pan steady with one hand as you spoon or pour in the batter.
- Don’t overfill; muffins can spill over and make a mess.
5. Bake
- Place the baking sheet (with the silicone pan) in the center of the oven.
- Bake according to your recipe’s time and temperature.
- Muffins in silicone pans might take 2-4 minutes longer than in metal pans, since silicone doesn’t heat as quickly.
6. Check For Doneness
- Insert a toothpick into the center of a muffin. If it comes out clean or with a few crumbs, they’re done.
- Look for golden tops, but remember: Muffins won’t brown as much as with metal pans.
7. Cool And Remove
- Let muffins cool in the pan for 5-10 minutes.
- Gently flex or push the bottom of each cup to release the muffins. If they stick, run a thin spatula around the edge.
Tips For Perfect Results Every Time
Many bakers make small mistakes with silicone that lead to soggy or stuck muffins. Here are two insights many miss:
- Don’t skip the baking sheet. Silicone pans are floppy, especially when full. A baking sheet keeps everything steady and makes moving the pan in and out of the oven much safer.
- Allow for extra time. Because silicone insulates, the bottom and sides of your muffins may cook a little slower. Always check doneness with a toothpick, even if you follow the recipe’s time.
Other tips:
- Use liners for easy flavor changes or decoration, but they aren’t required.
- For extra shine, wipe the pan with a soft cloth after washing and drying.
- Don’t use sharp tools to remove muffins—silicone can tear.
Common Problems And How To Fix Them
Muffins Stick To The Pan
Even with nonstick silicone, some batters (like egg or low-fat) may stick. Try brushing the cups with a bit of melted butter or oil before filling.
Muffins Are Pale Or Soggy
If your muffins are too pale or soft, try baking at a slightly higher temperature for the last 2-3 minutes. Always let them cool fully before removing; this helps the structure set.
Uneven Baking
If some muffins bake faster than others, check that your oven heats evenly. Also, fill each cup with the same amount of batter.
Silicone Smell Or Taste
High-quality silicone should not smell or taste. If you notice an odor, try washing the pan with baking soda and warm water. If the smell stays, the pan may have fillers—consider replacing it.
Advanced Uses For Silicone Muffin Pans
Silicone muffin pans aren’t just for muffins. Here are some creative ways to use them:
- Egg Muffins: Whisk eggs with cheese and veggies, pour into the cups, and bake for portable breakfasts.
- Frozen Treats: Fill with juice, yogurt, or smoothie mix and freeze for healthy snacks.
- Mini Cheesecakes: Silicone makes it easy to release delicate desserts without breaking them.
- Chocolate Cups: Pour melted chocolate and let set in the fridge for homemade candy cups.
- Savory Bites: Use them for baked meatballs, mac and cheese cups, or single-serve quiches.
You can also use the pan as a mold for soap, bath bombs, or crafts. Just keep a separate pan for non-food uses.
Cleaning And Caring For Silicone Muffin Pans
Hand Washing
- Rinse the pan in warm water right after use to remove crumbs and grease.
- Use a mild dish soap and a soft sponge. Avoid abrasive pads, which can scratch the silicone.
- For stuck-on food, soak the pan in warm soapy water for 15–20 minutes, then wash.
Dishwasher Use
Most silicone pans are dishwasher safe. Place them on the top rack. If you notice a white film after washing, it’s likely from hard water. Wipe with a little vinegar and rinse.
Drying And Storage
Let your pan air-dry or use a clean towel. Store it flat or rolled up—silicone won’t lose its shape.
Removing Odors
Sometimes, silicone can hold onto strong smells. To remove odors:
- Sprinkle the pan with baking soda.
- Add a few drops of water to make a paste.
- Let sit for 1–2 hours, then wash as usual.

Credit: www.amazon.com
When To Replace Your Silicone Muffin Pan
Silicone pans can last for years, but check for:
- Tears or cracks: Even small splits can leak batter and ruin muffins.
- Sticky or greasy feel: If the surface stays sticky after washing, it may be breaking down.
- Strong odors: If washing and baking soda don’t remove smells, it’s time for a new pan.
Silicone Muffin Pan Safety: What You Need To Know
Many people worry about baking with silicone. Food-grade silicone is approved by the U.S. Food and Drug Administration (FDA) for use in the kitchen. It’s considered safe, as long as you don’t heat it above the recommended temperature (usually 450°F/232°C).
Never use silicone pans on the stovetop or under a broiler, as direct flames or very high heat can damage them. If you see white marks or cracks, stop using the pan for food.
Still unsure? You can read more about silicone bakeware safety on the FDA’s official website.
Baking Muffins: Recipe Example For Your Silicone Pan
To see all these steps in action, here’s a classic blueberry muffin recipe made for a 12-cup silicone muffin pan.
Ingredients
- 2 cups all-purpose flour
- 1/2 cup sugar
- 1 tbsp baking powder
- 1/2 tsp salt
- 2 large eggs
- 1 cup milk
- 1/3 cup vegetable oil
- 1 tsp vanilla extract
- 1 cup fresh or frozen blueberries
Directions
- Preheat oven to 375°F (190°C). Place silicone muffin pan on a baking sheet.
- In a large bowl, mix flour, sugar, baking powder, and salt.
- In another bowl, whisk eggs, milk, oil, and vanilla.
- Add wet ingredients to dry and stir until just mixed. Fold in blueberries.
- Lightly grease silicone cups. Fill each cup about 3/4 full.
- Bake for 22–26 minutes, or until a toothpick comes out clean.
- Cool for 10 minutes, then gently remove muffins.
This recipe makes 12 standard muffins. Adjust baking time if you use mini or jumbo pans.
Cleaning, Storage, And Longevity: Real-world Comparison
How does silicone stack up against other materials for cleaning and storage? Here’s a quick look:
| Pan Type | Cleaning | Storage | Expected Lifespan |
|---|---|---|---|
| Silicone | Dishwasher safe, easy to hand-wash | Flexible, takes little space | 5–10 years |
| Metal | Can rust, needs drying | Rigid, needs shelf space | 10+ years |
| Glass | Breakable, dishwasher safe | Bulky, heavy | 10+ years |
Silicone is best for easy cleanup and small kitchens, but doesn’t last as long as metal or glass if roughly handled.
Practical Uses Beyond Muffins
You can use your silicone muffin pan for meal prep, kids’ snacks, and even portion control. Try these ideas:
- Freeze leftover soup or broth in muffin cups for quick reheating.
- Make single-serve lasagna or baked oatmeal.
- Pre-portion cookie dough and freeze for quick baking later.
- Organize small parts, beads, or art supplies (use a dedicated pan for crafts).
Mistakes To Avoid With Silicone Muffin Pans
Even experienced bakers can get it wrong sometimes. Here’s what to watch out for:
- Not using a baking sheet: This leads to spills and uneven muffins.
- Overfilling cups: Silicone is flexible and can tip easily if overloaded.
- Cutting or scraping inside cups: Never use knives or metal tools inside silicone—use only silicone-safe spatulas.
- Ignoring temperature limits: Going over 450°F can ruin your pan and affect safety.
- Storing near sharp objects: Store away from knives or scissors to prevent tears.
Comparing Results: Metal Vs. Silicone Muffin Pan
To see how muffins bake differently, here’s a summary from side-by-side tests:
| Feature | Silicone Pan | Metal Pan |
|---|---|---|
| Browning | Light, even | Dark, crisp edges |
| Release | Very easy | Sometimes sticks |
| Shape | More rounded, smooth sides | More defined, crisp sides |
| Cooking Time | 2–4 min longer | Standard time |
If you want muffins that are easy to remove and soft all around, go with silicone. If you love crispy edges, stick with metal.
Eco-friendly And Health Benefits
One overlooked benefit of silicone muffin pans is that they are reusable and reduce waste. You don’t need paper liners or sprays, which means less trash. Food-grade silicone doesn’t leach chemicals into your food, so it’s a safer alternative to some nonstick coatings.
When Not To Use A Silicone Muffin Pan
Silicone isn’t perfect for every recipe. Avoid using it for:
- Recipes that need super crisp edges or crusts.
- Broiling or direct flame cooking.
- Heavy, dense batters that need extra support.
For these, choose metal or glass instead.
Frequently Asked Questions
How Do I Know If My Silicone Muffin Pan Is Food Safe?
Look for labels like “100% food-grade silicone” or certifications such as FDA or LFGB on the product or packaging. Food-safe silicone has no chemical smell and feels sturdy. If you’re unsure, squeeze and twist the pan—if white streaks appear, it may contain fillers.
Can I Put My Silicone Muffin Pan In The Dishwasher?
Yes, most silicone muffin pans are dishwasher safe. Place them on the top rack for best results. For stubborn grease, try a baking soda soak before washing.
Why Are My Muffins Not Browning In A Silicone Pan?
Silicone insulates more than metal, so muffins may come out lighter or softer. To boost browning, bake a few minutes longer or raise the oven temperature by 5–10°F near the end of baking.
Do I Need To Use Liners Or Grease With A Silicone Muffin Pan?
Usually, you don’t need liners. However, a light grease can help with sticky recipes or the first few uses. Liners can be used for easy cleanup or special decorations.
Can I Use A Silicone Muffin Pan For Freezing Food?
Absolutely. Silicone pans work well for freezing because they can go from freezer to oven. They’re great for freezing broth, sauce, or desserts. Just pop out the frozen portions easily.
Baking with a silicone muffin pan is simple once you know the basics. With the right preparation and care, you’ll enjoy easy release, simple cleanup, and endless creative baking options. Give it a try—and see how much more fun and flexible baking can be.
Credit: www.target.com